
Script to set up a Django-React hybrid project with Tailwind CSS and Vite

Project description
Hybrid Django-React-Tailwind-Vite Setup
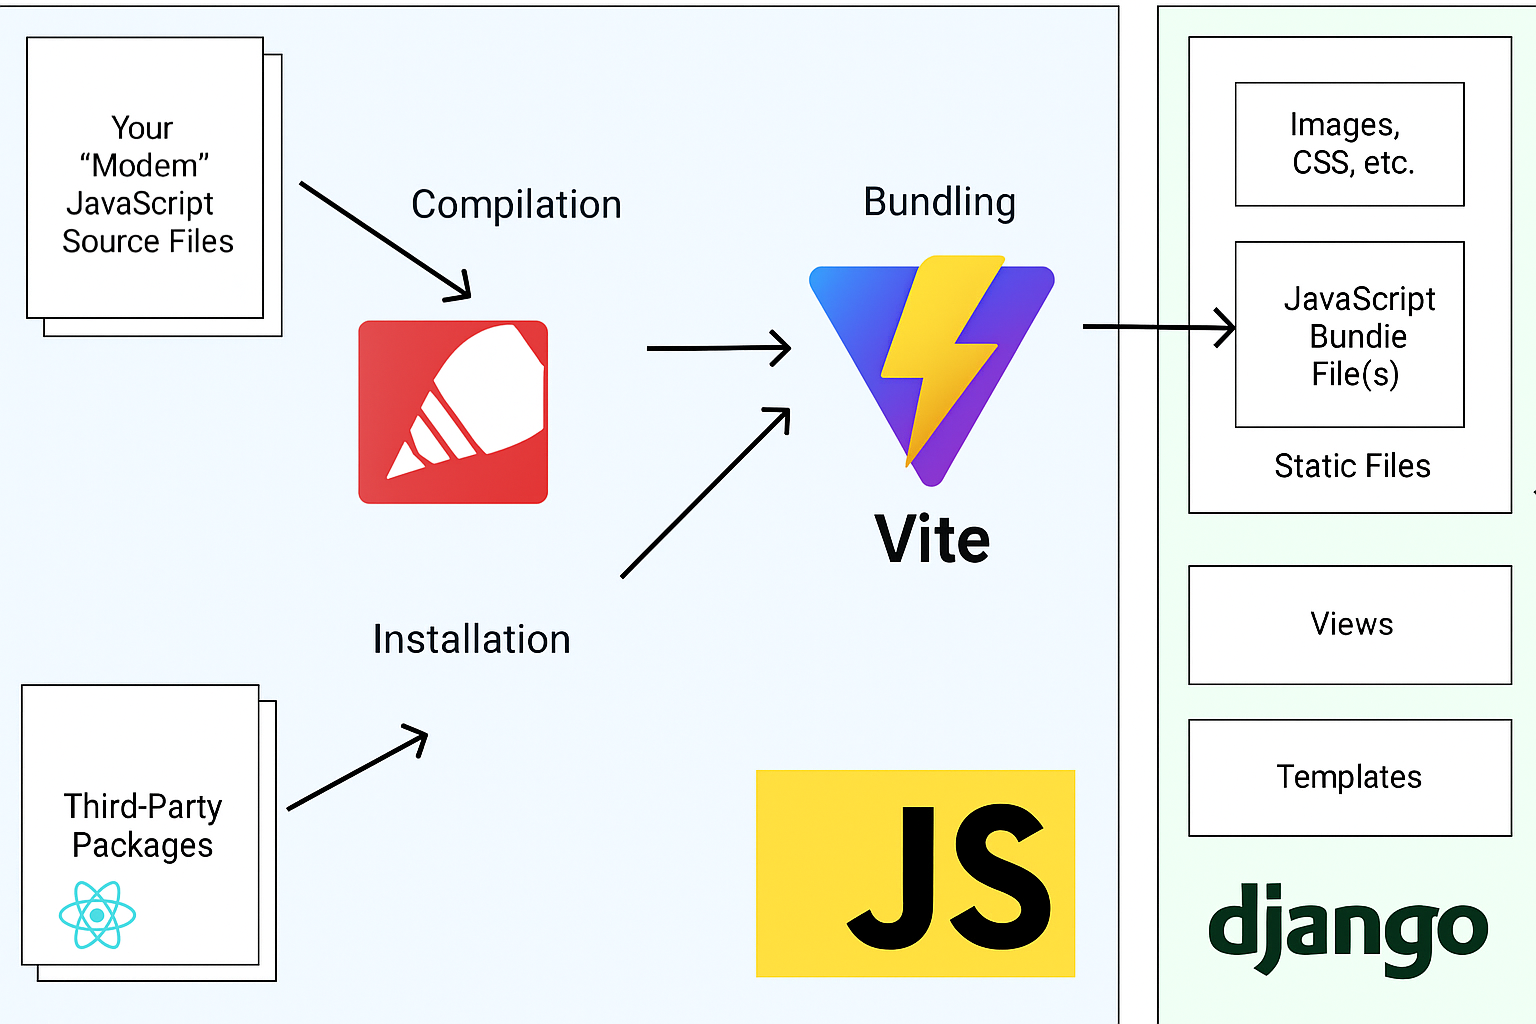

Script to bootstrap hybrid django-react projects set up inspired by
- The hybrid Python/Django/React Architecture as described by Cory Zue in this article
- Session based Auth for SPA/Django as described by Nik Tomazic in this article
- The benefits of this set up is that you're able to use django features where you want and selectively use React. Also you don't have to worry about JWT as we're using normal django authentication.
Proof Of Concept
A fully cloneable version of this that integrates mantine ui library can be found here
Quick Overview
- React/Redux/Typescript (Javascript not recommended)
- Vite is used for bundling
- Tailwind CSS is used for styling
- Quite opinionated but loosely coupled. The contents matter, structure doesn't
Run The Script
- You need to have node and a preferred dependency manager installed
- Create a new virtual environment using
uv venv .venvor equivalent - Install the package with
uv pip install django-react-tailwind-vite
or equivalent pip or pipenv commands
- Run the script with
dj-vite
this will configure django, vite, tailwind and the react app
- You can uninstall the package once you've verified successful installation
Post Script Instructions
-
Update and install frontend packages by running
pnpm up --latest && pnpm installor equivalent -
Install the python dependencies by running
uv pip install -r requirements.txtor equivalent- Note that the
requirements.txtfile has no versions so that you install the latest
- Note that the
-
The django project settings file has the following additions
#TEMPLATES["DIRS"] list in project/settings.py
import os # top of file
os.path.join(BASE_DIR, "templates")
#static files section
STATIC_ROOT = os.path.join(BASE_DIR.parent, "static")
STATICFILES_DIRS = [
 os.path.join(BASE_DIR, "assets"),
]
DJANGO_VITE = {
"default": {
   "dev_mode": DEBUG, #to serve contents dynamically
   "manifest_path": os.path.join(BASE_DIR, "assets", "manifest.json"),
}
}
#Allow Session Auth For React SPA
CSRF_COOKIE_SAMESITE = "Lax"
SESSION_COOKIE_SAMESITE = "Lax"
CSRF_COOKIE_HTTPONLY = False  # False since we will grab it via universal-cookies
SESSION_COOKIE_HTTPONLY = True

SESSION_COOKIE_AGE = 60 * 60 * 24 * 7  # 1 week
To further understand these values, read:
- For Making API Queries to your backend, use this snippet in your axios client
import axios from "axios";
import Cookies from "universal-cookie";
const cookies = new Cookies();

//Rest Client Snippet
async function restClient(url: string, method: string, data: any) {
  const response = await axios({
    url: url,
    method: method,
    data: data,
    headers: {
      "Content-Type": "application/json",
      "X-CSRFToken": cookies.get("csrftoken"),
    },
    withCredentials: true,
  });
  return response;
}
// Graphql Client Snippet
async function graphqlClient(query: any) {
  const GRAPHQL_API_URL = "http://127.0.0.1:8000/your_graphql_endpoint"
  const queryResult = await axios.post(
    GRAPHQL_API_URL,
    { query },
    {
      headers: {
        "Content-Type": "application/json",
        "X-CSRFToken": cookies.get("csrftoken"),
      },
      withCredentials: true,
    },
  );
  return queryResult;
}
The idea is to have csrf token as part of your headers. That's why you don't need JWT!
Start Your Project
- Run
pnpm run devandpython manage.py runserverin separate terminal windows - Navigate to
http://127.0.0.1:8000and you will see the react home page loaded
- Always use that url instead of localhost so that you use session auth
- Alternatively, you may use
localhost:8000but ensure this is also equal to urls in the react app
- Try changing contents in
frontend/src/pages/home.tsxto see live reload in action - The django urls connects to the react home via the
app/*regex wildcard - Build on from there
Production
- Ensure you set the
DJANGO_VITE["default"]["dev_mode"]toFalse- A nifty way is to set it
DJANGO_VITE["default"]["dev_mode"]=DEBUGso that it sets dynamically per your environment
- A nifty way is to set it
- Run
pnpm run build - Run
python manage.py collectstatic - Deploy your app and django-vite will auto serve bundled files
Release history Release notifications | RSS feed


Download files
Download the file for your platform. If you're not sure which to choose, learn more about installing packages.
Source Distribution
Built Distribution
Filter files by name, interpreter, ABI, and platform.
If you're not sure about the file name format, learn more about wheel file names.
Copy a direct link to the current filters
File details
Details for the file django_react_tailwind_vite-1.1.0.tar.gz.
File metadata
- Download URL: django_react_tailwind_vite-1.1.0.tar.gz
- Upload date:
- Size: 16.8 kB
- Tags: Source
- Uploaded using Trusted Publishing? No
- Uploaded via: uv/0.8.13
File hashes
| Algorithm | Hash digest | |
|---|---|---|
| SHA256 |
2797d6574dc7c4a6d5e8065dc5f4d1c73c6d32a25ebf2e56b1e961998bed801e
|
|
| MD5 |
36c1be9fc5fada91b09e62d748ef739d
|
|
| BLAKE2b-256 |
6d668d2462150c96179e22ea250d5efc6af131f9029f7c54ad61c623adc7cd87
|
File details
Details for the file django_react_tailwind_vite-1.1.0-py3-none-any.whl.
File metadata
- Download URL: django_react_tailwind_vite-1.1.0-py3-none-any.whl
- Upload date:
- Size: 23.3 kB
- Tags: Python 3
- Uploaded using Trusted Publishing? No
- Uploaded via: uv/0.8.13
File hashes
| Algorithm | Hash digest | |
|---|---|---|
| SHA256 |
ddece1bc6a7416e73b70faf68fe3c919b788879563121af9540d28d7c2e61405
|
|
| MD5 |
adc3a80d3f57544e51860e777b261e3c
|
|
| BLAKE2b-256 |
6a6c7cf3fb4d769eaa74284a8cb817412f08cc790d2c09e4491ba4d958cfa0c6
|






