Abstraction layer used by the DKIST science data processing pipelines with Apache Airflow

Project description

Overview
The dkist-processing-core package provides an abstraction layer between the dkist data processing code, the workflow engine that supports it (Airflow), and the logging infrastructure. By providing the abstraction layer to Airflow specifically a versioning system is implemented.
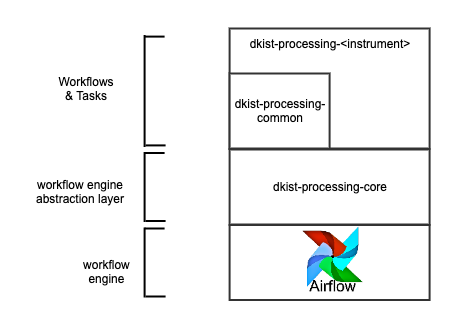
There are 4 main entities which implement the abstraction which are described below.
Task : The Task defines the interface used by a processing pipeline for a step in a workflow. By conforming to this interface (i.e. subclassing) the processing pipelines can remain agnostic of how the tasks will ultimately be run. The Task additionally implements some methods that should be global for all dkist processing tasks based on the infrastructure it will run on (e.g. application performance monitoring infrastructure).
Node : The job of the Node is to translate a Task into code that can instantiate that task. Instantiations of a Task can vary depending on the target environment e.g. a virtual environment with a BashOperator for Airflow vs. straight python for a notebook.
Workflow : The Workflow defines the interface used by the processing pipeline to chain tasks together in a directed graph. The Workflow transforms this graph into the workflow engine format by providing any wrapping boilerplate, task ordering, and selecting the appropriate Node instantiation.
Build Utils : The Build Utils are the capstone layer which aims to ease the transformation process for multiple workflows at a time during a processing pipeline’s build process.
Usage
The Workflow and Task are the primary objects used by client libraries. The Task is used as a base class and the subclass must at a minimum implement run. A Workflow is used to give the tasks an order of execution and a name for the flow.
from dkist_processing_core import TaskBase
from dkist_processing_core import Workflow
# Task definitions
class MyTask1(TaskBase):
def run(self):
print("Running MyTask1")
class MyTask2(TaskBase):
def run(self):
print("Running MyTask2")
# Workflow definition
# MyTask1 -> MyTask2
w = Workflow(process_category="My", process_name="Workflow", workflow_package=__package__, workflow_version="dev")
w.add_node(MyTask1, upstreams=None)
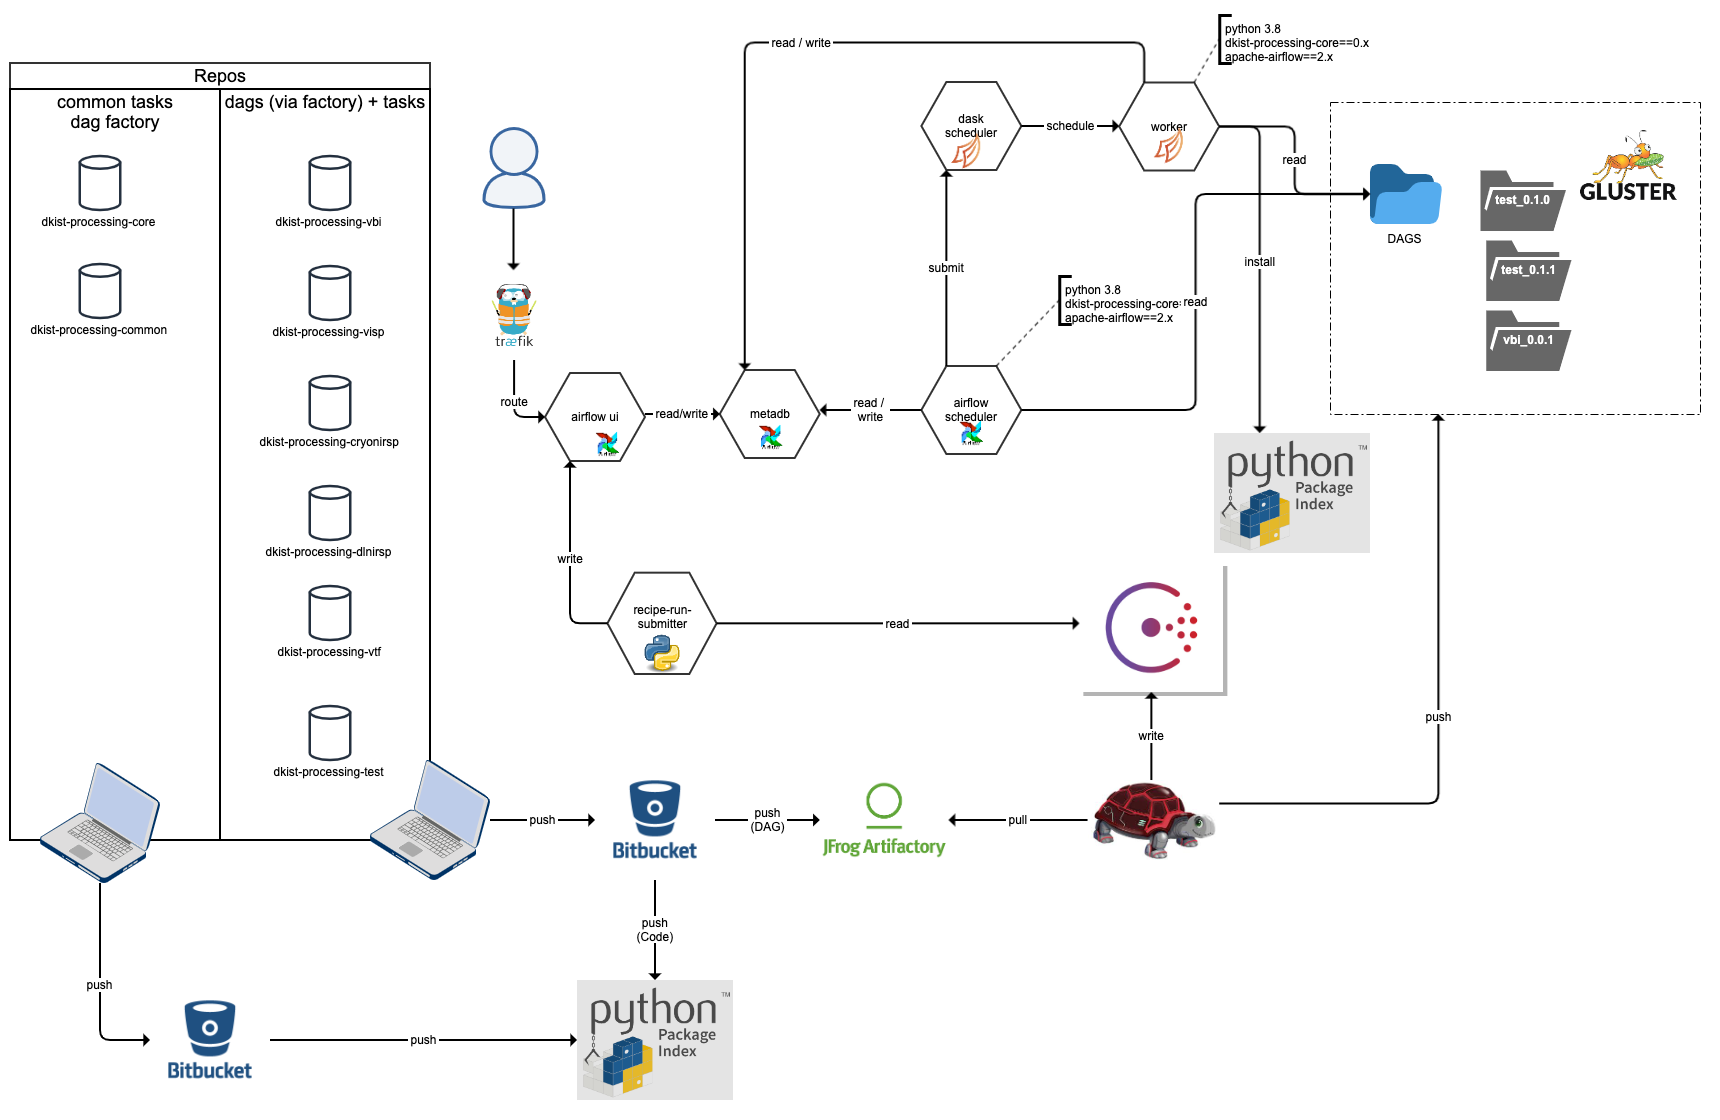
w.add_node(MyTask2, upstreams=MyTask1)Using dkist-processing-core for data processing with Airflow involves a project structure and build process that results in code artifacts deployed to PyPI and a zip of workflow artifacts deployed to artifactory.
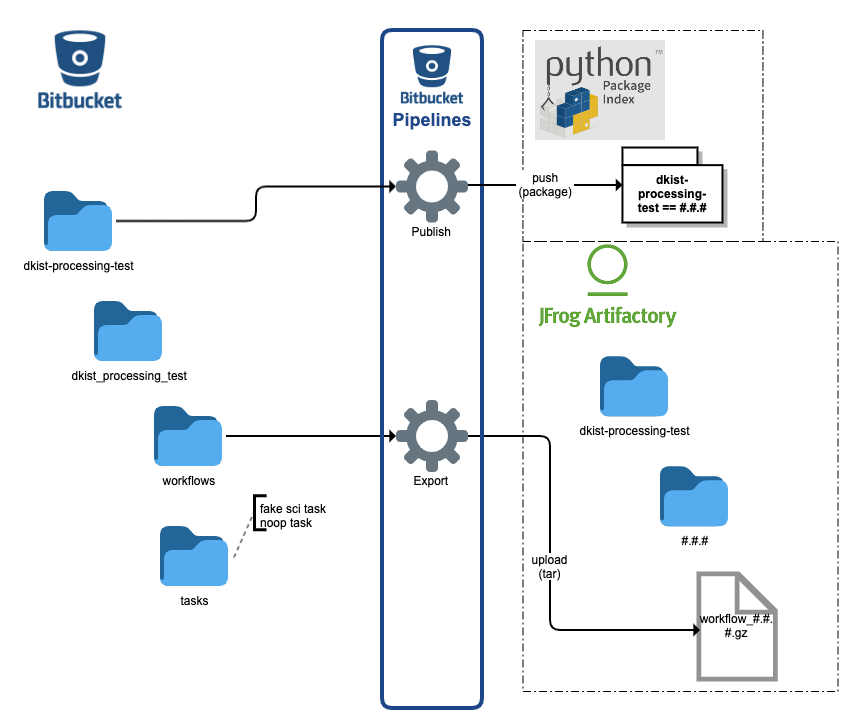
The client dkist data processing libraries should implement a structure and build pipeline using dkist-processing-test as an example. The build pipelines for a client repo can leverage the build_utils for test and export.
Specifically for Airflow, the resulting deployment has the versioned workflow artifacts all available to the scheduler and the versioned code artifacts available to workers for task execution
Build
dkist-processing-core is built using bitbucket-pipelines
Deployment
dkist-processing-core is deployed to PyPI
Environment Variables
Variable |
Field Info |
|---|---|
LOGURU_LEVEL |
annotation=str required=False default=’INFO’ alias_priority=2 validation_alias=’LOGURU_LEVEL’ description=’Log level for the application’ |
MESH_CONFIG |
annotation=dict[str, MeshService] required=False default_factory=dict alias_priority=2 validation_alias=’MESH_CONFIG’ description=’Service mesh configuration’ examples=[{‘upstream_service_name’: {‘mesh_address’: ‘localhost’, ‘mesh_port’: 6742}}] |
RETRY_CONFIG |
annotation=RetryConfig required=False default_factory=RetryConfig description=’Retry configuration for the service’ |
OTEL_SERVICE_NAME |
annotation=str required=False default=’unknown-service-name’ alias_priority=2 validation_alias=’OTEL_SERVICE_NAME’ description=’Service name for OpenTelemetry’ |
DKIST_SERVICE_VERSION |
annotation=str required=False default=’unknown-service-version’ alias_priority=2 validation_alias=’DKIST_SERVICE_VERSION’ description=’Service version for OpenTelemetry’ |
NOMAD_ALLOC_ID |
annotation=str required=False default=’unknown-allocation-id’ alias_priority=2 validation_alias=’NOMAD_ALLOC_ID’ description=’Nomad allocation ID for OpenTelemetry’ |
NOMAD_ALLOC_NAME |
annotation=str required=False default=’unknown-allocation-name’ alias=’NOMAD_ALLOC_NAME’ alias_priority=2 description=’Allocation name for the deployed container the task is running on.’ |
NOMAD_GROUP_NAME |
annotation=str required=False default=’unknown-allocation-group’ alias=’NOMAD_GROUP_NAME’ alias_priority=2 description=’Allocation group for the deployed container the task is running on’ |
OTEL_EXPORTER_OTLP_TRACES_INSECURE |
annotation=bool required=False default=True description=’Use insecure connection for OTLP traces’ |
OTEL_EXPORTER_OTLP_METRICS_INSECURE |
annotation=bool required=False default=True description=’Use insecure connection for OTLP metrics’ |
OTEL_EXPORTER_OTLP_TRACES_ENDPOINT |
annotation=Union[str, NoneType] required=False default=None description=’OTLP traces endpoint. Overrides mesh configuration’ examples=[‘localhost:4317’] |
OTEL_EXPORTER_OTLP_METRICS_ENDPOINT |
annotation=Union[str, NoneType] required=False default=None description=’OTLP metrics endpoint. Overrides mesh configuration’ examples=[‘localhost:4317’] |
OTEL_PYTHON_DISABLED_INSTRUMENTATIONS |
annotation=list[str] required=False default_factory=list description=’List of instrumentations to disable. https://opentelemetry.io/docs/zero-code/python/configuration/’ examples=[[‘pika’, ‘requests’]] |
OTEL_PYTHON_FASTAPI_EXCLUDED_URLS |
annotation=str required=False default=’health’ description=’Comma separated list of URLs to exclude from OpenTelemetry instrumentation in FastAPI.’ examples=[‘client/.*/info,healthcheck’] |
SYSTEM_METRIC_INSTRUMENTATION_CONFIG |
annotation=Union[dict[str, bool], NoneType] required=False default=None description=’Configuration for system metric instrumentation. https://opentelemetry-python-contrib.readthedocs.io/en/latest/instrumentation/system_metrics/system_metrics.html’ examples=[{‘system.memory.usage’: [‘used’, ‘free’, ‘cached’], ‘system.cpu.time’: [‘idle’, ‘user’, ‘system’, ‘irq’], ‘system.network.io’: [‘transmit’, ‘receive’], ‘process.runtime.memory’: [‘rss’, ‘vms’], ‘process.runtime.cpu.time’: [‘user’, ‘system’], ‘process.runtime.context_switches’: [‘involuntary’, ‘voluntary’]}] |
ISB_USERNAME |
annotation=str required=False default=’guest’ description=’Username for the interservice-bus.’ |
ISB_PASSWORD |
annotation=str required=False default=’guest’ description=’Password for the interservice-bus.’ |
ISB_EXCHANGE |
annotation=str required=False default=’master.direct.x’ description=’Exchange for the interservice-bus.’ |
ISB_QUEUE_TYPE |
annotation=str required=False default=’classic’ description=’Queue type for the interservice-bus.’ examples=[‘quorum’, ‘classic’] |
BUILD_VERSION |
annotation=str required=False default=’dev’ description=’Fallback build version for workflow tasks.’ |
PIP_TIMEOUT |
annotation=int required=False default=15 description=’Timeout for pip installs in seconds.’ |
PIP_RETRIES |
annotation=int required=False default=5 description=’Number of retries for pip installs.’ |
IS_NOTEBOOK_EXECUTION_ENVIRONMENT |
annotation=bool required=False default=False description=’Indication of whether the code is running in a notebook execution environment.’ examples=[True, False] |
Development
A prerequisite for test execution is a running instance of rabbitmq and docker on the local machine. For RabbitMQ the tests will use the default guest/guest credentials and a host ip of 127.0.0.1 and port of 5672 to connect to the broker. Getting docker set up varies by system, but the tests will use the default unix socket for the docker daemon.
To run the tests locally, clone the repository and install the package in editable mode with the test extras.
git clone git@bitbucket.org:dkistdc/dkist-processing-core.git
cd dkist-processing-core
pre-commit install
pip install -e .[test]
# RabbitMQ and Docker needs to be running
pytest -v --cov dkist_processing_core
Changelog
When you make any change to this repository it MUST be accompanied by a changelog file. The changelog for this repository uses the towncrier package. Entries in the changelog for the next release are added as individual files (one per change) to the changelog/ directory.
Writing a Changelog Entry
A changelog entry accompanying a change should be added to the changelog/ directory. The name of a file in this directory follows a specific template:
<PULL REQUEST NUMBER>.<TYPE>[.<COUNTER>].rst
The fields have the following meanings:
<PULL REQUEST NUMBER>: This is the number of the pull request, so people can jump from the changelog entry to the diff on BitBucket.
<TYPE>: This is the type of the change and must be one of the values described below.
<COUNTER>: This is an optional field, if you make more than one change of the same type you can append a counter to the subsequent changes, i.e. 100.bugfix.rst and 100.bugfix.1.rst for two bugfix changes in the same PR.
The list of possible types is defined the the towncrier section of pyproject.toml, the types are:
feature: This change is a new code feature.
bugfix: This is a change which fixes a bug.
doc: A documentation change.
removal: A deprecation or removal of public API.
misc: Any small change which doesn’t fit anywhere else, such as a change to the package infrastructure.
Rendering the Changelog at Release Time
When you are about to tag a release first you must run towncrier to render the changelog. The steps for this are as follows:
Run towncrier build –version vx.y.z using the version number you want to tag.
Agree to have towncrier remove the fragments.
Add and commit your changes.
Tag the release.
NOTE: If you forget to add a Changelog entry to a tagged release (either manually or automatically with towncrier) then the Bitbucket pipeline will fail. To be able to use the same tag you must delete it locally and on the remote branch:
# First, actually update the CHANGELOG and commit the update
git commit

# Delete tags
git tag -d vWHATEVER.THE.VERSION
git push --delete origin vWHATEVER.THE.VERSION

# Re-tag with the same version
git tag vWHATEVER.THE.VERSION
git push --tags origin mainRelease history Release notifications | RSS feed


Download files
Download the file for your platform. If you're not sure which to choose, learn more about installing packages.
Source Distribution
Built Distribution
Filter files by name, interpreter, ABI, and platform.
If you're not sure about the file name format, learn more about wheel file names.
Copy a direct link to the current filters
File details
Details for the file dkist_processing_core-7.3.0.tar.gz.
File metadata
- Download URL: dkist_processing_core-7.3.0.tar.gz
- Upload date:
- Size: 395.2 kB
- Tags: Source
- Uploaded using Trusted Publishing? No
- Uploaded via: twine/6.2.0 CPython/3.13.13
File hashes
| Algorithm | Hash digest | |
|---|---|---|
| SHA256 |
deb75700eba17eb6d408cb3b3b9a200da09e5063ee8b1e160059c05e569c2d4e
|
|
| MD5 |
f794ccedbdda1a3ea65aef58548f1a30
|
|
| BLAKE2b-256 |
378a7cddd29344e78c469d74ae8864f97a9fc62fa0f06506d6f71e086b4727bd
|
File details
Details for the file dkist_processing_core-7.3.0-py3-none-any.whl.
File metadata
- Download URL: dkist_processing_core-7.3.0-py3-none-any.whl
- Upload date:
- Size: 392.1 kB
- Tags: Python 3
- Uploaded using Trusted Publishing? No
- Uploaded via: twine/6.2.0 CPython/3.13.13
File hashes
| Algorithm | Hash digest | |
|---|---|---|
| SHA256 |
367f0225286d35ed3a238e49d714b38320fb3f6526bbdcc0ef76439561c37a85
|
|
| MD5 |
0cfd75030384a7da5600577cfee1f3ec
|
|
| BLAKE2b-256 |
961409d1b88f1041270ce39e26f4dbc7f77e9507bb004e80a6f39b0e3f3e912f
|


