
Dorothea







Dorothea is a static site generator for photography websites, primarily photo essays.
It is a port to Python of Jack Qiao's wonderful Exposé project (originally in bash).
While over time bugfixes and new features will be added, it is output-compatible* with Exposé and our integration tests validate that on each commit.
*=There are small tweaks in output because native python libraries have been preferred to OS-level packages were possible, but the difference is pretty minute.
Why a Python port of Exposé
I wanted to make start addressing some of the pain points with the original package, branch out to new themes and tweaks, and found maintaining my own fork in Bash to be less work than porting it to Python, thanks to today's AI-assisted coding tools.
What is it
If you're a photographer, you probably come back home from a trip and end up with photos that look like this:
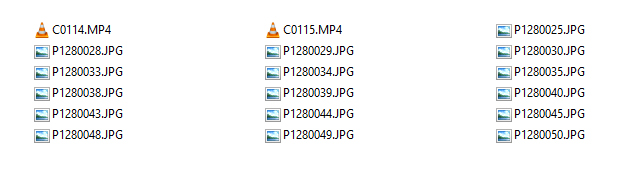
This tool (and the original Exposé) are designed to turn those folders into websites, including resizing and adjusting the files!
Two themes are included, each in two versions: Dorothea's (photoessay and medium), which get new features such as keyboard navigation, and Exposé's originals (theme1 and theme2), kept exactly as they were. Pick one with theme_dir in _config.json; the default is photoessay.
photoessay (and the original theme1)
Full-screen photos with the text laid over them. Examples made with the original:
medium (and the original theme2)
An alternative Medium-style theme, with text in a column between the photos:
In photoessay and medium, visitors can move between photos with the keyboard: ↓, Page Down, →, Space or j for the next photo; ↑, Page Up, ←, Shift+Space or k for the previous one; Home and End for the first and last.
How to run it
This is a Python application for Linux, macOS and Windows with Python 3.14+ (older versions of Python aren't supported). Everything it needs installs with it, ffmpeg included; ImageMagick is optional on every platform.
Installation
Run it without installing, or install it as a command:
uvx dorothea                 # run it once
uv tool install dorothea     # or install the `dorothea` command
If you do not have uv/uvx, you can install it from the official uv website. uv picks (and if needed downloads) the Python 3.14 that Dorothea needs by itself.
pipx works too, but it doesn't choose the Python version on its own, so ask for 3.14 (pipx downloads it if you don't have it):
pipx run --python 3.14 --fetch-python=missing dorothea
pipx install --python 3.14 --fetch-python=missing dorothea
Plain pipx install dorothea only works if pipx's default Python is already 3.14 or newer.
It will bring with it everything it needs including ffmpeg. However if you have ffmpeg already installed, it will use it; and if you have ImageMagick, it may use that for some features instead of Pillow for better compatibility with the original (colour extraction and image-options).
How to use it
Navigate to the folder full of images, and run the tool:
cd ~/my-trip-to-ecuador
uvx dorothea
A folder called _site will contain the output HTML/jpeg/etc. You can take that folder and put it on any webserver that serves static HTML website (including S3 buckets, etc.).
Photos can be JPEG, PNG, GIF, WebP, AVIF, HEIC/HEIF (iPhone) or TIFF; they're published as JPEGs. Animated GIFs and WebPs use their first frame. Videos in most formats work too (MP4, MOV, MKV, WebM, AVI, …).
Adding text
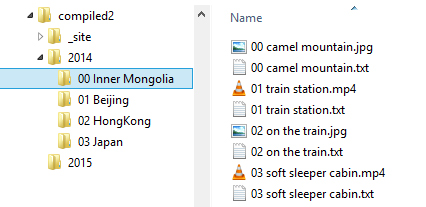
To add text, you simply have to create a .txt or .md file whose name matches the image: if your image is called DSC0001.jpg, you can put the text in DSC0001.txt or DSC0001.md (if both exist, the .txt wins). The text is Markdown either way.
A text file can start with a metadata section: key: value lines between two --- lines. Everything after the second --- is the caption:
---
title: Chimborazo
top: 60
---
The summit at dawn, **6,263 m** up.
Without --- lines the whole file is the caption. With a single ---, the lines above it are metadata. The caption must come after the metadata: text placed before the first --- counts as metadata and isn't shown, so Dorothea warns about it and names the file. Windows line endings and a byte-order mark (as Notepad saves) are fine.
If the text is hard to read over a photo, give it a background with a textbackground line in the metadata section (any CSS colour):
---
textbackground: rgba(0,0,0,0.5)
---
Text over a busy photo.
Sorting
Images are sorted by name, with numbers compared as numbers (1, 2, 10). If you wish to set a different order, add a numerical prefix in front of the file name (e.g. 1_DSC0003.jpg, 2_DSC0002.jpg, etc.).
Other orders are available with the sort setting (or --sort):
name: plain alphabetical order, like expose.sh (1,10,2unless you zero-pad)capture: in the order the photos were taken (from the camera's EXIF data, else the file date); galleries follow their earliest photo, so the whole site reads like the trip- add
-descto reverse any order, e.g.capture-descfor newest first
A gallery can choose its own order with a sort: line in its metadata.txt. See CONFIG.md.
Organization
You can put images in folder to organize them. The folder can be nester arbitrarily. This generates a nested HTML menu for navigation.
To set the order, again put a numerical prefix in front of them.
Files and folders whose names start with _ or . are ignored, so drafts (_unsorted/), hidden folders (.git, .thumbs) and macOS helper files (.DS_Store, ._IMG_0001.jpg) never end up on the site. Names in any language work: a folder called Москва or Café Zürich becomes москва/ or café-zürich/ on the site. If two photos end up with the same name once the numbering is stripped (01 sunset.jpg and 02 sunset.jpg), the one taken first keeps sunset/ and the other becomes sunset-2/.
Configuration
To configure the name of the site and some basic settings, you need to create a _config.json file in the top folder:
{
  "site_title": "Alternate Site Title",
  "theme_dir": "theme2",
  "social_button": false,
  "backgroundcolor": "#ffffff"
}
An expose.sh-style _config.sh still works (and dorothea --convert-config converts it). Every
option is described in CONFIG.md.
Feed
Set site_url to the site's public address and the build also writes an Atom feed (feed.xml), so people can follow new galleries in a feed reader. Each gallery is one entry, with its first photo and text. The photoessay and medium themes then show a feed link and announce the feed to browsers and reader extensions.
{ "site_url": "https://example.com/photos/" }
Galleries are ordered by when their newest photo was taken. To control the order (say, a trip you publish months later), add a date: line to the gallery's metadata.txt:
date: 2022-07-14
description: Two weeks driving around Iceland.
Each gallery also gets its own feed (e.g. https://example.com/photos/iceland/feed.xml) with one entry per photo, handy for a gallery you keep adding to. Its pages announce it next to the site feed. Turn these off with "gallery_feeds": false, or for one gallery with feed: false in its metadata.txt.
Photo metadata and privacy
The resized photos keep the photographer's copyright and the camera information (camera, lens, aperture, shutter speed, ISO, date taken), but not the GPS location. To choose differently, set keep_metadata in _config.json: "none", "copyright", "camera" (the default), "location", "cameralocation" or "all". The last three publish where each photo was taken, which anyone can read from the downloaded image.
Photos in a wide colour space (Display P3 from phones, Adobe RGB from many cameras) are converted to sRGB so they look the same in every browser.
Advanced options
This section is generated.
Text metadata
YAML in the text file is read and made available to the theme. The variables depend on the theme used.
Theme-1 specific options
---
top: 30
left: 5
width: 30
height: 20
textcolor: #ffffff
---
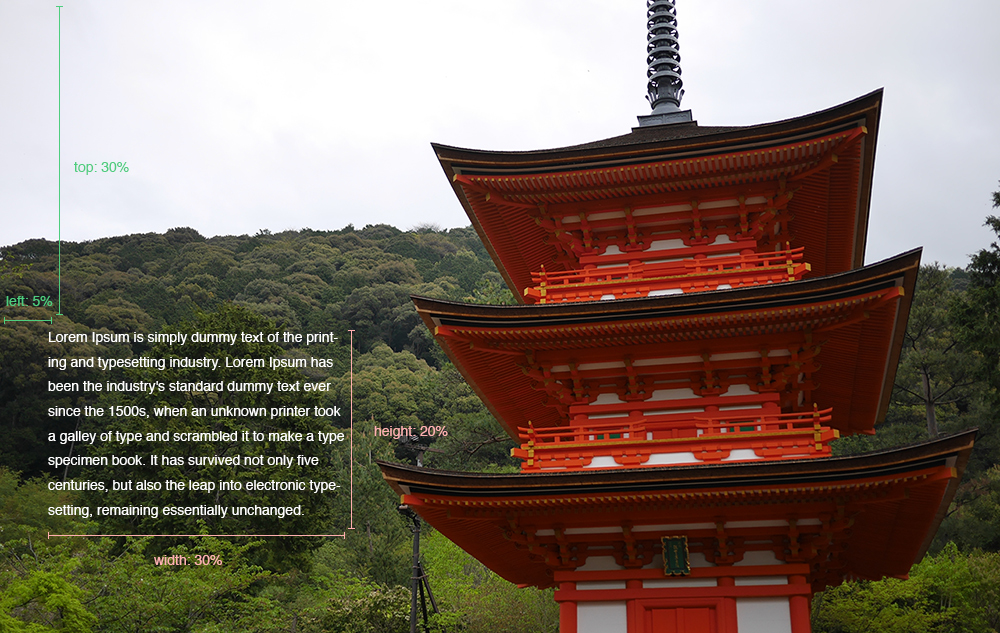
The units are in percentages
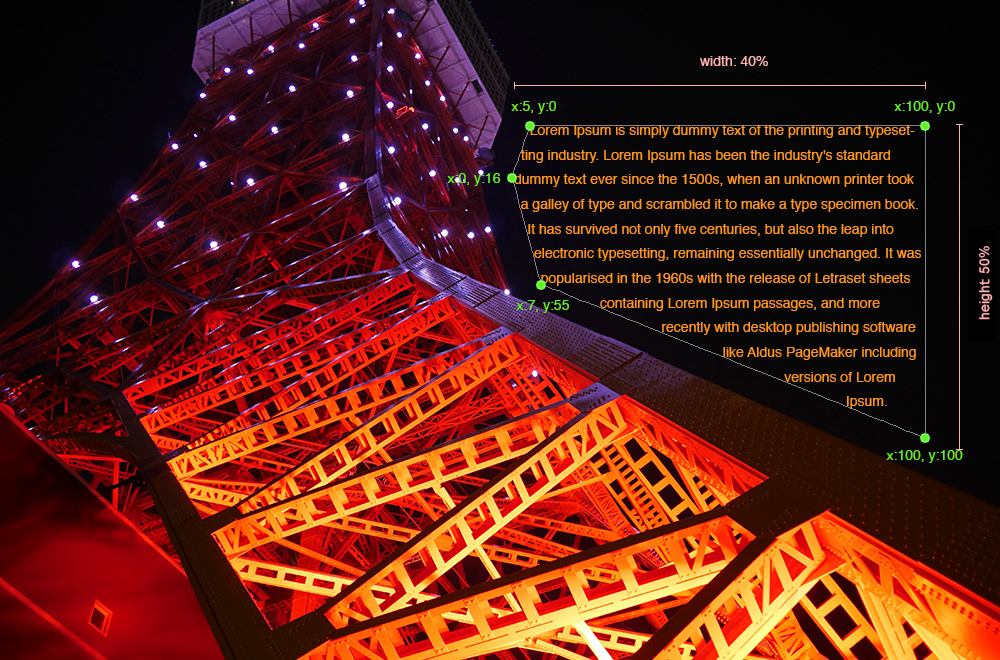
---
top: 12
left: 50
width: 40
height: 50
polygon:[{"x":5, "y":0},{"x":100, "y":0},{"x":100, "y":100},{"x":7, "y":55}, {"x":0, "y":16}]
textcolor: #ff9518
---
Use a polygon to wrap text around shapes. The polygon is defined by 3 or more points in a JSON blob. Units are again in percentages.
Theme-2 specific options
---
width: 32.5
---
In theme-2 the width variable acts on the image rather than the content. You can use this to tile images in a row:
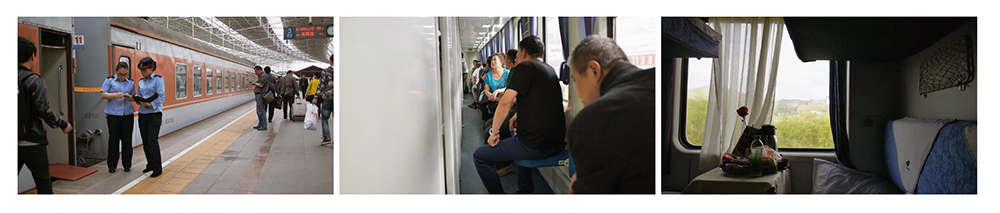
Clicking on each image shows it in full screen mode.
Note that in this theme the text goes above its associated image, except the first image which is used as a masthead.
CSS classes can be passed to the template via the "class" property. eg: use class: textafter to add a CSS class that makes the text go after the image.
Metadata file
If you want certain variables to apply to an entire gallery, place a metadata.txt (this is configurable) file in the gallery directory. eg. in metadata.txt:
width: 19
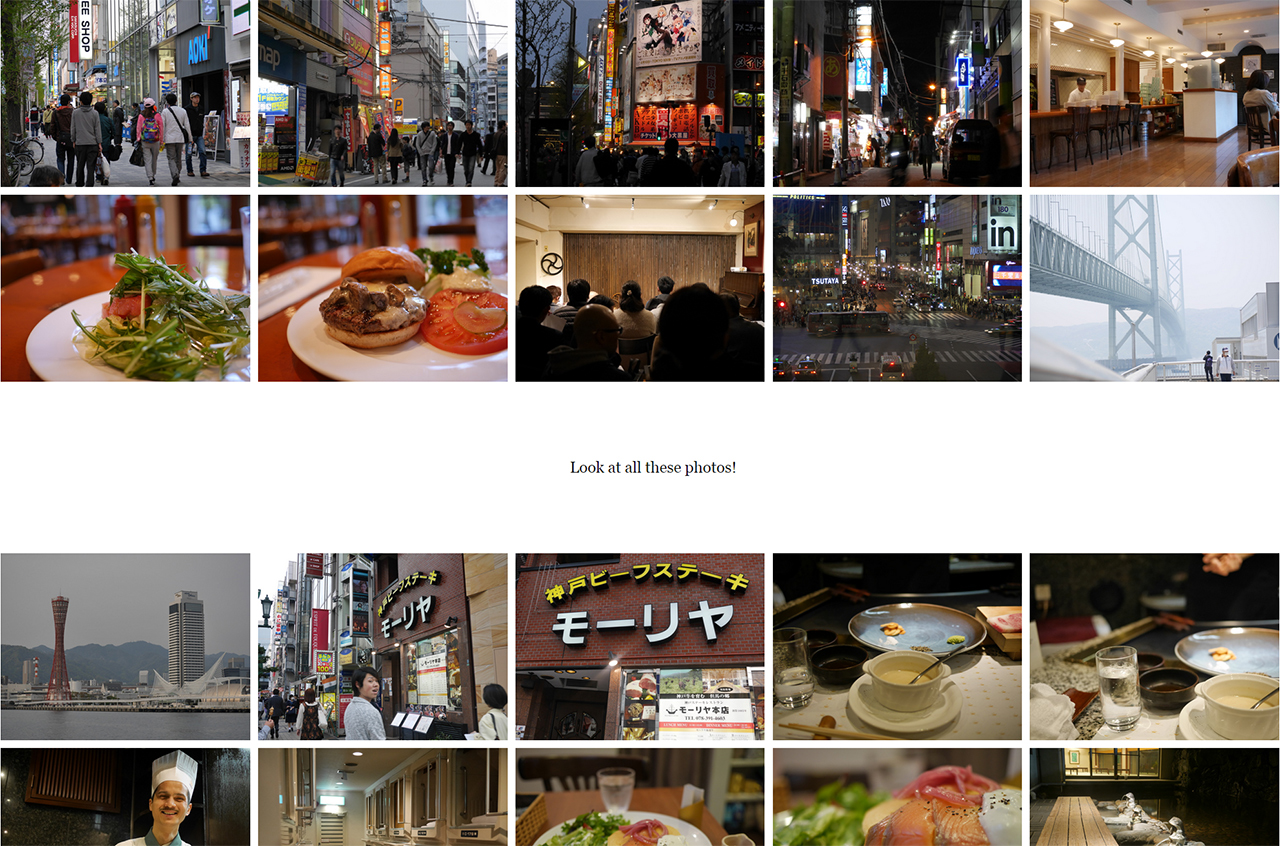
This sets all image widths to form a grid. Metadata file parameters are overriden by metadata in individual posts.
Flags
dorothea -d
The -d flag enables draft mode, where only a single low resolution is encoded. This can be used for a quick preview or for layout purposes.
Other flags:
dorothea -n                           # dry run: list what would be built, and why
dorothea --config other.json          # use a different config file than ./_config.json
dorothea --set jpeg_quality=85 --set 'resolution=[1920,640]'   # override config values
dorothea -j 4                         # parallel workers for images (default: one per CPU)
dorothea --ffmpeg bundled             # which ffmpeg: auto (default), bundled, system, or a path
dorothea --sort capture               # order: natural (default), name, capture; add -desc to reverse
dorothea --legacy                     # expose.sh's default settings, for exactly expose.sh's output
dorothea --convert-config             # turn an expose.sh _config.sh into _config.json
dorothea --version
Previewing
dorothea serve                        # build, then preview at http://localhost:8000/
dorothea serve -d                     # same, with a draft build (takes the same flags as dorothea)
dorothea serve --no-build --port 8080 # just serve the existing _site
dorothea serve --bind 0.0.0.0         # reachable from other devices, e.g. a phone on your network
Gallery links point at folders, which only work through a web server: if you open
_site/index.html straight from disk, clicking a gallery shows a folder listing. Preview with
dorothea serve instead, or set "link_index_html": true for a site meant to be browsed from
disk (see CONFIG.md).
On a terminal, the build shows progress bars: files read and encoded so far (e.g.
Encoding 12/80), and the percentage and time left of each video encoding pass. Output
redirected to a file or a CI log stays plain text.
Re-running only rebuilds what changed: edited photos, changed settings, or changed post
metadata. There's no need to delete _site. All settings are listed in CONFIG.md;
coming from expose.sh, see MIGRATION.md.
To do a completely clean build, delete the existing _site directory first.
Video options
Since we're using FFMpeg for video, we can leverage its filter framework for quick effects. This also saves a re-encode from a video editor workflow. Not all the FFmpeg options are applicable, but here are a few I found useful:
---
video-options: -ss 10 -t 5
---
This will cut the video 10 seconds from the start, with a duration of 5 seconds.
---
video-filters: lut3d=file=fuji3510.cube
---
If you're like me and shoot video in log profile, doing post work can be a pain. I like to globally apply a film print emulation LUT for a consistent look. Note that FFmpeg will look for the LUT file in the working directory you started the script in. FFmpeg does not support .look LUTs, so you'll have to convert them to one of .cube .3dl .dat or .m3d
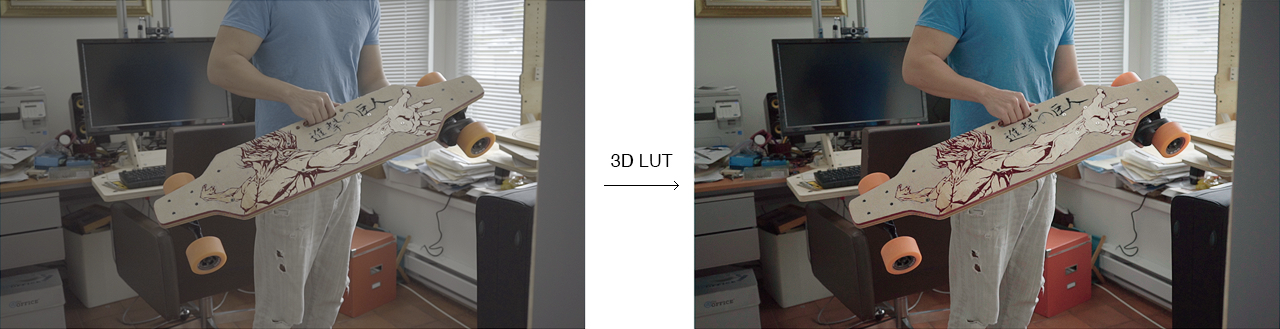
Here I use a nice low-contrast LUT I found online with excellent highlight rolloff for a cinematic look.
---
video-filters: deshake,unsharp=6:6:3,lutyuv="u=128:v=128"
---
Applies stabilization to the video and a slight sharpen filter, then converts to grayscale. Separate filters with commas.
A full list of FFmpeg filters can be found here
Image options
Similar to videos, we can leverage the image editing features of Imagemagick.
Things like cropping and color correction are very visual operations that are hard to do in command line. Most people would shoot in RAW and export as jpeg anyways, so a lot of ImageMagick's CLI options won't be very useful. However, it is very handy for non-destructively applying effects across an entire gallery, eg:
---
image-options: watermark.png -gravity SouthEast -geometry +50+50 -composite
---
You can use this to apply a watermark on the bottom right corner, with a 50 pixel margin from the edge.
---
image-options: -sharpen 0x1.5
---
Sharpens the image with a 1.5 pixel radius
---
image-options: -hald-clut transform.png
---
Imagemagick does not read LUTs natively, but will accept a Hald color lookup image. This image can be created in photoshop or other graphics package by applying your LUT to the Hald identity CLUT image
---
image-options: -colorspace Gray -sigmoidal-contrast 5,50%
---
Convert to a black-and-white image. Typically you would want to enhance contrast as well, which can be done by the sigmoidal contrast modifier. The first number controls contrast intensity.
A full list of Imagemagick options can be found here
Image sequences
Timelapse and stop-motion are a great way to add motion to a scene. If your folder contains the key word "imagesequence" (this is configurable), the images in the folder will be converted to a video. Video options and filters may be applied to image sequences.
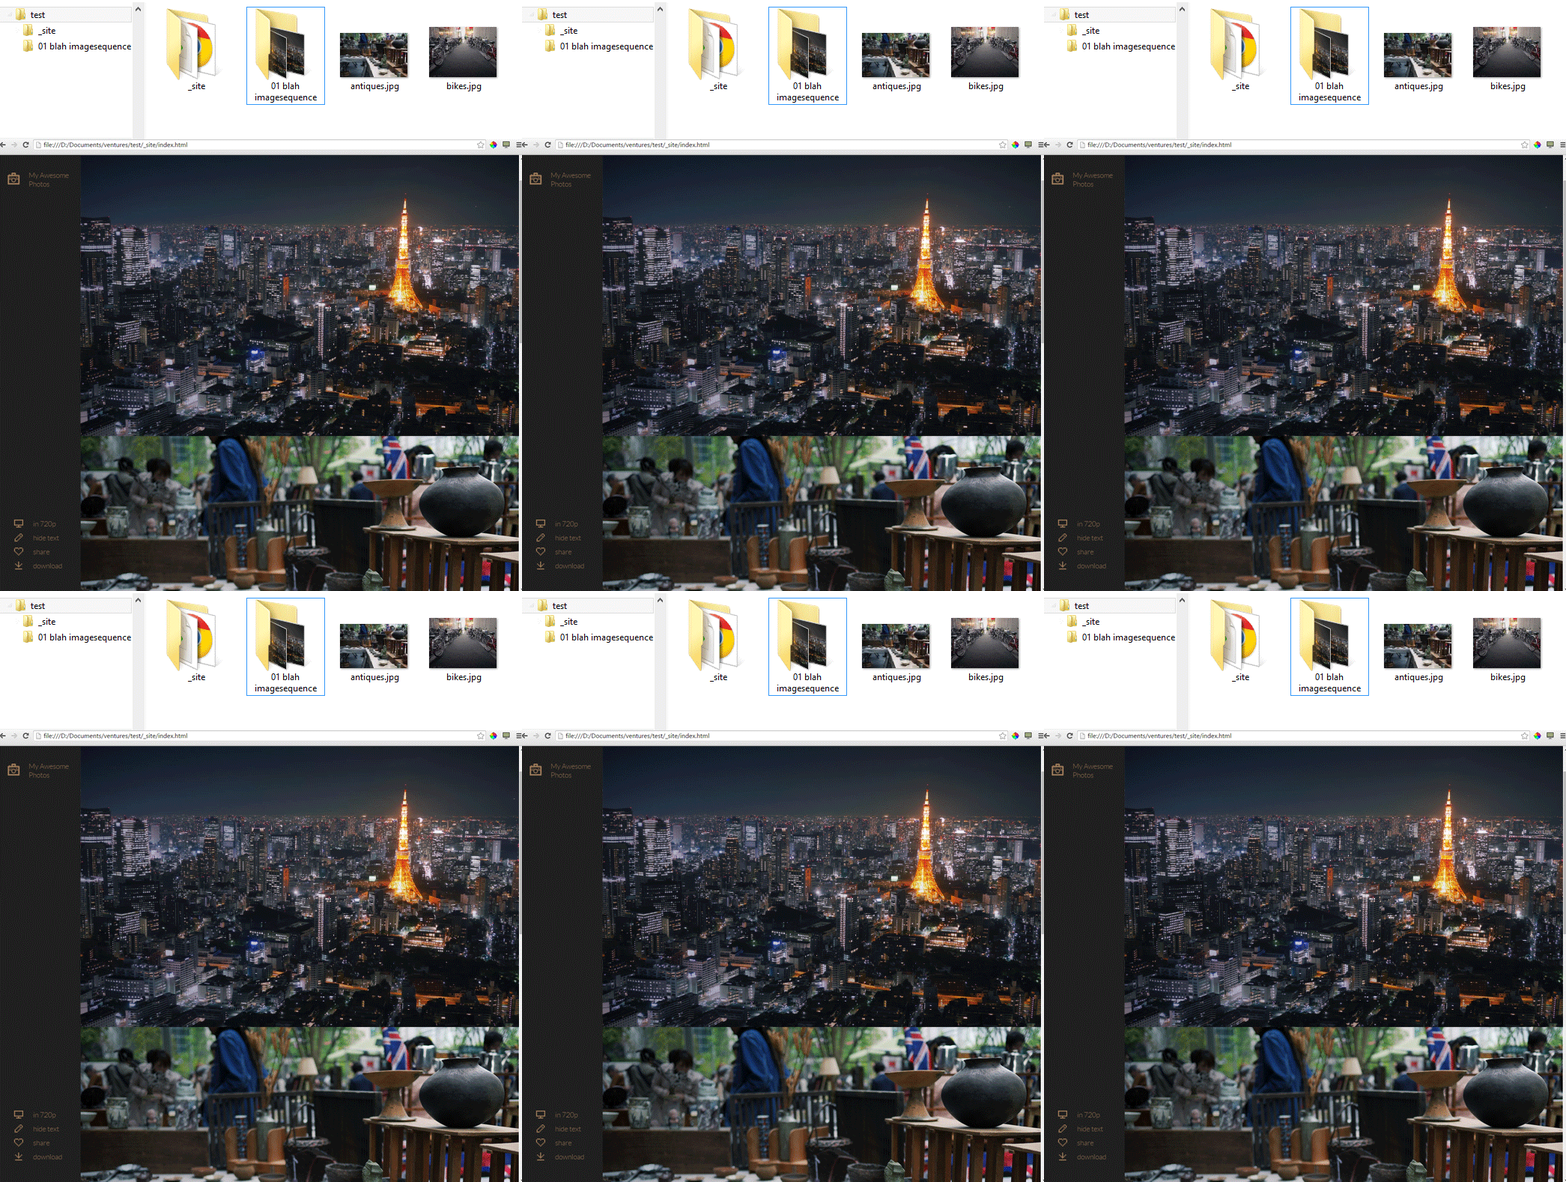
By default the video is encoded at 24fps.
Templating
If the two built-in themes aren't your thing, you can create a new theme. There are only two template files in a theme:
template.html contains the global html for your page. It has access to the following built-in variables:
- {{basepath}} - a path to the top level directory of the generated site with trailing slash, relative to the current html file
- {{resourcepath}} - a path to the gallery resource directory, relative to the current html file. This will be mostly empty (since the html page is in the resource directory), except for the top level index.html file, which necessarily draws resources from a subdirectory
- {{resolution}} - a list of horizontal resolutions, as specified in the config. This is a single string with space-delimited values
- {{videoformats}} - a list of video codecs that are generated, as defined in the config. This is also a single string with space-delimited values
- {{content}} - where the text/images will go
- {{sitetitle}} - a global title for your site, as specified in the config
- {{gallerytitle}} - the title of the current gallery. This is just taken from the folder name
- {{navigation}} - a nested html menu generated from the folder structure. Does not include wrapping ul tag so you can use your own id
- {{disqus_shortname}} - your disqus shortname, as specified in the config
- {{disqus_identifier}} - the disqus_identifier, which is just the relative path of the current gallery
post-template.html contains the html fragment for each individual image. It has access to the following built-in variables:
- {{imageurl}} - url of the directory which contains the image/video resources, relative to the current html file.
- For images, this folder will contain all the scaled versions of the images, where the file name is simply the width of the image - eg. 640.jpg
- For videos, this folder will contain scaled videos for each resolution and video codec. The naming convention here is size-codec.extension - eg. 640-h264.mp4
- For videos, this folder will additionally contain scaled images in the same nomenclature (eg. 640.jpg) to be used as posters prior to video load
- {{imagewidth}} - maximum width that the source image can be downscaled to
- {{imageheight}} - maximum height, based on aspect ratio and max width
- {{type}} - the type of media to display, this is a string that can either be "image" or "video"
- {{textcolor}} - color of the text, either extracted from the source image or specified in config
- {{backgroundcolor}} - background color, either extracted from the source image or specified in config
in addition to these, any variables specified in the YAML metadata of the post will also be available to the post template, eg:
---
mycustomvar: foo
---
this will cause {{mycustomvar}} to be replaced by "foo", in this particular post
Additional notes:
Specify default values, in case of unset template variables in the form {{foo:bar}} eg:
{{width:50}}
will set width to 50 if no specific value has been assigned to it by the time page generation has finished.
Any unused {{xxx}} variables that did not have defaults are removed from the generated page.
Any non-template files (css, images, javascript) in the theme directory are simply copied into the _site directory.
To avoid additional dependencies, the YAML parser and template engine is simply a sed regex. This means that YAML metadata must take the form of simple key:value pairs, and more complex liquid template syntax are not available.
1 maintainer

Metadata
1 maintainer
Release files for dorothea 1.9.3
For a detailed explanation of source distributions (sdists) and built distributions (wheels), please see the package formats documentation.
Source distribution (sdist)
| File | Size | Uploaded | |
|---|---|---|---|
| dorothea-1.9.3.tar.gz | 6.3 MB | Details |
Built distribution (wheel)
| File | Interpreter | ABI | Platform | Reset |
|---|---|---|---|---|
| dorothea-1.9.3-py3-none-any.whl | Python 3 | none | any | Details |
Total release size: 6.6 MB
Release files / dorothea-1.9.3.tar.gz
| Download URL | dorothea-1.9.3.tar.gz |
|---|---|
| Size | 6.3 MB |
| Tags | Source |
|
SHA-256 checksum How to use checksums |
816e3fdeb4e87ba7a5302ce2078ee339e0e55ec9f160f07a2494c549ed39d5e2
|
|
BLAKE2b-256 checksum How to use checksums |
be93b51bb8a159dc0084ecfeaa76f359b9bae9b159b2fcd2512172c3a9b2b639
|
| Upload date | |
|
Uploaded using Trusted Publishing? What is trusted publishing? |
Yes |
| Uploaded via |
uv/0.12.19 {"installer":{"name":"uv","version":"0.12.19","subcommand":["publish"]},"python":null,"implementation":{"name":null,"version":null},"distro":{"name":"Ubuntu","version":"24.04","id":"noble","libc":null},"system":{"name":null,"release":null},"cpu":null,"openssl_version":null,"setuptools_version":null,"rustc_version":null,"ci":true}
|
Release files / dorothea-1.9.3-py3-none-any.whl
| Download URL | dorothea-1.9.3-py3-none-any.whl |
|---|---|
| Size | 260.0 kB |
| Tags | Python 3 |
|
SHA-256 checksum How to use checksums |
ee7338c484fd3dbd5c417ec4287fec25aaaf3931ce354fd0529eaf06f75aa5ed
|
|
BLAKE2b-256 checksum How to use checksums |
e67d4716aab0d8d6c2f0564aadab82eace2008eb3c7c585e80daeae79b7e1359
|
| Upload date | |
|
Uploaded using Trusted Publishing? What is trusted publishing? |
Yes |
| Uploaded via |
uv/0.12.19 {"installer":{"name":"uv","version":"0.12.19","subcommand":["publish"]},"python":null,"implementation":{"name":null,"version":null},"distro":{"name":"Ubuntu","version":"24.04","id":"noble","libc":null},"system":{"name":null,"release":null},"cpu":null,"openssl_version":null,"setuptools_version":null,"rustc_version":null,"ci":true}
|














