Panda's wrapper for IO operations


Project description


A repository for hosting the dynamicio library, used as a wrapper for pandas i/o operations.
-- Logo illustrated by Nick Loucas
Table of Contents
- Why wrap your i/o?
- Supported sources and data formats:
- Installation
- API Documentation
- How to use
- Testing Locally
- Last notes
Table of contents generated with markdown-toc
Why wrap your i/o?
Working with pandas dataframes has opened up a new world of potential in Data Science. However,
if you are using pandas to support production pipelines, whether ML or ETL, you end up having
a big part of your code be concerned with I/O operations.
Managing various Resources
First, it's the various type of resources you need to interact with; object storage (S3 or GCS)
databases (Athena, Big Query, Postgres), Kafka and many more. For each of these, you have
dependencies on various libraries such as s3fs, fsspec, gcfs, boto3, awscli, aws-wrangler,
sql-alchemy, tables, kafka-python and many more.
Managing Various Data Types

Then it's the various data types you need handle, parquet, hdfs, csv, json and many
others, each of which come with their own set of configuration kwargs, things like the
orientation of the dataset (json) or the parquet engine you want
to use behind the scenes (pyarrow or fastparquet).
Validations & Metrics Generation
Then, it's the need to validate your expectations on the datasets; things like unique or null values being allowed in a column, allowing only a specific set of categorical values, or numerical values within a specified range. And what about metrics generation? The ability to monitor data distributions and how various metrics change with every run, is a significant aspect of monitoring the quality of your solution.
Testing (Running Local Regression Tests)
Finally, what about testing your code in different environments? Take, for instance, a traditional setup where you have the following 4 environments to work against:
- Local;
- Develop;
- Staging, and;
- Production.
Configuring your code to work against the last 3 Develop, Staging and Production can easily be done through
environment variables, but what about testing locally? What if you want to run your pipelines locally?
Well, you can, but usually that entails a big deal of mocking calls to external services. Instead, wouldn't
it be great if you could seamlessly direct your I/O operations to local sample data.
So, what do we do about these?
This proliferation of I/O operations leads to the emergence of glue code, which can be very difficult to manage. The problem is highlighted as an ML-System Anti-Pattern in Hidden Technical Debt in Machine Learning Systems
...ML researchers tend to develop general purpose solutions as self-contained packages. A wide variety of these are available as open-source packages at places like
ml-oss.org, or from in-house code, proprietary packages, and cloud-based platforms.Using generic packages often results in a glue code system design pattern, in which a massive amount of supporting code is written to get data into and out of general-purpose packages. Glue code is costly in the long term because it tends to freeze a system to the peculiarities of a specific package; testing alternatives may become prohibitively expensive. In this way, using a generic package can inhibit improvements, because it makes it harder to take advantage of domain-specific properties or to tweak the objective function to achieve a domain-specific goal. Because a mature system might end up being (at most) 5% machine learning code and (at least) 95% glue code, it may be less costly to create a clean native solution rather than re-use a generic package.
The Solution
Quoting from the same paper:
An important strategy for combating glue-code is to wrap black-box packages into common API's. This allows supporting infrastructure to be more reusable and reduces the cost of changing packages.
Dynamicio (or dynamic(i/o)) serves exactly that; it serves as a convenient wrapper around pandas I/O operations. It's a manifestation of
the dependency inversion principle--a layer of indirection if you want--which keeps your code DRY and increases re-usability, effectively
decoupling business logic from the I/O layer.
Main features
dynamic(i/o) supports:
- seamless transition between environments;
- abstracting away from resource and data types through
resource definitions; - honouring your expectations on data through
schema definitions; - metrics auto-generation (logging) for monitoring purposes.
Supported sources and data formats

- S3 (or local) Input & Output:
parqueth5jsoncsv
- Postgres Input & Output
- Kafka Output
Coming soon
- Athena (pending)
- Delta Tables (pending)
- GCS (pending)
- BigQuery (pending)
Installation
To install dynamic(i/o) you need to first authenticate with AWS Code Artifact. Just follow the below steps:
>> pip install dynamicio
API Documentation
Read our docs here: https://vortechsa.github.io/dynamicio/
How to use
We will go over an end-to-end example for reading and writing a single dataset, covering:
- all components involved and how they are configured, and;
- how these components are pieced together
You can find this example under the demo directory fo this repo.
Keywords:
- source configs
- resource definitions
- schema definitions
Let's start
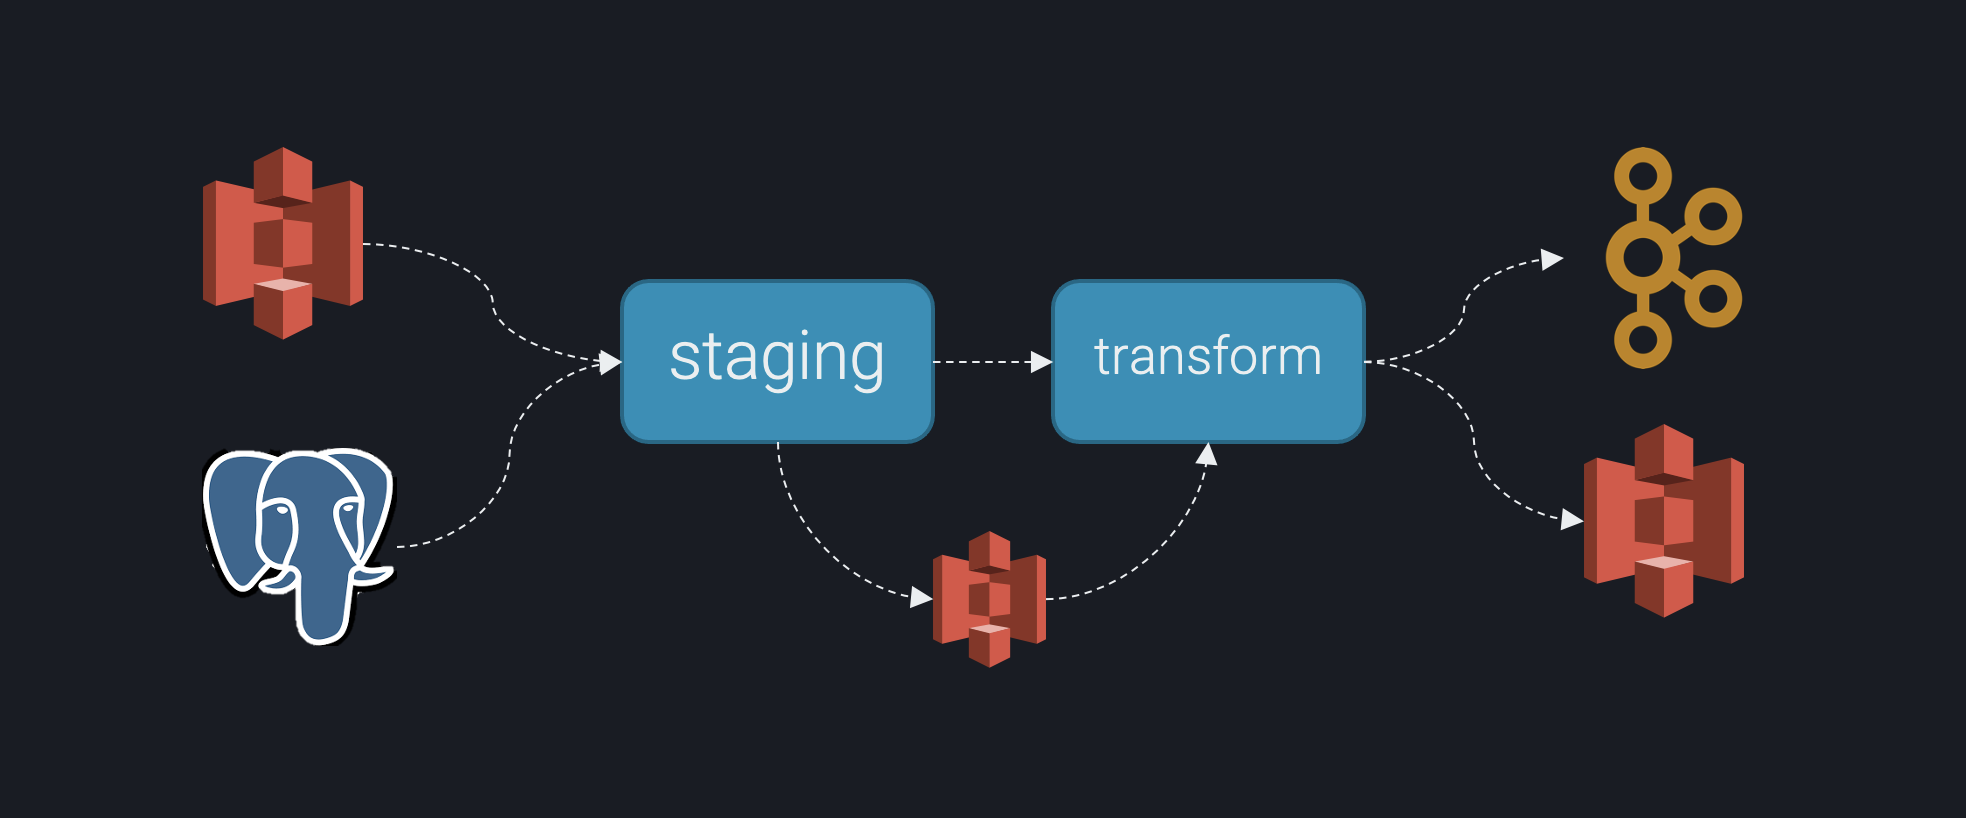
Suppose you want to ingest the foo and bar datasets, respectively from S3 and Postgres and stage them
to S3 for further processing.
Assume you want to build a pipeline that looks something like the image below:
Assume the below repository structure, which implements this pipeline, for the purpose of this tutorial:
demo
├── __init__.py
├── resources
│   ├── definitions
│   │   ├── input.yaml
│   │   ├── processed.yaml
│   │   └── raw.yaml
│   └── schemas
│       ├── input
│       │   ├── bar.yaml
│       │   └── foo.yaml
│       └── processed
│           ├── final_bar.yaml
│           └── final_foo.yaml
├── src
│   ├── __init__.py
│   ├── __main__.py
│   ├── constants.py
│   ├── environment.py
│   ├── io.py
│   ├── runner_selection.py
│   └── runners
│       ├── __init__.py
│       ├── staging.py
│       └── transform.py
└── tests
    ├── __init__.py
    ├── conftest.py
    ├── constants.py
    ├── data
    │   ├── input
    │   │   ├── bar.parquet
    │   │   └── foo.csv
    │   ├── processed
    │   │   └── expected
    │   │       ├── final_bar.parquet
    │   │       └── final_foo.parquet
    │   └── raw
    │       └── expected
    │           ├── staged_bar.parquet
    │           └── staged_foo.parquet
    ├── runners
    │   ├── __init__.py
    │   ├── conftest.py
    │   ├── test_staging.py
    │   └── test_transform.py
    ├── test_pipeline.py
    └── test_runner_selection.py
Step 1: Resource Definitions
We will start with defining our input and output resources as yaml files. These need to be defined under resources/definitions:
resources
├── __init__.py
├── definitions
│   ├── input.yaml
│   ├── processed.yaml
│   └── raw.yaml
└── schemas
    ├── input
    │   ├── bar.yaml
    │   └── foo.yaml
    └── processed
        ├── final_bar.yaml
        └── final_foo.yaml
You will need to define your pipeline's resources by creating three yaml files. The first is:
input.yamlwhich concerns data read by the staging task;
---
FOO:
  sample:
    type: "local"
    local:
      file_path: "[[ TEST_RESOURCES ]]/data/input/foo.csv"
      file_type: "csv"
  actual:
    type: "s3"
    s3:
      bucket: "[[ S3_YOUR_INPUT_BUCKET ]]"
      file_path: "data/foo.h5"
      file_type: "hdf"
  schema:
    file_path: "[[ RESOURCES ]]/schemas/input/foo.yaml"

BAR:
  sample:
    type: "local"
    local:
      file_path: "[[ TEST_RESOURCES ]]/data/input/bar.parquet"
      file_type: "parquet"
  actual:
    type: "postgres"
    postgres:
      db_host: "[[ DB_HOST ]]"
      db_port: "[[ DB_PORT ]]"
      db_name: "[[ DB_NAME ]]"
      db_user: "[[ DB_USER ]]"
      db_password: "[[ DB_PASS ]]"
  schema:
    file_path: "[[ RESOURCES ]]/schemas/input/bar.yaml"
- the
raw.yaml, which concerns data coming out of the staging task and go into the transform task:
---
STAGED_FOO:
  sample:
    type: "local"
    local:
      file_path: "[[ TEST_RESOURCES ]]/data/raw/staged_foo.parquet"
      file_type: "parquet"
  actual:
    type: "s3"
    s3:
      bucket: "[[ S3_YOUR_OUTPUT_BUCKET ]]"
      file_path: "live/data/raw/staged_foo.parquet"
      file_type: "parquet"

STAGED_BAR:
  sample:
    type: "local"
    local:
      file_path: "[[ TEST_RESOURCES ]]/data/raw/staged_bar.parquet"
      file_type: "parquet"
  actual:
    type: "s3"
    s3:
      bucket: "[[ S3_YOUR_OUTPUT_BUCKET ]]"
      file_path: "live/data/raw/staged_bar.parquet"
      file_type: "parquet"
- and the
processed.yaml, which concerns data coming out of the *transform task:
---
FINAL_FOO:
  sample:
    type: "local"
    local:
      file_path: "[[ TEST_RESOURCES ]]/data/processed/final_foo.parquet"
      file_type: "parquet"
  actual:
    type: "s3"
    s3:
      bucket: "[[ S3_YOUR_OUTPUT_BUCKET ]]"
      file_path: "live/data/processed/final_foo.parquet"
      file_type: "parquet"
  schema:
    file_path: "[[ RESOURCES ]]/schemas/processed/final_foo.yaml"

FINAL_BAR:
  sample:
    type: "local"
    local:
      file_path: "[[ TEST_RESOURCES ]]/data/processed/final_bar.parquet"
      file_type: "parquet"
    options:
      use_deprecated_int96_timestamps: true
      coerce_timestamps: "ms"
      allow_truncated_timestamps: false
      row_group_size: 1000000
  actual:
    type: "kafka"
    kafka:
      kafka_server: "[[ KAFKA_SERVER ]]"
      kafka_topic: "[[ KAFKA_TOPIC ]]"
    options:
      compression_type: "snappy"
      max_in_flight_requests_per_connection: 10
      batch_size: 262144
      request_timeout_ms: 60000 # 60s
      buffer_memory: 134217728  # 128MB
  schema:
    file_path: "[[ RESOURCES ]]/schemas/processed/final_bar.yaml"
We will hence refer to these files as "resource definitions".
The first, input.yaml defines the input sources for the staging task, handled by the respective module (runners/staging.py) while the
second one, defines its output; similarly for transform. These files are parsed by dynamicio.config.IOConfig to generated configuration i/o
instances referred to as "source configs" (see demo/src/__init__.py).
Notice that under every source there are three layers: sample, actual and schema. The first two point to the variants of the same
dataset, depending on whether it is called from the local environment or from the cloud (we will showcase how this
distinction takes place later).
The third refers your source config to a "schema definition" for your dataset (we will cover this in detail later).
Step 2: Defining your environment variables
Also notice that paths to datasets are embedded with dynamic values identified with double squared brackets, e.g.
[[ S3_YOUR_OUTPUT_BUCKET ]]. These can be defined in a module in your repository.
Resource definitions (*.yaml files) work in conjunction with global and environment variables:
environment.py
├── __init__.py
├── src
    └── environment.py
...
Let's have a look inside.
"""A module for configuring all environment variables."""
import os

ENVIRONMENT = "sample"
CLOUD_ENV = "DEV"
RESOURCES = os.path.join(os.path.dirname(os.path.realpath(__file__)), "../resources")
TEST_RESOURCES = os.path.join(os.path.dirname(os.path.realpath(__file__)), "../tests")
S3_YOUR_INPUT_BUCKET = None
S3_YOUR_OUTPUT_BUCKET = None
KAFKA_SERVER = None
KAFKA_TOPIC = None
DB_HOST = None
DB_PORT = None
DB_NAME = None
DB_USER = None
DB_PASS = None
REFERENCE_DATA_STATE_KEY = None
LOWER_THAN_LIMIT = 1000         # We will discuss this one later in step 4.
This module will be passed as an input parameter to instances of the dynamicio.config.IOConfig class. Let's cover
some of its variables:
-
"ENVIRONMENT": "sample",
used to distinguish between local and cloud runs of your module. It assumes that this environment variable is defined in the cloud environment where your module is executed from. -
"TEST_RESOURCES": os.path.join(os.path.dirname(os.path.realpath(__file__)), "../tests"),
It is defined in the resource definitions, e.g.:
---
FOO:
  sample:
    type: "local"
    local:
      file_path: "[[ TEST_RESOURCES ]]/data/input/foo.csv"
      file_type: "csv"
  actual:
    type: "s3"
    s3:
      bucket: "[[ S3_YOUR_INPUT_BUCKET ]]"
      file_path: "data/foo.h5"
      file_type: "hdf"
  schema:
    file_path: "[[ RESOURCES ]]/schemas/input/foo.yaml"
and therefore needs to be defined here as well.
Any other dynamic variable (identified with the doubly squared brackets) defined in the resource definitions needs to also be defined here and can be either statically or dynamically defined (i.e. hardcoded or defined as an environment value).
Step 3: Read in your resource definitions
Reading in the resources definitions can be done by means of instantiating instances of the dynamicio.config.IOConfig
class (the, so called, "source configs"). This is done in:
src
├── __init__.py
which allows it to be automatically loaded on call of any module within the pipeline package.
"""Set config IOs"""
__all__ = ["input_config", "raw_config", "processed_config"]

import logging
import os

from demo.src import environment
from demo.src.environment import ENVIRONMENT, RESOURCES
from dynamicio.config import IOConfig

logging.basicConfig(level=logging.INFO)
logging.getLogger("kafka").setLevel(logging.WARNING)


input_config = IOConfig(
    path_to_source_yaml=(os.path.join(RESOURCES, "definitions/input.yaml")),
    env_identifier=ENVIRONMENT,
    dynamic_vars=environment,
)
raw_config = IOConfig(
    path_to_source_yaml=(os.path.join(RESOURCES, "definitions/raw.yaml")),
    env_identifier=ENVIRONMENT,
    dynamic_vars=environment,
)
processed_config = IOConfig(
    path_to_source_yaml=(os.path.join(RESOURCES, "definitions/processed.yaml")),
    env_identifier=ENVIRONMENT,
    dynamic_vars=environment,
)
On loading, IOConfig will load the respective configs for all resources in the form of a multi-layered dictionary, e.g.,
for actual:
import demo.src.environment

{
    "FOO": {
        "sample": {
            "type": "local",
            "local": {
                "file_path": f"{demo.src.environment.TEST_RESOURCES}/data/input/foo.csv",
                "file_type": "csv",
            },
        },
        "actual": {
            "type": "s3",
            "s3": {
                "bucket": f"{demo.src.environment.S3_YOUR_INPUT_BUCKET}",
                "file_path": "data/foo.h5",
                "file_type": "hdf"
            }
        },
    }
}
Then, depending on the value of the env_identifier parameter, the respective sub-dictionary is returned. For example,
with:
foo_io = input_config.get(source_key="FOO")
and with env_identifier="actual", the output would be:
"type": "s3",
"s3": {
    "bucket": f"{demo.src.environment.S3_YOUR_INPUT_BUCKET}",
    "file_path": "data/foo.h5",
    "file_type": "hdf"
}
Step 4: Loading the data resources
To load a resource, you will need to generate instances of subclasses of from dynamicio import UnifiedIO class. Note
that the UnifiedIO class operates as an abstract class and cannot be used for instantiating objects.
You will need to implement your own subclasses for each of the inputs you care to load. You can do this in the io.py
module, under:
.
├── src
│   ├── __init__.py
│   ├── io.py
The file looks like this:
"""Responsible for configuring io operations for input data."""
# pylint: disable=too-few-public-methods
__all__ = ["InputIO", "StagedFoo", "StagedBar"]

from sqlalchemy.ext.declarative import declarative_base

from dynamicio import UnifiedIO, WithLocal, WithPostgres, WithS3File
from dynamicio.core import SCHEMA_FROM_FILE, DynamicDataIO

Base = declarative_base()


class InputIO(UnifiedIO):
    """UnifiedIO subclass for V6 data."""

    schema = SCHEMA_FROM_FILE


class StagedFoo(WithS3File, WithLocal, DynamicDataIO):
    """UnifiedIO subclass for staged foos."""

    schema = {
        "column_a": "object",
        "column_b": "object",
        "column_c": "int64",
        "column_d": "int64",
    }


class StagedBar(WithLocal, WithPostgres, DynamicDataIO):
    """UnifiedIO subclass for cargo movements volumes data."""

    schema = {
        "column_a": "object",
        "column_b": "object",
        "column_c": "int64",
        "column_d": "int64",
    }
Instances of the DynamicDataIO class can either inherit directly from UnifiedIO (e.g. InputIO inherits from UnifiedIO) or user can choose the mixins they want to use
(e.g. StagedFoo inherits from WithS3File and WithLocal mixins and needs to inherit from DynamicDataIO; note that MOR kicks in to address polymorphic conflicts--i.e. order matters).
Also, all instances of the DynamicDataIO must define a class schema. The schema can have the form of a dictionary, associating columns (keys) with dtypes (values) or be defined
as a yaml file (see InputIO) as explained in the next section.
N.B. For convenience's sake and to reduce the need of boilerplate code, using a single class definition like InputIO is recommended (this way all your datasets can be loaded with instances of the same class).
However, if you need to use different mixins for different datasets, you can do so by defining a class for each dataset (e.g. StagedFoo and StagedBar). You will definitely need to define your own classes if you
want to avoid using SCHEMA_FROM_FILE (as per the below instructions) but in this case, your dataset's name will be inferred from the dataclass name you use, e.g. StagedFoo will be inferred as STAGED_FOO.
Step 4.1. SCHEMA_FROM_FILE
from dynamicio.core import SCHEMA_FROM_FILE is a unique dynamic(i/o) object used as a placeholder.
It is used to indicate that a schema is provided as part of a resource definition.
For example:
---
FOO:
  sample:
  ...
  actual:
  ...
  schema:
    file_path: "[[ RESOURCES ]]/schemas/input/foo.yaml"
foo.yaml is effectively a schema definition and looks like this:
---
name: foo
columns:
  column_a:
    type: "object"
    validations:
      has_unique_values:
        apply: true
        options: {}
    metrics:
      - Counts
  column_b:
    type: "object"
    validations:
      has_no_null_values:
        apply: true
        options: {}
    metrics:
      - CountsPerLabel
  column_c:
    type: float64
    validations:
      is_greater_than:
        apply: true
        options:
          threshold: 1000
    metrics: []
  column_d:
    type: float64
    validations:
      is_lower_than:
        apply: true
        options:
          threshold: 1000
    metrics:
      - Min
      - Max
      - Mean
      - Std
      - Variance
The file is quite self-explanatory. The format is:
DataSet:
Columntypevalidationsmetrics
For a dataset, each of the desired columns are dictated here, along with their
designated dtypes. The columns are used to filter out undesired columns in an optimal manner.
This means that it will happen on loading for *.csv and *.parquet files as well as when
interacting with a database, but will happen post-loading in the case of *.h5 or *.json.
dtypes are then used to validate the types of the columns. If types don't match, dynamic(i/o)
will attempt to cast them and will issue a WARNING. If casting does not work either, it will
throw a ValueError exception.
validations and metrics are there to document the user's expectations of the quality of the dataset.
They can be automatically applied on loading or on writing out.
Specifically, you can use the following validations:
has_unique_values# no optionshas_no_null_values# no optionshas_acceptable_percentage_of_nullsis_in:validations: is_in: apply: true options: categorical_values: - class_a - class_b - class_c match_all: false # true by default, if false, then the column unique categoricals must be equal to the acceptable ones, else they must be a subset
is_greater_thanvalidations: is_greater_than: apply: true options: threshold: 1000
is_greater_than_or_equal# same asis_greater_thanis_lower_than# same asis_greater_thanis_lower_than_or_equal# same asis_greater_thanis_between# same asis_greater_thanvalidations: is_between: apply: true options: lower: 0 upper: 1000 include_left: false include_right: true # true by default
and metrics:
MinMaxMeanStdVarianceCountsUniqueCountsCountsPerLabel
imposed as per below:
column_c:
type: float64
validations: {}
metrics:
- Min
- Max
- Mean
- Std
- ...
Note that you can also use dynamic fields to define validations, e.g. see LOWER_THAN_LIMIT in the file below:
---
name: bar
columns:
column_a:
type: "object"
validations:
has_unique_values:
apply: true
options: {}
metrics:
- Counts
column_b:
type: "object"
validations:
has_no_null_values:
apply: true
options: {}
metrics:
- CountsPerLabel
column_c:
type: float64
  validations:
    is_greater_than:
      apply: true
      options:
        threshold: 1000
metrics: []
column_d:
type: float64
validations:
is_lower_than:
apply: true
options:
threshold: "[[ LOWER_THAN_LIMIT ]]"
metrics:
- Min
- Max
- Mean
- Std
- Variance
Similar to resource definitions, this value needs to be defined in environment.py
Step 4.2. Use the dynamicio cli
The dynamicio cli can be used to automatically generate schema definitions for you, provided either a path to
a dataset (json, parquet, hdf, csv) or to a directory. Here is how you can use it:
usage: dynamicio [-h] (--batch | --single) -p PATH -o OUTPUT

Generate dataset schemas

optional arguments:
  -h, --help            show this help message and exit
  --batch               used to generate multiple schemas provided a datasets directory.
  --single              used to generate a schema provided a single dataset.
  -p PATH, --path PATH  the path to the dataset/datasets-directory.
  -o OUTPUT, --output OUTPUT
                        the path to the schemas output directory.
The generated schema definitions will not have any validations or metrics automatically selected for you.
Step 4.3: Loading from S3
To then load from S3 you simply do:
foo_df = InputIO(source_config=input_config.get(source_key="FOO"), apply_schema_validations=True, log_schema_metrics=True).read()
which will load the foo.csv file as a dataframe.
Step 4.3: Loading from Postgres
Likewise to S3 resources, postgres resources need the same number of options to be defined for their loading.
Implicitly, dynamicio is able to infer data model from the schema yml files of the source key provided rather than requiring that the schema is explicitly defined. This data model defines the table, the columns and their respective SQL types.
To, then, load from postgres you simply do:
bar_df = InputIOsource_config=input_config.get(source_key="BAR"), apply_schema_validations=True, log_schema_metrics=True).read()
which will load the cargo the movements table as a dataframe.
Step 5: Writing out
Sinking data is done in a very similar way. You need to:
- Define your output resource definitions, in our case in
raw.yaml
---
STAGED_FOO:
  sample:
    type: "local"
    local:
      file_path: "[[ TEST_RESOURCES ]]/data/raw/staged_foo.parquet"
      file_type: "parquet"
  actual:
    type: "s3"
    s3:
      bucket: "[[ S3_YOUR_OUTPUT_BUCKET ]]"
      file_path: "live/data/raw/staged_foo.parquet"
      file_type: "parquet"

STAGED_BAR:
  sample:
    type: "local"
    local:
      file_path: "[[ TEST_RESOURCES ]]/data/raw/staged_bar.parquet"
      file_type: "parquet"
  actual:
    type: "s3"
    s3:
      bucket: "[[ S3_YOUR_OUTPUT_BUCKET ]]"
      file_path: "live/data/raw/staged_bar.parquet"
      file_type: "parquet"
- You need to define the respective dynamic values found in your resource definitions
in your
src/environment.py - You need to create an instance of the
IOConfigclass for theraw.yamlin the__init__.pyfile (we already did this). - Define the additional
DynamicDataIOsubclasses in thesrc/io.pymodule, dictating through the schema the list of columns, and their types (also used for schema validation). - Finally, instantiate instances of those subclasses and call the
.write()method, passing in the dataframe you want to write out, e.g.
demo/src/runners/staging.py:
    ...
    StagedFoo(source_config=raw_config.get(source_key="STAGED_FOO"), **constants.TO_PARQUET_KWARGS).write(foo_df)
    StagedBar(source_config=raw_config.get(source_key="STAGED_BAR")).write(bar_df)
Notice that you can pass all pandas options to write out, when for instance you are writing out parquet.
demo/src/constants.py:
# Parquet
TO_PARQUET_KWARGS = {
    "use_deprecated_int96_timestamps": False,
    "coerce_timestamps": "ms",
    "allow_truncated_timestamps": True,
}
Of, course this is not a problem as parquet is the format used by both resources in either environment. This not always the case however. See in
demo/resources/definitions/processed.yaml:
---
...

FINAL_BAR:
  sample:
    type: "local"
    local:
      file_path: "[[ TEST_RESOURCES ]]/data/processed/final_bar.parquet"
      file_type: "parquet"
    options:                                      <---- Options for Local writing as parquet
      use_deprecated_int96_timestamps: true
      coerce_timestamps: "ms"
      allow_truncated_timestamps: false
      row_group_size: 1000000
  actual:
    type: "kafka"
    kafka:
      kafka_server: "[[ KAFKA_SERVER ]]"
      kafka_topic: "[[ KAFKA_TOPIC ]]"
    options:                                      <---- Options for writting to a Kafka Topic
      compression_type: "snappy"
      max_in_flight_requests_per_connection: 10
      batch_size: 262144
      request_timeout_ms: 60000 # 60s
      buffer_memory: 134217728  # 128MB
  schema:
    file_path: "[[ RESOURCES ]]/schemas/processed/final_bar.yaml"
Here, we have a case where different options need to be used for each environment as it deals with a different source. This is gracefully managed through resource
definitions passing these arguments in the options key per environment.
Step 6: Full Code
The full code for the loading module in our example would live under:
├── __init__.py
├── src
...
│   ├── runners
│   │   └── staging.py
and looks like:
"""Add module docstring...."""
import logging

from demo.src import constants, input_config, raw_config
from demo.src.io import InputIO, StagedBar, StagedFoo

logger = logging.getLogger(__name__)


def main() -> None:
    """The entry point for the Airflow Staging task.

    Returns:
        Void function.
    """
    # LOAD DATA
    logger.info("Loading data from live sources...")

    bar_df = InputIO(source_config=input_config.get(source_key="BAR"), apply_schema_validations=True, log_schema_metrics=True).read()
    foo_df = InputIO(source_config=input_config.get(source_key="FOO"), apply_schema_validations=True, log_schema_metrics=True).read()

    logger.info("Data successfully loaded from live sources...")

    # TRANSFORM  DATA
    logger.info("Apply transformations...")

    # TODO: Apply your transformations

    logger.info("Transformations applied successfully...")

    # SINK DATA
    logger.info("Begin sinking data to staging area:")
    StagedFoo(source_config=raw_config.get(source_key="STAGED_FOO"), **constants.TO_PARQUET_KWARGS).write(foo_df)
    StagedBar(source_config=raw_config.get(source_key="STAGED_BAR")).write(bar_df)
    logger.info("Data staging is complete...")
Utilising asyncio
Dynamic(i/o) supports use of asyncio to speed up I/O bound operations through leveraging multithreading.
An example can be found in the second of the two demo tasks, namely, the transform.py task.
"""Add module docstring...."""
import asyncio
import logging

import demo.src.environment
from demo.src import processed_config, raw_config
from demo.src.io import InputIO, StagedBar, StagedFoo

logger = logging.getLogger(__name__)


async def main() -> None:
    """The entry point for the Airflow Staging task.

    Returns:
        Void function.
    """
    # LOAD DATA
    logger.info("Loading data from live sources...")

    [bar_df, foo_df] = await asyncio.gather(
        StagedBar(source_config=raw_config.get(source_key="STAGED_BAR")).async_read(),
        StagedFoo(source_config=raw_config.get(source_key="STAGED_FOO")).async_read()
    )

    logger.info("Data successfully loaded from live sources...")

    # TRANSFORM  DATA
    logger.info("Apply transformations...")

    # TODO: Apply your transformations

    logger.info("Transformations applied successfully...")

    # SINK DATA
    logger.info(f"Begin sinking data to staging area: S3:{demo.src.environment.S3_YOUR_OUTPUT_BUCKET}:live/data/raw")
    await asyncio.gather(
        InputIO(source_config=processed_config.get(source_key="FINAL_FOO"), apply_schema_validations=True, log_schema_metrics=True).async_write(foo_df),
        InputIO(source_config=processed_config.get(source_key="FINAL_BAR"), apply_schema_validations=True, log_schema_metrics=True).async_write(bar_df),
    )
    logger.info("Data staging is complete...")
In short, you simply need to utilise the async_read() or the async_write() methods instead, plus await and gather your calls.
Testing Locally
After following the above documentation, at this point it should be clear that dynamic(i/o) is optimised for enabling
seamless local testing for your pipelines.
Simply by configuring your ENVIRONMENT's default value to sample and provided that you have the required tests data
sources in the necessary directories, it becomes very simple to test your pipelines end-to-end in seconds, eliminating
the need to deploy your dags and wait for their tasks to be provided access to processing resources.
All you need to do is mimic the order of execution of your tasks, running them in procedural order.
In the case of our example, you would have to:
- Add the necessary data under
tests/data:
└── tests
    ├── __init__.py
    ├── conftest.py
    ├── constants.py
    ├── data
    │   ├── input
    │   │   ├── bar.parquet
    │   │   └── foo.csv
    │   ├── processed
    │   │   └── expected
    │   │       ├── final_bar.parquet
    │   │       └── final_foo.parquet
    │   └── raw
    │       └── expected
    │           ├── staged_bar.parquet
    │           └── staged_foo.parquet
    ├── runners
    │   ├── __init__.py
    │   ├── conftest.py
    │   ├── test_staging.py
    │   └── test_transform.py
    ├── test_pipeline.py
    └── test_runner_selection.py
- Implement an end-to-end, black-box style test that simply generates the expected data output given a specific input (deleting the output after the assertion)
An example end-to-end test in this case, for a single airflow task would look like:
"""An example pipeline to showcase how dynamicio can bt used for setting up a local e2e testing!"""
# pylint: disable=missing-module-docstring, missing-class-docstring, missing-function-docstring, unused-argument, too-few-public-methods
# noqa
import os

import pandas as pd
import pytest

from demo.src import processed_config, raw_config
from demo.src.runners import staging, transform


class TestPipeline:
    """Example e2e test."""

    @pytest.mark.end_to_end
    def test_dag_with_mock_sample_input_data(
        self,
        expected_staged_foo_df,
        expected_staged_bar_df,
        expected_final_foo_df,
        expected_final_bar_df,
    ):
        """Showcases how you can leverage dynamicio to read local data for fast feedback when you want to run your pipelines locally."""
        # Given
        # The src/resources/input.yaml

        # When
        staging.main()
        transform.main()

        # Then
        try:
            assert expected_staged_foo_df.equals(pd.read_parquet(raw_config.get(source_key="STAGED_FOO")["local"]["file_path"]))
            assert expected_staged_bar_df.equals(pd.read_parquet(raw_config.get(source_key="STAGED_BAR")["local"]["file_path"]))
            assert expected_final_foo_df.equals(pd.read_parquet(processed_config.get(source_key="FINAL_FOO")["local"]["file_path"]))
            assert expected_final_bar_df.equals(pd.read_parquet(processed_config.get(source_key="FINAL_BAR")["local"]["file_path"]))
        finally:
            os.remove(raw_config.get(source_key="STAGED_FOO")["local"]["file_path"])
            os.remove(raw_config.get(source_key="STAGED_BAR")["local"]["file_path"])
            os.remove(processed_config.get(source_key="FINAL_FOO")["local"]["file_path"])
            os.remove(processed_config.get(source_key="FINAL_BAR")["local"]["file_path"])
Last notes
Hope this was helpful.
Please do reach out with comments and your views about how the library or the docs can be improved, and by all means, come along and contribute to our project!
Release history Release notifications | RSS feed


Download files
Download the file for your platform. If you're not sure which to choose, learn more about installing packages.
Source Distribution
Built Distribution
Filter files by name, interpreter, ABI, and platform.
If you're not sure about the file name format, learn more about wheel file names.
Copy a direct link to the current filters
File details
Details for the file dynamicio-7.3.1.tar.gz.
File metadata
- Download URL: dynamicio-7.3.1.tar.gz
- Upload date:
- Size: 65.2 kB
- Tags: Source
- Uploaded using Trusted Publishing? No
- Uploaded via: poetry/2.1.4 CPython/3.10.18 Linux/6.11.0-1018-azure
File hashes
| Algorithm | Hash digest | |
|---|---|---|
| SHA256 |
343102c72b23a82ba3a5e97c847aba8b797675d2b684757a7f14cc4db6828305
|
|
| MD5 |
c6243d82d5ce0a1490925374e2608abd
|
|
| BLAKE2b-256 |
23afe6cfcb8afeddb07e628d02f329287af5703317977e40ff055b33e6807a82
|
File details
Details for the file dynamicio-7.3.1-py3-none-any.whl.
File metadata
- Download URL: dynamicio-7.3.1-py3-none-any.whl
- Upload date:
- Size: 64.5 kB
- Tags: Python 3
- Uploaded using Trusted Publishing? No
- Uploaded via: poetry/2.1.4 CPython/3.10.18 Linux/6.11.0-1018-azure
File hashes
| Algorithm | Hash digest | |
|---|---|---|
| SHA256 |
5d79649092aed5087a5191d77dfbf446b10715c5ad2950eaf7a3258474935436
|
|
| MD5 |
f59932bcb4532a16c629802b695669a1
|
|
| BLAKE2b-256 |
4cc54248f6d852c67a4b3a369ed49e19e01370178aca02b15e78f151e6045da0
|


