
A Python module to add ANSI color and format codes to strings for terminal output

Project description
eRCaGuy_PyColors
For text formatting and colorization in the terminal.
A Python module to add ANSI color and format codes to strings for terminal output.
Installation
Upgrade pip first (optional but recommended):
pip install --upgrade pip
# or (more explicit)
python3 -m pip install --upgrade pip
Install from PyPI:
pip install eRCaGuy_PyColors
Or install from source:
git clone https://github.com/ElectricRCAircraftGuy/eRCaGuy_PyColors.git
cd eRCaGuy_PyColors
pip install .
For development (editable install):
pip install -e .
To install into a virtual environment:
# Create and activate a virtual environment
python3 -m venv ~/venvs/eRCaGuy_PyColors
. ~/venvs/eRCaGuy_PyColors/bin/activate

# To see if you're in a virtual environment, run:
echo "$VIRTUAL_ENV"
# If in a virtual environment, this will print the path to the virtual environment.
# Otherwise, it will print nothing.

# Now install as above. Ex:
# Option 1: install from PyPI:
pip install eRCaGuy_PyColors
# Option 2: install from source:
# - Inside of the `eRCaGuy_PyColors` repo:
pip install .
Example usage in your Python program
# Recommended import style
import eRCaGuy_PyColors as colors
# OR (older style):
# import eRCaGuy_PyColors.ansi_colors as colors

print(f"{colors.FGR}This text is green.{colors.END}")
print(f"{colors.FBB}This text is bright blue.{colors.END}")
print(f"{colors.FBR}This text is bright red.{colors.END}")

colors.print_green("This text is green.")
colors.print_blue("This text is bright blue.")
colors.print_red("This text is bright red.")
colors.print_yellow("This text is bright yellow.")
Test and run this program
Run the built-in tests:
python3 -m eRCaGuy_PyColors
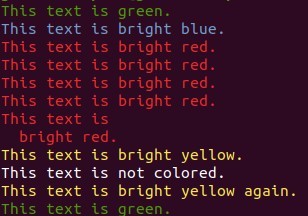
Example run and output:
eRCaGuy_PyColors$ ./ansi_colors.py
This text is green.
This text is bright blue.
This text is bright red.
This text is bright red.
This text is bright red.
This text is bright red.
This text is
  bright red.
This text is bright yellow.
This text is not colored.
This text is bright yellow again.
This text is green.
Screenshot:
Publishing to PyPI
See:
- https://packaging.python.org/en/latest/tutorials/packaging-projects/
- https://packaging.python.org/en/latest/guides/writing-pyproject-toml/
For maintainers, to publish a new version to PyPI:
Short version
./deploy.sh
Details
-
Install or upgrade
twine:python3 -m pip install --upgrade twine build
-
Update the version number in
eRCaGuy_PyColors/__init__.py.NB: no new changes will be deployed to PyPI if the version number in
eRCaGuy_PyColors/__init__.pyhas not been changed since the last upload. -
Clean the old build.
NB: Updating the version number above, plus cleaning the old build like this, are both required to ensure a successful new upload to PyPI.
rm -rf dist/ build/ *.egg-info
-
Build the distribution packages according to the settings in
pyproject.toml:time python3 -m build
-
Obtain a PyPI API token:
- Log into your PyPI account.
- Go to https://test.pypi.org/manage/account/#api-tokens, setting the “Scope” to “Entire account”. Don’t close the page until you have copied and saved the token — you won’t see that token again.
-
Test an upload to TestPyPI first (recommended):
- Obtain an API token at https://test.pypi.org/manage/account/#api-tokens --> "Add API token" --> (Activate two-factor authentication, if not yet done, to enable token generation.) --> Set "Token name" to
Gabriel TestPyPI(using your name); set "Scope" toEntire account (all projects)--> click "Create token". Follow the instructions there. ie: create a~/.pypircfile with the following contents:~/.pypirc:[testpypi] username = __token__ password = <your TestPyPI API token here, without the angle brackets> [pypi] username = __token__ password = <your PyPI API token here, without the angle brackets>
Paste your TestPyPI API token into thepasswordfield under[testpypi], and save the file. - Upload
python3 -m twine upload --repository testpypi dist/*
- Obtain an API token at https://test.pypi.org/manage/account/#api-tokens --> "Add API token" --> (Activate two-factor authentication, if not yet done, to enable token generation.) --> Set "Token name" to
-
Test an installation in a virtual environment from TestPyPI:
python3 -m venv ~/venvs/test_eRCaGuy_PyColors
. ~/venvs/test_eRCaGuy_PyColors/bin/activate
pip install --index-url https://test.pypi.org/simple/ --no-deps eRCaGuy_PyColors
Test that it works as expected.
-
Upload to PyPI using twine:
- Obtain an API token at https://pypi.org/manage/account/#api-tokens --> "Add API token" --> (Activate two-factor authentication, if not yet done, to enable token generation.) --> Set "Token name" to
Gabriel PyPI(using your name); set "Scope" toEntire account (all projects)--> click "Create token". Follow the instructions there. ie: update your~/.pypircfile by pasting in your token under the[pypi]section as shown above. - Upload
python3 -m twine upload dist/*
- Obtain an API token at https://pypi.org/manage/account/#api-tokens --> "Add API token" --> (Activate two-factor authentication, if not yet done, to enable token generation.) --> Set "Token name" to
-
Test an installation in a virtual environment from PyPI:
python3 -m venv ~/venvs/eRCaGuy_PyColors
. ~/venvs/eRCaGuy_PyColors/bin/activate
pip install eRCaGuy_PyColors
Test that it works as expected.
References
- Borrowed from my file here: https://github.com/ElectricRCAircraftGuy/eRCaGuy_hello_world/blob/master/python/pandas_dataframe_iteration_vs_vectorization_vs_list_comprehension_speed_tests.py
- https://github.com/ElectricRCAircraftGuy/eRCaGuy_hello_world/blob/master/python/ansi_colors.py
- https://github.com/ElectricRCAircraftGuy/eRCaGuy_PathShortener/blob/main/ansi_colors.py <==
- My Bash ANSI format library here: https://github.com/ElectricRCAircraftGuy/eRCaGuy_hello_world/blob/master/bash/ansi_text_format_lib.sh
- https://en.wikipedia.org/wiki/ANSI_escape_code#3-bit_and_4-bit


Download files
Download the file for your platform. If you're not sure which to choose, learn more about installing packages.
Source Distribution
Built Distribution
Filter files by name, interpreter, ABI, and platform.
If you're not sure about the file name format, learn more about wheel file names.
Copy a direct link to the current filters
File details
Details for the file ercaguy_pycolors-0.1.3.tar.gz.
File metadata
- Download URL: ercaguy_pycolors-0.1.3.tar.gz
- Upload date:
- Size: 5.7 kB
- Tags: Source
- Uploaded using Trusted Publishing? No
- Uploaded via: twine/6.2.0 CPython/3.10.12
File hashes
| Algorithm | Hash digest | |
|---|---|---|
| SHA256 |
8b9f9ba0bc67a0f46735ce5de0bf046ef8b7fb458e2d46b52c8c76b8e469ba4a
|
|
| MD5 |
0db1cc2d78ba22e8d42e0195aa60d0e4
|
|
| BLAKE2b-256 |
29a0c0822cc0dabf4fafb3c839e65d58ffe33e065eddd0cdc397e3d5defe97d0
|
File details
Details for the file ercaguy_pycolors-0.1.3-py3-none-any.whl.
File metadata
- Download URL: ercaguy_pycolors-0.1.3-py3-none-any.whl
- Upload date:
- Size: 6.5 kB
- Tags: Python 3
- Uploaded using Trusted Publishing? No
- Uploaded via: twine/6.2.0 CPython/3.10.12
File hashes
| Algorithm | Hash digest | |
|---|---|---|
| SHA256 |
8a75601f723d0cdaa8f49a1a6dedef6a90fa829da44f7933aa868424615c559d
|
|
| MD5 |
a0722b67940f88fb036c34c74855d205
|
|
| BLAKE2b-256 |
57fa9c83105b2fbef2cf8bd8498161c6a536aa42749b186ca9f7664a8484ebce
|






