GradCAM for torchvision, timm and huggingface model.

Project description
easy_gradcam
A lightweight tool to generate Grad-CAM visualizations for image classification models. It supports popular backbones such as ResNet, Vision Transformers (ViT), and Hugging Face Transformers.
This package is built on top of PyTorch for deep learning model implementation, and provides visualization utilities powered by Matplotlib and Seaborn. It is designed to help users easily train, evaluate, and visualize results with clear and customizable plots.
Installation
pip install easy_gradcam
Quick Start
1. Import dependencies
# === data preprocess ===
import cv2
from PIL import Image
import torchvision.transforms as transforms

# === model(maybe choose one?) ===
import torchvision.models as models
import timm
from transformers import AutoModelForImageClassification

# === this visualization tool ===
from easy_gradcam.classification import EasyGradCAM
from easy_gradcam.visualization import save_heatmap, save_mix_heatmap
2. Load a model
You can use different backbones:
# Example 1: ResNet-50 (from torchvision)
model = models.resnet50(pretrained=True)   # targets: "layer4"

# Example 2: ViT (from timm)
model = timm.create_model("vit_base_patch16_224_miil", pretrained=True)   # targets: "blocks.10"

# Example 3: DINOv2 (from Hugging Face)
model = AutoModelForImageClassification.from_pretrained(
    "facebook/dinov2-small-imagenet1k-1-layer"
) # targets: "dinov2.encoder.layer.11"

# Example 4: Your own model
model = CustomModel(...)

model.eval()
2.1 Identify target layers
To find the correct target layer names for your model, you can print the model architecture:
print(model)
3. Prepare an image
img_path = "./exp1.jpg"
# 1. Use OpenCV to read an image (choose one)
img = cv2.imread(img_path)
img = cv2.cvtColor(img, cv2.COLOR_BGR2RGB)

# 2. Use Pillow to read an image (choose one)
img = Image.open(img_path).convert("RGB")
img = np.array(img)

totensor = transforms.ToTensor()
resize = transforms.Resize((224, 224))
normalize = transforms.Normalize([0.485, 0.456, 0.406],
                                 [0.229, 0.224, 0.225])

t = totensor(img)
t = resize(t)
t = normalize(t)
t = t.unsqueeze(0)  # add batch dimension
4. Compute Grad-CAM
# Example 1: single target layer (choose one)
gradcam = EasyGradCAM(model, targets="dinov2.encoder.layer.11")

# Example 2: multiple target layers (choose one)
gradcam = EasyGradCAM(model, targets=["dinov2.encoder.layer.10", "dinov2.encoder.layer.11"])

# Extract features and gradients
feats, grads = gradcam.cal_feat_and_grad(t)

# Generate heatmaps
heats = gradcam.cal_heats(img, feats, grads)
5. Save results
from pathlib import Path
output_path = Path("results")
output_path.mkdir(parents=True, exist_ok=True)
for i in range(len(heats)):
for name in heats[i]:
# Save plain heatmap
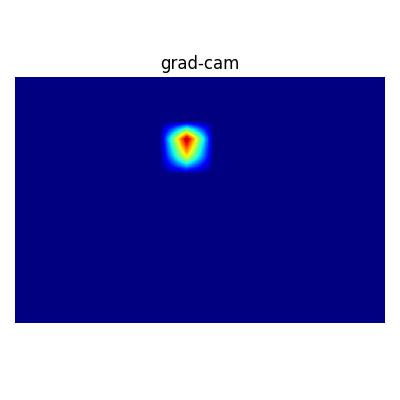
save_heatmap(
save_path=f"{output_path}/{img_path}-{i}-{name}.jpg",
heat=heats[i][name],
cmap="jet",
title="grad-cam"
)
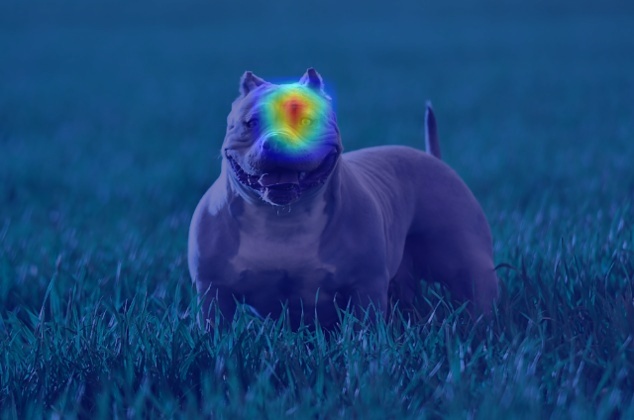
# Save overlay with original image
save_mix_heatmap(
save_path=f"{output_path}/{img_path}-{i}-{name}-mix.jpg",
heat=heats[i][name],
ori_img=img,
cmap="jet"
)
Example Output
- results/0-dinov2.encoder.layer.11.jpg: heatmap only
- results/0-dinov2.encoder.layer.11-mix.jpg: heatmap overlay on the input image
Notes
- Make sure the target layer you pass matches the internal structure of the model.
- Pretrained models from torchvision, timm, and Hugging Face are supported.
- Heatmaps are saved as .jpg files in the results/ directory.


Download files
Download the file for your platform. If you're not sure which to choose, learn more about installing packages.
Source Distribution
Built Distribution
Filter files by name, interpreter, ABI, and platform.
If you're not sure about the file name format, learn more about wheel file names.
Copy a direct link to the current filters
File details
Details for the file easy_gradcam-0.0.3.tar.gz.
File metadata
- Download URL: easy_gradcam-0.0.3.tar.gz
- Upload date:
- Size: 9.5 kB
- Tags: Source
- Uploaded using Trusted Publishing? No
- Uploaded via: twine/6.2.0 CPython/3.11.13
File hashes
| Algorithm | Hash digest | |
|---|---|---|
| SHA256 |
a3ef7d0fe55b1c1f7d943f73b502dd5ef6d1e07dbfb4e954f4786989602b2d88
|
|
| MD5 |
af81285d871bdff1b4cc357ed65f455c
|
|
| BLAKE2b-256 |
7aef3f51d3c711ab6fae60e05b80296f78f5eb8630c028a77101ac85eb4297f5
|
File details
Details for the file easy_gradcam-0.0.3-py3-none-any.whl.
File metadata
- Download URL: easy_gradcam-0.0.3-py3-none-any.whl
- Upload date:
- Size: 8.4 kB
- Tags: Python 3
- Uploaded using Trusted Publishing? No
- Uploaded via: twine/6.2.0 CPython/3.11.13
File hashes
| Algorithm | Hash digest | |
|---|---|---|
| SHA256 |
381845092edc88522a90c10182e54e19f6d73a706392ae3bf78d652c835815e5
|
|
| MD5 |
ead4347222a8a340f6d7871eb2a5504f
|
|
| BLAKE2b-256 |
128ab55238771a20fef0d0897b1bfd5d0d1643720fa7c6357a447f737cb42785
|


