

Enhanced Motor Unit sorter (EMUsort)
A command line tool for high performance spike sorting of multichannel, single unit electromyography
- Perform spike sorting with a modified version of Kilosort4 specifically tailored to MUAP data for improved performance (see paper for performance comparison results)
- Use a central configuration file to control all parameters and perform parameter sweeps
- Capable of automatically handling Intan, OpenEphys, NWB, Blackrock, and Binary datasets
- Combine recordings into single object for unified processing
- Remove broken or noisy channels automatically
- Export results and easily view in Phy
Installation
Requirements
- Currently, using a Linux-based OS is recommended. The code has been tested on Ubuntu. Windows is supported, but may require additional configuration steps as specified below. MacOS is not supported, but might work if it is macOS version >=12.3 and has an Apple silicon or AMD GPU, however, it is untested and tailored instructions are not provided.
- GPUs with compute capability >=5.0 are supported
- Nvidia Driver:
- Linux: >=450.80.02
- Windows: >=452.39
- CUDA Toolkit (Automatically installed with the environment):
- >=11.3
- Python (Automatically installed with the environment)
- >=3.10
Installation Options
There are two main options for installation of EMUsort (detailed in the below sections). At a high level, you can either:
- Clone from Github and install from those files, or
- Install from PyPI with
pip
In both cases, it is recommended to create a Python environment where the packages can be installed and controlled more effectively. This can be handled with venv or a package manager like micromamba. Choose a method you feel comfortable with to create a new environment and install EMUsort with one of the below methods.
Cloning from GitHub
Navigate into the folder where you want to clone the GitHub files for EMUsort, then run:
git clone https://github.com/snel-repo/EMUsort.git
After cloning is complete, you will need to configure an environment with uv, venv, micromamba, or conda.
Pulling Updates from GitHub
To update your EMUsort clone to the latest version, you can pull updates from the main repository. To do so, navigate into the folder where EMUsort was cloned and run:
git pull
If you used the uv method to install previously, and you have trouble updating, you may need to run the below commands to clear the uv cache before syncing:
uv cache clean
uv sync --extra full
If you are updating a previous EMUsort installation, you may encounter issues with the configuration file (if it's structure changed in the latest update). If this happens, you may want to backup your configuration file somewhere, then you can reset it to the new default configuration file by running:
emusort --reset-config --folder /path/to/session_folder
Python Environment Creation
Before following the below steps, make sure to navigate into the folder where EMUsort was cloned.
Option 1: uv
Recommended for Windows and Linux (see Option 2 if using Linux over RDP)
Follow the steps and execute the commands below to install and manage EMUsort with uv, a high performance Python package and project manager:
Windows only: Install GitBash first with default settings and use its shell to use EMUsort.
curl -LsSf https://astral.sh/uv/install.sh | sh
Then either restart the terminal or execute the command suggested in the terminal to enable using uv in the terminal. Next, create the environment and install all dependencies including Phy, using uv:
cd /path/to/repo_folder # go into the EMUsort clone location
Use uv to execute the installation with the "full" option, which will install Kilosort4 (with modifications), SpikeInterface, PyTorch, and Phy GUI. See pyproject.toml for more "--extra" options.
uv sync --extra full
If the install finished successfully, proceed to the Usage section next.
Option 2: micromamba
Recommended for Linux (remote, e.g., for use over Remote Desktop with X11 on remote system)
To install micromamba and set up a micromamba environment, follow the steps and execute the commands below:
Windows only: Install GitBash first with default settings and use its shell to use EMUsort.
"${SHELL}" <(curl -L micro.mamba.pm/install.sh)
If this errors out, you can simply download the script from micro.mamba.pm/install.sh and run a file with those contents manually with bash ./install.sh.
Afterwards, make sure to either restart the terminal or initialize micromamba directly, then run the below commands:
cd /path/to/repo_folder # go into the EMUsort clone location
micromamba env create -f environment.yml
Windows only: During micromamba environment creation, the conda packages usually work, but you may get an error at the end related to the
pippackages not install installing. If this happened, it's likely micromamba worked, but thepippackages need manual installation. This is a Windows problem. So, go ahead and activate the micromamba environment you just created (micromamba activate emusort), and run the following, one by one:pip install -e spikeinterface[full]==0.104.7pip install -e kilosort==4.0.18pip install "git+https://github.com/cortex-lab/phy.git@7a2494b"pip install -e .
If the install finished successfully, proceed to the Usage section next.
Option 3: anaconda/miniconda
Fallback Method, No Longer Recommended
To install miniconda, follow the link below, making sure to select the correct option for your OS:
Windows only: Open Anaconda Prompt from the Start Menu, and proceed with the below commands
Make sure restart the terminal or initialize conda in the terminal, then run the below commands:
cd /path/to/repo_folder # go into the EMUsort clone location
conda env create -f environment.yml
Installing from PyPI with pip
With this method you must create and activate a new Python environment first. If you don't know how to do that, consulting the micromamba instructions in Python Environment Creation above may be helpful (or read up on using venv). With the method of your choice, create and activate an environment (with Python 3.10), then run the below command:
pip install emusort[full]
This is usually enough, but sometimes the wrong version of CUDA files can be installed along with PyTorch that are not compatible with your GPU (not controllable in pyproject.toml due to how PyTorch CUDA versions are controlled with index URLs). If you run into issues using EMUsort, such as GPU not being detected, you can usually fix the issue by force reinstalling with CUDA 11.8 (recommended for use with Kilosort4), using the below command:
pip install "torch>=2.4,<2.8" "torchaudio>=2.4,<2.8" --index-url https://download.pytorch.org/whl/cu118 --force-reinstall
Usage
Python Environment Activation
Every time you open a new terminal, the environment must be activated, whether manually or automatically (see Advanced Usage for automatic activation).
Option 1: uv
Linux only:
source /path/to/repo_folder/.venv/bin/activate
Windows only:
source /path/to/repo_folder/.venv/Scripts/activate
Option 2: micromamba
micromamba activate emusort
Option 3: anaconda/miniconda
conda activate emusort
Session Folder Structure
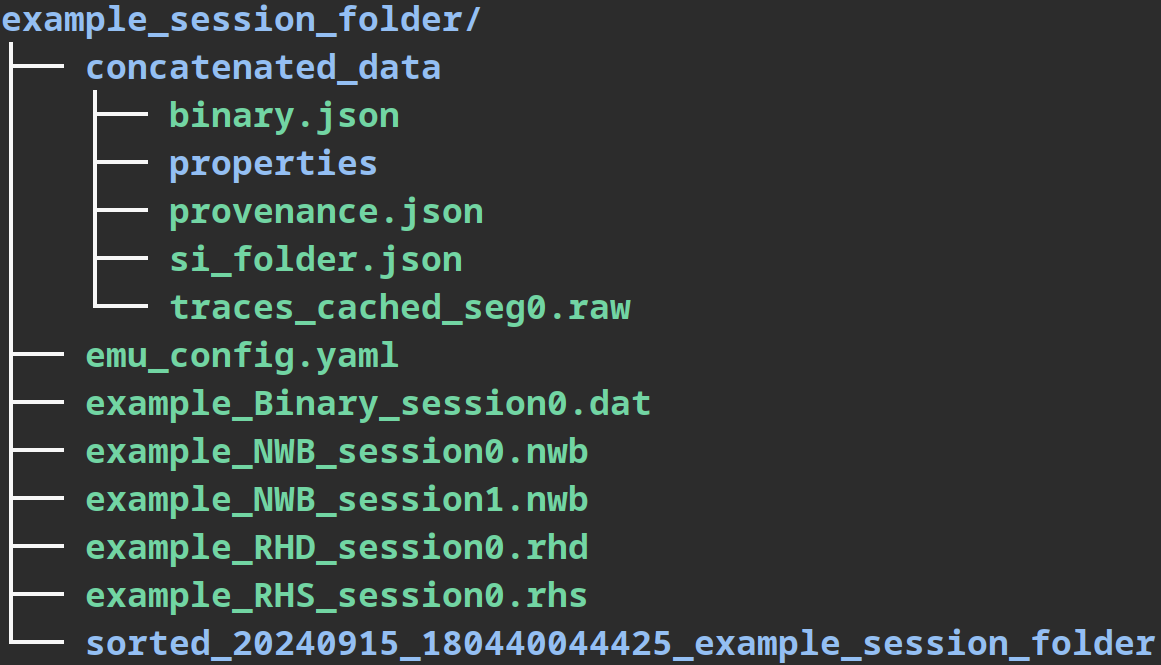
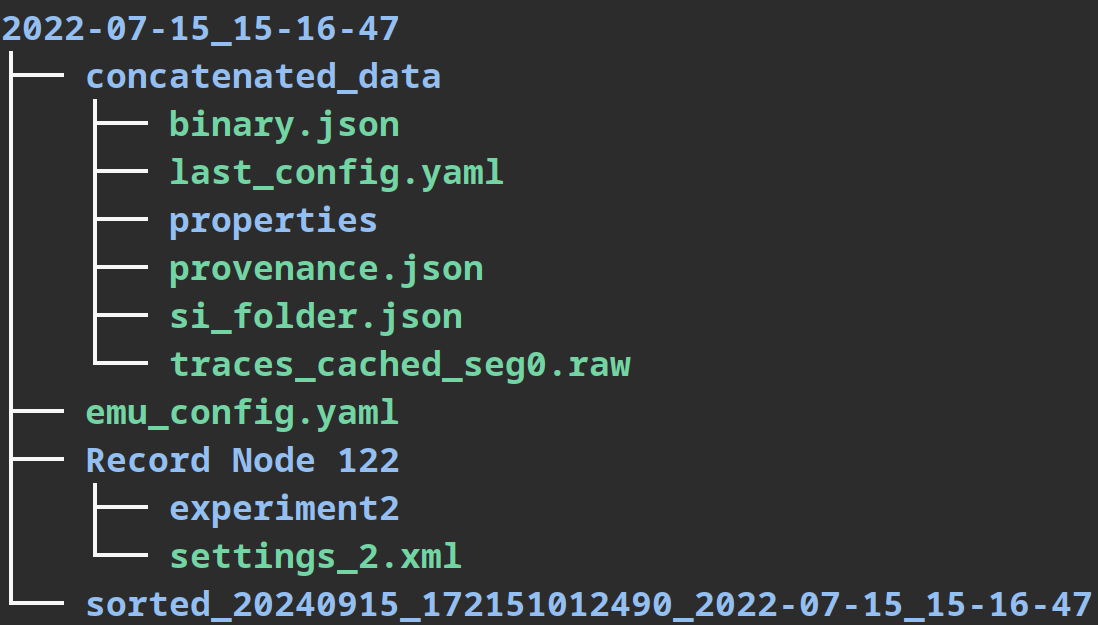
EMUsort relies on a main "session folder", which contains the below 4 items.
- For Intan, NWB, Blackrock, or Binary datasets, all you need to do is create a new session folder to contain your desired dataset files (Item #1 below).
- For Open Ephys, the session folder itself (dated folder containing 'Record Node ###') will act as the session folder. The original dataset files will not be modified.
Items #2-4, will be generated automatically inside the provided session folder.
- Data files (several dataset formats are supported)
- Intan RHD/RHS files
- NWB files
- Blackrock files
- Binary recording files
- Record Node ### (if using OpenEphys session folder)
emu_config.yamlfile- will be automatically generated and should be updated to make operational changes to EMUsort using the
--config(or-c) command line option. Within the configuration file, please note that you will have to change thedataset_typeattribute to match your desired dataset type. Once you generate the default config template, please review it and utilize the comments as documentation to guide your actions
- will be automatically generated and should be updated to make operational changes to EMUsort using the
sorted_yyyyMMdd_HHmmssffffff_g#_<session_folder>_P0_#_P1_#..._N#_SCORE#.###folders, which are tagged with a datetime stamp, a channel group ID (g#, if used), session folder name, name value pairs of parameters used in a sweep in the same order as they appear inemu_config.yamlunderKS_params_to_sweep(..._P0_#..., if used), the number of clusters identified (...N#_...), the number of good units abovecluster_score_threshold(...G#_...), and an average score for approximate estimation of the sorting performance (_SCORE#.###). From testing across many sorts, the number of good clusters scoring above 0.95 (indicated by theG#tag) tends to be a better estimator of the best sort overall. That is, the count of good scoring units (>0.95) is the best predictor of the count of truly good scoring units (>0.95 accuracy).- Each time a sort is performed, a new folder will be created in the session folder with the date and time of the sort. Inside this sorted folder will be the sorted data, the Phy output files, and a copy
emu_config.yamlfile that was used, for future reference. This important output file contains all parameters that were used for that sort and additional data related to how the sort performed underemu_config["Results"]. ThisResultssubsection includes channel IDs underemu_config["Results"]["emg_chans_used"], channel delays underemu_config["Results"]["emg_chan_delays"], and the scores and spike counts for each output cluster. These individual scores will also appear inside Phy GUI under ascorecolumn because of thecluster_scores.tsvfile. If Numpy format is preferred, the folder also contains anops.npyoutput file from Kilosort4 with channel delays underops['preprocessing']['chan_delays']and the reference channel for applying the delays underops['preprocessing']['reference_chan']. The channel IDs (names) are also saved inemg_chans_used.npy. - If the
cluster_score_thresholdfeature was enabled, i.e., by changing it from 0 to a value between 0 and 1 (0.95 is recommended), EMUsort will create a subfolder here calledprocessed_outputthat will contain a filtered output of only the clusters scoring above the set threshold. Targeting this subfolder with Phy GUI allows viewing these filtered outputs separately. Using this feature also provides another metric of performance, where the count of units scoring above a set threshold (e.g., 0.95) can serve as a predictor of the best overall sort (i.e., the sort with the highest number of good clusters).
- Each time a sort is performed, a new folder will be created in the session folder with the date and time of the sort. Inside this sorted folder will be the sorted data, the Phy output files, and a copy
concatenated_datafolder- will be automatically created if the
emg_recordingsfield has more than one entry, such as[0,1,2,7]or[all], which automatically includes all recordings in the session folder
- will be automatically created if the
Example Folder Tree
Intan, NWB, Blackrock, and Binary datasets:
Open Ephys datasets:
EMUsort Commands
To show a helpful summary of EMUsort commands:
emusort --help
To show the current version number:
emusort --version
To simply generate a configuration file (if it doesn't exist), run the below command:
Note: Absolute and relative paths are both acceptable.
emusort --folder /path/to/session_folder
Editing the main configuration file, emu_config.yaml, can be done by running the command below (will be generated from configs/config_template_emu.yaml if it doesn't exist):
emusort --config --folder /path/to/session_folder
If a problem occurs with your emu_config.yaml file and you would like to reset it to the default at configs/config_template_emu.yaml, you can run:
emusort --reset-config --folder /path/to/session_folder
To run a sort directly with the current emu_config.yaml on the dataset(s) in the session folder, run:
emusort --sort --folder /path/to/session_folder
For Kilosort4 emulation runs, you can include the --ks4 flag. See Running EMUsort As If Default Kilosort4 for more details.
If you want to specify multiple settings at the same time, you can append any combination of the below commands to the command line after emusort.
Note: For all commands, there is a short-form equivalent. The flags can be used in any order, but the path must always follow directly after the
--folderflag.
--help, -h
--version, -v
--folder /path/to/session_folder, -f ./session_folder
--config, -c
--reset-config, --r
--sort, -s
--ks4, -k
As an example of using multiple commands, if you want to reset to the default configuration file, edit the new emu_config.yaml, and also spike sort immediately after saving, you can run the below:
emusort --reset-config --config --sort --folder /path/to/session_folder
EMUsort Usage Tips to Boost Performance
- EMUsort is designed to be used to spike sort intramuscular EMG data where individual MUAP shapes are discernable and regular rather than surface EMG signals where the MUAP signals must be deconvolved or extracted with blind source separation.
- Be sure to remove segments of data that are not feasible to spike sort (e.g., segments containing artifacts due to physical perturbations of the EMG electrode) and that do not contain experimental data (e.g. remove all "rest" periods where the animal or human is performing miscellaneous movements). This ensures the sorting algorithm is not being given additional rare signals to deal with that do not pertain to the experiment, which can actually reduce the sorting performance in segments with more regular patterns of activity.
- Try to include more than 2 minutes worth of high-SNR multichannel intramuscular EMG recordings to try provide more than 200 spike examples for each MU present in the dataset. In addition, sorting more than 10-20 minutes worth of data can sometimes introduce challenges with stable identification because the MUAPs can actually change shape across this duration of time, which can result in that MUAP being sorted as 2 different clusters occuring in 2 different time epochs of the recording.
- The number of channels we have tested ranges mostly from 4-16. If the channel count is outside this range, it is likely that certain channel and template size-related parameters would need to be tuned for best performance, such as
min_template_size,template_sizes,nearest_chans, andnearest_templates, wherenearest_templatescan be set equal to the number of channels for better numerical stability. Currently, sorting of 1 channel is not supported due to the sorting improvement seen in template matching when signals from the same MUAP appear on multiple channels.
Inspecting and Curating with phy
To view and analyze the latest sort with Phy GUI, you can either copy and paste the suggested phy command in the terminal output, or navigate into the latest sorted_### folder, and execute:
phy template-gui params.py
For more information on phy, see the documentation at the main GitHub repository: https://phy.readthedocs.io/en/latest/
Advanced Usage
Automatically Activate the Environment
To automatically activate the environment each time you open a new terminal, append to the end of your ~/.bashrc file the activation command, depending on which environment manager you are using, execute:
Windows only: If using GitBash (recommended), you may need to replace
~/.bashrcwith~/.bash_profilein the below commands. Foruv, you must also swap to"source /path/to/repo_folder/.venv/Scripts/activate".
uv:
echo "source /path/to/repo_folder/.venv/bin/activate" >> ~/.bashrc # USING YOUR VALID PATH
micromamba:
echo "micromamba activate emusort" >> ~/.bashrc # USING YOUR VALID PATH
conda:
echo "conda activate emusort" >> ~/.bashrc # USING YOUR VALID PATH
Parameter Sweeping Over Multiple Kilosort Parameters to Find the Best Configurations for Your Dataset
EMUsort can now perform parameter sweeps across all parameters under the KS section of the configuration file.
Initial Set Up and Managing Jobs for a Parameter Sweep
If you want to explore different settings for multiple parameters and find the best parameter combinations for your dataset, you can edit the emu_config.yaml file under the Sorting section to enable a parameter sweep. First, you should decide which GPU(s) you want to use during processing. This is usually determined by how much memory each GPU has, and how many sorting processes can fit on a single GPU. You can test empirically to see what arrangement of job loads runs fastest on your system.
To set the selected GPU(s), modify the GPU_to_use list to include the indexes of the GPU(s) that should be used. Next, modify num_KS_jobs to specify how many total jobs to distribute evenly across all chosen GPUs. This num_KS_jobs parameter determines how many jobs will be running in parallel, so if you set num_KS_jobs: 1, any parameter combinations to be tried will be run sequentially on the first GPU specified in the GPU_to_use list.
For example, if you set
GPU_to_use: [0,1]andnum_KS_jobs: 1, the jobs would be run one after the other on GPU 0, but if you instead setnum_KS_jobs: 10, this would allow up to 5 sort jobs to be run on each of GPU 0 and GPU 1.
Managing Parameter Combinations and Executing a Parameter Sweep
In order to activate the parameter sweep, you must set the do_KS_param_sweep field to true. However, if do_KS_param_sweep is false, then num_KS_jobs must be 1 to reflect that only 1 sort job will be performed. Next, the KS_params_to_sweep field controls which parameters are going to be explored during the parameter sweep. Each field under KS_params_to_sweep must be a Kilosort parameter as listed under the KS section. The values corresponding to each Kilosort parameter under KS_params_to_sweep must be a list, which will be iterated across during the sweep.
The linked_params_for_sweep parameter controls how the sweep combinations are explored by using only matched indexes for linked parameters. If no linked parameters are specified (e.g., if linked_params_for_sweep is left blank), the Kilosort parameter combinations will be explored in full, so that the product of the number of elements in each Kilosort parameter list defined in KS_params_to_sweep is the total number of combinations. In this case, beware of the combinatorics so you don't generate more sorts than you expected (e.g., NxM combinations for N of param1, M of param2, etc.). With linked_params_for_sweep, you can specify lists of linked parameters where each element is a list of parameter keys, such as linked_params_for_sweep: [[Th_universal, Th_learned]] for a single linkage, or linked_params_for_sweep: [[Th_universal, Th_learned], [nt, nt0min]] for two different linkages. When parameters are linked, the first element of each parameter will be used with the first element of all other parameters in the group, the second elements of linked parameters are used together, and so on. This means each Kilosort parameter list for linked parameters must be equal length. If you want, you may also link more than 2 parameters together, such as linked_params_for_sweep: [[Th_universal, Th_learned, Th_single_ch]].
By using linked_params_for_sweep, you get explicit control of some Kilosort parameter combinations to avoid bad combinations and reduce the overall number of runs to be performed. To determine the total number of combinations for a given sweep when using linked_params_for_sweep, you can treat the linked parameters as a single parameter in the combinatorics multiplication.
For example, the default configuration file specifies 5 settings each for
Th_universal,Th_learned, andTh_single_ch. If no parameters were linked, the number of combinations would by 5*5*5=125, which is a very large number of combinations. So, instead,Th_learned, andTh_single_chare linked by adding a sublist with the two keys:linked_params_for_sweep: [[Th_universal, Th_learned]]. In this case, because the linked parameters are treated as a single parameter in the combinatorics multiplication, the number of combinations will be 5*5=25.
Running EMUsort As If Default Kilosort4 (v4.0.18)
To compare performance, you can also run EMUsort exactly like a default Kilosort4 installation (v4.0.18) by using the short-form command emusort -kcsf . to run it in the current folder, or use the longer-form command below:
emusort --ks4 --config --sort --folder /path/to/session_folder
This will generate a default Kilosort4 configuration file and run the sort with it. It does not interfere with the main emu_config.yaml file because it is a separate configuration file named ks4_config.yaml.
To only adjust the ks4_config.yaml in the session folder without performing spike sorting, you can run:
emusort --ks4 --config --folder /path/to/session_folder
To reset the ks4_config.yaml file to default from configs/config_template_ks4.yaml and edit it, run:
emusort --reset-config --ks4 --config --folder /path/to/session_folder
To run Kilosort4 emulation, reset ks4_config.yaml to default settings, edit the new ks4_config.yaml, and perform spike sorting in the current folder, all in one compact command, you can run the below command:
emusort --r -kcsf .
This emulation capability is useful for comparing the performance of EMUsort vs. Kilosort4.
Final Notes
If there are any discrepancies in the instructions/comments or any problems with the code, please submit an issue on GitHub so we can try to address the issue ASAP. If you'd like to request a specific feature or improvement to EMUsort, please let us know by submitting an issue on GitHub with the "enhancement" label with details about the feature request.
If you found this work helpful or just love emus, give us a ⭐️ on GitHub! Blessings and have a great week.
1 maintainer

Metadata
1 maintainer
Release files for emusort 1.1.0
For a detailed explanation of source distributions (sdists) and built distributions (wheels), please see the package formats documentation.
Source distribution (sdist)
| File | Size | Uploaded | |
|---|---|---|---|
| emusort-1.1.0.tar.gz | 855.6 kB | Details |
Built distribution (wheel)
| File | Interpreter | ABI | Platform | Reset |
|---|---|---|---|---|
| emusort-1.1.0-py3-none-any.whl | Python 3 | none | any | Details |
Total release size: 958.9 kB
Release files / emusort-1.1.0.tar.gz
| Download URL | emusort-1.1.0.tar.gz |
|---|---|
| Size | 855.6 kB |
| Tags | Source |
|
SHA-256 checksum How to use checksums |
3ef2ef9243b135abe306ace30d48937a1b16638c0e406db63562204ab16b0a8c
|
|
BLAKE2b-256 checksum How to use checksums |
645dd5a68520c05f22d873638cca44b3474a4071902937de7f43b1c2b2cfe843
|
| Upload date | |
|
Uploaded using Trusted Publishing? What is trusted publishing? |
Yes |
| Uploaded via |
twine/7.0.0 CPython/3.13.14
|
Provenance
Provenance describes where a file came from. On PyPI, provenance is shared via attestations, which provide a verifiable record of the build or publishing details. View details, limitations and caveats.


PyPI Publish Attestation
PyPI verified that this artifact, at this checksum, originated from the publisher listed below.
Signed by GitHub Actions, verified by PyPI on Oct 6, 2026.
Transparency logRelease files / emusort-1.1.0-py3-none-any.whl
| Download URL | emusort-1.1.0-py3-none-any.whl |
|---|---|
| Size | 103.3 kB |
| Tags | Python 3 |
|
SHA-256 checksum How to use checksums |
faf3faf726a06c6416679387b38dfe457710d384cf5d5aaca96adc5c3d6bfc72
|
|
BLAKE2b-256 checksum How to use checksums |
a3eae3bcf5f7b5627311fb728018c8bb1d2d003e1b9b11c0fbcb013a5c8729d7
|
| Upload date | |
|
Uploaded using Trusted Publishing? What is trusted publishing? |
Yes |
| Uploaded via |
twine/7.0.0 CPython/3.13.14
|
Provenance
Provenance describes where a file came from. On PyPI, provenance is shared via attestations, which provide a verifiable record of the build or publishing details. View details, limitations and caveats.
PyPI Publish Attestation
PyPI verified that this artifact, at this checksum, originated from the publisher listed below.
Signed by GitHub Actions, verified by PyPI on Oct 6, 2026.
Transparency log













