
EnzymeHunter
Overview
EnzymeHunter: Achieving fine-grained enzyme function prediction with a hierarchically-aware contrastive learning framework. The prediction pipeline was developed and tested on Linux (CentOS) with Python 3.9. The package also provides a CLI and Python API for installed use.
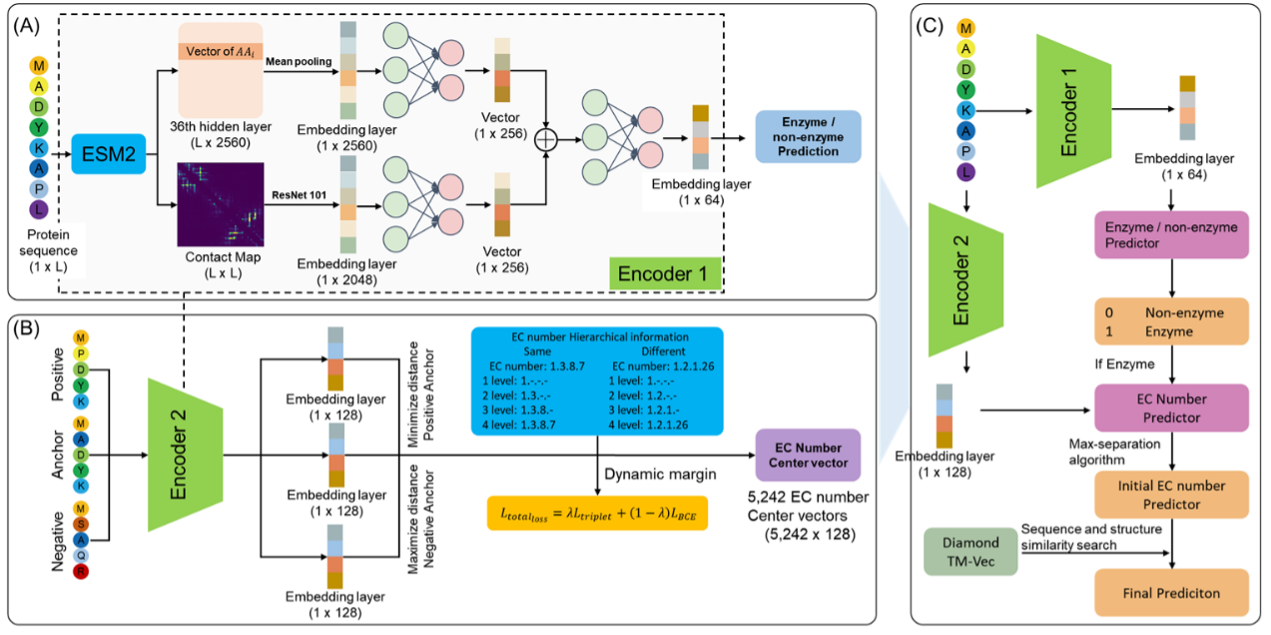
EnzymeHunter Architecture
Architecture and workflow of the EnzymeHunter model:
Installation & Setup
Install from PyPI
The project provides a Python API and a command-line entry point. Large pretrained weights and reference databases are distributed separately rather than embedded in the PyPI wheel.
python -m pip install enzymehunter
The PyPI package does not embed the large pretrained weights or reference database. Download both from Hugging Face with the command below, then run a prediction from the download directory:
cd /path/to/model-and-data
enzymehunter predict input.fasta -o results.csv
By default, the CLI looks for ./model and then
~/.cache/enzymehunter/model, so --model-dir is normally unnecessary. If
you store the model somewhere else, pass its location explicitly:
enzymehunter predict input.fasta \
  --model-dir /data/enzymehunter/model \
  -o results.csv
Use a specific device when needed:
# Automatically choose CUDA when available, otherwise CPU
enzymehunter predict input.fasta --device auto -o results.csv

# Force CPU
enzymehunter predict input.fasta --device cpu -o results.csv

# Use physical GPU 1
enzymehunter predict input.fasta --device cuda:1 -o results.csv

# Model stored outside the default locations
enzymehunter predict input.fasta --model-dir /data/enzymehunter/model \
  --device cuda:1 -o results.csv
For cuda:N, the selected physical GPU is isolated as logical cuda:0 for
the pipeline and its external tools, so all stages use the same GPU.
The model directory must contain the downloaded model files, and its parent
directory must contain the reference data used by the pipeline. Install
diamond separately and ensure it is available on PATH or in the model
directory. Linux with Python 3.9--3.11 is currently the tested environment.
The same operation is available from Python:
from enzymehunter import predict

# Uses ./model by default
predict("input.fasta", "results.csv")

# Use this only when the model is stored elsewhere
predict("input.fasta", "results.csv", model_dir="/data/enzymehunter/model")
Download the model and reference data from Hugging Face
The Tonybio/EnzymeHunter repository contains both the model/ tree and the
reference data/ tree. Hugging Face support is installed automatically with
enzymehunter:
Note: the current
model/tree is approximately 18 GB, mainly because it contains the ESM2 and ProtT5 weights. Make sure the target disk has enough free space before starting.
python -m pip install enzymehunter
enzymehunter download-hf-assets
By default, this creates ./model/ and ./data/ in the current directory.
The older name download-hf-model remains an alias. Choose another directory
or a fixed revision with:
enzymehunter download-hf-assets \
  --dir /data/enzymehunter/model \
  --repo-id Tonybio/EnzymeHunter \
  --revision main
The --dir value is the model directory; the downloader places data/ next
to it. For example, --dir /data/enzymehunter/model creates:
/data/enzymehunter/
├── model/
└── data/
The downloader supports caching and resuming and only retrieves the
repository's model/ and data/ trees. The model tree is approximately
18 GB, with additional space required for the reference data.
The downloader tries the official Hugging Face endpoint first. If that fails,
it automatically sets HF_ENDPOINT=https://hf-mirror.com and retries. To
disable this fallback:
enzymehunter download-hf-assets --no-mirror-fallback
Install from source for development
-
Clone the repository
git clone https://github.com/cgxbio/EnzymeHunter_pypi.git
cd EnzymeHunter_pypi
-
Create and activate the virtual environment
conda env create -f environment.yml
conda activate EnzymeHunter
-
Build and validate the package
python -m pip install -e ".[dev]"
python -m build
python -m twine check dist/*
Assets layout
The prediction pipeline expects the model directory and its reference data to be siblings:
<assets-root>/
├── model/         # Model files downloaded from Hugging Face
└── data/
    ├── datasets/
    │   ├── split100.csv
    │   └── split100.fasta
    ├── datasets_process/
    │   └── train_dataset_model_embedding/
    └── pdb/       # Optional PDB files named {UNIPROT_ID}.pdb
The --model-dir option points to model/. Its parent directory is used to
locate the matching data/ directory. If --model-dir is omitted, the CLI
looks for ./model first and then ~/.cache/enzymehunter/model.
Usage Example
Here are the common examples of using the EnzymeHunter, corresponding to different running modes:
1. Normal Mode (Default Mode)
Use this mode when you need the program to automatically distinguish between enzymes and non-enzymes, and only predict EC numbers for proteins classified as enzymes:
# Example: run prediction on a dataset where not all proteins are enzymes
enzymehunter predict input.fasta \
  -o results.csv
Explanation:
- The input is a regular FASTA file; sequence identifiers become the
Entrycolumn. - The program first performs enzyme/non-enzyme classification.
- Only proteins predicted as enzymes (
pred_label=1) undergo EC number prediction. - Non-enzyme proteins are marked with EC number
0.0.0.0.
2. All-Enzymes Mode
Use this mode when you know all proteins in the dataset are enzymes and want to skip the enzyme/non-enzyme classification step, proceeding directly to EC number prediction:
   # Example: run prediction assuming all proteins are enzymes
   enzymehunter predict input.fasta \
     --all-are-enzymes \
     -o results.csv
Explanation:
--all-are-enzymestreats every input protein as an enzyme.- The enzyme/non-enzyme classification step is skipped.
- All proteins receive
pred_label=1andpred_prob=1.0.
3. PDB-Based Contact Map Mode
By default, EnzymeHunter uses ESM2-predicted contact maps. You can switch to PDB-based contact maps (computed from AlphaFold or ESMFold 3D structures) with --contact-map-source pdb:
- Place your PDB structure files (named
{UNIPROT_ID}.pdb) into the assets directory underdata/pdb/(for example,/path/to/assets/data/pdb/). - Run the pipeline with
--contact-map-source pdb:
In this mode, EnzymeHunter will use the model trained with PDB-derived contact maps.
# Normal mode with PDB contact maps
enzymehunter predict input.fasta \
  --contact-map-source pdb \
  -o results.csv

# All-enzymes mode with PDB contact maps
enzymehunter predict input.fasta \
  --all-are-enzymes \
  --contact-map-source pdb \
  -o results.csv
Output
When using the PyPI CLI, the result is written to the path supplied with -o:
results.csv
1 maintainer

Metadata
1 maintainer
Release files for enzymehunter 0.1.1
For a detailed explanation of source distributions (sdists) and built distributions (wheels), please see the package formats documentation.
Source distribution (sdist)
| File | Size | Uploaded | |
|---|---|---|---|
| enzymehunter-0.1.1.tar.gz | 32.6 kB | Details |
Built distribution (wheel)
| File | Interpreter | ABI | Platform | Reset |
|---|---|---|---|---|
| enzymehunter-0.1.1-py3-none-any.whl | Python 3 | none | any | Details |
Total release size: 67.4 kB
Release files / enzymehunter-0.1.1.tar.gz
| Download URL | enzymehunter-0.1.1.tar.gz |
|---|---|
| Size | 32.6 kB |
| Tags | Source |
|
SHA-256 checksum How to use checksums |
e9ace13b607801cbb61fca0ed27c0eba87f115dc3ed8af50fb2755f30405c06e
|
|
BLAKE2b-256 checksum How to use checksums |
4c31509b6e34757c9dfeae4c8ab0ec4ed76bdbcb019483d5ae790de3f80cfab3
|
| Upload date | |
|
Uploaded using Trusted Publishing? What is trusted publishing? |
Yes |
| Uploaded via |
twine/7.0.0 CPython/3.13.14
|
Provenance
Provenance describes where a file came from. On PyPI, provenance is shared via attestations, which provide a verifiable record of the build or publishing details. View details, limitations and caveats.


PyPI Publish Attestation
PyPI verified that this artifact, at this checksum, originated from the publisher listed below.
Signed by GitHub Actions, verified by PyPI on Aug 26, 2026.
Transparency logRelease files / enzymehunter-0.1.1-py3-none-any.whl
| Download URL | enzymehunter-0.1.1-py3-none-any.whl |
|---|---|
| Size | 34.8 kB |
| Tags | Python 3 |
|
SHA-256 checksum How to use checksums |
279250c2facd93db75f98c95ebf1de8d7005596a49da3ac705e39d9fec4dd95e
|
|
BLAKE2b-256 checksum How to use checksums |
a9fde37c86d764a22be3422b6b241a975f7310dadb5a9c732b7a3643d7e78e80
|
| Upload date | |
|
Uploaded using Trusted Publishing? What is trusted publishing? |
Yes |
| Uploaded via |
twine/7.0.0 CPython/3.13.14
|
Provenance
Provenance describes where a file came from. On PyPI, provenance is shared via attestations, which provide a verifiable record of the build or publishing details. View details, limitations and caveats.
PyPI Publish Attestation
PyPI verified that this artifact, at this checksum, originated from the publisher listed below.
Signed by GitHub Actions, verified by PyPI on Aug 26, 2026.
Transparency log













