Headless 3D print pipeline: arrange, orient, slice, and send to printer from a TOML config
Verified details
These details have been verified by PyPIProject links
GitHub Statistics
Maintainers

Project description

fabprint


3D printing has a reproducibility problem:
- Slicer settings get lost between sessions or through human error
- Printer configs drift across machines and slicer versions
- There's no way to version, diff, or audit a print job
fabprint addresses this with declarative, version-controlled builds. Define your print like code — parts, slicer settings, and printer config in a single TOML file — and fabprint handles the rest: arrangement, slicing, and dispatch to the printer.
Same repo → same G-code → consistent, repeatable prints across machines. fabprint produces identical G-code for a given config; physical results may still vary with hardware and materials.
Built for engineers, makers, and teams who treat their prints like software. Works with STL, STEP, and 3MF files, and pairs naturally with code-CAD tools like build123d, OpenSCAD, and cadquery.
# fabprint.toml — a multi-part print with slicer overrides

[[parts]]
file = "enclosure_base.step"
orient = "flat"
filament = 1                    # AMS slot 1: PETG-CF

[[parts]]
file = "enclosure_lid.step"
orient = "upright"
filament = 1

[[parts]]
file = "button_cap.stl"
copies = 4
filament = 2                    # AMS slot 2: PLA

[slicer]
engine = "orca"
version = "2.3.1"               # pinned for reproducibility
printer = "Bambu Lab P1S 0.4 nozzle"
process = "0.20mm Standard @BBL X1C"
filaments = ["Generic PETG-CF @base", "Generic PLA @base"]

[slicer.overrides]
sparse_infill_density = "25%"
enable_support = 1
brim_type = "auto_brim"

[printer]
name = "workshop"
fabprint run # arrange → slice → print, one command
✔ Loaded 3 parts
✔ Arranged 3 parts onto plate  (256×256mm)
✔ Plate exported
✔ Sliced with OrcaSlicer 2.3.1  48s
✔ 3h 42m, 24.6g filament
✔ Sent to printer "workshop"
How it works
- Define parts + settings in
fabprint.toml - Arrange — fabprint bin-packs models onto the build plate
- Slice — using a pinned OrcaSlicer version (via Docker) for identical G-code across machines
- Print — sends identical G-code to your printer
Everything is declared in a single TOML file — git-friendly, diffable, and committable alongside your CAD files. Lock the slicer version, pin the profiles, and the output is reproducible on any machine or in CI.
Why not just use OrcaSlicer CLI?
OrcaSlicer CLI is great for slicing a prepared plate. fabprint builds a reproducible pipeline around it:
- Arrangement — bin-packs multiple STLs onto the build plate (OrcaSlicer CLI has no arrange step)
- Multi-part filament mapping — per-part filament slot assignment and paint color preservation, injected into the 3MF metadata
- Reproducible builds — pin slicer profiles into your repo + lock OrcaSlicer version in Docker = identical gcode on any machine
- Partial execution —
--until plateto inspect layout,--only sliceto re-slice,--dry-runto test everything - Send to printer — Bambu LAN, Bambu Cloud, and Moonraker/Klipper (experimental), with live status monitoring. PrusaLink and OctoPrint support is on the roadmap
- Headless Docker slicing — no GUI, no display server, works in CI, uses a specific OrcaSlicer version
Quick start
Prerequisites: Python 3.11+ and Docker. Docker is central to fabprint — it runs OrcaSlicer in a container with a pinned version so every machine produces identical G-code, and it powers cloud printing via the Bambu Connect bridge. A local OrcaSlicer install can be used as an alternative for slicing only.
pip install fabprint
# or, to install as an isolated CLI tool:
pipx install fabprint
Generate a config with the interactive wizard, or dump a commented template:
fabprint setup                      # configures printer targets
fabprint init                       # interactive wizard — discovers profiles and CAD files creates TOML
fabprint init --template            # dump a commented template (works on all platforms incl. Windows)
Note:
fabprint init(interactive wizard) requires a Unix terminal (Linux, macOS, or WSL). On Windows, usefabprint init --templateand edit the generated file manually. Or createfabprint.tomlby hand (see full config reference):
[pipeline]
stages = ["load", "arrange", "plate", "slice", "print"]

[printer]
name = "workshop"       # references ~/.config/fabprint/credentials.toml

[plate]
size = [256, 256]       # build plate dimensions in mm
padding = 5.0

[slicer]
engine = "orca"
version = "2.3.1"       # pin OrcaSlicer version for reproducibility
printer = "Bambu Lab P1S 0.4 nozzle"
process = "0.20mm Standard @BBL X1C"

[slicer.overrides]      # simple way to define print settings without editing JSON
sparse_infill_density = "30%"       # stronger infill
wall_loops = 3                       # extra wall strength
enable_support = 1
brim_type = "auto_brim"             # help adhesion
curr_bed_type = "Textured PEI Plate"

[[parts]]               # define multiple parts using STEP, STL or 3MF inputs
file = "frame.step"
rotate = [180, 0, 0]    # flip so mounting plate faces down
filament = "Generic PETG-CF @base"

[[parts]]
file = "wheel.stl"
copies = 5
orient = "upright"
filament = "Generic PETG-CF @base"
Run it (see full CLI reference):
fabprint run                   # arrange, slice and send to printer
fabprint run --until slice     # stop after slicing
fabprint run --dry-run         # full pipeline without sending to printer
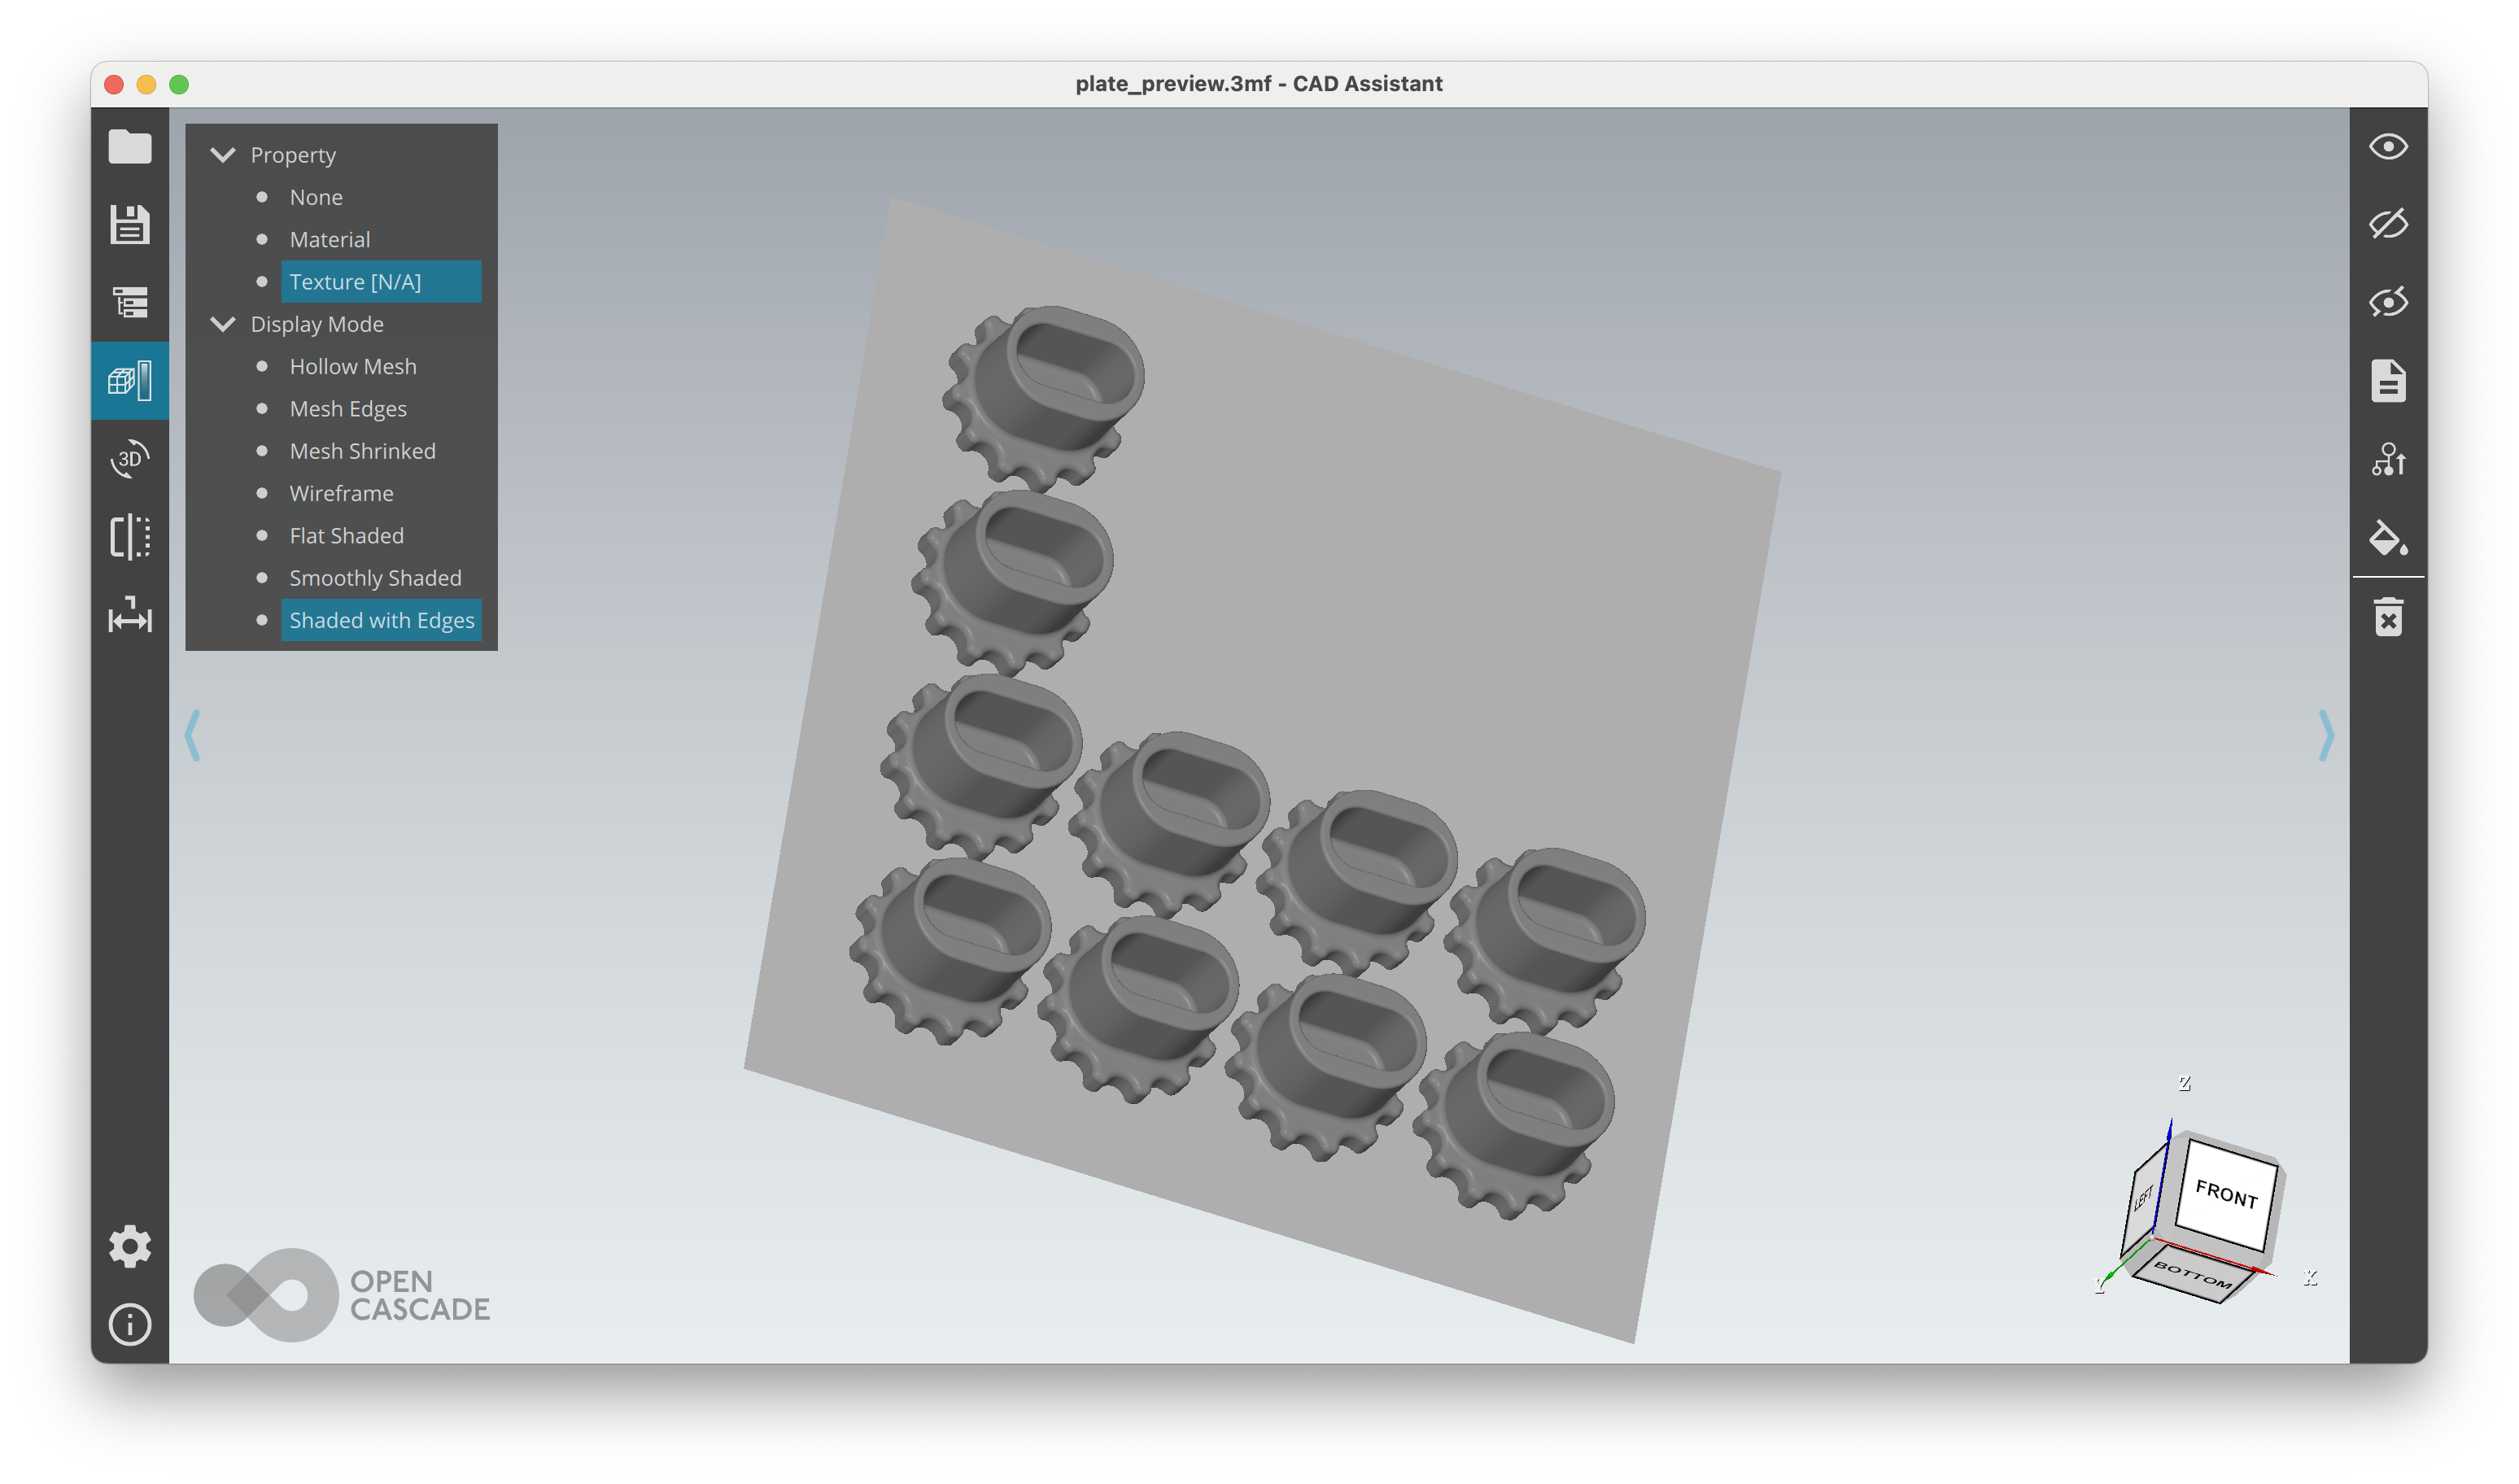
The arrangement (plate) stage generates a plate_preview.3mf — open it in any 3MF viewer to check placement:
Reproducibility
Pin profiles into your repo so builds are identical across machines:
fabprint profiles pin          # copies slicer profiles into ./profiles/
git add profiles/              # commit to lock them
Combined with version = "2.3.1" in [slicer] (which pins the Docker image), the same config always produces the same gcode.
CI/CD example
Automate slicing in GitHub Actions — push a commit, get G-code as a build artifact with print metrics on your PR:
# .github/workflows/slice.yml
name: Slice
on: [push, pull_request]
jobs:
  slice:
    runs-on: ubuntu-latest
    steps:
      - uses: actions/checkout@v4
      - uses: pzfreo/fabprint@main
        with:
          orca-version: "2.3.1"
The action slices your model, uploads G-code as an artifact, and posts print time / filament stats as a PR comment. See action/README.md for all options.
CLI overview
fabprint init # interactive config wizard
fabprint init --template # dump commented TOML template
fabprint validate # check config for issues
fabprint setup # set up a printer (credentials + connection type)
fabprint run # full pipeline
fabprint run --until plate # stop after plating
fabprint run --only slice # run just one stage
fabprint run --dry-run # everything except sending to printer
fabprint watch # re-run pipeline when input files change
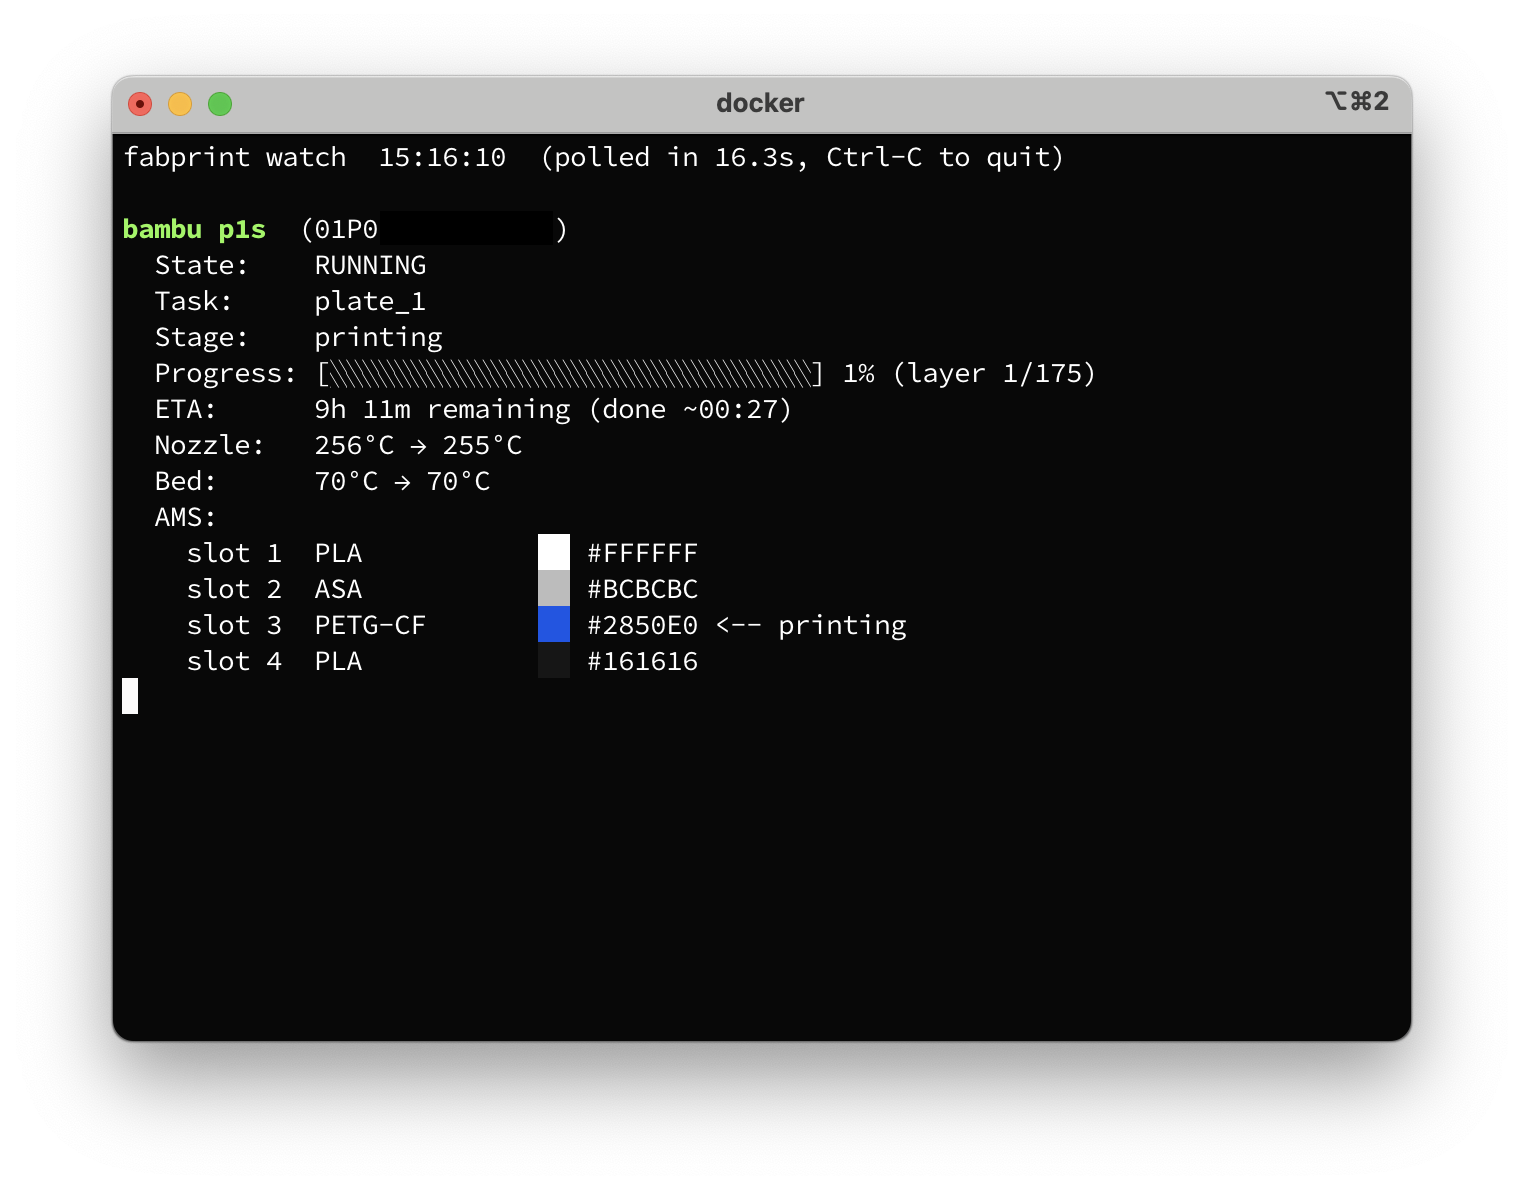
fabprint status # query printer status
fabprint status -w # live printer dashboard
fabprint profiles list # list available slicer profiles
fabprint profiles pin # pin profiles for reproducible builds
Credentials
Printer credentials are stored in ~/.config/fabprint/credentials.toml, created by fabprint setup. The file is set to 600 permissions (owner read/write only) and is never committed to your repo — only the printer name appears in fabprint.toml. Credentials can also be supplied via environment variables (BAMBU_PRINTER_IP, BAMBU_ACCESS_CODE, BAMBU_SERIAL) for CI or shared environments.
Documentation
- CLI reference — all commands, flags, and pipeline stages
- Config reference — complete TOML format
- Developing — setup, testing, architecture
License
Apache 2.0
Project details
Verified details
These details have been verified by PyPIProject links
GitHub Statistics
Maintainers
Release history Release notifications | RSS feed


Download files
Download the file for your platform. If you're not sure which to choose, learn more about installing packages.
Source Distribution
Built Distribution
Filter files by name, interpreter, ABI, and platform.
If you're not sure about the file name format, learn more about wheel file names.
Copy a direct link to the current filters
File details
Details for the file fabprint-0.1.121.tar.gz.
File metadata
- Download URL: fabprint-0.1.121.tar.gz
- Upload date:
- Size: 6.2 MB
- Tags: Source
- Uploaded using Trusted Publishing? Yes
- Uploaded via: twine/6.1.0 CPython/3.13.7
File hashes
| Algorithm | Hash digest | |
|---|---|---|
| SHA256 |
3aa0dd7bc8fa1549aaeb862086512acde91be962be13e5dc1058fe9cc9f58701
|
|
| MD5 |
989a3b7e7be061b3e9ad9156e00c00bb
|
|
| BLAKE2b-256 |
9c52da558a6ad2188f986b50fb96e24294cebb2e6ac1e5ad591b527a09c94ca3
|
Provenance
The following attestation bundles were made for fabprint-0.1.121.tar.gz:
Publisher:
publish-cloud-bridge.yml on pzfreo/fabprint
-
Statement:
-
Statement type:
https://in-toto.io/Statement/v1 -
Predicate type:
https://docs.pypi.org/attestations/publish/v1 -
Subject name:
fabprint-0.1.121.tar.gz -
Subject digest:
3aa0dd7bc8fa1549aaeb862086512acde91be962be13e5dc1058fe9cc9f58701 - Sigstore transparency entry: 1143160858
- Sigstore integration time:
-
Permalink:
pzfreo/fabprint@58e1dfd0e8e33b4b73a4f1b613ba123d62077802 -
Branch / Tag:
refs/heads/main - Owner: https://github.com/pzfreo
-
Access:
public
-
Token Issuer:
https://token.actions.githubusercontent.com -
Runner Environment:
github-hosted -
Publication workflow:
publish-cloud-bridge.yml@58e1dfd0e8e33b4b73a4f1b613ba123d62077802 -
Trigger Event:
push
-
Statement type:
File details
Details for the file fabprint-0.1.121-py3-none-any.whl.
File metadata
- Download URL: fabprint-0.1.121-py3-none-any.whl
- Upload date:
- Size: 95.8 kB
- Tags: Python 3
- Uploaded using Trusted Publishing? Yes
- Uploaded via: twine/6.1.0 CPython/3.13.7
File hashes
| Algorithm | Hash digest | |
|---|---|---|
| SHA256 |
dd00d74e0cf405064204ddd2ab1a929287d54ae30e45223acbd5a110dd7cc014
|
|
| MD5 |
57ddad2b93c89f9d829e16604e29ed68
|
|
| BLAKE2b-256 |
44b9929c864e6631669a295bef81d5db805741f7411028f983aadb6de5c0eccc
|
Provenance
The following attestation bundles were made for fabprint-0.1.121-py3-none-any.whl:
Publisher:
publish-cloud-bridge.yml on pzfreo/fabprint
-
Statement:
-
Statement type:
https://in-toto.io/Statement/v1 -
Predicate type:
https://docs.pypi.org/attestations/publish/v1 -
Subject name:
fabprint-0.1.121-py3-none-any.whl -
Subject digest:
dd00d74e0cf405064204ddd2ab1a929287d54ae30e45223acbd5a110dd7cc014 - Sigstore transparency entry: 1143160935
- Sigstore integration time:
-
Permalink:
pzfreo/fabprint@58e1dfd0e8e33b4b73a4f1b613ba123d62077802 -
Branch / Tag:
refs/heads/main - Owner: https://github.com/pzfreo
-
Access:
public
-
Token Issuer:
https://token.actions.githubusercontent.com -
Runner Environment:
github-hosted -
Publication workflow:
publish-cloud-bridge.yml@58e1dfd0e8e33b4b73a4f1b613ba123d62077802 -
Trigger Event:
push
-
Statement type:


