
facetweak




Face retouching for Python and the command line. It finds the face landmarks, then bends the pixels around the eyes, brows, nose, lips and jaw with smooth local warps. Bigger eyes, a slimmer face, a narrower nose bridge, fuller lips: 23 adjustments, each one a number from -1 to 1.
It does not use a generative model. Nothing is repainted, so skin texture and lighting stay as they were, and it runs on a plain CPU in well under a second.
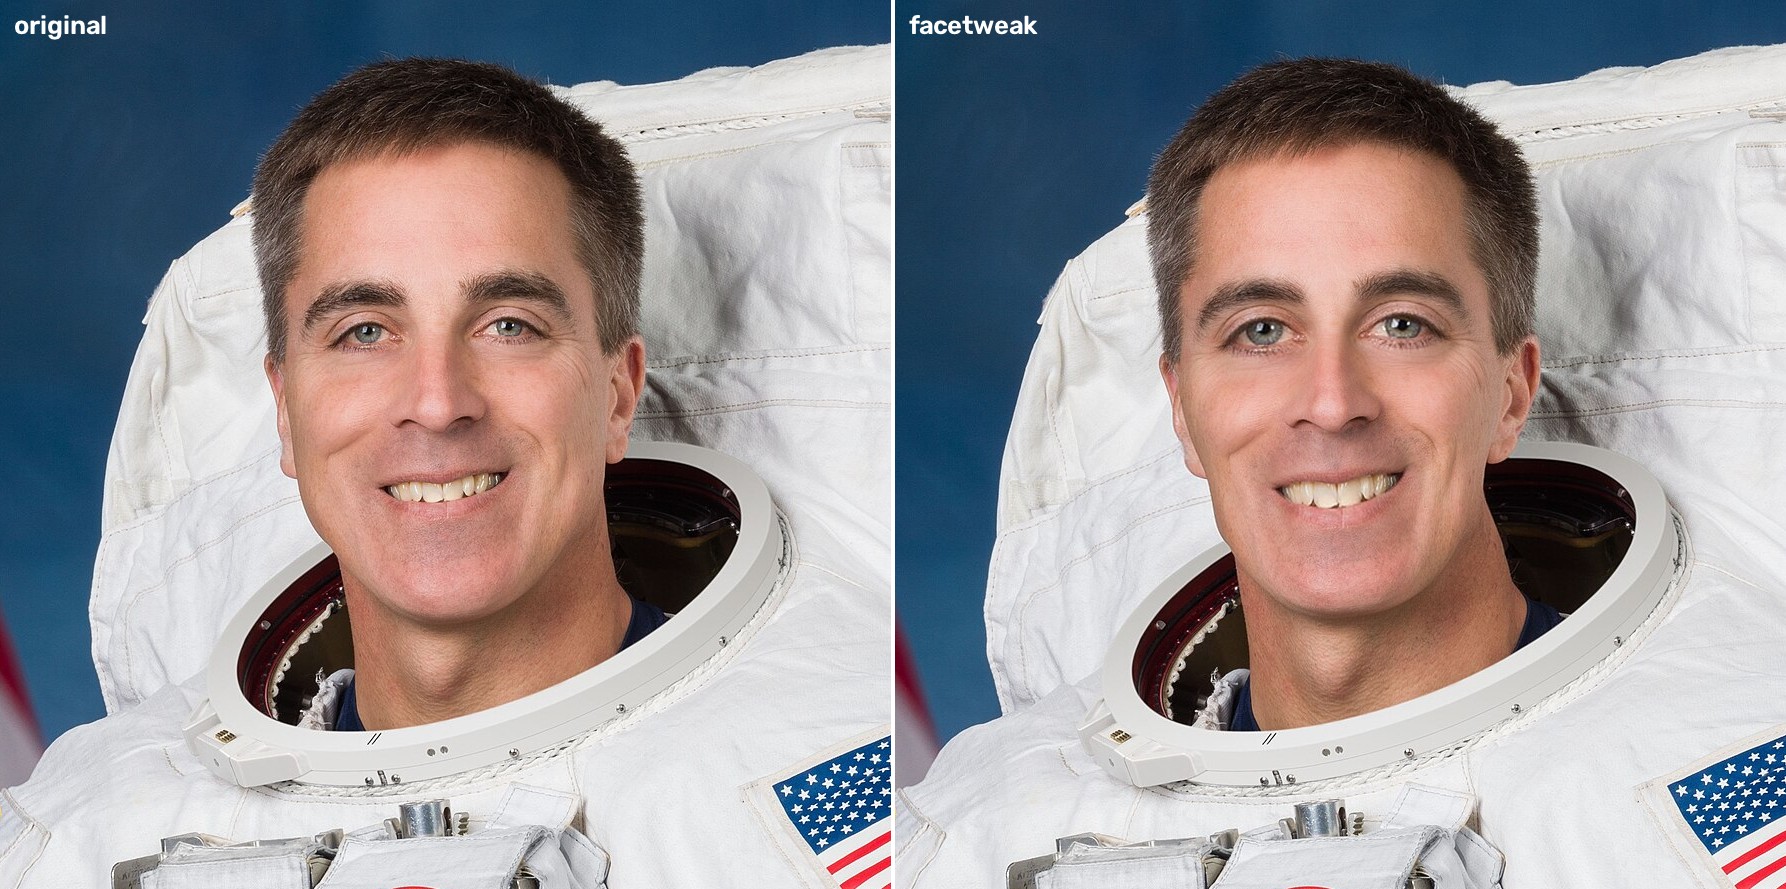
Left: original. Right: --eye-size 0.5 --face-slim 0.5 --nose-bridge -0.3 --lip-size 0.25 --chin-fullness -0.3. The photo is a public domain NASA portrait (see examples/SOURCES.txt).
Quick start
pip install facetweak
facetweak portrait.jpg --eye-size 0.5 --face-slim 0.5 -o out.jpg
The first run downloads a 4 MB landmark model into ~/.cache/facetweak. After that nothing touches the network.
Real output from one run:
$ facetweak examples/portrait.jpg -o out.jpg --preset subtle --eye-size 0.5 --json
{
  "input": "examples\\portrait.jpg",
  "backend": "mediapipe",
  "output": "out.jpg",
  "faces": 1,
  "applied": {
    "eye_size": 0.5,
    "lip_size": 0.15,
    "face_slim": 0.2,
    "chin_fullness": -0.1
  },
  "seconds": 0.088
}
Read this first
This edits how a face looks in a photo. Use it on your own pictures or pictures you have permission to edit, and don't present edited photos as unedited ones where that would mislead people. It is also a warp, not magic: push a value to 1 and you will see it. Values around 0.2 to 0.5 look natural. Look at the result before you use it.
Install
Python 3.9 or newer. The default install pulls in numpy, opencv-python and mediapipe, all of which have ordinary wheels on Windows, macOS and Linux, so no compiler is needed.
pip install facetweak
If you want the older dlib landmark detector instead, install the extra. It needs CMake and a C++ compiler on most platforms:
pip install "facetweak[dlib]"
facetweak photo.jpg --backend dlib --eye-size 0.3
The dlib model (about 100 MB) is downloaded from dlib.net on first use. It was trained on the iBUG 300-W data, which restricts commercial use, so check that before you ship anything with --backend dlib. The MediaPipe model is Apache-2.0.
Usage
Command line
facetweak photo.jpg --eye-size 0.4 --face-slim 0.3        # writes photo_tweaked.jpg
facetweak photo.jpg --preset doll --strength 0.5 -o a.jpg # preset at half strength
facetweak photo.jpg --eye-size 0.5 --compare -o cmp.jpg   # before and after side by side
facetweak photos/ -o retouched/ --preset subtle           # a whole folder
facetweak group.jpg --face largest --face-slim 0.4        # or --face 0,2 for the left and third face
facetweak photo.jpg --landmarks                           # draw the 68 points to see what was detected
facetweak params                                          # every adjustment and what its sign means
facetweak gui photo.jpg                                   # sliders in an OpenCV window
Exit code is 0 on success and 1 on an error (no face, unreadable file). In folder mode, images with no face are skipped and the exit code is 1 at the end.
facetweak params, trimmed:
[eyes]
  --eye-size       positive = bigger eyes (negative: smaller)
  --eye-distance   positive = eyes further apart (negative: closer together)
  --eye-height     positive = eyes lower on the face (negative: higher)
  ...
presets: doll, sculpted, slim, subtle
Python
from facetweak import FaceTweak, write_image

tool = FaceTweak()                      # loads the model once
out = tool.retouch("photo.jpg", eye_size=0.4, face_slim=0.3)
write_image("out.jpg", out)
retouch takes a path or a BGR numpy array and returns a new array. It never changes the input. You can pass an Adjustments object or a dict instead of keyword arguments, and faces="largest" or a list of indexes to pick faces. With no face it raises NoFaceFound. A misspelled adjustment name raises KeyError rather than being ignored.
If you already have landmarks (from your own detector, in the 68-point layout), facetweak.effects.apply(image, points, adjustments) skips detection.
How it works
- MediaPipe's face landmarker finds 478 points. I map 68 of them onto the classic dlib layout (jaw, brows, nose, eyes, mouth), because that is what the original tool used and it is easy to reason about. The mapping is in
landmarks.py. - Each adjustment is a small warp from
warp.py: a bulge, a shift, a stretch or a twist, with a Gaussian falloff so there is no visible edge. Sizes come from the face width, so a value of 0.4 does about the same thing on a phone selfie and on a 4000 px portrait. - Only a window around the feature is remapped, not the whole frame.
This started as a single 1600-line script (legacy/face.py) that used dlib and OpenCV windows. I rewrote it as a package and fixed things I found on the way. The old code had several effects whose slider direction was the opposite of what its own label said (eyes moved together instead of apart, "thinner" eyebrows got thicker), a chin effect that nudged only one side of the jaw, and a bunch of dead code. The tests now check the direction of every adjustment.
Speed
Measured on an AMD laptop CPU (Windows 11, Python 3.10, CPU only) with benchmarks/latency.py, median of 20 runs on examples/portrait.jpg resized to each width, applying the doll preset (five groups of adjustments):
| width | detect (ms) | apply (ms) | total (ms) |
|---|---|---|---|
| 480 | 13.8 | 11.0 | 24.8 |
| 960 | 15.9 | 54.8 | 70.7 |
| 1920 | 16.3 | 191.0 | 207.2 |
| 3840 | 29.9 | 777.3 | 807.2 |
The first call in a process takes about 1.2 s because it loads the model. benchmarks/compare_legacy.py times the old script on a similar five-effect stack at 960x1158: 533 ms for the old code against 41 ms for facetweak. The two stacks aren't identical, so treat that as roughly 10x, not an exact ratio.
Accuracy of the landmarks
I compared the 68 mapped MediaPipe points to dlib's own 68 points on the example portrait, as a fraction of the distance between the eye centres. Eyes differ by about 2%, mouth about 5%, brows about 6%, nose about 13% and jaw about 17%. The jaw gap is systematic: MediaPipe's contour sits on the outer edge of the face and dlib's a bit inside it. This is one image, so it's a sanity check and not a benchmark. The adjustment strengths were tuned by eye, on a handful of photos.
Limitations
- Warps move pixels. Big values on busy backgrounds (a patterned wall right next to the cheek) can bend the background too.
- Faces turned far to the side, with a hand over them, or very small in the frame may not be detected, or may get a poor fit. Use
--landmarksto check. - Glasses are fine for mild values. Strong eye adjustments will bend the frame.
- I have only run the tests on Python 3.10 on Windows locally. CI covers Linux, macOS and Windows on more versions, see the badge.
- Detection is per image. There is no video mode and no temporal smoothing.
Development
git clone https://github.com/Ekaghni/facetweak
cd facetweak
pip install -e ".[dev]"
pytest -m "not slow"   # fast, no model needed
pytest                 # also downloads the 4 MB model and runs real detection
License
MIT, see LICENSE. Credits: the landmark model is Google's MediaPipe Face Landmarker (Apache-2.0). The example photo is a NASA portrait in the public domain.
1 maintainer

Metadata
1 maintainer
Release files for facetweak 0.1.0
For a detailed explanation of source distributions (sdists) and built distributions (wheels), please see the package formats documentation.
Source distribution (sdist)
| File | Size | Uploaded | |
|---|---|---|---|
| facetweak-0.1.0.tar.gz | 25.6 kB | Details |
Built distribution (wheel)
| File | Interpreter | ABI | Platform | Reset |
|---|---|---|---|---|
| facetweak-0.1.0-py3-none-any.whl | Python 3 | none | any | Details |
Total release size: 45.7 kB
Release files / facetweak-0.1.0.tar.gz
| Download URL | facetweak-0.1.0.tar.gz |
|---|---|
| Size | 25.6 kB |
| Tags | Source |
|
SHA-256 checksum How to use checksums |
6714130390a30e55faaa7f29825484f0c563188a8b87f60c321cc7e9154511f4
|
|
BLAKE2b-256 checksum How to use checksums |
e0f5c852bb641040c4ce815013010cbc4a793e3afb6a71fd93a3885d5754644e
|
| Upload date | |
|
Uploaded using Trusted Publishing? What is trusted publishing? |
No |
| Uploaded via |
twine/7.0.0 CPython/3.10.6
|
Release files / facetweak-0.1.0-py3-none-any.whl
| Download URL | facetweak-0.1.0-py3-none-any.whl |
|---|---|
| Size | 20.1 kB |
| Tags | Python 3 |
|
SHA-256 checksum How to use checksums |
d0cdadde9d4df5035246eab2e066d164332d788c5d6c431bb22af7796aebb250
|
|
BLAKE2b-256 checksum How to use checksums |
57c7058dd7b3bde097b6a36a52a56e18a5a2f58f18283304007ac54b0d1055dc
|
| Upload date | |
|
Uploaded using Trusted Publishing? What is trusted publishing? |
No |
| Uploaded via |
twine/7.0.0 CPython/3.10.6
|














