Most effective and easiest to install python library for recognising faces in images or videos

Project description
facial_recognition
facial_recognition aims to be the most effective face recognition library for python that you can easily install with a single command. Has an accuracy of 99.59% on the Labelled Faces in the Wild (LFW Dataset) as well as the maximum possible accuracy on the very popular CelebA dataset(scroll down for details of the tests)
Demo -Below you can see facial_recognition correctly recognizing actors Tom Cruise and Leonardo DiCaprio amongst a group of other people from just a single photo of them


Images stored as known faces
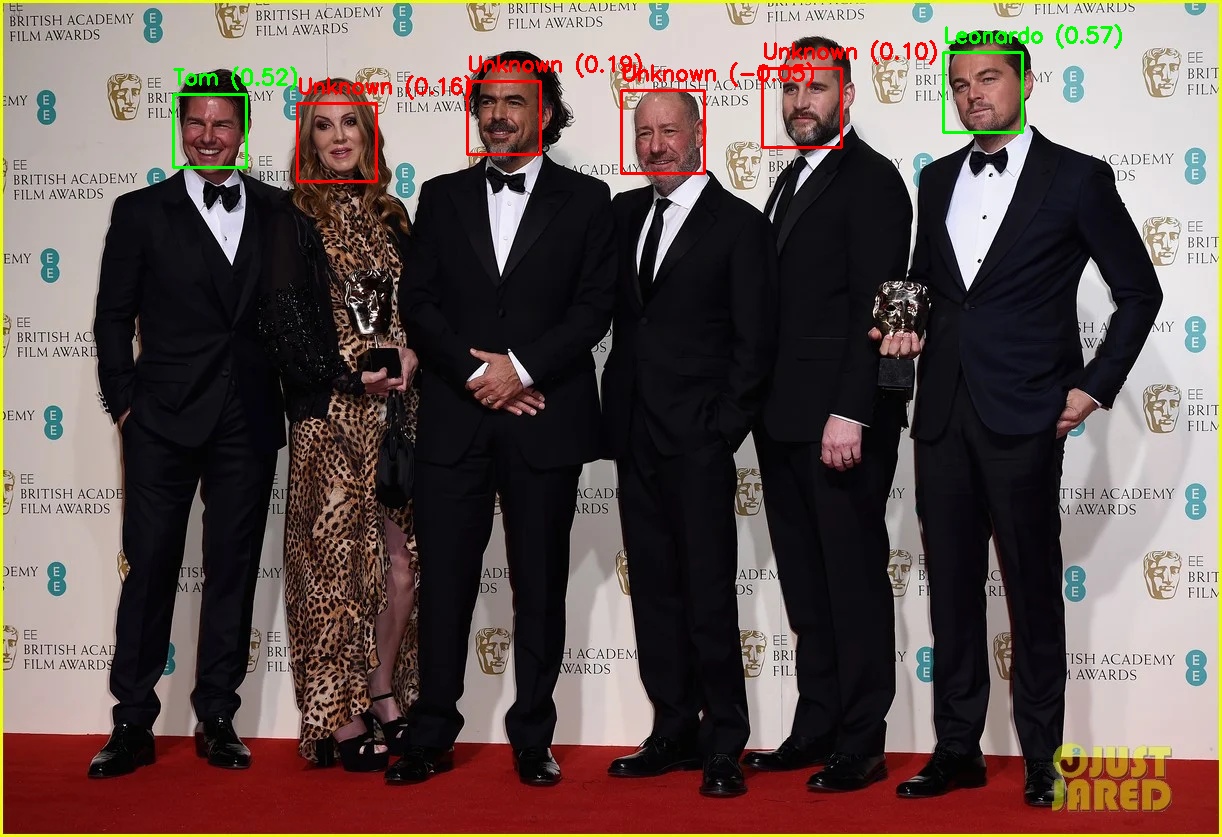
Output image with all the faces identified and labelled correctly
🚀 Unique Features
- ✅ Works the same on all Operating systems be it Windows,Linux or Mac and also installs the same on all
- ✅ Has the highest possible accuracy of 99.59% on the labelled faces in the wild dataset
- ✅ Has the max possible accuracy of 86.17% on the massive CelebA dataset
- ✅ Works the same on CPUs and GPUs. Instantaneous face recognition on simple CPUs
- ✅ Works on its own and doesn't require the installation of any other libraries like dlib
- ✅ Images can be passed as either files or as arrays and therefore very easy to use on existing large databases of images of people
Installation
pip install facial_recognition
After that, you need to download and setup the model file used for recognition by running the following command (Even if you don't do this now, the model file will be downloaded the first time you run this library)
facial_recognition setup
In case this results in an error, you need to manually download the model file to the path where facial_recognition is installed( Usually on Windows its in C:\Users\user\AppData\Local\Programs\Python\Python312\Lib\site-packages\facial_recognition) using wget on Linux and Invoke-WebRequest on Windows
Invoke-WebRequest https://huggingface.co/Rubarion/facial_recognition_model/resolve/main/arcface.onnx -OutFile arcface.onnx
(The model file is a single file of around 130Mb in size. Currently this has to be downloaded serparately as pypi has a limit of 100Mb for the total pacakage size. If and when pypi allows me to bundle the model file along with the code, you will only need to run pip install facial_recognition)
Usage as a command line tool (scroll down for how to use in programs)
Adding Known faces to the database
Just copy a preferably high definition camera facing and face clearly visible single photo of each person you want recognized to a folder and rename it with the name of that person. After you have copied and renamed all known faces in this manner, Run the following command from inside the folder (open the folder and then right click shell/terminal)
facial_recognition add_faces
This creates a database of known faces to which the faces in the new image that you give will be compared for matching. As the accuracy of this library is solely dependednt on the quality of the single photo of each person that you store in databse, please make sure that you use a very clear photo where the face is looking straight at the camera and slightly zoomed in so that the entire face region is clearly visible.
Recognizing Images
Then inorder to recognise the faces in a image, lets say sample.jpg, Open terminal in the folder where this image is stored and simply run
facial_recognition recognize sample.jpg
This will create an output folder in that same folder and the corresponding output image with boxes drawn around faces and labels will be saved in that folder.
To remove all stored known faces and start again
facial_recognition remove_faces
How to Use in Programs
To prepare the database of known faces to which the detected faces in the input image will be compared, so as to get a match, there are two methods, the second of which is the most easiest of any face recognition package. You can either add faces manually as in the code below.
from facial_recognition import add_person

#Adding images of Tom Crusie and Leonardo Dicaprio using add_person function
add_person("Tom","tom.jpg")
add_person("Leonardo","leonardo.png")
Accepts both jpg as well as png images
Or in the most easiest way, you can use the add_faces_from_folder function to add all faces in a folder with the names of image files being the names of the people you want recognised. For eg if image file name is leonardo1.png, then the person's name will be taken as leonardo1 and that itself will be marked in the output image. If you are running the script from the same folder as the images, then there is no need to give any arguments to the function.
from facial_recognition import add_faces_from_folder
add_faces_from_folder()
Or if your script/program is in any other folder, then just give the path to the folder containing your known persons images as the argument to the function, but make sure to add r before the quoatation mark to avoid a common python path error
from facial_recognition import add_faces_from_folder
add_faces_from_folder(r"Your path to image folder")
After that, again it is insanely easy to recognize the faces in any image (both jpg and png) and generate the output image with all the known and unknown faces labelled.
from facial_recognition import recognize_image

recognize_image("test.png")
This recognize_image function also returns a results python dictionary as defined below that has the keys name,score, confidence, box and optionally embedding. You can use these to do further processing of your recognised image. Please note that inorder to get embeddings, you need to set the argument as return_embeddings=True while calling the function as in recognize_image("test.png",return_embeddings=True)
results = {
                "name": recognized_name,
                "score": best_score,
                "confidence": f["confidence"],
                "box": f["box"]
                "embedding":emb
            }
Finally to remove all known faces stored in the database and start fresh
from facial_recognition import remove_face_database
remove_face_database()
Recognizing faces in Videos
Also very easy to do by taking each frame from any video file or video feed and passing it to the recognize_image function
from facial_recognition import recognize_image

for frame in video_feed:
    recognize_image(frame)
As an example, if you wish to get your own face recognised from your webcam, you can use the following code after first adding your face to the database as explained above
import cv2
from facial_recognition import recognize_image


# Start webcam
cap = cv2.VideoCapture(0)

if not cap.isOpened():
    print("[ERROR] Could not open webcam.")
    exit()

print("[INFO] Starting webcam face recognition... Press 'q' to quit.")

while True:
    ret, frame = cap.read()
    if not ret:
        print("[ERROR] Failed to grab frame.")
        break

    # Run face recognition (don't save output each frame)
    results = recognize_image(frame, save_output=False)

    # Draw results on frame
    for r in results:
        x, y, w, h = r["box"]
        H, W = frame.shape[:2]
        x1, y1 = int(x * W), int(y * H)
        x2, y2 = int((x + w) * W), int((y + h) * H)

        color = (0, 255, 0) if r["name"] != "Unknown" else (0, 0, 255)
        cv2.rectangle(frame, (x1, y1), (x2, y2), color, 2)
        label = f"{r['name']} ({r['score']:.2f})"
        cv2.putText(frame, label, (x1, max(20, y1 - 10)),
                    cv2.FONT_HERSHEY_SIMPLEX, 0.7, color, 2)

    # Show the frame
    cv2.imshow("Webcam Face Recognition", frame)

    # Press 'q' to quit
    if cv2.waitKey(1) & 0xFF == ord('q'):
        break

cap.release()
cv2.destroyAllWindows()
print("[INFO] Webcam recognition stopped.")
Testing my webcam feed using this photo of mine given below as known face input

Input
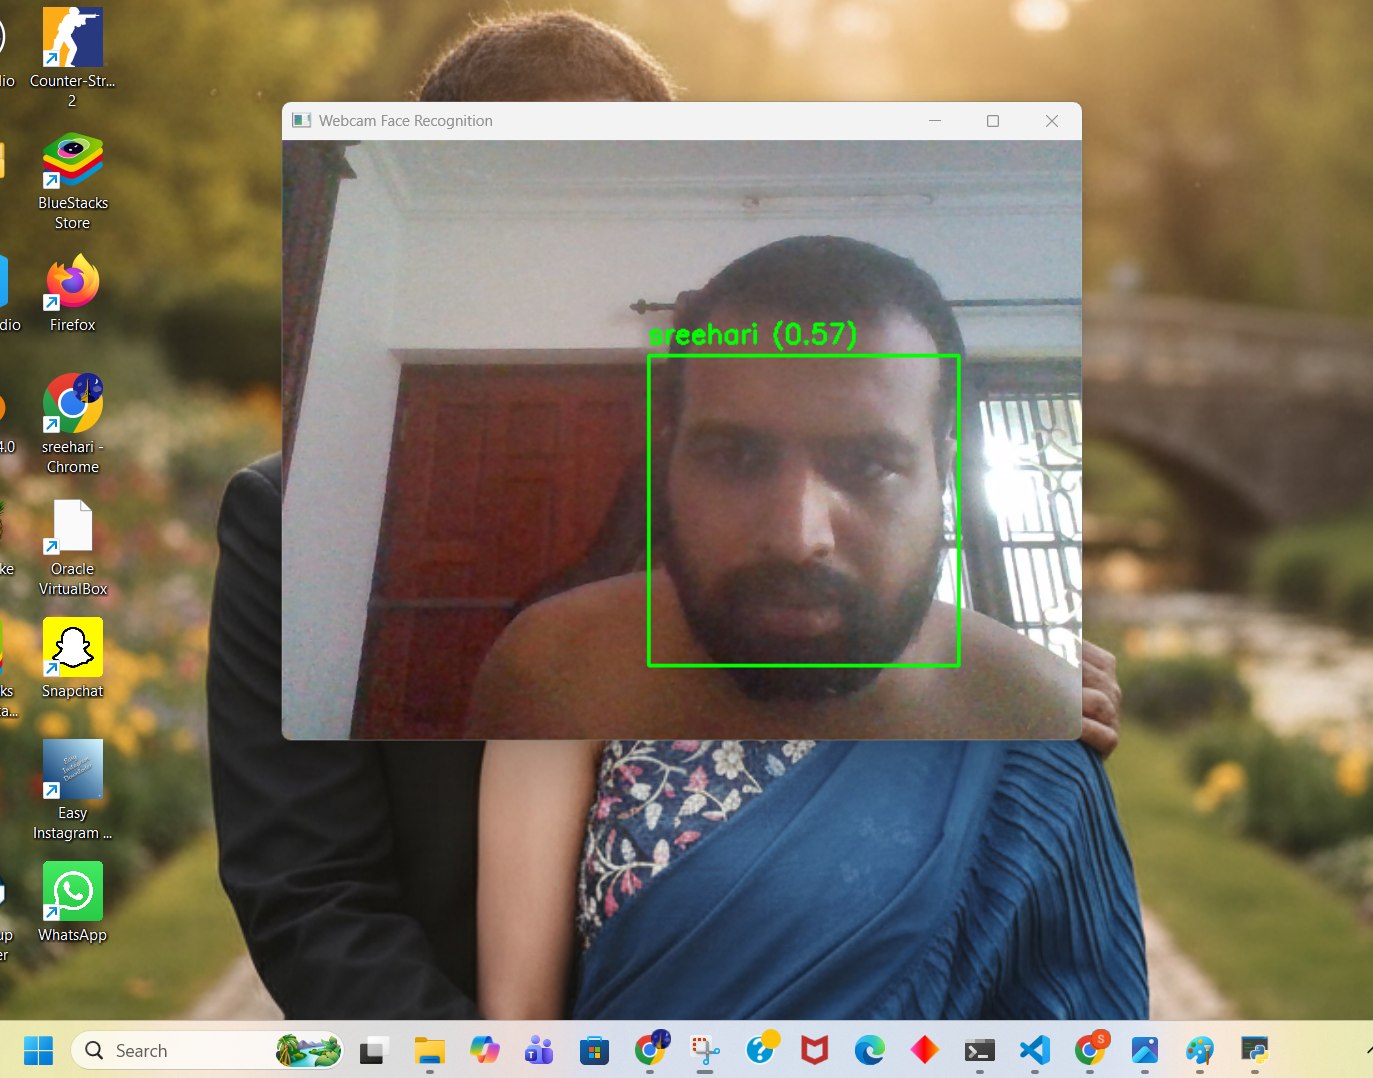
Output Video Feed
As you can see, even though my input photo was taken two years back and even though currently my hairstyle(short hair) is drastically different from the input photo and also despite the very low clarity of my web cam feed, this python package correctly recognised me.
You can also optionally pass the threshold argument while calling recognize_image function and try tweaking its value between 0(very lenient face identification/more false positives) to 1 (very strict) to try to improve accuarcy for your use case as in recognize_image("test.png",threshold=0.4).When you run without the argument, the default fixed as 0.3 will be used. The other argument to this recognize_image fucntion is
save_output and so you can set recognize_image("test1.jpg",save_output=False) to avoid generating an output image and saving it in the output folder.
Testing and Accuracy
This package was tested on the Labelled Faces in the Wild (LFW Dataset) and a very impressive 99.59% accuracy was obtained or 969 faces recognised correctly out of 973 . Firstly the libaray was tested on the entire LFW dataset without providing any tolerance value and therefore using the default tolerance of 0.3 and it was observed that of the total 1298 faces reported to be in the databse, 969 was correctly recognized (Screenshots of test running in terminal attached below)
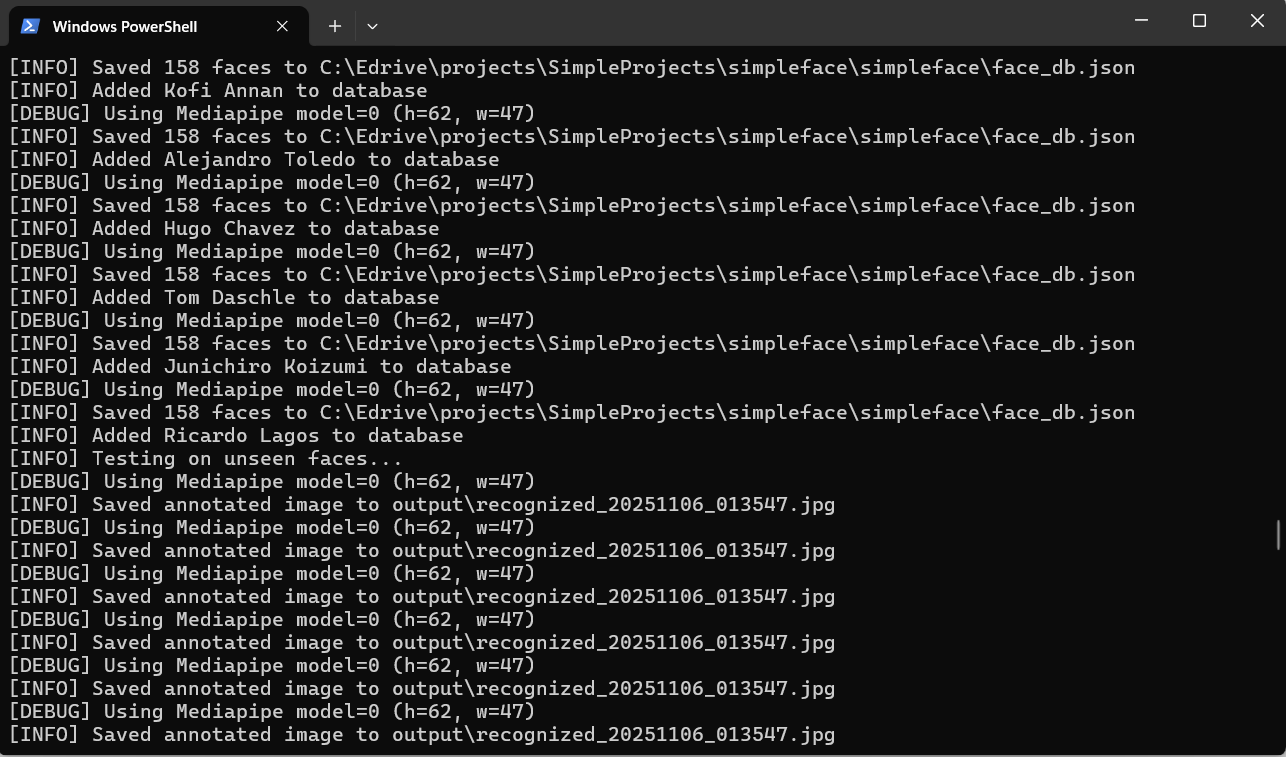
However when I tried to increase the accuracy by adjusting the threshold value, it became clear that accuracy drops to 46% with a high threshold value 0.8 or therefore it made sense to only decrease the threshold to 0.2 and beyond from 0.3 Decreasing to 0.2 identified 973 faces but after that for values less than 0.2, number of recognised faces was remaining the same at 973. Even for 0.001 or 0.00 threshold, only 973 faces were identified. Check the thresholdAdjust folder.This allowed me to conclude that of the total 1298 faces said to be in LFW, only 973 had actual faces and rest were all noise or very low res images where it is impossible to identify faces even for humans.So concluding,
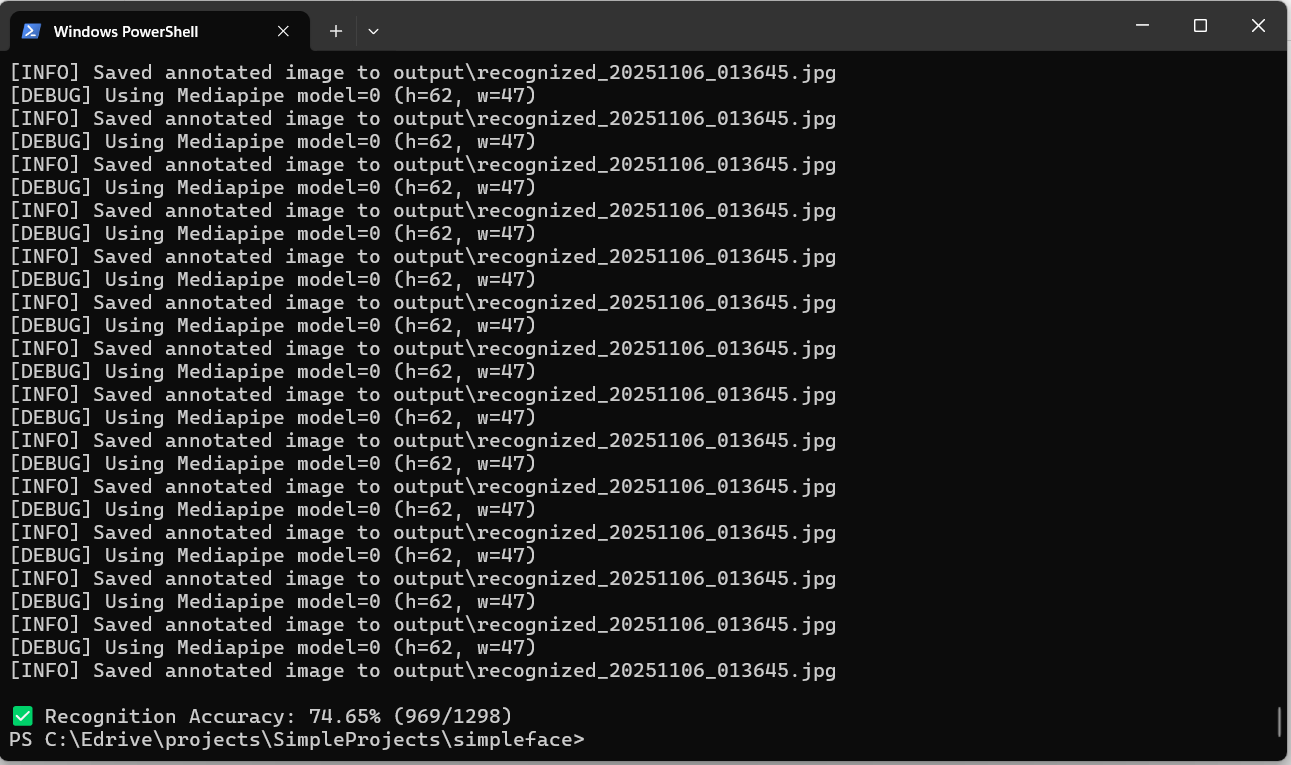
On the full LFW test set (1298 images), this library achieved 74.65% accuracy
(969 faces correctly recognized out of 1298).
However, the LFW dataset is known to contain many extremely low-resolution or heavily compressed face crops (some as small as ~40×40 pixels). These images do not contain enough identity information for any ArcFace-style embedding model to produce a reliable match.
To analyze this, the distance threshold was gradually reduced down to 0.0.
Below a threshold of 0.2, the accuracy stopped improving, indicating that only
973 LFW images contain usable identity information.
On these 973 usable images, the recognition accuracy is 969 / 973 = 99.59%.
YOu can see from the images given below that the facial_recognition package correctly recognised Angelina Jolie and Catherine Zeta Jones.


CelebA Dataset
This package was tested on the very popular CelebA dataset and the highest possible accuracy of 86.17% or 165807 faces correctly recognized out of total 192422 was obtained.(Screenshot of test running in terminal attached below). Code used for testing is given here

Testing done On Visual Studio Code Using just CPU
This is the maximum possible accuarcy for this dataset In case you are wondering why the accuracy is not close to 100% or even above 90%, an explanation of the same is given here as answered by ChatGPT.
GPU Acceleration
Running facial_recognition on billions of images/frames
Firstly you need to install onnxruntime-gpu by running pip command
pip install onnxruntime-gpu
✅ Step 1 — Install CUDA 12.2 (Required by ONNXRuntime 1.18+)
Download from NVIDIA:
Choose:
Operating System: Windows
Architecture: x86_64
Version: Windows 10/11
Installer Type: exe (local)
Install with all default options.
This will add:
cublasLt64_12.dll
nvcuda.dll
cusolver64_12.dll
cudart64_12.dll
✅ Step 2 — Install cuDNN 9 (Required by ONNXRuntime GPU)
ONNXRuntime CUDAExecutionProvider requires cuDNN 9.
Download here:
cuDNN 9 for Windows (CUDA 12.x) 👉
You must log in with an Nvidia Developer account (free).
Download:
✅ Step 3 — Add CUDA to PATH
In Windows PowerShell (as admin):
setx PATH "$env:PATH;C:\Program Files\NVIDIA GPU Computing Toolkit\CUDA\v12.2\bin;C:\Program Files\NVIDIA GPU Computing Toolkit\CUDA\v12.2\lib\x64"
(Will be updated soon)
In the meantime you can check out the testing script used for tesing on celebA dataset to impement fast recognition on GPUs (Firstly you need to )
Please note in case of any bugs that this library will be updated frequently
Release history Release notifications | RSS feed


Download files
Download the file for your platform. If you're not sure which to choose, learn more about installing packages.
Source Distribution
Built Distribution
Filter files by name, interpreter, ABI, and platform.
If you're not sure about the file name format, learn more about wheel file names.
Copy a direct link to the current filters
File details
Details for the file facial_recognition-0.3.0.tar.gz.
File metadata
- Download URL: facial_recognition-0.3.0.tar.gz
- Upload date:
- Size: 264.1 kB
- Tags: Source
- Uploaded using Trusted Publishing? No
- Uploaded via: twine/6.2.0 CPython/3.12.0
File hashes
| Algorithm | Hash digest | |
|---|---|---|
| SHA256 |
a7550a834863653faa9fd1247dc95eb0014bf4023dcfb973a2bf79c14204cb8a
|
|
| MD5 |
8ab8a36533c6942990c69076bea2122f
|
|
| BLAKE2b-256 |
476f7e4efccbca1bee9ddb8bd36c1df902b3f4fb0b116fb352782fc417b28cef
|
File details
Details for the file facial_recognition-0.3.0-py3-none-any.whl.
File metadata
- Download URL: facial_recognition-0.3.0-py3-none-any.whl
- Upload date:
- Size: 15.6 kB
- Tags: Python 3
- Uploaded using Trusted Publishing? No
- Uploaded via: twine/6.2.0 CPython/3.12.0
File hashes
| Algorithm | Hash digest | |
|---|---|---|
| SHA256 |
26e3853ba1eec384117eccda672f39201798a709330511f7e4ce53cfc3be2751
|
|
| MD5 |
d08a1de9dd20e5f47ef3c3427ff9acba
|
|
| BLAKE2b-256 |
a19727de1005f131a159b7bcca61ccd20e5ed0b64d6b437a8363c257ba656e51
|


