Model-agnostic feature-map visualization: PCA, cosine-similarity, k-means and foreground maps from any vision model and any layer.
Verified details
These details have been verified by PyPIProject links
GitHub Statistics
Maintainers

Project description


📖 Documentation: https://turhancan97.github.io/FeatLens/
See what any vision model encodes. FeatLens renders feature maps for
any vision model — DINO, DINOv2/v3, CLIP, SigLIP, MAE, DeiT, V-JEPA, CNNs, … — loaded from
any source (timm, HuggingFace transformers, torch.hub, an external repo, or a model you
built yourself), and from any layer, as a clean model × layer grid. Color the features by
robust PCA, cosine-similarity to a seed patch, k-means segmentation, or a foreground
mask — and match patches across two images.

Most "DINO PCA" scripts are welded to one model. FeatLens separates representation access (a small adapter layer over the model zoo) from visualization (PCA / cosine / k-means / foreground), so you can point it at a new model in seconds and compare models/layers side by side.
 Gallery
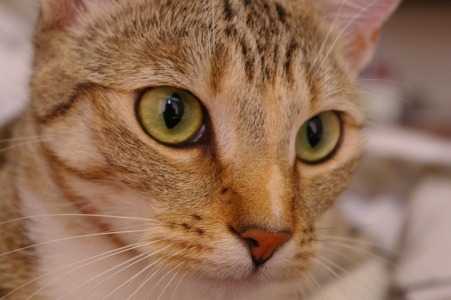
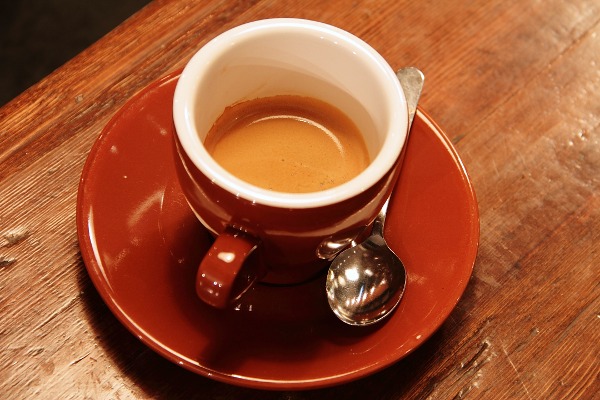
All produced by examples/quickstart.py on the three bundled images. Sizes below are the
originals; each image is resized to img_size (default 224) before the model.
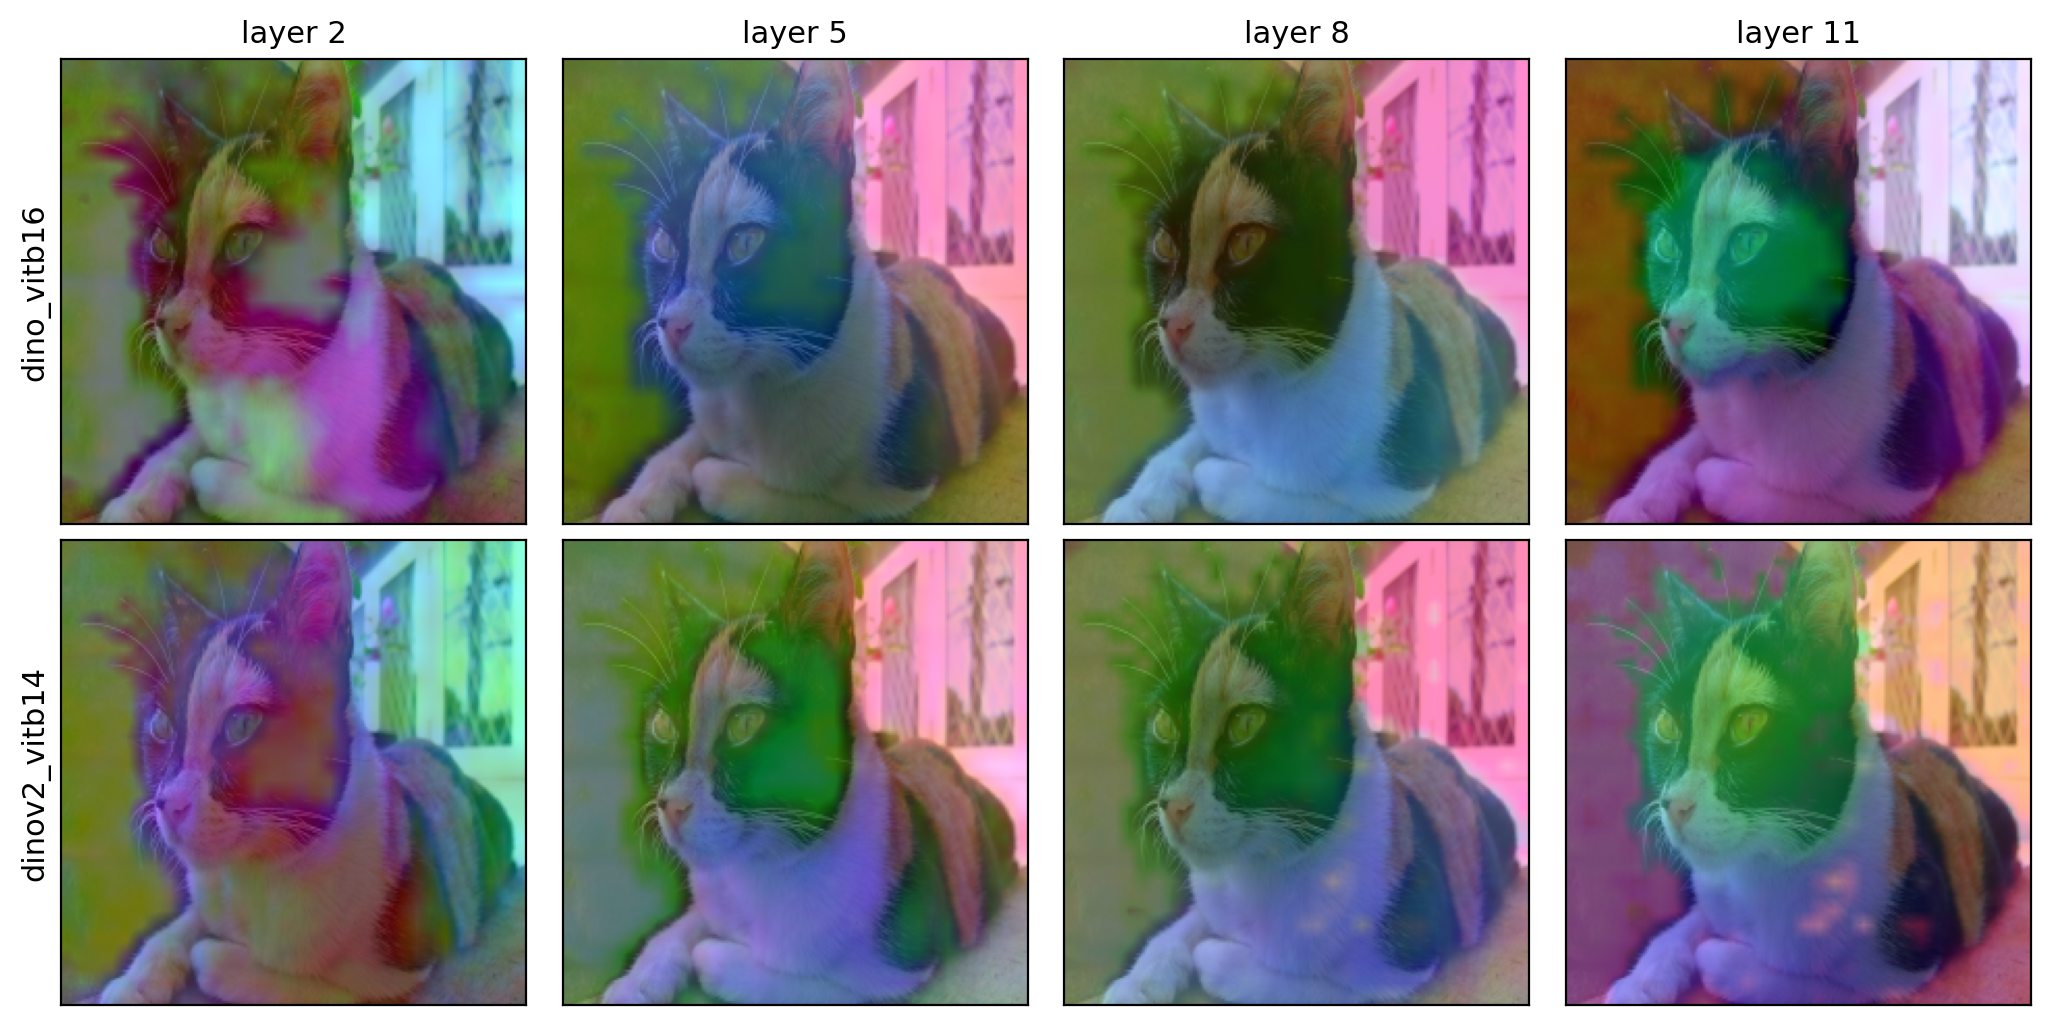
visualize(...) — DINO ViT-B/16 feature maps across layers 2 / 5 / 8 / 11:
| Image (original size) | Source | Feature maps |
|---|---|---|
astronaut.jpg · 512×512 |
 |
 |
cat.jpg · 451×300 |
 |
|
coffee.jpg · 600×400 |
 |
 |
grid(...) — model × layer, overlaid on the image (DINO vs DINOv2 across layers 2/5/8/11):
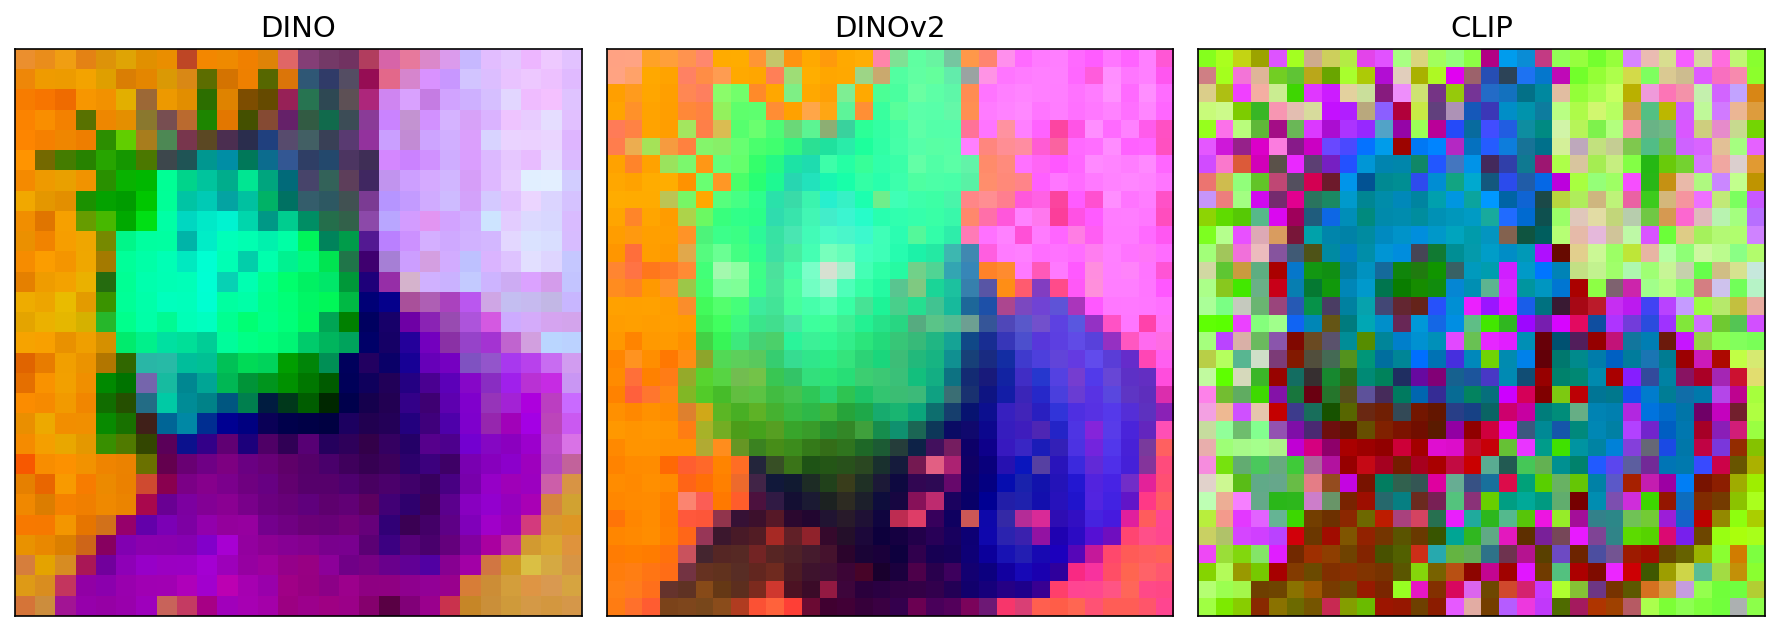
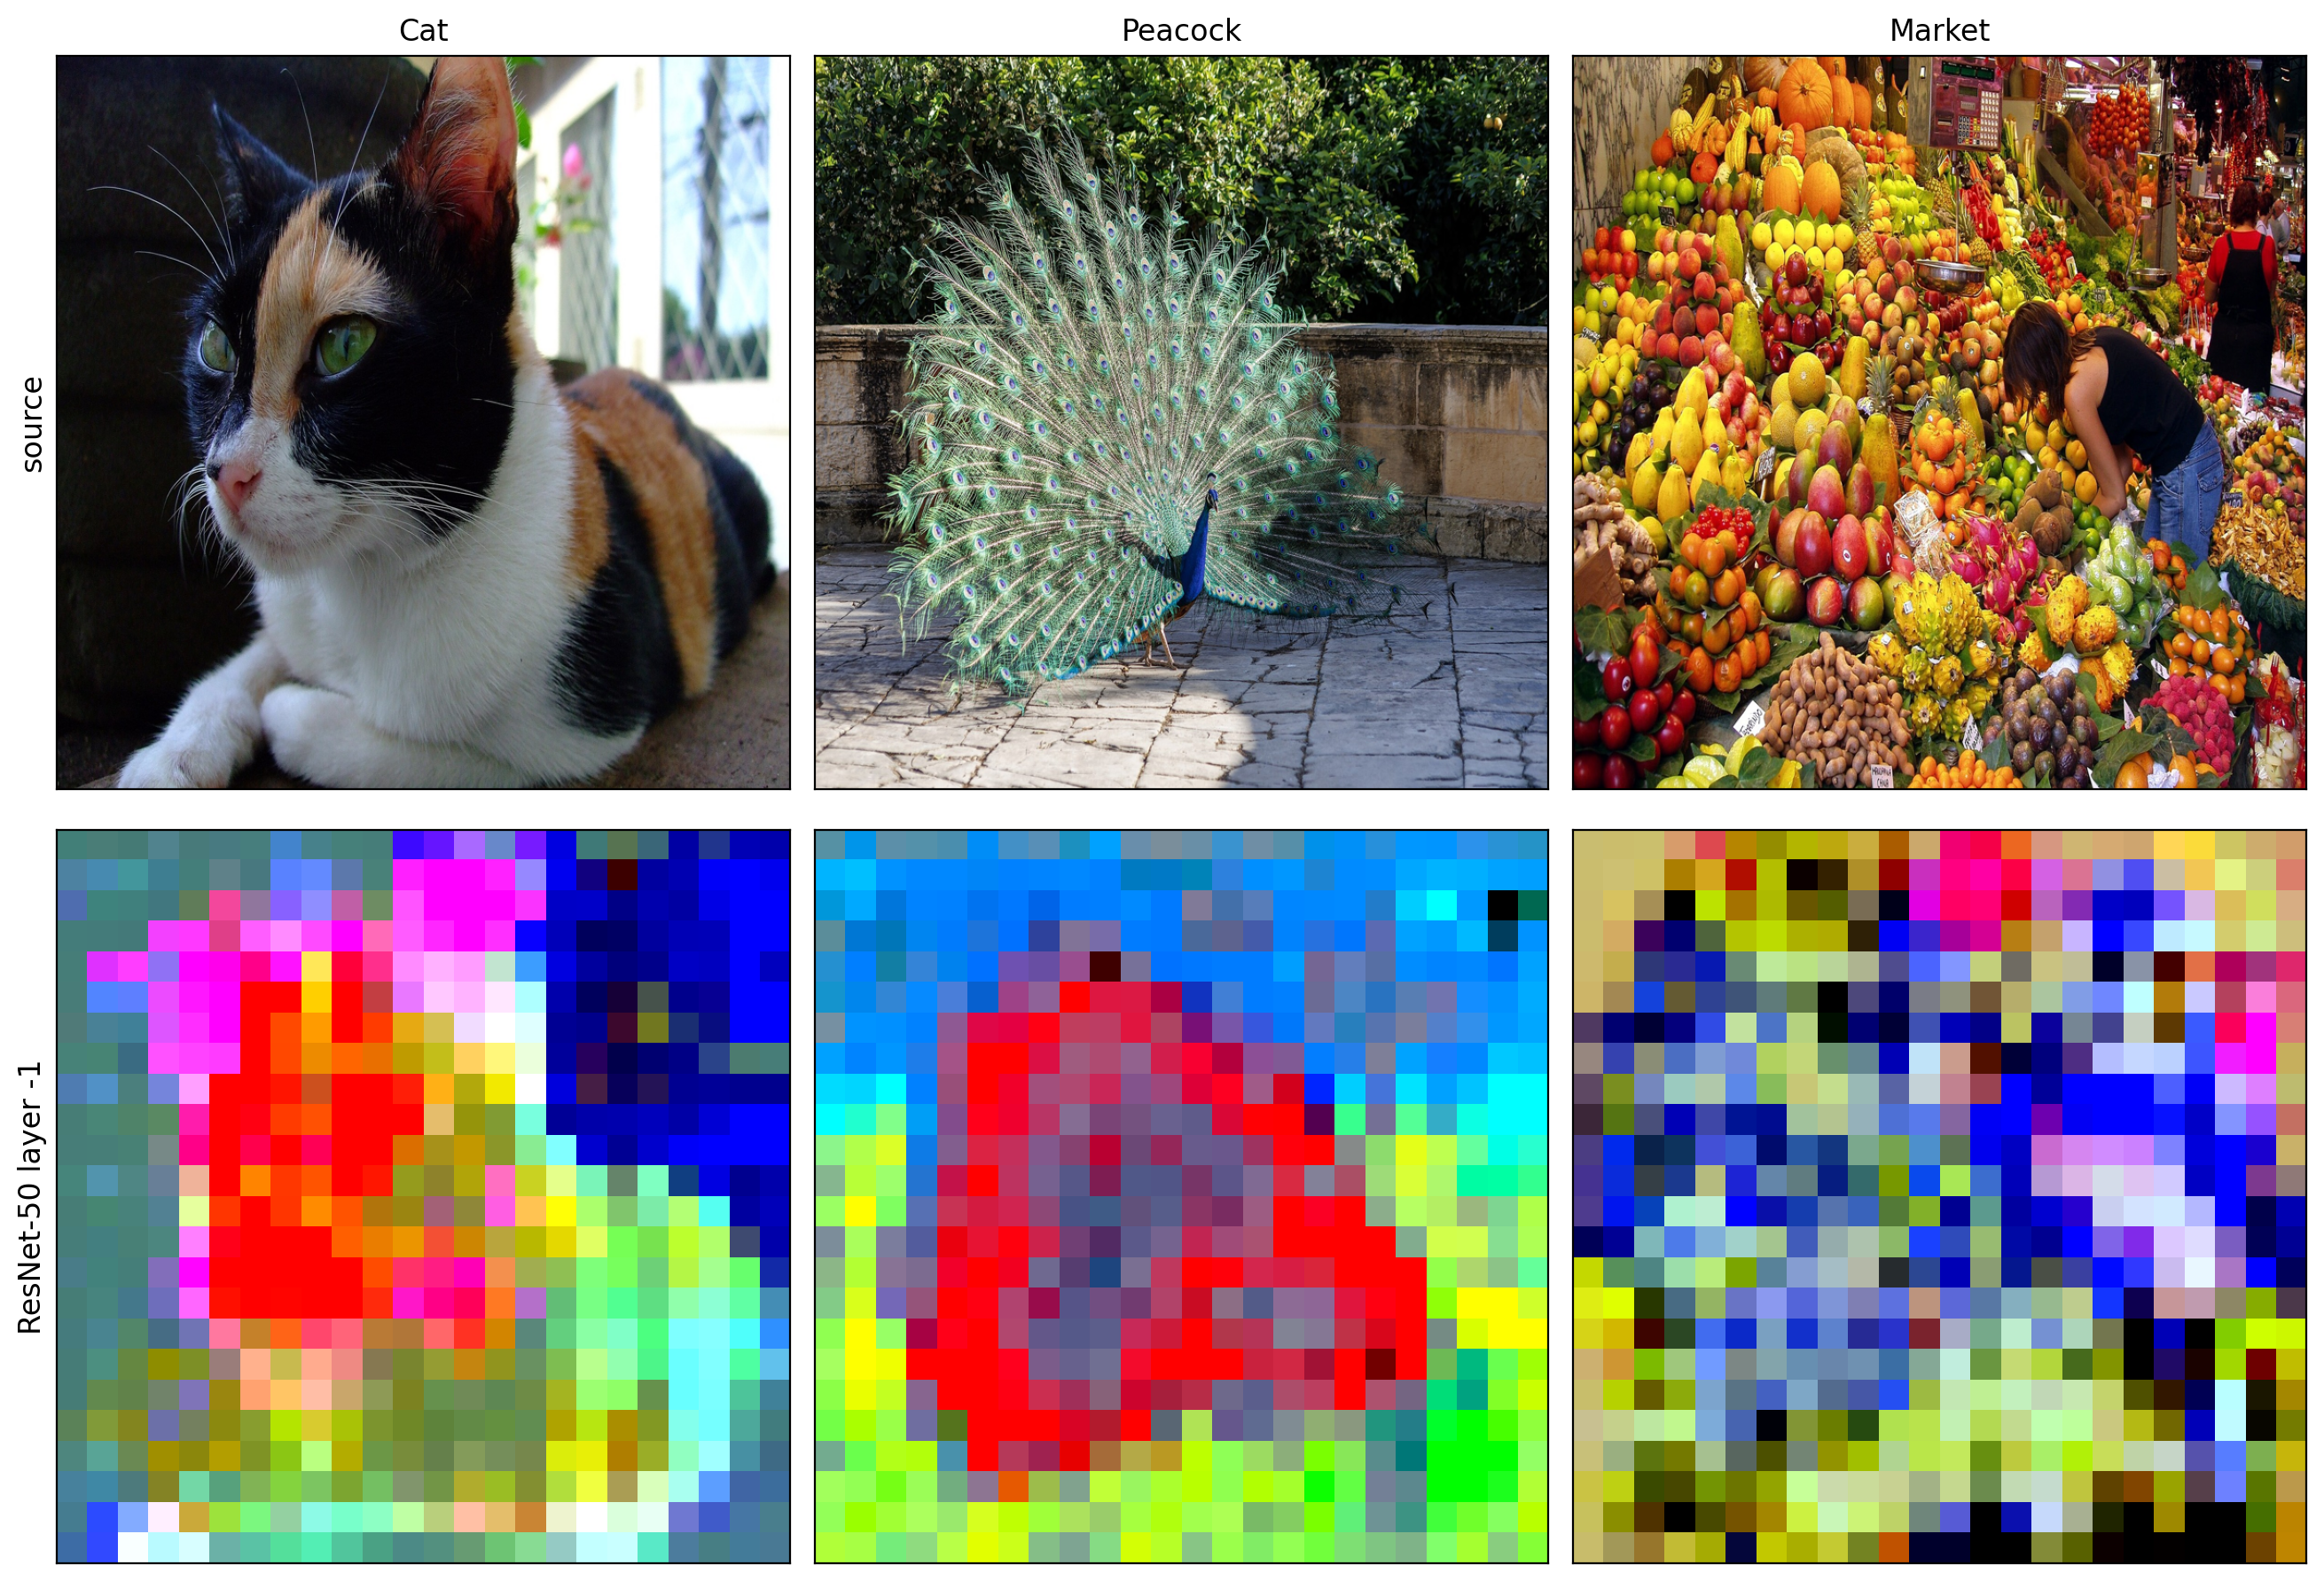
compare(...) — models at the final layer | custom_adapter — a ResNet-50 (CNN escape hatch)
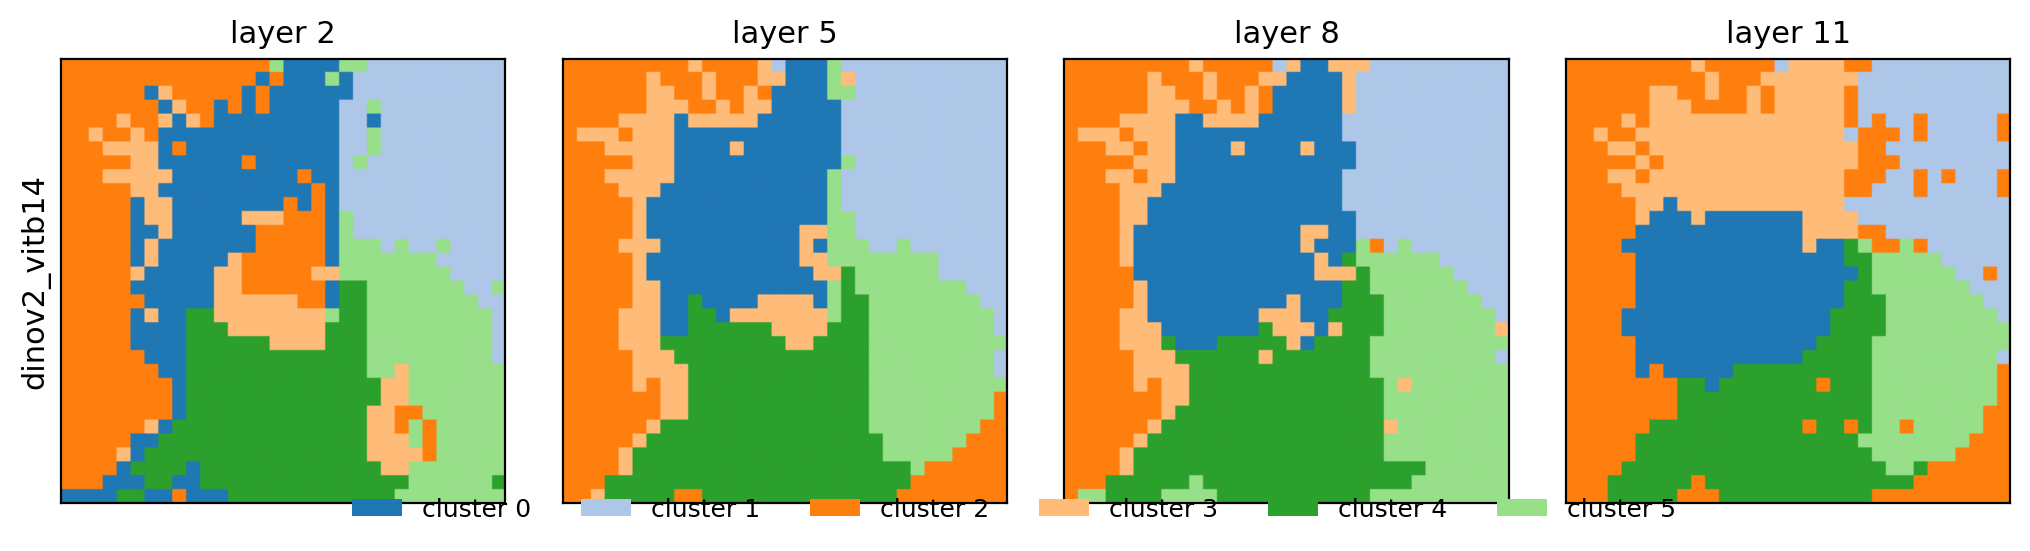
Beyond PCA — the same DINOv2 row, recolored by cosine-similarity to a seed patch, k-means segmentation, and a foreground mask (across layers 2 / 5 / 8 / 11):
| Method | Across layers |
|---|---|
cosine (seed on the cat) |
 |
kmeans (k=6) |
 |
foreground |
 |
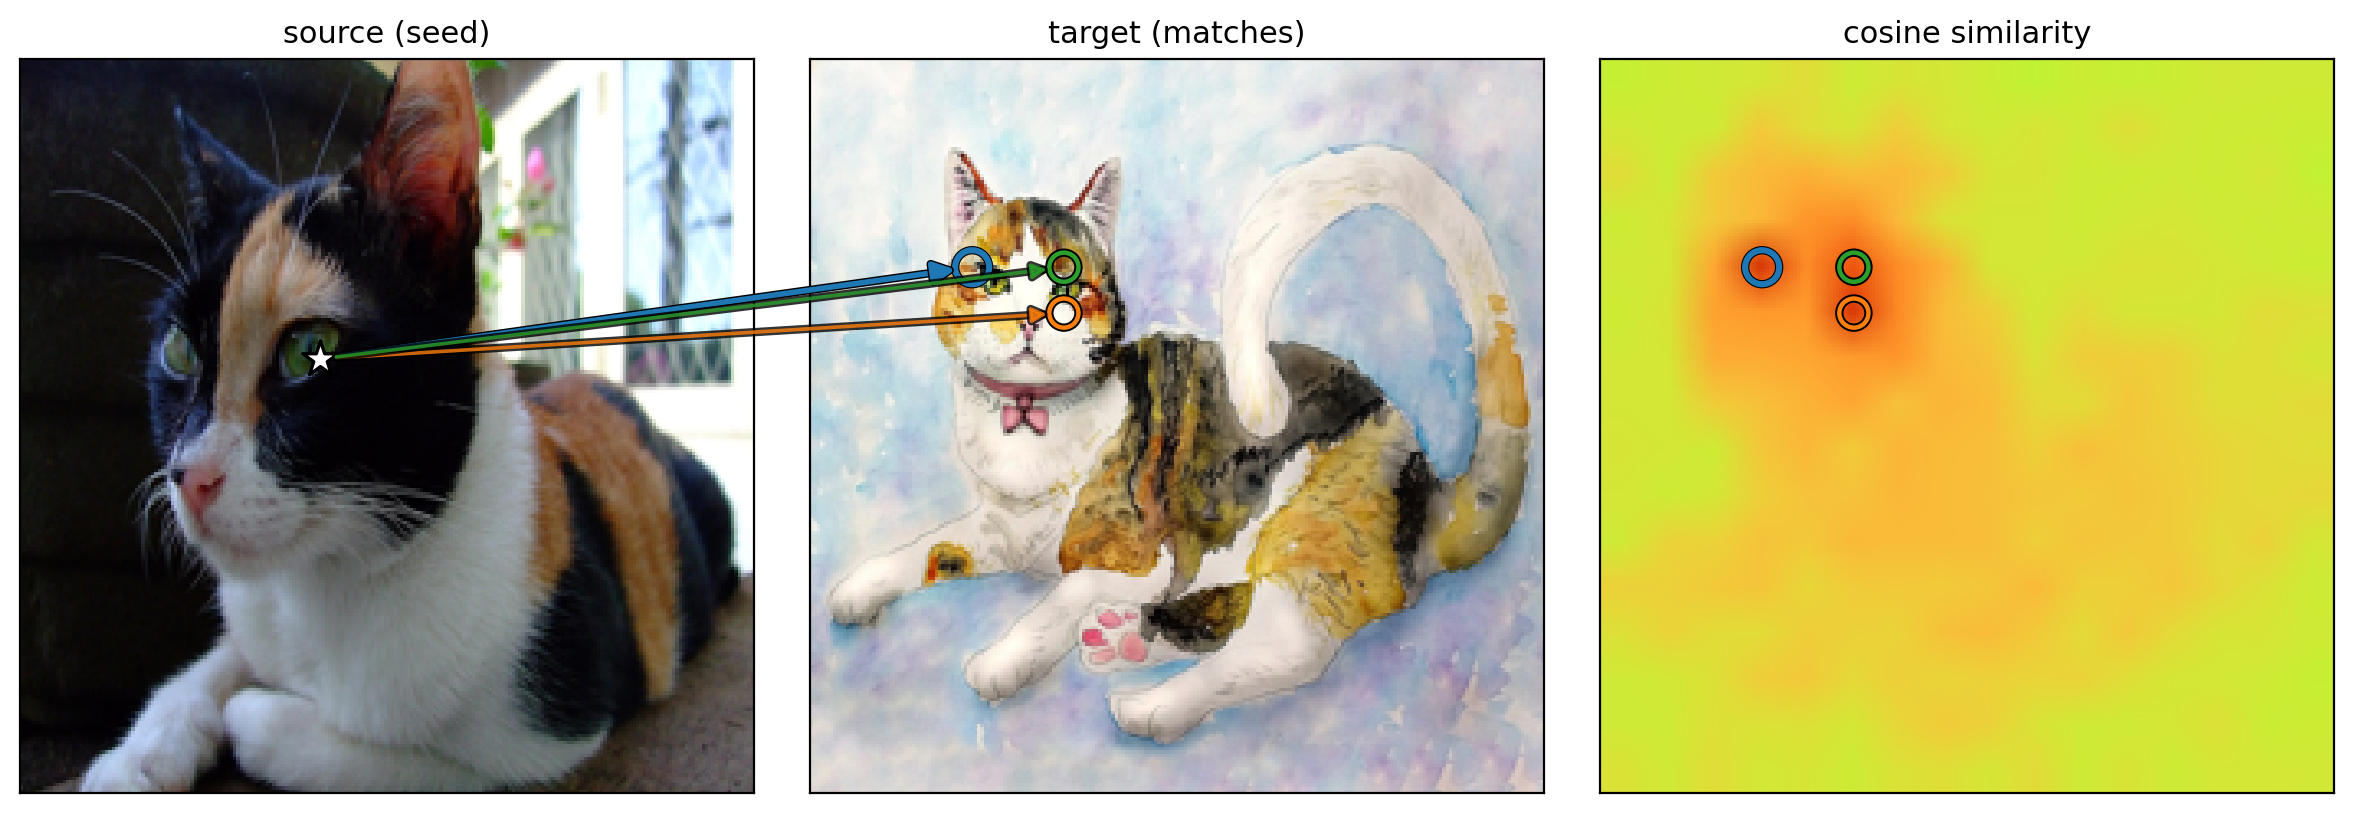
correspond(...) — seed a patch in image A, find the matches in image B:
Install
pip install -e ".[timm]"          # timm backend (DINO, CLIP, SigLIP, DeiT, ...)
# extras: [hf] transformers · [clip] open_clip · [all]
Install PyTorch for your platform first (https://pytorch.org).
Quick start (Python)
import featlens as ll

# One model, scrub layers (shared PCA basis -> colors comparable across the row)
ll.visualize("dinov2_vitb14", "img.jpg", layers=[2, 5, 8, 11], out="row.png")

# Compare models at the final layer (per-tile basis)
ll.compare(["dino_vitb16", "mae_vitb16", "clip_large_openai"], "img.jpg", layer=-1, out="cmp.png")

# Full model x layer grid, overlaid on the image
ll.grid(["dino_vitb16", "dinov2_vitb14"], "img.jpg", layers=[2, 5, 8, 11], overlay=True, out="grid.png")
Quick start (CLI)
featlens --models dino_vitb16 clip_large_openai --layers 2 5 8 11 \
    --images examples/images/cat.jpg --mode grid --out out/grid.png
featlens --config configs/example.yaml --images examples/images/cat.jpg --out out/grid.png
Image size & resizing
Images are resized to a square img_size × img_size before the model (default 224).
img_size must be divisible by the model's patch size (multiples of 16 for patch-16 models,
14 for patch-14). Larger sizes give a finer feature grid at more compute:
ll.visualize("dinov2_vitb14", "img.jpg", layers=[2, 5, 8, 11], img_size=448) # 32x32 grid
For non-square images, choose how aspect ratio is handled with resize_mode:
resize_mode |
behavior |
|---|---|
squash (default) |
resize straight to img_size² — may distort |
crop |
resize shortest side to img_size, center-crop — aspect preserved |
pad |
resize longest side to img_size, pad to square — keeps the whole image |
ll.grid([...], "wide.jpg", resize_mode="crop") # Python
featlens --models dino_vitb16 --images wide.jpg --resize-mode pad --img-size 448 --out g.png
(FeatureGrid(interpolation_size=…) is separate — it only upscales the rendered tiles, not the
model input.)
Model sources
| Source | How to pass it | Needs |
|---|---|---|
| timm | friendly name (dinov2_vitb14) or raw id (vit_base_patch16_224) |
[timm] |
| HuggingFace | hf:facebook/dinov2-base |
[hf] |
| torch.hub (V-JEPA) | vjepa2_vitl16 |
network for weights |
| External repo (VGGT/SPA/…) | external_adapter.load(repo_dir, builder, hook_target=…) |
the cloned repo |
| Your own model | custom_adapter.load(model, feature_fn=…) |
— |
Friendly names (see featlens/registry.py) cover DINO, DINOv2/v3, CLIP, SigLIP, MAE, DeiT,
Perception Encoder and V-JEPA; any other timm id works directly.
Layers
layers=[2, 5, 8, 11] selects transformer block indices (0-based, negatives allowed,
-1 = last). The same convention holds across backends — for HuggingFace models FeatLens maps
block i to hidden_states[i+1] (skipping the embedding output) for you.
Visualization methods
Every method consumes the same dense feature stack, so it works on grid / visualize /
compare and across any layer:
method |
shows | extra args |
|---|---|---|
pca (default) |
robust PCA → RGB | basis, remove_first_component |
cosine |
cosine similarity to a seed patch | seed=(x, y), colormap |
kmeans |
unsupervised k-means segmentation | k |
foreground |
fg/bg mask (first PCA component) | — |
fl.visualize("dino_vitb16", "img.jpg", layers=[2, 5, 8, 11], method="cosine", seed=(0.5, 0.5))
fl.compare(["dino_vitb16", "dinov2_vitb14"], "img.jpg", layer=-1, method="kmeans", k=8)
fl.correspond("dino_vitb16", "a.jpg", "b.jpg", seed=(0.4, 0.5), topk=3, out="corr.png")  # cross-image
seed is normalized image coords (x, y) ∈ [0, 1] (resolution/model independent). Pass
cache=True to memoize extraction on disk ($FEATLENS_CACHE_DIR, else ~/.cache/featlens) so
re-renders are instant. An interactive Gradio demo lives in demo/ — in cosine mode,
click the image to move the seed. See the docs.
Bring your own model
Anything that isn't built in works through the escape hatch — give a feature function or a hook target. CNNs work for free (their conv map is already spatial):
import torch.nn as nn, torchvision
from featlens import FeatureExtractor, FeatureGrid
from featlens.adapters import custom_adapter

resnet = torchvision.models.resnet50(weights="DEFAULT")
trunk = nn.Sequential(*list(resnet.children())[:-2])           # -> [B, 2048, h, w]
lm = custom_adapter.load(trunk, patch_size=32, feature_fn=lambda m, x: m(x), name="resnet50")
FeatureGrid([FeatureExtractor(lm)]).render("img.jpg", out_path="resnet50.png")
For a model in its own repo, external_adapter.load(repo_dir, builder, hook_target="blocks")
puts the repo on sys.path, builds the model, and hooks its blocks.
How it works
- Adapters resolve a spec → a
LoadedModeland drive extraction in one of three modes: forward hooks on per-block modules (ViTs/CNNs/V-JEPA), HFoutput_hidden_states, or a user callable. tokens_to_gridnormalizes whatever a layer emits ([B,N,D]tokens with optional CLS/register prefixes, or[B,D,h,w]maps) into a dense[B,D,h,w]grid.- Robust PCA (median-absolute-deviation outlier filtering) projects features to RGB;
FeatureGridlays out the model × layer tiles with a per-tile or shared-per-model basis.
The extraction core adapts the FrozenBackbone pattern; the PCA is adapted from the SpaRRTa
feature-map script.
Releasing
Releases publish to PyPI automatically via
.github/workflows/publish.yml (PyPI Trusted Publishing — no API token stored in the repo).
One-time setup on PyPI: add a trusted publisher for the project (Account → Publishing) with
owner turhancan97, repository FeatLens, workflow publish.yml, environment pypi. PyPI
supports a pending publisher so the very first release can also go through Actions.
Then cut a release by pushing a tag:
# bump the version in pyproject.toml first, then:
git tag v0.1.0 && git push origin v0.1.0
The workflow builds the sdist + wheel, runs twine check, and uploads to PyPI.
License
MIT.
Project details
Verified details
These details have been verified by PyPIProject links
GitHub Statistics
Maintainers
Release history Release notifications | RSS feed


Download files
Download the file for your platform. If you're not sure which to choose, learn more about installing packages.
Source Distribution
Built Distribution
Filter files by name, interpreter, ABI, and platform.
If you're not sure about the file name format, learn more about wheel file names.
Copy a direct link to the current filters
File details
Details for the file featlens-0.2.0.tar.gz.
File metadata
- Download URL: featlens-0.2.0.tar.gz
- Upload date:
- Size: 34.1 kB
- Tags: Source
- Uploaded using Trusted Publishing? Yes
- Uploaded via: twine/6.1.0 CPython/3.13.12
File hashes
| Algorithm | Hash digest | |
|---|---|---|
| SHA256 |
68454c7f2aea88597e10796b3f65227cc834b020fc3a35d2f0a58939f96bd73b
|
|
| MD5 |
56b643c9fc12ef824225be3dfb668bdf
|
|
| BLAKE2b-256 |
04ecb07966f44ca2bc0ec9ae8447d681ed00a7a8d8880e1f30d7ad8ff67d563b
|
Provenance
The following attestation bundles were made for featlens-0.2.0.tar.gz:
Publisher:
publish.yml on turhancan97/FeatLens
-
Statement:
-
Statement type:
https://in-toto.io/Statement/v1 -
Predicate type:
https://docs.pypi.org/attestations/publish/v1 -
Subject name:
featlens-0.2.0.tar.gz -
Subject digest:
68454c7f2aea88597e10796b3f65227cc834b020fc3a35d2f0a58939f96bd73b - Sigstore transparency entry: 1971197850
- Sigstore integration time:
-
Permalink:
turhancan97/FeatLens@ee206a10eb5a1116f8d73aa7e045f2741e25a4ab -
Branch / Tag:
refs/tags/v0.2.0 - Owner: https://github.com/turhancan97
-
Access:
public
-
Token Issuer:
https://token.actions.githubusercontent.com -
Runner Environment:
github-hosted -
Publication workflow:
publish.yml@ee206a10eb5a1116f8d73aa7e045f2741e25a4ab -
Trigger Event:
push
-
Statement type:
File details
Details for the file featlens-0.2.0-py3-none-any.whl.
File metadata
- Download URL: featlens-0.2.0-py3-none-any.whl
- Upload date:
- Size: 36.1 kB
- Tags: Python 3
- Uploaded using Trusted Publishing? Yes
- Uploaded via: twine/6.1.0 CPython/3.13.12
File hashes
| Algorithm | Hash digest | |
|---|---|---|
| SHA256 |
e032c2217eebc0e04b8f233b4bad400e2c08509e41c964375a9d93425ed89cfc
|
|
| MD5 |
17bea3f84a94fe98b6c4bf2c8bdbb7e4
|
|
| BLAKE2b-256 |
2b2a1b8c0372c7a9a2e9dcaffcdfd9cac5317ed63d2e5d0e37f677893d965abf
|
Provenance
The following attestation bundles were made for featlens-0.2.0-py3-none-any.whl:
Publisher:
publish.yml on turhancan97/FeatLens
-
Statement:
-
Statement type:
https://in-toto.io/Statement/v1 -
Predicate type:
https://docs.pypi.org/attestations/publish/v1 -
Subject name:
featlens-0.2.0-py3-none-any.whl -
Subject digest:
e032c2217eebc0e04b8f233b4bad400e2c08509e41c964375a9d93425ed89cfc - Sigstore transparency entry: 1971197935
- Sigstore integration time:
-
Permalink:
turhancan97/FeatLens@ee206a10eb5a1116f8d73aa7e045f2741e25a4ab -
Branch / Tag:
refs/tags/v0.2.0 - Owner: https://github.com/turhancan97
-
Access:
public
-
Token Issuer:
https://token.actions.githubusercontent.com -
Runner Environment:
github-hosted -
Publication workflow:
publish.yml@ee206a10eb5a1116f8d73aa7e045f2741e25a4ab -
Trigger Event:
push
-
Statement type:


