A tool to help convert a video file to a target file size.

Project description
ffmpeg4discord (ff4d) -- Target File Size Video Compression for Discord with FFmpeg

ff4d is a command-line tool that compresses video files to fit under a specified file size, making them easy to share on Discord and other platforms with file size limits. It is especially useful for quickly preparing large video clips (such as NVIDIA ShadowPlay recordings) for upload, without needing a visual editor.
The package provides a convenient interface for FFmpeg, including a 2-pass encoding workflow (via the TwoPass() class) and support for advanced video filters like cropping and resolution scaling. This makes it adaptable to a wide range of audio/video processing needs.
Installation
This package requires Python >= 3.9. For Windows users, ensure that Python is added to your system's PATH. I highly recommend that you use the python.org Python installation.
Install this package with the following command.
pip install ffmpeg4discord
You must first have FFmpeg installed on your system. ffmpeg needs to be registered in your PATH. macOS or Linux users can use their favorite package manager to do this, but this process is a little more tricky for Windows users.
NOTE: This package relies on the external FFmpeg binary, and updates to FFmpeg may cause unexpected errors; please raise an issue if you encounter any problems.
Help for Windows users
After installing this package, Windows users can run this command in a terminal to download the necessary ffmpeg binaries:
install-ffmpeg-windows
This will place ffmpeg.exe, ffprobe.exe, and ffplay.exe into the same location as your Python executable.
Usage
Use ff4d in your favorite terminal like this:
ff4d path-to-file.mp4 [optional-flags]
This command tries to compress the whole video file down to the an output file size of 10MB:
ff4d cool_clip.mp4 -s 10
This will trim a 20 second section out of cool_clip.mp4 starting at 10 seconds in and ending at 30 seconds. The output will be less than 10MB. More on the optional flags.
ff4d cool_clip.mp4 --from 00:00:10 --to 00:00:30 -s 10
I've had a good time using this command with a Batch file on Windows. Refer to the Sample Batch File section for more information.
Optional Flags
Boolean flags support both
--flagand--no-flagforms (e.g.--web/--no-web).
| Flag | Default | Example | Description |
|---|---|---|---|
-o--output |
current working directory | -o "C:/Users/zflee/A Folder"-o "C:/Users/zflee/Desktop/A Folder/filename.mp4" |
Output directory or full output filename. If you provide a directory, ff4d will generate a timestamped filename. If you provide a filename, ff4d will use it (and will correct the extension if it doesn’t match the selected codec). |
-s--target-filesize |
10 | -s 50 |
Target output file size in MiB. The encoder will iterate until it gets under this size (unless --approx is used). |
-a--audio-br |
96 | -a 128 |
Audio bitrate in kbps. Lowering this allows a slightly higher video bitrate for the same target file size. |
-c--codec |
x264 | -c hevc_nvenc |
Video "codec profile". These aren't 1:1 titles with the FFmpeg codec choices, because modern codecs require more tweaking for encoding performance, so I've setup a profile for vp9 and av1 speed. Options are ordered from "most compatible" to "least compatible": x264, h264_nvenc, x265, hevc_nvenc, vp9, av1. See Notes on Codec Selection for more information. |
-r--resolution |
off | -r 1280x720 |
Scale the output video to a specific resolution (format: WIDTHxHEIGHT). |
-x--crop |
No default | -x 255x0x1410x1080 |
Crop the input before encoding (format: x_offsetx y_offsetx widthx height). See FFmpeg crop documentation. |
-f--framerate |
off | -f 30 |
Output frame rate (FPS). If you specify a value higher than the input video’s FPS, the original FPS will be kept. |
--from |
No default | --from 00:01:00 |
Start time for trimming the input (timestamp format HH:MM:SS). |
--to |
No default | --to 00:01:20 |
End time for trimming the input (timestamp format HH:MM:SS). |
--filename-times |
false | --filename-times |
Parse From/To timestamps from the input filename. See File Name Formatting. |
--approx |
false | --approx |
Approximate the target size: do a single 2-pass encode and do not loop to get under the target. |
-an--no-audio |
false | -an |
Do not include any audio stream in the output. (Overrides --amix / --astreams.) To explicitly re-enable audio after setting this in a config, use --no-no-audio. |
--amix |
false | --amix |
Mix all (selected) audio streams into one output track. When off, only the default/first audio track is used. |
--amix-normalize |
false | --amix-normalize |
When mixing audio, normalize volume levels. Specifying this implies --amix. |
--astreams |
all | --astreams "0,1" |
Comma-separated list of 0-based audio stream positions to include. When used with --amix, those streams will be mixed; otherwise, only the first selected stream is kept. |
-v--verbose |
false | --verbose |
Enable verbose FFmpeg logging (useful for debugging). |
--config |
off | --config config.json |
Path to a JSON file containing a saved configuration. When a setting is provided by both JSON and CLI flags, the CLI flag wins. See JSON Configuration. |
--no-config |
off | no---config |
Disable loading any default configuration files. See JSON Configuration. |
--web |
false | --web |
Launch the Web UI for this job. See Web UI. |
-p--port |
random (when --web) |
-p 5333 |
Run the Web UI on a specific port. If omitted, a random free port between 5000–6000 is chosen. |
File Name Formatting
Enable this feature with --filename-times. You can edit the name of your video file if you need to trim it to a specific section. Here are a few examples.
000020.mp4- This trims and compresses the video from 00:00:20 to the end of the clip.
000020-000145.mp4- This trims and compresses the video from 00:00:20 to 00:01:45.
SomethingElse.mp4- Compresses the entire video if the first six characters of the file's name aren't numeric.
JSON Configuration
If your encoding job uses the same settings consistently, you can simplify your workflow by referencing a JSON configuration file instead of specifying multiple command-line arguments. This feature was designed for advanced users or "workflow people."
When using both a JSON configuration file and command-line flags, the command-line flag values take precedence over the values defined in the JSON. For example, if "target_filesize" is specified in the JSON file and you include the --target-filesize (or -s) flag in your command, the command-line value will be used.
If you supply a configuration JSON file, include only the settings that differ from the default values. Any omitted values will automatically use their defaults.
By default, ff4d will try to read a default configuration file if it is present. This file is located wherever your platform stores user-specific configuration data. Typically, this would be:
| Windows | Linux | MacOS |
|---|---|---|
%LOCALAPPDATA%\zfleeman\ffmpeg4discord |
$XDG_CONFIG_HOME/ffmpeg4discord.json OR $XDG_CONFIG_HOME/ff4d/ffmpeg4discord.json |
~/Library/Application Support/ffmpeg4discord/ffmpeg4discord.json |
If you are unsure of where these paths would resolve to, ff4d logs any searched paths to the console when run.
This feature can be turned off with the --no-config flag.
Example JSON File Configuration
Create a new plain text JSON file (my-config.json) structured like this:
{
    "target_filesize": 10.0,
    "resolution": "1280x720",
    "codec": "libvpx-vp9",
    "to": "00:00:40"
}
And then you would call ff4d like this:
ff4d my-video.mp4 --config my-config.json
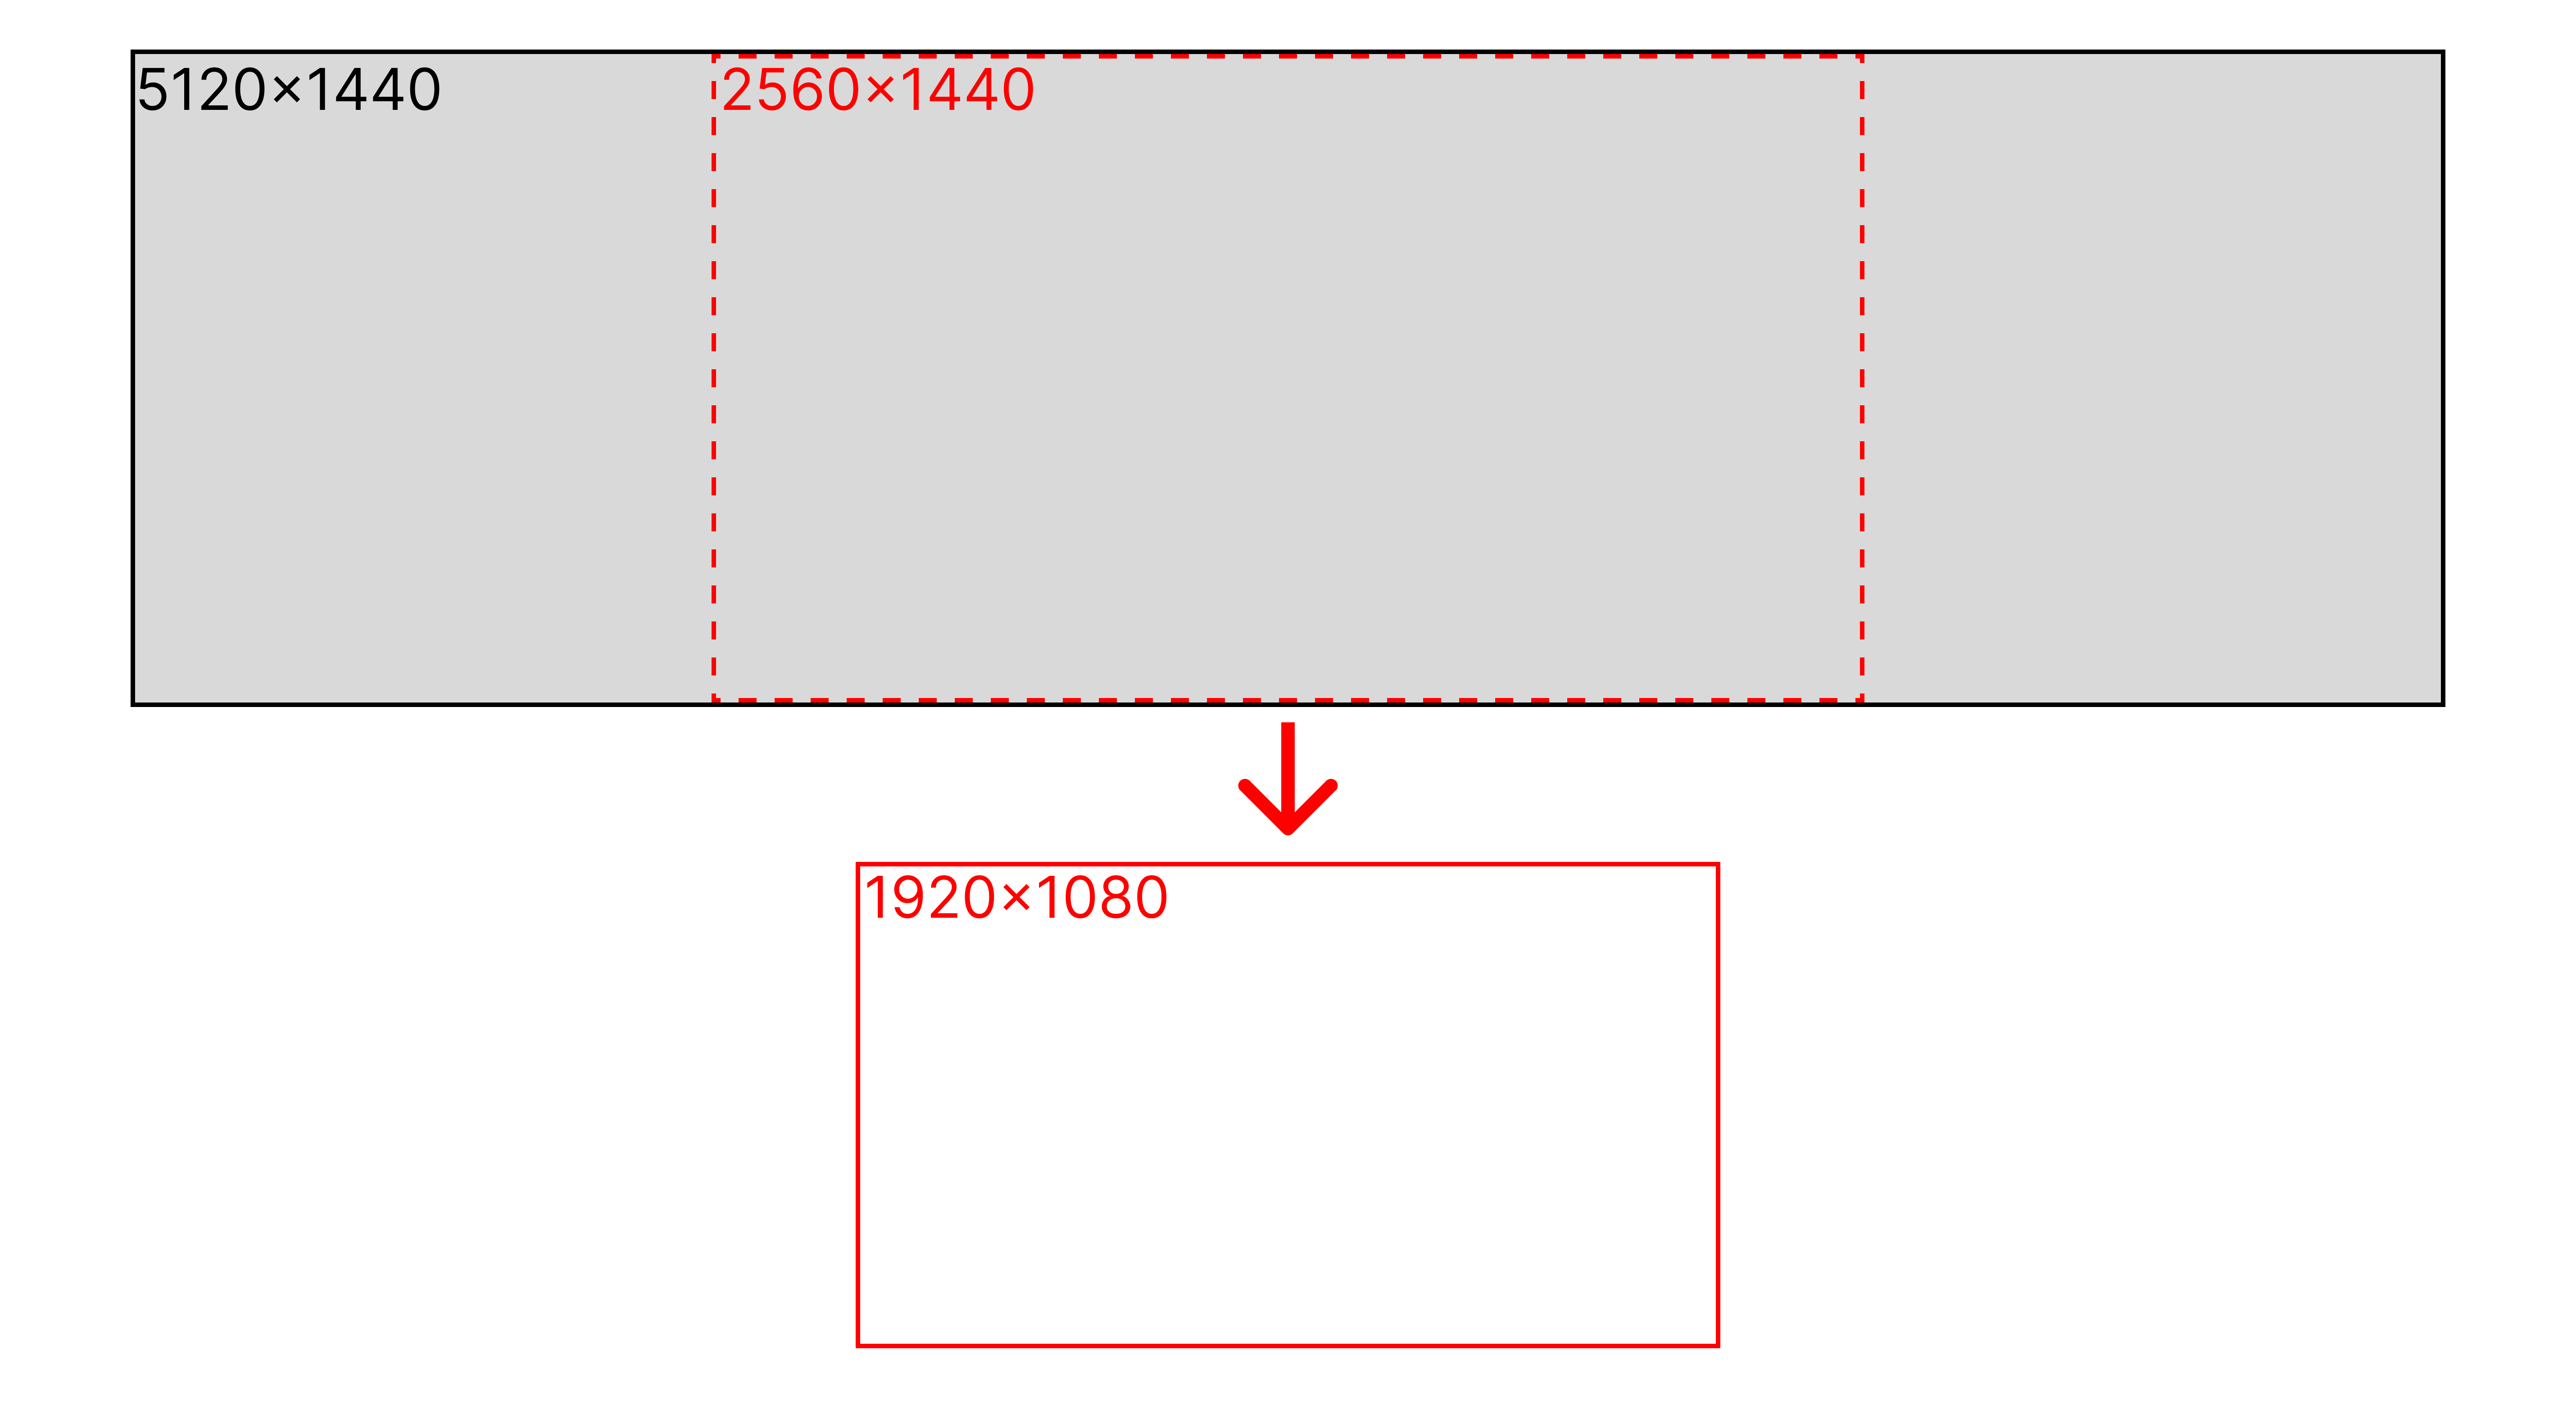
Detailed Example
ff4d 000050-000145.mp4 \
    -x 1280x0x2560x1440 \
    -r 1920x1080 \
    -s 50 \
    -a 48 \
    -o D:/shadowplay/ \
    --filename-times
The example above takes a 5120x1440 resolution video as its input. The script trims the video from 00:00:50 to 00:01:45 (specified in the file name, and enabled with --filename-times). It crops a 2560x1440 section starting at 1280 pixels from the top-left and 0 pixels down (-x). The output file will be located in D:/shadowplay/ (-o) with a new resolution of 1920x1080 (-r), and it will be 50MB (-s). The audio bitrate will be reduced to 48k (-a) as well, but that's probably going to sound terrible.
Web UI
The web UI can be activated by adding --web to your ff4d call.
ff4d cool_clip.mp4 -r 1280x720 -s 20 --web
That command will spin up a Flask server on your local machine and launch a rendered webpage with the video as the centerpiece. The flags you provide to ff4d will fill in the defaults for the form. You can override/replace the values with the web form.
You can drag the video playhead to different portions of the video and click the "Set Start/End Time" buttons to specify the section of the video you want to be clipped out. You can also use the range sliders underneath the buttons if you prefer. A "Preview Selection" button is provided for your convenience, and it does what it sounds like.
https://github.com/zfleeman/ffmpeg4discord/assets/1808564/ff323bcb-4747-437b-808f-ce48b8c269ce
Note that the Flask server doesn't automatically shut down, so you'll need to manually terminate it by closing the terminal window where it's running.
Sample Batch File
To enable "drag and drop" functionality for this package, Windows users can create a .bat file with the following code snippet. Once the file is created, you can drag and drop any .mp4 file on top of it, and it will run with the flags specified in the "Optional Flags" section. This example is a Batch file that will launch the web UI.
@echo off
Set filename=%1
ff4d %filename% -o "C:/output/folder/" --web
PAUSE
Notes on Codec Selection
Different codecs have different trade-offs in terms of quality, speed, file size, and compatibility. “Compatibility” here refers to how widely a format can be played across devices, browsers, operating systems, and media players without requiring special software or recent hardware.
-
x264(H.264, CPU) General‑purpose default. Produces H.264 video that is widely supported across virtually all modern devices, browsers, and players. Good balance of quality, speed, and compatibility. FFmpeg trac link -
h264_nvenc(H.264, NVENC GPU) Hardware‑accelerated H.264 using an NVIDIA GPU. Typically faster thanx264with slightly lower quality at the same bitrate. Compatibility of the output files is essentially the same asx264; the difference is how the video is encoded, not how it is played. FFmpeg trac link -
x265(HEVC, CPU) HEVC encoder that can provide approximately 25–50% lower bitrate than H.264 (x264) at comparable visual quality. Playback support is more limited than H.264: many newer devices and players support HEVC, but older hardware, some browsers, and certain embeds may not. FFmpeg trac link -
hevc_nvenc(HEVC, NVENC GPU) Hardware‑accelerated HEVC using an NVIDIA GPU. Similar compression benefits and compatibility characteristics asx265, but significantly faster encoding due to GPU offload. FFmpeg trac link -
vp9(VP9, CPU,.webm) Produces.webmvideo. VP9 can save about 20–50% bitrate compared to H.264 (x264) at similar quality. It is well supported in modern browsers (especially for web streaming) but may have more limited support in older devices, legacy players, and some hardware decoders. FFmpeg trac link -
av1(AV1, CPU,.mp4/.webm/.mkv/others) AV1 can offer around 30% better compression than VP9 and roughly 50% better than H.264 at comparable quality. However, playback support is still maturing: recent browsers and newer devices increasingly support AV1, but compatibility with older hardware, embedded players, and some software remains limited. Encoding is typically slower than the other options. I have had issues with using this codec to create shorter clips (< 15 seconds). FFmpeg trac link
Thanks!
Yes, this is a simple collection of Python files using FFmpeg tricks that is masquerading as a robust Audio/Video tool. But! I use this nearly every day to quickly share videos with people on various messaging apps that have built-in video players. I don't have to share a link that embeds a video player this way, and I guess that's important to me?
I like working on this! Enjoy!
Release history Release notifications | RSS feed


Download files
Download the file for your platform. If you're not sure which to choose, learn more about installing packages.
Source Distribution
Built Distribution
Filter files by name, interpreter, ABI, and platform.
If you're not sure about the file name format, learn more about wheel file names.
Copy a direct link to the current filters
File details
Details for the file ffmpeg4discord-0.2.2.tar.gz.
File metadata
- Download URL: ffmpeg4discord-0.2.2.tar.gz
- Upload date:
- Size: 43.0 kB
- Tags: Source
- Uploaded using Trusted Publishing? No
- Uploaded via: twine/6.2.0 CPython/3.14.2
File hashes
| Algorithm | Hash digest | |
|---|---|---|
| SHA256 |
7119fbb9c9b90321145ae64f62f8fb4ec88237ad9654386571a33367a4d1af2f
|
|
| MD5 |
d6004288206b70de38fcbc480da13bf0
|
|
| BLAKE2b-256 |
8d1a3da87afed8cc8a852c705b1f1137af3e2e0b44cfcad44d95b545cc18b6e2
|
File details
Details for the file ffmpeg4discord-0.2.2-py3-none-any.whl.
File metadata
- Download URL: ffmpeg4discord-0.2.2-py3-none-any.whl
- Upload date:
- Size: 40.0 kB
- Tags: Python 3
- Uploaded using Trusted Publishing? No
- Uploaded via: twine/6.2.0 CPython/3.14.2
File hashes
| Algorithm | Hash digest | |
|---|---|---|
| SHA256 |
538d8449f678672f70807be0edda66316421d7912851ad53550bc6fc72ab883a
|
|
| MD5 |
f1fe0a676bf4fb12bf910e30e9091f6b
|
|
| BLAKE2b-256 |
1ac6275e6498ff09945cd89a80986b0a277bc4bf389296a725245d8d75db426f
|


