A tool to help convert a video file to a target file size.

Project description
ffmpeg4discord (ff4d) -- Target File Size Video Compression for Discord with FFmpeg
This repository houses scripts and applications to assist with compressing a video file to a desired size.
ff4d takes a video file as its input and encodes it to be less than a target file size. Discord's free-tier file size sharing limit is 25MB. You can change the file's name in a way that trims the file to a timestamped section. I developed this package specifically for swift sharing of large NVIDIA ShadowPlay clips on Discord, eliminating the need for a visual editor.
The TwoPass() class presents a 2-pass encoding approach for the ffmpeg-python library, which is not showcased in that package's documentation. Additionally, the class extends support to various FFmpeg video filters such as cropping and resolution scaling, making it adaptable to a range of audio/video workflows.
Installation
This package works with Python >= 3.8. For Windows users, ensure that Python is added to your system's PATH. I highly recommend that you use the python.org Python installation.
Install this package with the following command.
pip install ffmpeg4discord
You must first have FFmpeg installed on your system. ffmpeg needs to be registered in your PATH. macOS or Linux users can use their favorite package manager to do this, but this process is a little more tricky for Windows users.
Help for Windows users
After installing this package, Windows users can run this command in a terminal to download the necessary ffmpeg binaries:
install-ffmpeg-windows
This will place ffmpeg.exe, ffprobe.exe, and ffplay.exe into the same location as your Python executable.
Usage
Use ff4d in your favorite terminal like this:
ff4d <path-to-file.mp4> <optional-flags>
This command tries to compress the whole video file down to the default output file size of 25MB:
ff4d cool_clip.mp4
This will trim a 20 second section out of cool_clip.mp4 starting at 10 seconds in and ending at 30 seconds. More on the optional flags.
ff4d cool_clip.mp4 --from 00:00:10 --to 00:00:30
I've had a good time using this command with a Batch file on Windows. Refer to the Sample Batch File section for more information.
Optional Flags
| Flag | Default | Example | Description |
|---|---|---|---|
-o--output |
current working directory | -o "C:/Users/zflee/A Folder"-o "C:/Users/zflee/Desktop/A Folder/filename.mp4" |
If you want your smaller clips to go to a specific folder, use this option. You can also choose a custom output filename, just make sure to include the correct file extension for your video codec. |
-s--filesize |
25 | -s 50 |
Increase or decrease this value if you want to compress your video to something other than the 25MB Discord limit. |
-a--audio-br |
96 | -a 128 |
You can change this value if you want to increase or decrease your audio bitrate. Lowering it will allow for a slight increase in the compressed file's video bitrate. |
-r--resolution |
No default | -r 1280x720 |
Modify this value to change the output resolution of your video file. |
-x--crop |
No default | -x 255x0x1410x1080 |
FFmpeg crop documentation. From the top-left of your video, this example goes 255 pixels to the right, 0 pixels down, and it carves out a 1410x1080 section of the video. |
-c--codec |
libx264 | -c libvpx-vp9 |
Options: libx264 or libvpx-vp9Specify the video codec that you want to use. The default option creates .mp4 files, while libvpx-vp9 creates .webm video files.libvpx-vp9 creates better looking video files with the same bitrates, but it takes significantly longer to encode. VP9 is also not as compatible with as many devices or browsers. I can view .webm videos on the desktop installtion of Discord, but they are not viewable on my iOS Discord installation. |
--web |
No default. Boolean flag. | --web |
Launch the Web UI for this job. A Boolean flag. No value is needed after the flag. See Web UI for more information on the Web UI. |
-p--port |
No default. Picks a random port if not specified. | -p 5333 |
Run the Web UI on a specific port. |
--config |
No default | --config config.json |
Path to a JSON file containing the configuration for the above parameters. This config file takes precedence over all of the other flags. See JSON Configuration. |
--from |
No default | --from 00:01:00 |
Start time for trimming the video file to a desired section. |
--to |
No default | --to 00:01:20 |
End time for trimming the video file to a desired section. |
--filename-times |
No default. Boolean flag. | --filename-times |
Generate From/To timestamps from the clip's file name. See File Name Formatting |
--approx |
No default. Boolean flag. | --approx |
Approximate file size. The job will not loop to output the file under the target size. It will get close enough to the target on the first run. |
File Name Formatting
Enable this feature with --filename-times. You can edit the name of your video file if you need to trim it to a specific section. Here are a few examples.
000020.mp4- This trims and compresses the video from 00:00:20 to the end of the clip.
000020-000145.mp4- This trims and compresses the video from 00:00:20 to 00:01:45.
SomethingElse.mp4- Compresses the entire video if the first six characters of the file's name aren't numeric.
JSON Configuration
If your encoding job will always be the same, you can reference a JSON configuration file instead of passing a long list of arguments to the command line.
{
    "target_filesize": 8.0,
    "audio_br": 96,
    "crop": "",
    "resolution": "",
    "codec": "libx264",
    "times": {
        "from": "00:00:00",
        "to": "00:00:40"
    }
}
Notes:
- All of the keys except for
"from"and"to"must always be present. Those entries can be deleted if you do not have a timestamp entry for the given field. Examples:"times": {}-> if you do not wish to trim the start and stop time of the file."times": {"from": "00:00:10"}-> trim the clip from00:00:10to the end of the file"times": {"to": "00:00:20"}-> trim the clip from the beginning of the file up to00:00:20
- You can set
audio_brtonullif you want to maintain the clip's audio bitrate.
Detailed Example
ff4d 000050-000145.mp4 \
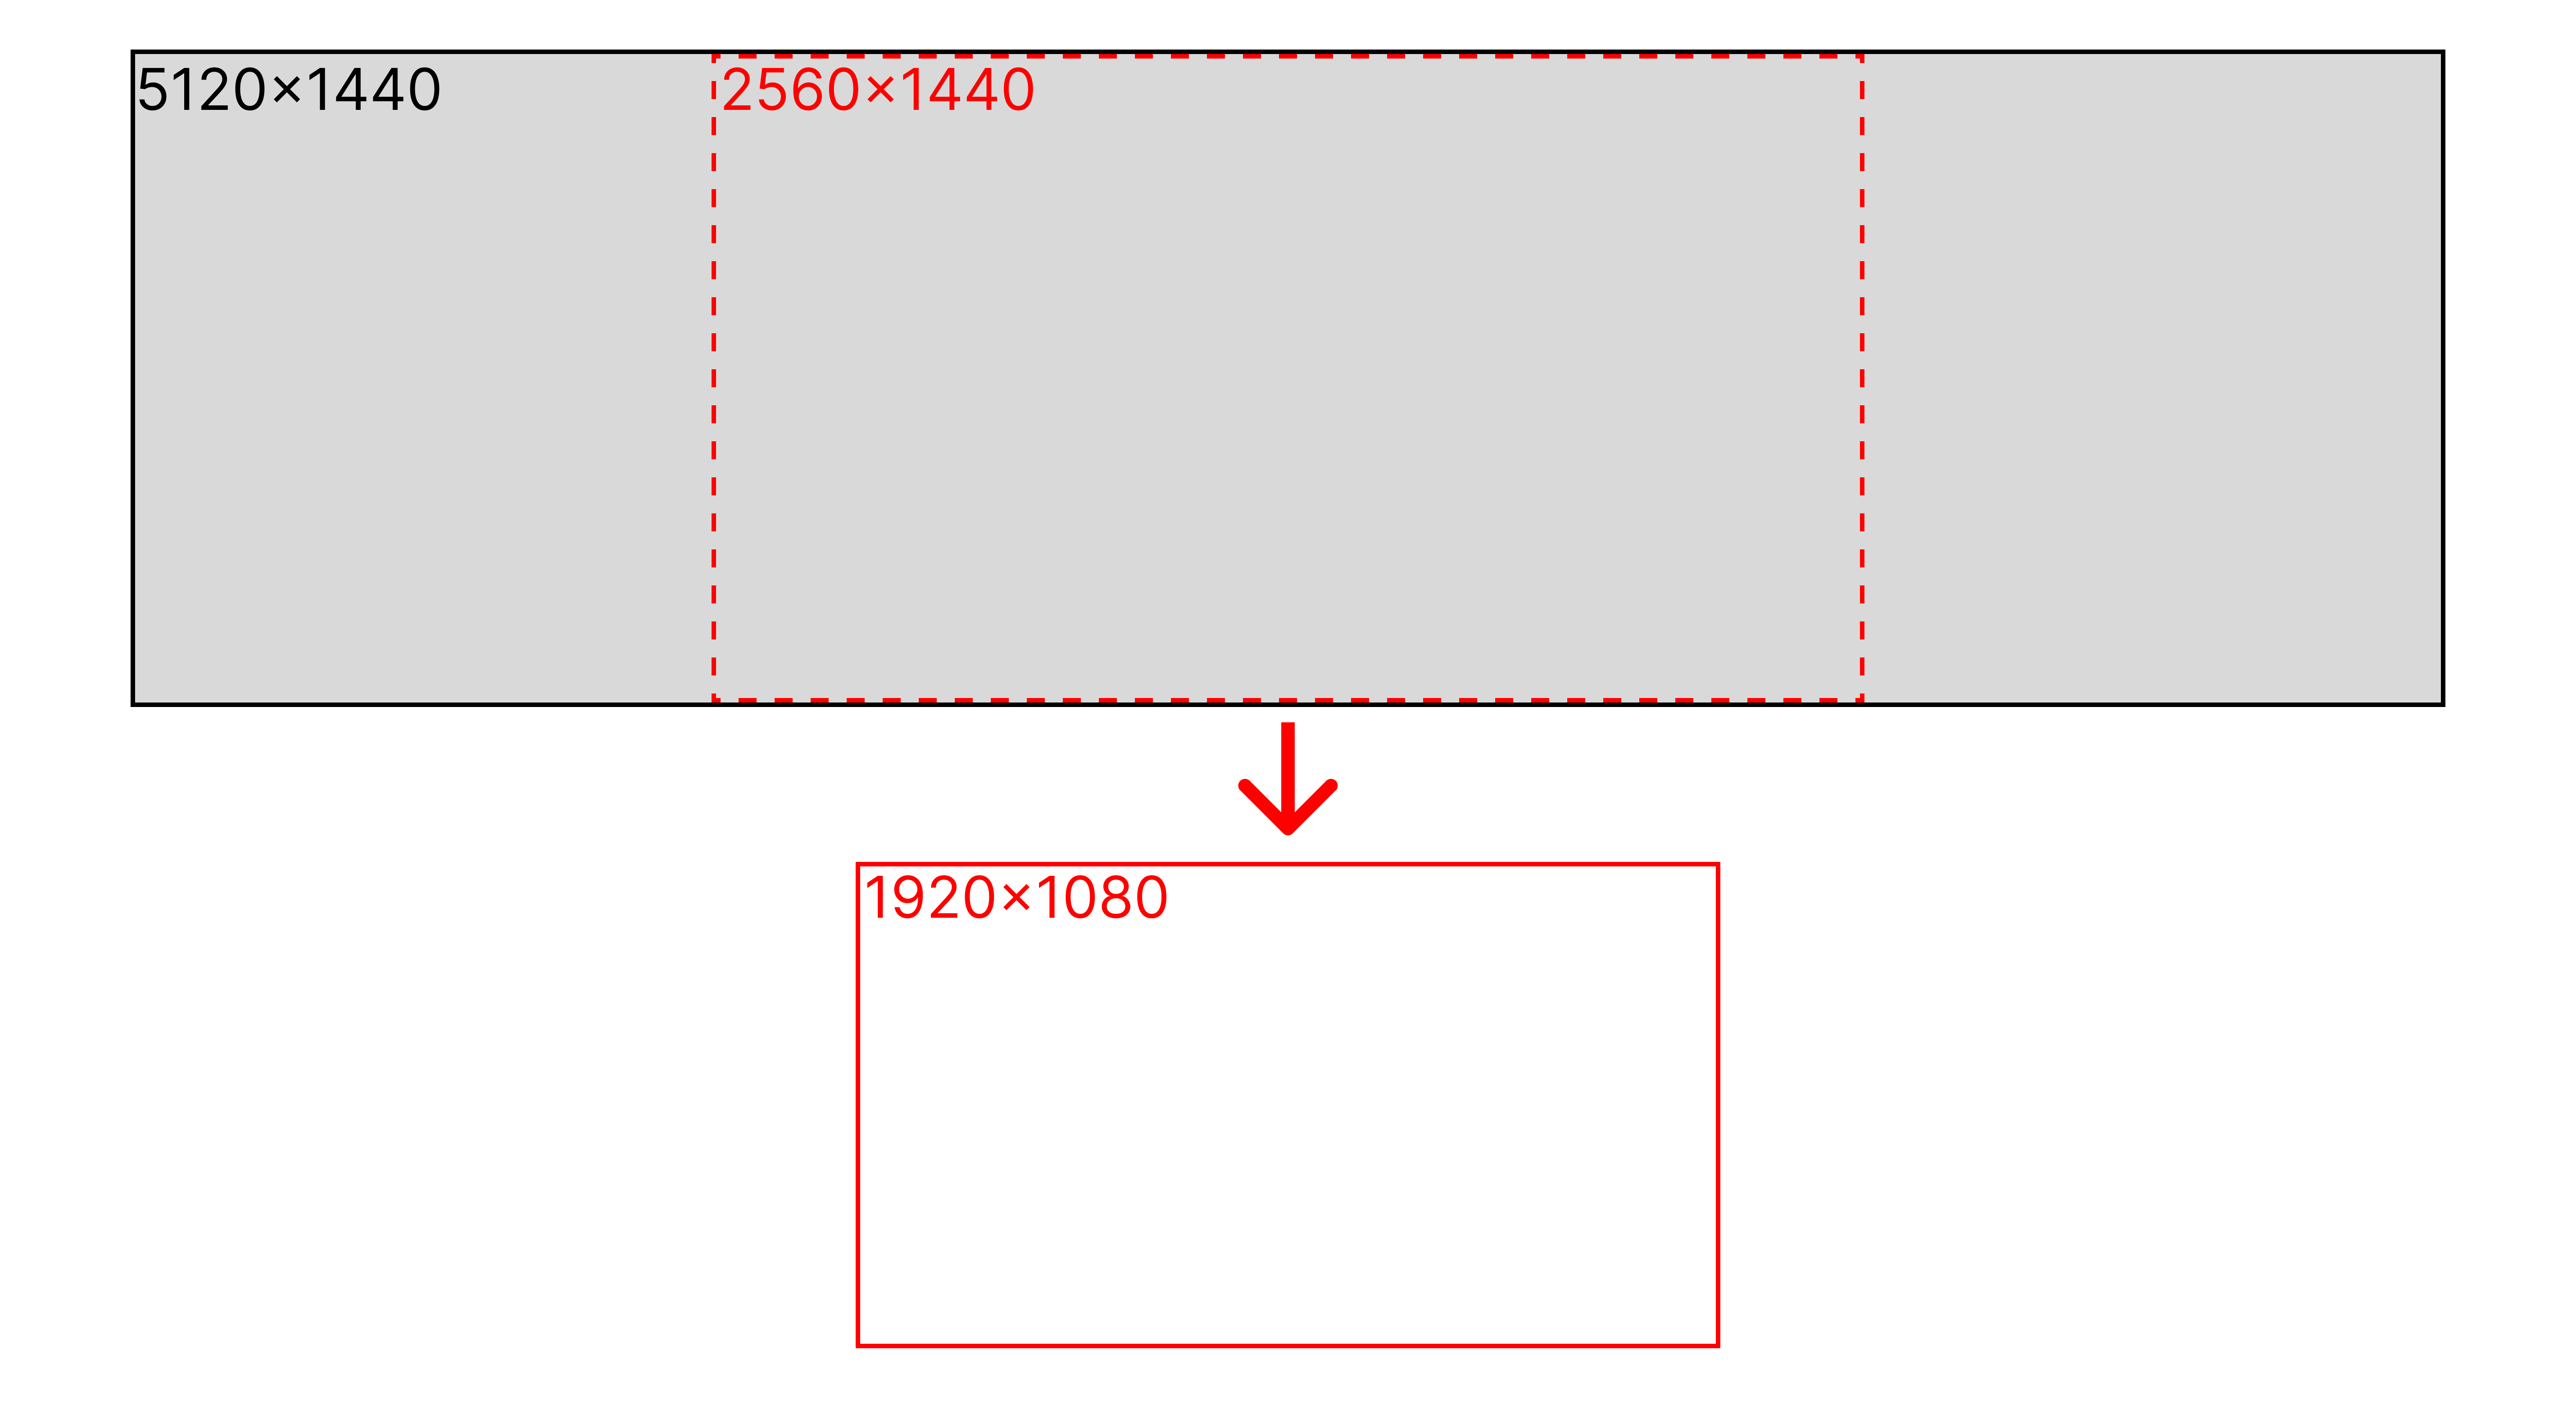
-x 1280x0x2560x1440 \
-r 1920x1080 \
-s 50 \
-a 48 \
-o D:/shadowplay/ \
--filename-times
The example above takes a 5120x1440 resolution video as its input. The script trims the video from 00:00:50 to 00:01:45 (specified in the file name, and enabled with --filename-times). It crops a 2560x1440 section starting at 1280 pixels from the top-left and 0 pixels down (-x). The output file will be located in D:/shadowplay/ (-o) with a new resolution of 1920x1080 (-r), and it will be 50MB (-s). The audio bitrate will be reduced to 48k (-a) as well, but that's probably going to sound terrible.
Web UI
The web UI can be activated by adding --web to your ff4d call.
ff4d cool_clip.mp4 -r 1280x720 -s 20 --web
That command will spin up a Flask server on your local machine and launch a rendered webpage with the video as the centerpiece. The flags you provide to ff4d will fill in the defaults for the form. You can override/replace the values with the web form.
You can drag the video playhead to different portions of the video and click the "Set Start/End Time" buttons to specify the section of the video you want to be clipped out. You can also use the range sliders underneath the buttons if you prefer. A "Preview Selection" button is provided for your convenience, and it does what it sounds like.
https://github.com/zfleeman/ffmpeg4discord/assets/1808564/ff323bcb-4747-437b-808f-ce48b8c269ce
Note that the Flask server doesn't automatically shut down, so you'll need to manually terminate it by closing the terminal window where it's running.
Sample Batch File
To enable "drag and drop" functionality for this package, Windows users can create a .bat file with the following code snippet. Once the file is created, you can drag and drop any .mp4 file on top of it, and it will run with the flags specified in the "Optional Flags" section. This example is a Batch file that will launch the web UI.
@echo off
Set filename=%1
ff4d %filename% -o "C:/output/folder/" --web
PAUSE
Thanks!
Yes, this is a simple collection of Python files using FFmpeg tricks that is masquerading as a robust Audio/Video tool. But! I use this nearly every day to quickly share videos with people on various messaging apps that have built-in video players. I don't have to share a link that embeds a video player this way, and I guess that's important to me?
I like working on this! Enjoy!
Release history Release notifications | RSS feed


Download files
Download the file for your platform. If you're not sure which to choose, learn more about installing packages.
Source Distribution
Built Distribution
Hashes for ffmpeg4discord-0.1.4-py3-none-any.whl
| Algorithm | Hash digest | |
|---|---|---|
| SHA256 | c49398a4c68c3e9db49e0d6bf72a3d2c809057cd2fbcad3ebb53024cd2e4122b |
|
| MD5 | 9b678bf2c03b9c19c08a6bfe471cf905 |
|
| BLAKE2b-256 | 38d29d682f390405d0e1b462d62b53da75a864cf37f50a34ce32b4890282326a |


