文本读写,简繁转换,xlsx纯数据迭代读取,仿Linux的tree命令、文件差异比较工具、图片加水印和curl请求转python代码。

Project description
大纲:
- 简介
- 基本功能
- 仿Linux树形目录显示tree命令
- 文件差异比较diff命令
- 图片加水印marker命令
- curl请求命令转python请求代码
简介
filestools目前包含四个工具包,分别是树形目录显示、文件差异比较、图片加水印和curl请求转python代码。 现在新版本增加简繁转换、文本文件读写和xlsx数据读取功能。
通过以下命令进行安装:
pip install filestools -U
也可以使用阿里云加速(可能因为同步延迟,暂时无法下载到最新版):
pip install filestools --index-url=http://mirrors.aliyun.com/pypi/simple -U
保证能够下载到最新版的命令:
pip install filestools --index-url https://pypi.org/simple/ -U
作者:小小明(代码实体)
博客主页:https://blog.csdn.net/as604049322
基本用法
简繁转换:
from filestools import langconv

cht = langconv.chs_to_cht("香港国际机埸超级一号货运站速递中心一楼1003-1008台位")
print(cht)
chs = langconv.cht_to_chs("香港國際機埸超級一號貨運站速遞中心一樓1003-1008台位")
print(chs)
文本读写:
from filestools import read_txt, write_txt

write_txt("test.txt", "你好\n世界")
txt = read_txt("test.txt")
print(txt)
excel文件迭代读取:
from filestools.XlsxDataReader import XlsxDataReader

xlsx = XlsxDataReader("xxx.xlsx")
print(xlsx.sheet_names())
for row in xlsx.load_data():
    print(row)
文件名格式化:
from filestools import format_filename

print(format_filename(r"?|\/\\///|你好:     !@#$%:^&*().xlsx"))
命令行功能
下面分别看看这几大功能的用法:
仿Linux树形目录显示tree命令
查看帮助文档:
D:\tool>tree -h
usage: tree [-h] [-p PATH] [-m MAX_LEVEL] [-n]

仿Linux树形目录显示,含文件/文件夹大小统计

optional arguments:
  -h, --help            show this help message and exit
  -p PATH, --path PATH  进行递归显示的目录路径,默认为当前目录
  -m MAX_LEVEL, --max-level MAX_LEVEL
                        递归展示的最大层数,默认为7层
  -n, --no-calc         指定该参数后,对于超过递归显示的最大层数的文件夹不再继续递归计算文件夹大小
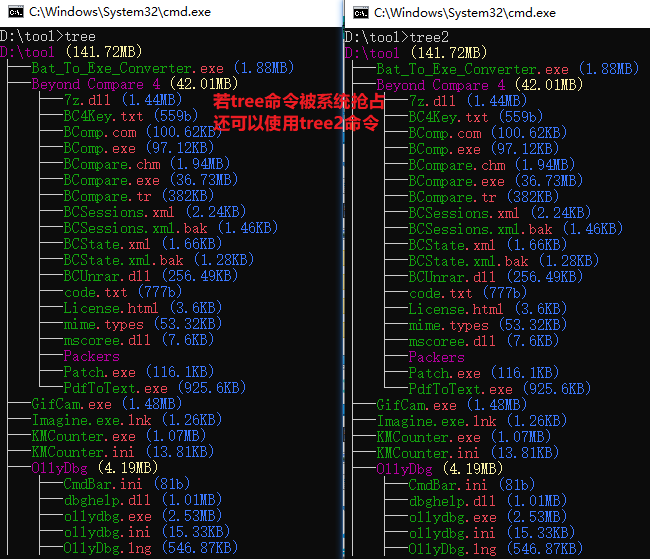
安装treedir后即可直接使用tree命令显示当前目录的树形结构:
tree
指定其他需要递归显示的目录:
tree -p E:/tmp/wap
当目录层级过多,可以限制最大显示的层数:
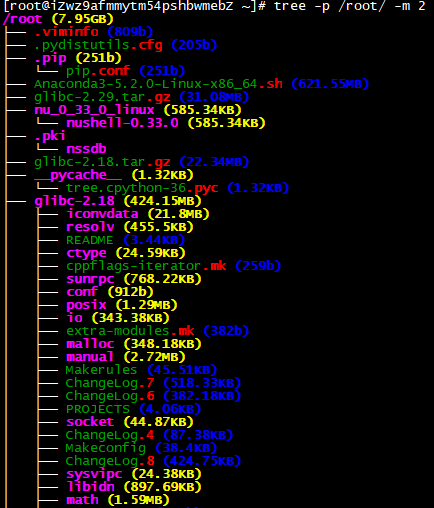
tree -p E:/tmp -m 2
若递归计算文件夹大小耗时过久,可以加-n参数取消对超过递归层级的文件计算大小:
tree -p E:/ -m 2 -n
如果你的系统由于系统环境的优先级高于本地python导致执行结果是系统的tree命令,除了可以调整环境变量顺序修改优先级外,还可以使用tree2命令,与tree一致。
对于windows:
对于Linux:

查看指定目录并指定最大递归层级为2(默认最大层级是7):
可以直接在python代码中操作:
from treedir.tree import tree_dir
tree_dir(".", m_level=7, no_calc=False)
文件差异比较diff命令
-h参数可以查看帮助文档:
E:\>diff -h
usage: diff [-h] [-o OUT] [-m MAX_WIDTH] [-n NUMLINES] [-a] [--no-browser]
            file1 file2

比较两个文本文件的差异输出到HTML网页中

positional arguments:
  file1                 被比较的文件1
  file2                 被比较的文件2

optional arguments:
  -h, --help            show this help message and exit
  -o OUT, --out OUT     差异结果保存的文件名,默认值diff_result.html
  -m MAX_WIDTH, --max_width MAX_WIDTH
                        每行超过多少字符就自动换行,默认值70
  -n NUMLINES, --numlines NUMLINES
                        在差异行基础上前后显示多少行,默认是0
  -a, --show_all        只要设置这个参数就表示显示全部原始数据,此时-n参数无效;默认不显示全部
  --no-browser          设置这个参数,在生成结果后不会自动打开游览器
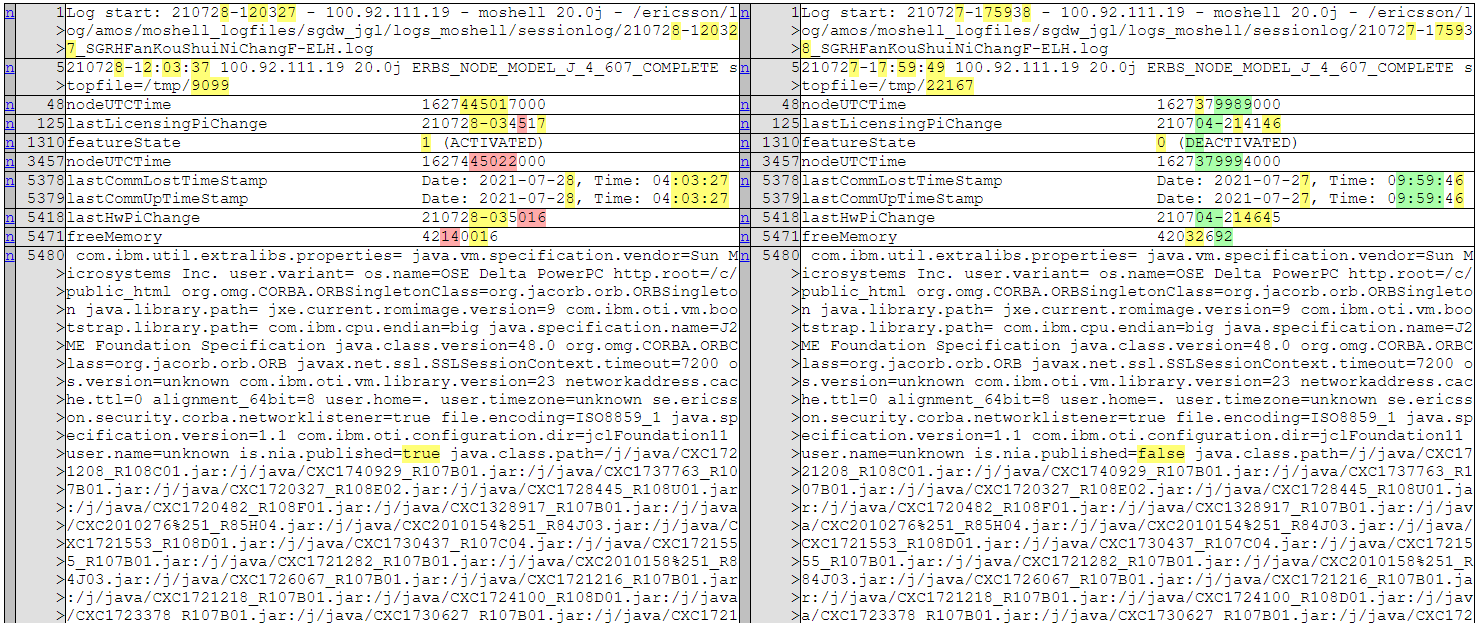
用法示例:
diff t1.log t2.log
生成结果:
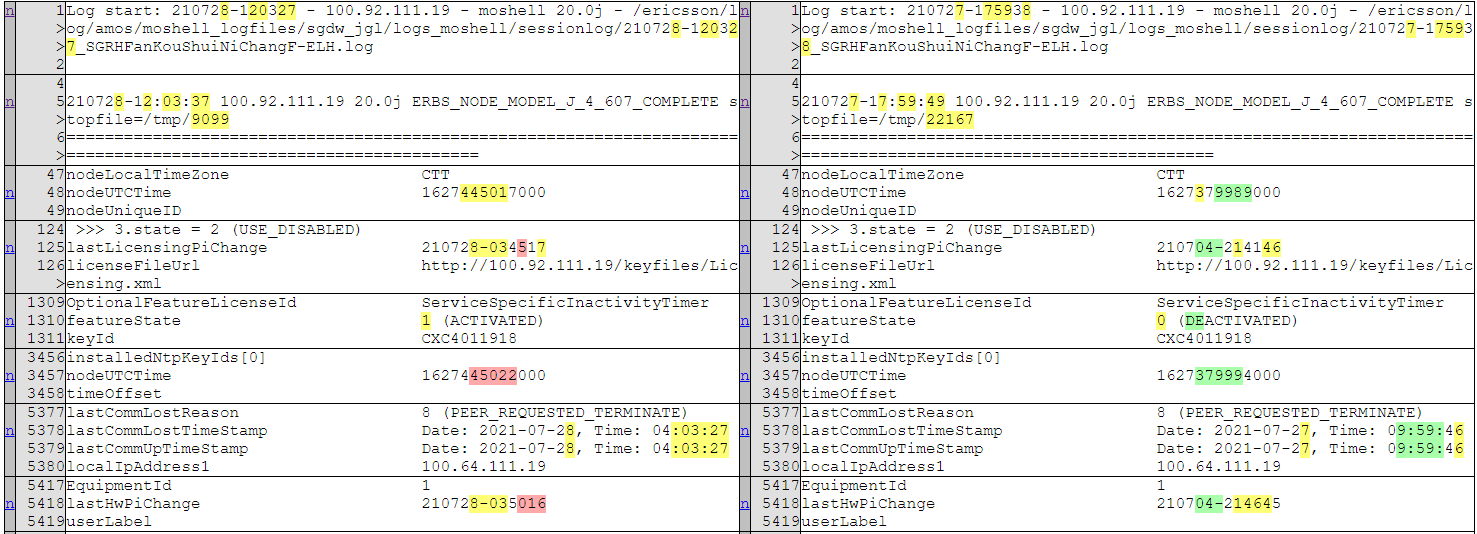
指定前后多显示一行:
diff t1.log t2.log -n 1
生成结果:
若要取消自动打开游览器:
diff t1.log t2.log --no-browser
也可以直接在python代码中操作(关键字参数均为默认参数):
from filediff.diff import file_diff_compare
file_diff_compare("a.txt", "b.txt", diff_out="diff_result.html", max_width=70, numlines=0, show_all=False, no_browser=True)
图片加水印marker命令
查看帮助:
C:\Users\ASUS\Pictures>marker -h
usage: marker [-h] [-o OUT] [-c COLOR] [-s SPACE] [-a ANGLE] [--size SIZE]
              [--opacity OPACITY]
              file mark

用于一张图片或一个图片文件夹批量添加水印

positional arguments:
  file                  图片文件或图片文件夹路径
  mark                  要添加的水印内容

optional arguments:
  -h, --help            show this help message and exit
  -o OUT, --out OUT     添加水印后的结果保存位置,默认生成到output文件夹
  -c COLOR, --color COLOR
                        水印颜色,默认#8B8B1B
  -s SPACE, --space SPACE
                        水印直接的间隔, 默认75个空格
  -a ANGLE, --angle ANGLE
                        水印旋转角度,默认30度
  --size SIZE           水印字体的大小,默认50
  --opacity OPACITY     水印的透明度,默认0.15
示例:
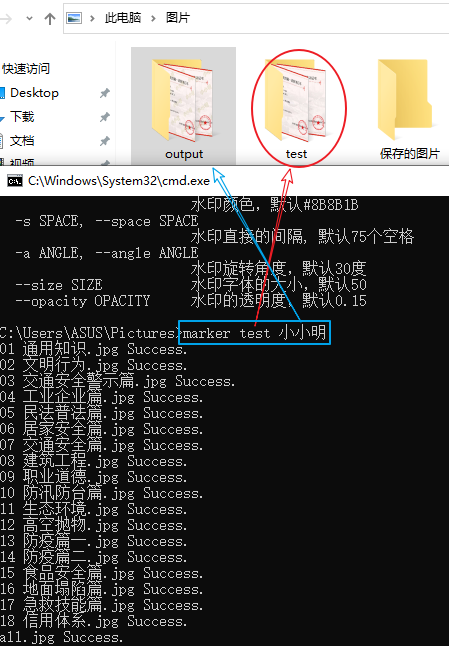
默认加水印的结果都添加到output文件夹中。
也可以直接在python代码中操作:
from watermarker.marker import add_mark
add_mark(r"C:\Users\ASUS\Pictures\act", "小小明")
curl请求命令转python请求代码
帮助文档:
E:\>curl2py -h
usage: curl2py [-h] [-f FILE] [-o OUT] [-t] [-c]

将curl网络请求命令转换成python的requests库请求代码,-f/-t/-o三个参数均没有指定时,结果将保存到剪切板中

optional arguments:
  -h, --help            show this help message and exit
  -f FILE, --file FILE  被转换的curl命令文件,-o和-t参数均没有指定将保存到对应的同名py脚本中,不指定则从直接对剪切板操作
  -o OUT, --out OUT     生成py脚本的保存位置
  -t, --tmp             py脚本是否保存到当前目录的tmp.py中
  -c, --copy            始终copy结果到剪切板
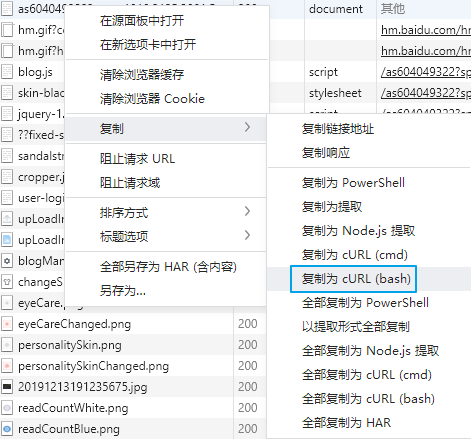
我们在复制游览器(使用谷歌游览器内核的游览器)请求信息为cURL(bash)后,就可以通过curl2py命令将其转换为python代码。
先在谷歌游览器中复制网络抓到的网络请求为cURL(bash):
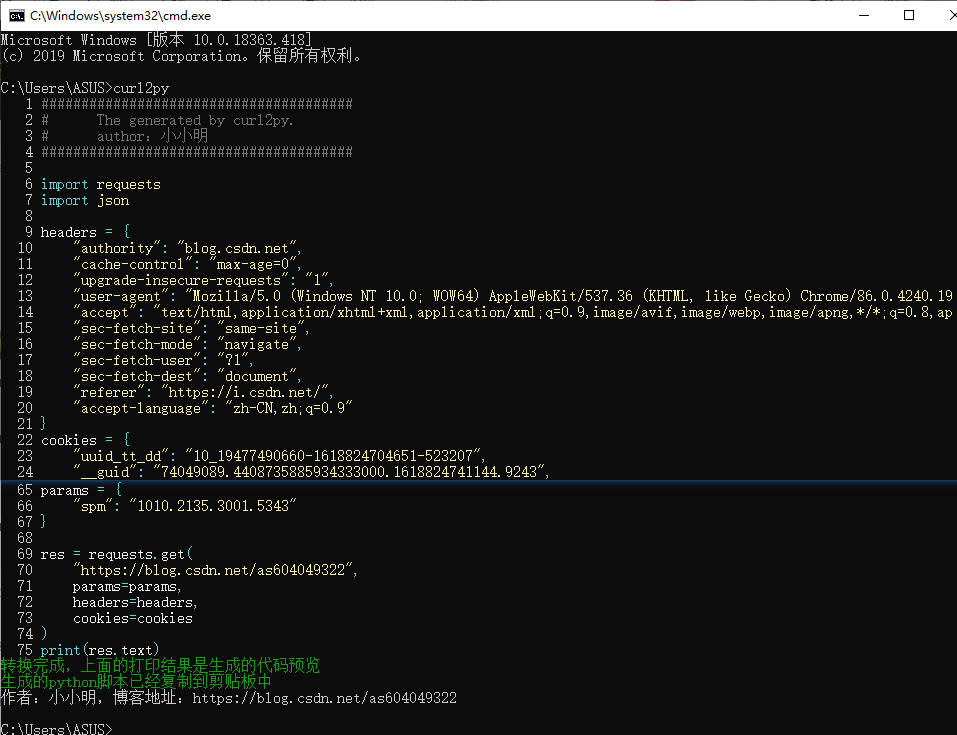
再执行命令将剪切板中curl请求命令转换为python代码:
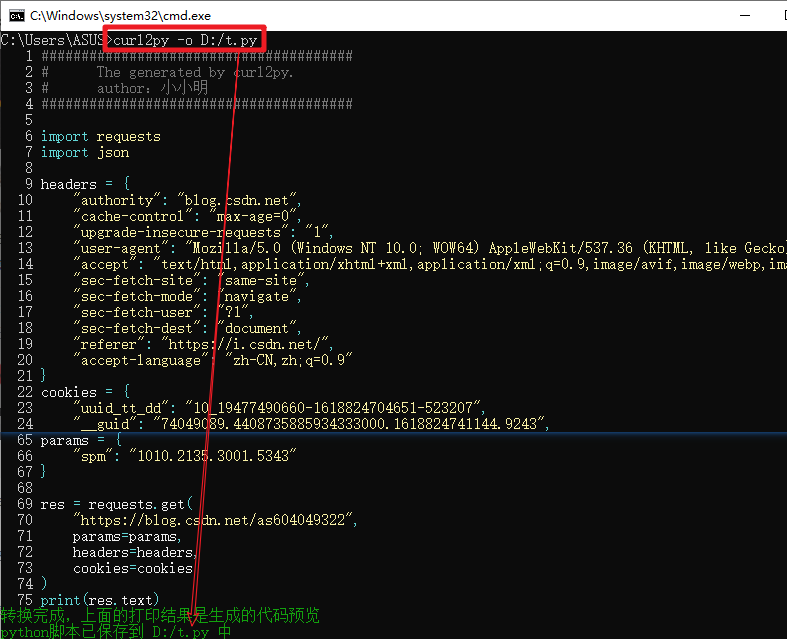
还可以指定生成结果保存到文件:
也可以直接在python代码中使用:
from curl2py.curlParseTool import curlCmdGenPyScript

curl_cmd = """curl 'https://pypi.org/' \
  -H 'authority: pypi.org' \
  -H 'cache-control: max-age=0' \
  -H 'upgrade-insecure-requests: 1' \
  -H 'user-agent: Mozilla/5.0 (Windows NT 10.0; WOW64) AppleWebKit/537.36 (KHTML, like Gecko) Chrome/86.0.4240.198 Safari/537.36' \
  -H 'accept: text/html,application/xhtml+xml,application/xml;q=0.9,image/avif,image/webp,image/apng,*/*;q=0.8,application/signed-exchange;v=b3;q=0.9' \
  -H 'sec-fetch-site: same-origin' \
  -H 'sec-fetch-mode: navigate' \
  -H 'sec-fetch-user: ?1' \
  -H 'sec-fetch-dest: document' \
  -H 'referer: https://pypi.org/' \
  -H 'accept-language: zh-CN,zh;q=0.9' \
  -H 'if-none-match: "aHcyOtSkyMSZwaPVSUwL1g"' \
  --compressed"""
output = curlCmdGenPyScript(curl_cmd)
print(output)


Download files
Download the file for your platform. If you're not sure which to choose, learn more about installing packages.
Source Distribution
Built Distribution
Filter files by name, interpreter, ABI, and platform.
If you're not sure about the file name format, learn more about wheel file names.
Copy a direct link to the current filters
File details
Details for the file filestools-0.2.1.tar.gz.
File metadata
- Download URL: filestools-0.2.1.tar.gz
- Upload date:
- Size: 2.9 MB
- Tags: Source
- Uploaded using Trusted Publishing? No
- Uploaded via: twine/4.0.2 CPython/3.8.18
File hashes
| Algorithm | Hash digest | |
|---|---|---|
| SHA256 |
b5da202cf89a123d31af3594694142f43d945ab660114b7a839ab4543a2e62a1
|
|
| MD5 |
180763132b7bfaa6d2d73485cda8e8a7
|
|
| BLAKE2b-256 |
3d946f0e3be6405eca4d3ffe6def7cba778119ee9ccd082d42ed8d613d7c3b95
|
File details
Details for the file filestools-0.2.1-py3-none-any.whl.
File metadata
- Download URL: filestools-0.2.1-py3-none-any.whl
- Upload date:
- Size: 2.9 MB
- Tags: Python 3
- Uploaded using Trusted Publishing? No
- Uploaded via: twine/4.0.2 CPython/3.8.18
File hashes
| Algorithm | Hash digest | |
|---|---|---|
| SHA256 |
522c8e1bcea1a29d8d21e7de7e2e6021310103f8f86720a48ae50a25e66fc390
|
|
| MD5 |
76fc3892a44489b405f40f3b97b61396
|
|
| BLAKE2b-256 |
24ed1b6728f2a7b7066bed7506687adb4a17fd2f1d693c4be8113e9b9d254377
|


