flatpoints


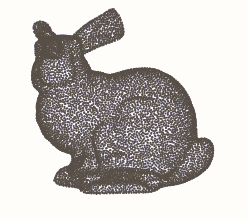
Turn a 3D point cloud sampled on a latent (unknown) surface into something flat.
| INPUT: raw point cloud | OUTPUT: flat transformation |
|---|---|
 |
 |
▶️ bunny 🐇
▶️ dragon🐉
▶️ elephant 🐘 \
flatpoints takes a raw point cloud (N, 3) and arranges its points on a square (n, n)
grid of pixels:
- one pixel per point: each point gets its own pixel, idx -> (row, column)
- neighbour pixels hold neighbour points: two adjacent pixels hold two points close on the surface, so the image is a continuous picture of the surface.
Any data attached to the points, (N, *C), then becomes an image (n, n, *C): the xyz
coordinates, normals, colours, features... and the whole 2D toolbox applies to the point
cloud: convolutions and CNNs, SVD, grid interpolation…
This is the idea of the geometry images of Gu, Gortler & Hoppe (2002), which remesh a surface onto a completely regular grid. flatpoints applies it directly to a point cloud. How it works: see Method.md.
Install
pip install flatpoints                # core: numpy, scipy, gridpoints, open3d
pip install "flatpoints[viz]"         # + matplotlib, Pillow (plots, animations)
pip install "flatpoints[compress]"    # + PyWavelets, Pillow (compression)
#or pip install "flatpoints[all]"     # (everything)
Quickstart
Take a raw 3D point cloud (N, 3) and turn it into images.
Available models: bunny, dragon, elephant, airplane, cow, everest… (fp.datasets())
import flatpoints as fp
fp.exemple_flat("bunny")   # prints the shapes, plots the surface and its images
fp.exemple_flat("bunny", save="plots", animate=True)  # + saves plots/bunny.png and plots/animation/bunny.webp
Usage
import numpy as np
import flatpoints as fp

xyz = fp.load("bunny") #raw (N, 3) points, on a latent (unknown) surface
z = xyz[:, -1] #(N, *C) any data related to the point cloud, e.g. the z coordinate

# ==== Build the flat object ============

flat = fp.Flat(xyz) # Apply the flattening processing of the surface

# ==== Use it: pixels and images ========

i = 42 #point with index 42 (xyz[42])
face, row, col = flat.pixels[i] # face: 0 or 1 (see the Cut section)
image_z = flat.to_image(z)    # full pixel image,  (N, *C) to  (1, n, n, *C) or (2, n, n, *C)
fig = flat.plot()           # the surface in 3D and its images
fig = flat.imshow(z)        # plot any data on the images
anim = flat.imshow(z, animate="z.webp") # animated version
Cut
To map the surface properly to a square, flatpoints need to cut it first in two hemispheres
if needed. The hemispheric cut will remove some (not all) topological closedness. Residual
closedness (e.g. for a torus, which cannot be opened by a single cut) will also be automatically
cut by shearing the surface further on each hemisphere.
- Use
fp.Flat(points, single_face=True)for an open surface (e.g. a terrain),
to flatten it on a single image. - Use
fp.Flat(points, single_face=False)for a closed surface (e.g. a dragon),
to flatten left and right hemispheres independently, on two images.
normal_axis (fp.Flat(points, single_face=..., normal_axis = "x")) is the axis the
surface is seen along. With single_face = False (two hemispheres), the surface is cut
roughly across it, so it has a strong impact on the result: choose an axis consistent
with your point cloud (e.g. the third axis of a PCA). With single_face = True (open
surface), it only orients the image (which way is up, where the corners go); the mesh
itself is built in 3D, without any projection.
See fp.exemple_flat (examples.py).
Application: resampling a point cloud
fp.exemple_sampler("bunny", save="plots") # plots/resampling/bunny_resampled.png
Sampling from a mesh is easy: sample uniformly on each triangle. Resampling from a point cloud is harder, because there is no surface to sample from, only points.
The images provide that missing surface: to_image(xyz) maps the unit square onto the
cloud. So one can sample points in the unit square and transport them onto the surface by
bilinear interpolation of the xyz image, (row, col) → xyz.
By default, flat.resample uses a hyperuniform 2D seed (blue noise), so the new points are
fairly evenly spread over the surface.
sampler = flat.resample(n_points=512)   # n new points in total
new = sampler.points                    # (512, 3)
sampler.plot()                          # before / after
other = flat.resample(n_points=512, seed=1)  # a new resampling, with different seed
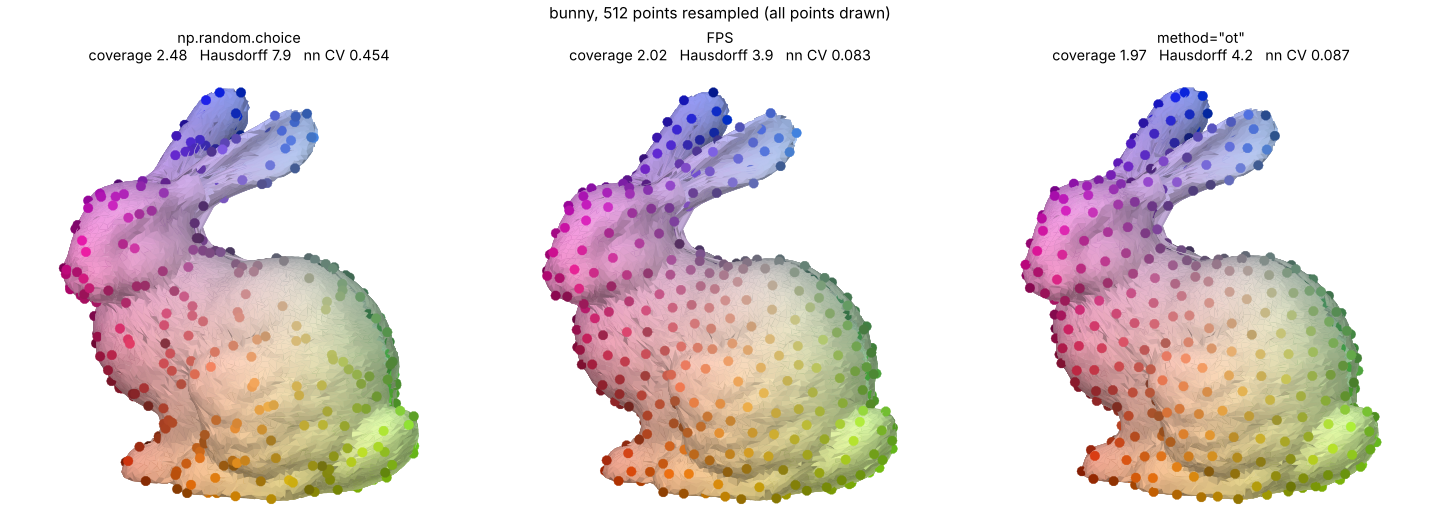
To be honest: if you only need a subset of the input points, farthest point sampling (FPS) are more uniform than flatpoints (figure below), this is mainly an exemple usecase to show how to use the images to transport properties (like good spatial repartition) from the simple unit square to an arbitrary surface.
Application: compressing a point cloud
needs PyWavelets and Pillow (pip install "flatpoints[compress]")
fp.exemple_compression("bunny", save="plots") # plots/compression/bunny.png
Since neighbour pixels hold neighbour points, the xyz images are smooth, and smooth images
compress well. flat.compress compresses them with one of three methods
(compressor.py):
"svd": truncated SVD"dct": 2D DCT"wavelet": 2D wavelets
factor is the fraction of the storage saved against the points in float32 (96 bits per
point).
comp = flat.compress(factor=0.8)  # save 80% of the storage, best method
comp.method                       # "dct"
comp.code                         # what is stored, e.g. quantized DCT coefficients and step
comp.points                       # (N, 3) reconstructed points, in the input order
flat.compress(0.8, method="svd")  # a given method
comp.save("compressed.jp2")       #save the compressed structure
points = fp.Compressor.read("compressed.jp2") #reconstructed (N, 3) point cloud

Licence
- code: MIT, except
src/flatpoints/rcm.py. src/flatpoints/rcm.py: Python port (modified) of garyptchoi/rectangular-conformal-map, Copyright (c) 2015-2024 Gary Pui-Tung Choi, Apache License 2.0, see LICENSE-rectangular-conformal-map.src/flatpoints/data/seed.npy(shipped in the package): hyperuniform point cloud from the Hyperuniform samples database, MIT licence.- example point clouds (
data/, downloaded byfp.load, not shipped in the package): third-party models, each under its own terms (some research / non-commercial only), see data/README.md.
Acknowledgement
The concept of a surface stored as a square image comes from the geometry images:
@article{gu2002geometry,
  title   = {Geometry Images},
  author  = {Gu, Xianfeng and Gortler, Steven J. and Hoppe, Hugues},
  journal = {ACM Transactions on Graphics (SIGGRAPH)},
  volume  = {21},
  number  = {3},
  pages   = {355--361},
  year    = {2002},
  doi     = {10.1145/566654.566589}
}
The images rely on the rectangular conformal map of:
@article{meng2016tempo,
  title   = {{TEMPO}: Feature-Endowed {T}eichm{\"u}ller Extremal Mappings of Point Clouds},
  author  = {Meng, Ting Wei and Choi, Gary Pui-Tung and Lui, Lok Ming},
  journal = {SIAM Journal on Imaging Sciences},
  volume  = {9},
  number  = {4},
  pages   = {1922--1962},
  year    = {2016},
  doi     = {10.1137/15M1049117}
}
1 maintainer

Metadata
1 maintainer
Release files for flatpoints 0.1.0
For a detailed explanation of source distributions (sdists) and built distributions (wheels), please see the package formats documentation.
Source distribution (sdist)
| File | Size | Uploaded | Provenance | Actions |
|---|---|---|---|---|
| flatpoints-0.1.0.tar.gz | 992.2 kB | Without provenance | Details for flatpoints-0.1.0.tar.gz |
Built distribution (wheel)
| File | Interpreter | ABI | Platform | Actions Reset |
|---|---|---|---|---|
| flatpoints-0.1.0-py3-none-any.whl | Python 3 | none | any | Details for flatpoints-0.1.0-py3-none-any.whl |
Total release size: 2.0 MB
Release files / flatpoints-0.1.0.tar.gz
| Download URL | flatpoints-0.1.0.tar.gz |
|---|---|
| Size | 992.2 kB |
| Tags | Source |
|
SHA-256 checksum How to use checksums |
912139a5ff3ffcd603b68c49d18f1b5d4975cde59d49a899d86ecbd629817f9a
|
|
BLAKE2b-256 checksum How to use checksums |
01282c50bf3f9b181a1ae86a1e86278b4b2ab308746baa95968f73349d5ba026
|
| Upload date | |
|
Uploaded using Trusted Publishing? What is trusted publishing? |
No |
| Uploaded via |
twine/7.0.0 CPython/3.14.4
|
Release files / flatpoints-0.1.0-py3-none-any.whl
| Download URL | flatpoints-0.1.0-py3-none-any.whl |
|---|---|
| Size | 981.3 kB |
| Tags | Python 3 |
|
SHA-256 checksum How to use checksums |
8c760886acc527434676f03ab91014dec6dd6bf831b89d9cc755301bf8955eb5
|
|
BLAKE2b-256 checksum How to use checksums |
7863deaa1cd4d475fd3fd131d7544040f54813ba4693b2d8b7b26c9254fe0843
|
| Upload date | |
|
Uploaded using Trusted Publishing? What is trusted publishing? |
No |
| Uploaded via |
twine/7.0.0 CPython/3.14.4
|
Security for flatpoints 0.1.0
Provenance
Provenance describes where a file came from. On PyPI, provenance is shared via attestations, which provide a verifiable record of the build or publishing details. View details, limitations and caveats.
No provenance found
None of the files in this release were uploaded with provenance metadata.
A note on package security
PyPI is a repository for distributing packages, not a service for auditing them. While third-party security researchers and our staff do their best to detect and remove malicious packages, PyPI cannot guarantee the quality, security or suitability of any given package.
To learn more about protecting yourself from malicious actors, visit our package security documentation.