A Python framework for creating FSM-based LLM agents

Project description
FSM-based LLM Conversational Agents
This project provides a package framework for creating conversational agents using a Finite State Machine (FSM) powered by Large Language Models (LLMs). It integrates with OpenAI's API and provides an easy way to define states, transitions, and interactions.
This is currently an experimental setup, and also part of a research project I am doing for university. For now it is meant for developers and experimenters mainly. Requires an OpenAI API key (currently tested on gpt-4o-mini and gpt-4o).
Features
- Define states and transitions for your agent using a simple decorator.
- Handle dynamic conversation flow with flexible state management.
- Integrates with GPT models to generate responses based on state context.
Installation
-
Install the package directly from PyPI:
pip install fsm-llm -
Set up environment variables: Create a
.envfile and add your OpenAI API key:OPENAI_API_KEY=your-api-key OPENAI_ORGANIZATION=your-organization-id
Usage Example (On/Off Switch)
0. What is an FSM?
A Finite State Machine (FSM) is a computational model used to design systems that can exist in one of a finite number of states at any given time. The system transitions from one state to another based on specific conditions or inputs.
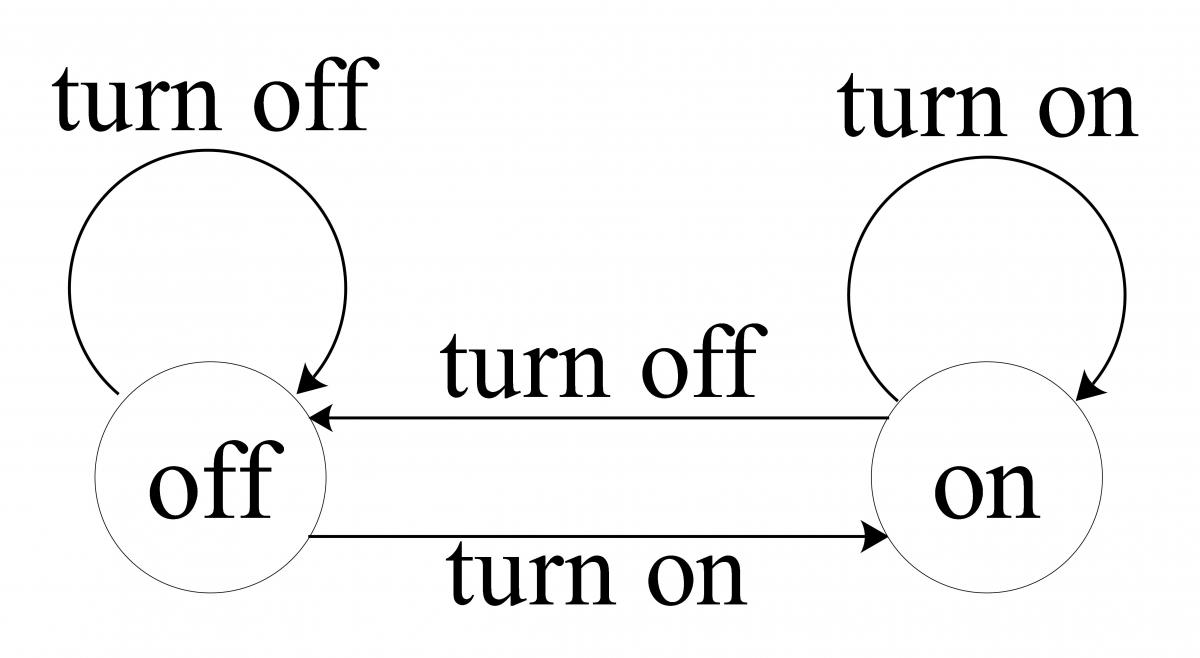
In the example examples/switch_agent.py, the FSM transitions between two states (OFF and ON) based on the input (user pressing the switch). If the user presses the switch while the light is already in the desired state (e.g., turning the light off when it’s already off), the FSM remains in the same state but can trigger additional responses.
1. Creating the FSM (Finite State Machine)
The LLMStateMachine class is the core of the framework. It handles state transitions based on user input.
from fsm_llm import LLMStateMachine

# Create the FSM
fsm = LLMStateMachine(initial_state="START", end_state="END")
2. Defining States with the @fsm.define_state Decorator
The main feature of this framework is the ability to define states using the @fsm.define_state decorator. Each state has a unique key, a prompt that will be used for the LLM, and possible transitions to other states based on user input.
START State
@fsm.define_state(
    state_key="START",
    prompt_template="You are an on-off switcher. Ask the user if they want to turn the switch on or off.",
    transitions={"STATE_ON": "If user wants to turn on the switch", "END": "If user wants to end the conversation"},
)
async def start_state(fsm: LLMStateMachine, response: str, will_transition: bool):
    global SWITCH_STATE
    if will_transition and fsm.get_next_state() == "STATE_ON":
        SWITCH_STATE = "ON"
        print("SWITCH TURNED ON")
    elif will_transition and fsm.get_next_state() == "END":
        return "Goodbye!"
    return response
state_key="START": The name of the state in the FSM.prompt_template: The message that will be used to prompt the LLM. In this case, the agent asks the user if they want to turn the switch on or off.transitions: This defines what happens next based on user input. For example:- If the user wants to turn the switch on, the FSM transitions to the
STATE_ONstate. - If the user wants to end the conversation, the FSM will transition to the
ENDstate.
- If the user wants to turn the switch on, the FSM transitions to the
Inside the function start_state, we check whether the FSM will transition to the STATE_ON or END state. If the transition happens, we update the SWITCH_STATE to "ON".
STATE_ON State
@fsm.define_state(
    state_key="STATE_ON",
    prompt_template="The switch is now on. Ask the user if they want to turn off the switch or end the conversation.",
    transitions={"START": "If user wants to turn off the switch", "END": "If user wants to end the conversation"},
)
async def state_on(fsm: LLMStateMachine, response: str, will_transition: bool):
    global SWITCH_STATE
    if will_transition and fsm.get_next_state() == "START":
        SWITCH_STATE = "OFF"
        print("SWITCH TURNED OFF")
    elif will_transition and fsm.get_next_state() == "END":
        return "Goodbye!"
    return response
The logic inside state_on checks the transition. If the FSM is transitioning back to the START state, it sets the SWITCH_STATE to "OFF".
END State
@fsm.define_state(
    state_key="END",
    prompt_template="Goodbye!",
)
async def end_state(fsm: LLMStateMachine, response: str, will_transition: bool):
    return "Goodbye!"
3. Running the Agent
To run the FSM-based agent, we use an asynchronous loop to interact with the user and process their input.
from fsm_llm.state_models import FSMRun
async def main():
    """Example of a simple on-off switch FSM using LLMStateMachine"""
    # Create the OpenAI client
    openai_client = openai.AsyncOpenAI()

    print("Agent: Hi. I am an on-off switch manager.")
    while not fsm.is_completed():  # Run until FSM reaches the END state
        user_input = input("Your input: ")
        if user_input.lower() in ["quit", "exit"]:
            fsm.set_next_state("END")
            break
        run_state: FSMRun = await fsm.run_state_machine(openai_client, user_input=user_input)
        print(f"Agent: {run_state.response}")
        print("CURRENT SWITCH STATE:", SWITCH_STATE)

    print("Agent: Goodbye.")
while not fsm.is_completed(): The loop continues running until the FSM reaches theENDstate.user_input: The user provides input, which the FSM processes.fsm.run_state_machine: This method processes the current state and transitions based on the user's input. The OpenAI client is used to get the response.SWITCH_STATE: After each interaction, the current state of the switch (on or off) is printed.
Examples
- Light Switch Agent: A simple agent that asks the user whether they want to turn a switch on or off.
switch_agent.py - Customer Support Agent: A bot that collects user details and assists with customer queries.
support_agent.py - Medical Triage Agent: A complex agent that helps assess if a medical situation is an emergency and collects patient data.
medical_agent.py


Download files
Download the file for your platform. If you're not sure which to choose, learn more about installing packages.
Source Distribution
Built Distribution
Filter files by name, interpreter, ABI, and platform.
If you're not sure about the file name format, learn more about wheel file names.
Copy a direct link to the current filters
File details
Details for the file fsm_llm-0.1.3.tar.gz.
File metadata
- Download URL: fsm_llm-0.1.3.tar.gz
- Upload date:
- Size: 15.3 kB
- Tags: Source
- Uploaded using Trusted Publishing? No
- Uploaded via: twine/6.0.1 CPython/3.11.4
File hashes
| Algorithm | Hash digest | |
|---|---|---|
| SHA256 |
1c28492e27568741d1733402487958cad0fef3a8831fdaa9d8f3639c6f3e9b66
|
|
| MD5 |
4b9197ac50699ab2d7d9afaaf495ca19
|
|
| BLAKE2b-256 |
fdf7291edccc3a4227e11f7a132fbfc68ce64dcc5bdc6705cdb0bc474eeaae27
|
File details
Details for the file fsm_llm-0.1.3-py3-none-any.whl.
File metadata
- Download URL: fsm_llm-0.1.3-py3-none-any.whl
- Upload date:
- Size: 14.3 kB
- Tags: Python 3
- Uploaded using Trusted Publishing? No
- Uploaded via: twine/6.0.1 CPython/3.11.4
File hashes
| Algorithm | Hash digest | |
|---|---|---|
| SHA256 |
bd90b88c9cc5b947c7165053ca951ff8aa39039df81b050d7dfcef99f1b155b9
|
|
| MD5 |
fa7bdf10ee0863076b1496a0491ce380
|
|
| BLAKE2b-256 |
282f351bc7c91071d99c2da5fa8df6d900215d1afc9e8cbd2b4689b2a9a2136b
|


