Free and open source library for AI object detection and semantic segmentation in geospatial rasters
Verified details
These details have been verified by PyPIProject links
GitHub Statistics
Maintainers

Project description
GeoDeep
A fast, easy to use, lightweight Python library for AI object detection and semantic segmentation in geospatial rasters (GeoTIFFs), with pre-built models included.
Install
pip install -U geodeep
Usage
From the command line
geodeep [geotiff] [model ID or path to ONNX model]
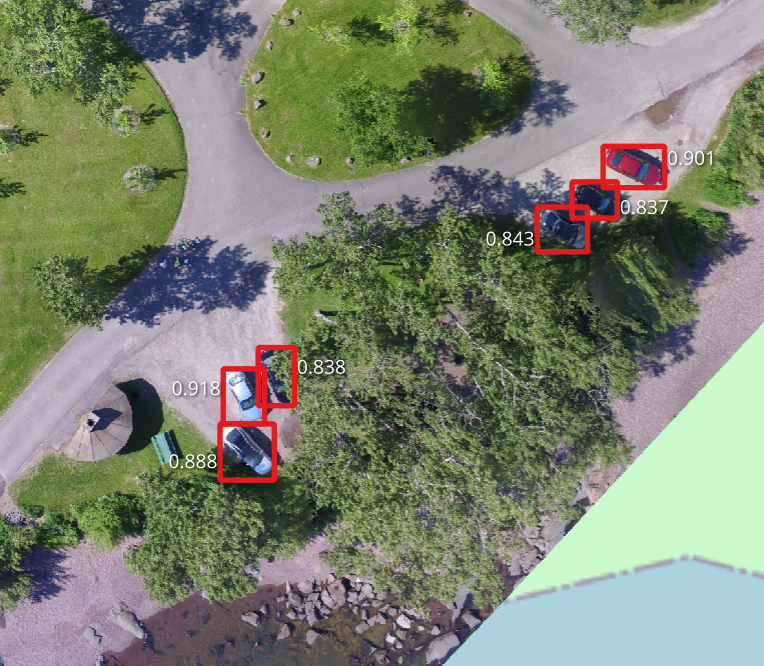
Object Detection
geodeep orthophoto.tif cars
This will create a GeoJSON file with the bounding boxes, confidence scores and class labels of all cars detected in the orthophoto.
Semantic Segmentation
geodeep orthophoto.tif buildings
Areas that correspond to buildings will be saved as a GeoJSON file containing the polygons that approximate the building footprints. You can also export a georeferenced raster mask via:
geodeep orthophoto.tif buildings -t mask
Note you should not expect the output mask to have the same width and height as the input raster, since most models are trained at a different resolution. You can always resize the mask later.
A list of up-to-date model IDs can be retrieved via:
geodeep --list-models
See also geodeep --help.
From Python
Object Detection
from geodeep import detect
bboxes, scores, classes = detect('orthophoto.tif', 'cars')
print(bboxes) # <-- [[x_min, y_min, x_max, y_max], [...]]
print(scores) # <-- [score, ...]
print(classes) # <-- [(id: int, label: str), ...]

geojson = detect('orthophoto.tif', 'cars', output_type="geojson")
Semantic Segmentation
from geodeep import segment
from geodeep.segmentation import save_mask_to_raster
mask = segment('orthophoto.tif', 'buildings')
print(mask.shape) # <-- np.ndarray([height, width], dtype=np.uint8)

save_mask_to_raster('orthophoto.tif', mask, 'segmentation.tif')
Models by default will be cached in ~/.cache/geodeep. You can change that with:
from geodeep import models
models.cache_dir = "your/cache/path"
Models
Object Detection
| Model | Description | Resolution (cm/px) | Experimental | Classes |
|---|---|---|---|---|
| cars | YOLOv7-m model for cars detection on aerial images. Based on ITCVD. | 10 | car | |
| trees | Retinanet tree crown detection model from DeepForest | 10 | :heavy_check_mark: | tree |
| trees_yolov9 | YOLOv9 model for treetops detection on aerial images. Model is trained on a mix of publicly available datasets. | 10 | :heavy_check_mark: | tree |
| birds | Retinanet bird detection model from DeepForest | 2 | :heavy_check_mark: | bird |
| planes | YOLOv7 tiny model for object detection on satellite images. Based on the Airbus Aircraft Detection dataset. | 70 | :heavy_check_mark: | plane |
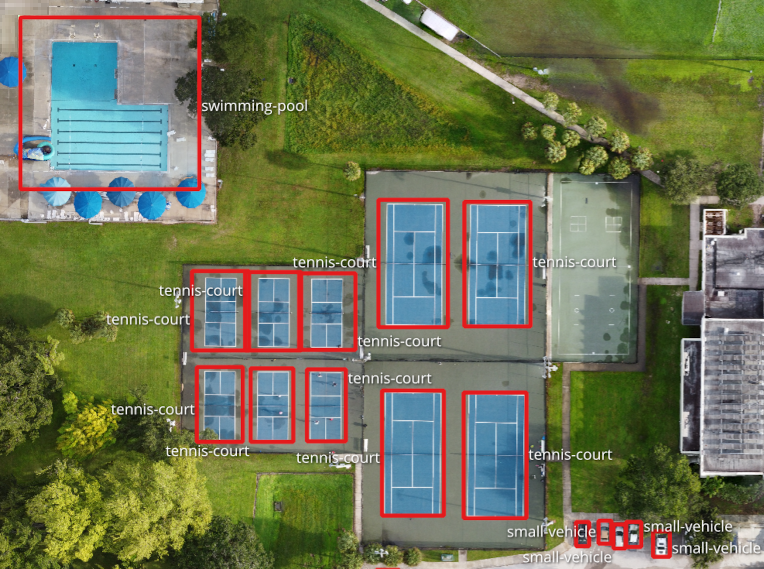
| aerovision | YOLOv8 model for multi-class detection on aerial images. | 30 | :heavy_check_mark: | [1] |
| utilities | YOLOv8 model for detecting paint markings placed on the ground by utility locators that commonly work for 811 Call before you dig. | 3 | :heavy_check_mark: | [2] |
- small-vehicle, large-vehicle,plane,storage-tank,boat,dock,track-field,soccer-field,tennis-court,swimming-pool,baseball-field,road-circle,basketball-court,bridge,helicopter,crane
- Gas, Manhole, Power, Reclaimed, Sewer, Telecom, Water
Semantic Segmentation
| Model | Description | Resolution (cm/px) | Experimental | Classes |
|---|---|---|---|---|
| buildings | Trained on RampDataset. Annotation masks for buildings and background. | 50 | :heavy_check_mark: | Background, Building |
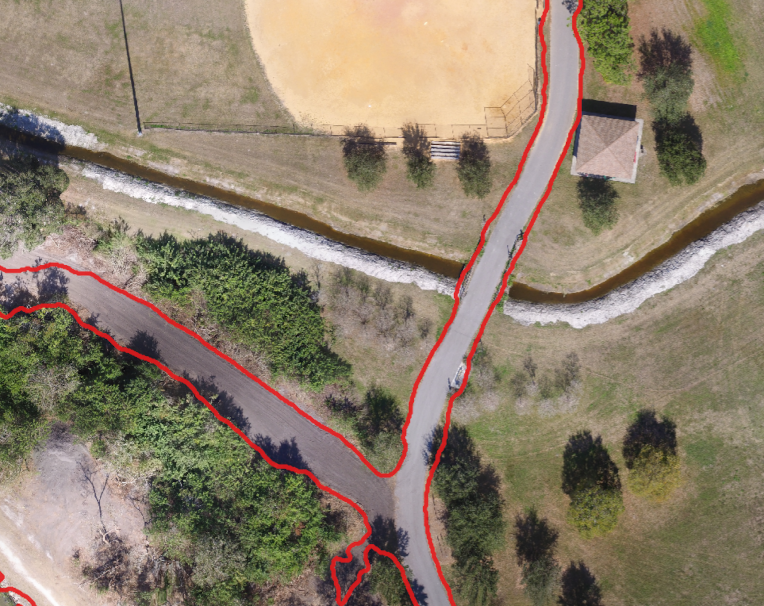
| roads | The model segments the Google Earth satellite images into ‘road’ and ‘not-road’ classes. Model works best on wide car roads, crossroads and roundabouts. | 21 | :heavy_check_mark: | not_road, road |
All ONNX models are published on https://huggingface.co/datasets/UAV4GEO/GeoDeep-Models
Training Detection Models
In short, first you need to train a YOLO model, then you run yolo2geodeep. See below for details. If you already have a YOLO model, skip directly to Step 3.
Requirements
You need a decent GPU and plenty of RAM. It's possible to train models on a CPU, but it will take weeks (maybe even months). There's also platforms that will do the training for you if you don't have the necessary hardware.
Step 1. Gather annotated images
A good point to start is https://universe.roboflow.com/browse/aerial, but the quality of the datasets is all over the place. Always inspect before using. When downloading a dataset, choose the YOLOv8 format.
You can also annotate your own images.
Aim to gather at least 1000 training images for decent results.
Step 2. Train a YOLO model
For up to date instructions, follow the steps on https://docs.ultralytics.com/modes/train/. Also make sure to install a GPU version of pytorch (https://pytorch.org/get-started/locally/).
Once you have a folder with your annotated images (e.g. dataset/train, dataset/valid), check your data.yaml to make sure you have the correct number of classes, then run:
yolo train task=detect model=yolov8s.pt data=dataset\data.yaml epochs=400
There's also several settings you can tweak, but start with the defaults.
Once the processes is done, you'll end up with a best.pt (model weights) file, usually in runs/detect/trainX/weights/best.pt.
Step 3. Convert the YOLO model to ONNX
Before converting, you should estimate the ground sampling distance (GSD) resolution of your training data (in cm/px). This affects the model quality quite a bit so it's important to have a good estimate. If you're unsure, you can just start with a reasonable value (e.g. 10 or 20 for aerial datasets) and run a few experiments to see which value yields the best results.
Then:
yolo2geodeep runs/detect/trainX/weights/best.pt [resolution]

[...]
Wrote runs/detect/trainX/weights/best.quant.onnx <-- Use this with GeoDeep
You can finally run:
geodeep orthophoto.tif runs/detect/trainX/weights/best.quant.onnx
You can also convert existing ONNX models for use with GeoDeep. See the retinanet conversion script for an example. In some cases modifications to GeoDeep might be required if the model architecture is not supported. Currently GeoDeep supports:
- YOLO 5,6,7,8,9
- Retinanet
Other architectures can be added. Pull requests welcome!
Step 4. (Optional) Share Your Model
The most convenient way to deploy your model is to share it. Open a pull request on https://huggingface.co/datasets/UAV4GEO/GeoDeep-Models and we'll include it in GeoDeep!
Training Segmentation Models
Instructions coming soon!
Inspect Models
You can inspect an existing model by running:
geodeep-inspect [model ID or path to ONNX model]
For example:
geodeep-inspect cars

det_type: YOLO_v5_or_v7_default
det_conf: 0.3
det_iou_thresh: 0.8
classes: []
resolution: 10.0
class_names: {'0': 'car'}
model_type: Detector
tiles_overlap: 10.0
tiles_size: 640
input_shape: [1, 3, 640, 640]
input_name: images
Why GeoDeep?
Compared to other software packages (e.g. Deepness), GeoDeep relies only on two dependencies, rasterio and onnxruntime. This makes it simple and lightweight.
Does this need a GPU?
It does not! Models are tuned to run fast on the CPU.
Contributing
We welcome contributions! Pull requests are welcome.
Roadmap Ideas
- Train more models
- Faster inference optimizations
Support the Project
There are many ways to contribute to the project:
- ⭐️ us on GitHub.
- Help us test the application.
- Become a contributor!
Credits
GeoDeep was inspired and uses some code from Deepness and DeepForest.
License
The code in this repository is licensed under the AGPLv3.
Made with ❤️ by UAV4GEO
Project details
Verified details
These details have been verified by PyPIProject links
GitHub Statistics
Maintainers
Release history Release notifications | RSS feed


Download files
Download the file for your platform. If you're not sure which to choose, learn more about installing packages.
Source Distribution
Built Distribution
Filter files by name, interpreter, ABI, and platform.
If you're not sure about the file name format, learn more about wheel file names.
Copy a direct link to the current filters
File details
Details for the file geodeep-0.9.11.tar.gz.
File metadata
- Download URL: geodeep-0.9.11.tar.gz
- Upload date:
- Size: 46.5 kB
- Tags: Source
- Uploaded using Trusted Publishing? Yes
- Uploaded via: twine/6.1.0 CPython/3.12.9
File hashes
| Algorithm | Hash digest | |
|---|---|---|
| SHA256 |
14d90559a30e5e96b59418975d8f3182eae6530bd87fdd00f349954a6a39d24d
|
|
| MD5 |
048a521d854eecd4c4a3576ca7307ec3
|
|
| BLAKE2b-256 |
1084b1a2ad905aa01c6cc588ab79de0407934d08287acce8b6bc4f35d7eb5897
|
Provenance
The following attestation bundles were made for geodeep-0.9.11.tar.gz:
Publisher:
publish.yml on uav4geo/GeoDeep
-
Statement:
-
Statement type:
https://in-toto.io/Statement/v1 -
Predicate type:
https://docs.pypi.org/attestations/publish/v1 -
Subject name:
geodeep-0.9.11.tar.gz -
Subject digest:
14d90559a30e5e96b59418975d8f3182eae6530bd87fdd00f349954a6a39d24d - Sigstore transparency entry: 173316870
- Sigstore integration time:
-
Permalink:
uav4geo/GeoDeep@a261565e130e734da6ed276a07d411c91116483f -
Branch / Tag:
refs/tags/v0.9.11 - Owner: https://github.com/uav4geo
-
Access:
public
-
Token Issuer:
https://token.actions.githubusercontent.com -
Runner Environment:
github-hosted -
Publication workflow:
publish.yml@a261565e130e734da6ed276a07d411c91116483f -
Trigger Event:
release
-
Statement type:
File details
Details for the file geodeep-0.9.11-py3-none-any.whl.
File metadata
- Download URL: geodeep-0.9.11-py3-none-any.whl
- Upload date:
- Size: 47.8 kB
- Tags: Python 3
- Uploaded using Trusted Publishing? Yes
- Uploaded via: twine/6.1.0 CPython/3.12.9
File hashes
| Algorithm | Hash digest | |
|---|---|---|
| SHA256 |
cae8865d05283811678fd639617d8ff0d5bb303b7a817f42e1656afe935287a8
|
|
| MD5 |
377b36e14e3bc1b7b7a70cbce3b2b8b0
|
|
| BLAKE2b-256 |
b9efe47109c511bd618641dc6eee4e557391e0f96e33b0ab5810082973f89a4a
|
Provenance
The following attestation bundles were made for geodeep-0.9.11-py3-none-any.whl:
Publisher:
publish.yml on uav4geo/GeoDeep
-
Statement:
-
Statement type:
https://in-toto.io/Statement/v1 -
Predicate type:
https://docs.pypi.org/attestations/publish/v1 -
Subject name:
geodeep-0.9.11-py3-none-any.whl -
Subject digest:
cae8865d05283811678fd639617d8ff0d5bb303b7a817f42e1656afe935287a8 - Sigstore transparency entry: 173316871
- Sigstore integration time:
-
Permalink:
uav4geo/GeoDeep@a261565e130e734da6ed276a07d411c91116483f -
Branch / Tag:
refs/tags/v0.9.11 - Owner: https://github.com/uav4geo
-
Access:
public
-
Token Issuer:
https://token.actions.githubusercontent.com -
Runner Environment:
github-hosted -
Publication workflow:
publish.yml@a261565e130e734da6ed276a07d411c91116483f -
Trigger Event:
release
-
Statement type:


