
Fast implementation of asyncio event loop on top of libuv

Project description



uvloop is a fast, drop-in replacement of the built-in asyncio event loop. uvloop is implemented in Cython and uses libuv under the hood.
The project documentation can be found here. Please also check out the wiki.
Performance
uvloop makes asyncio 2-4x faster.
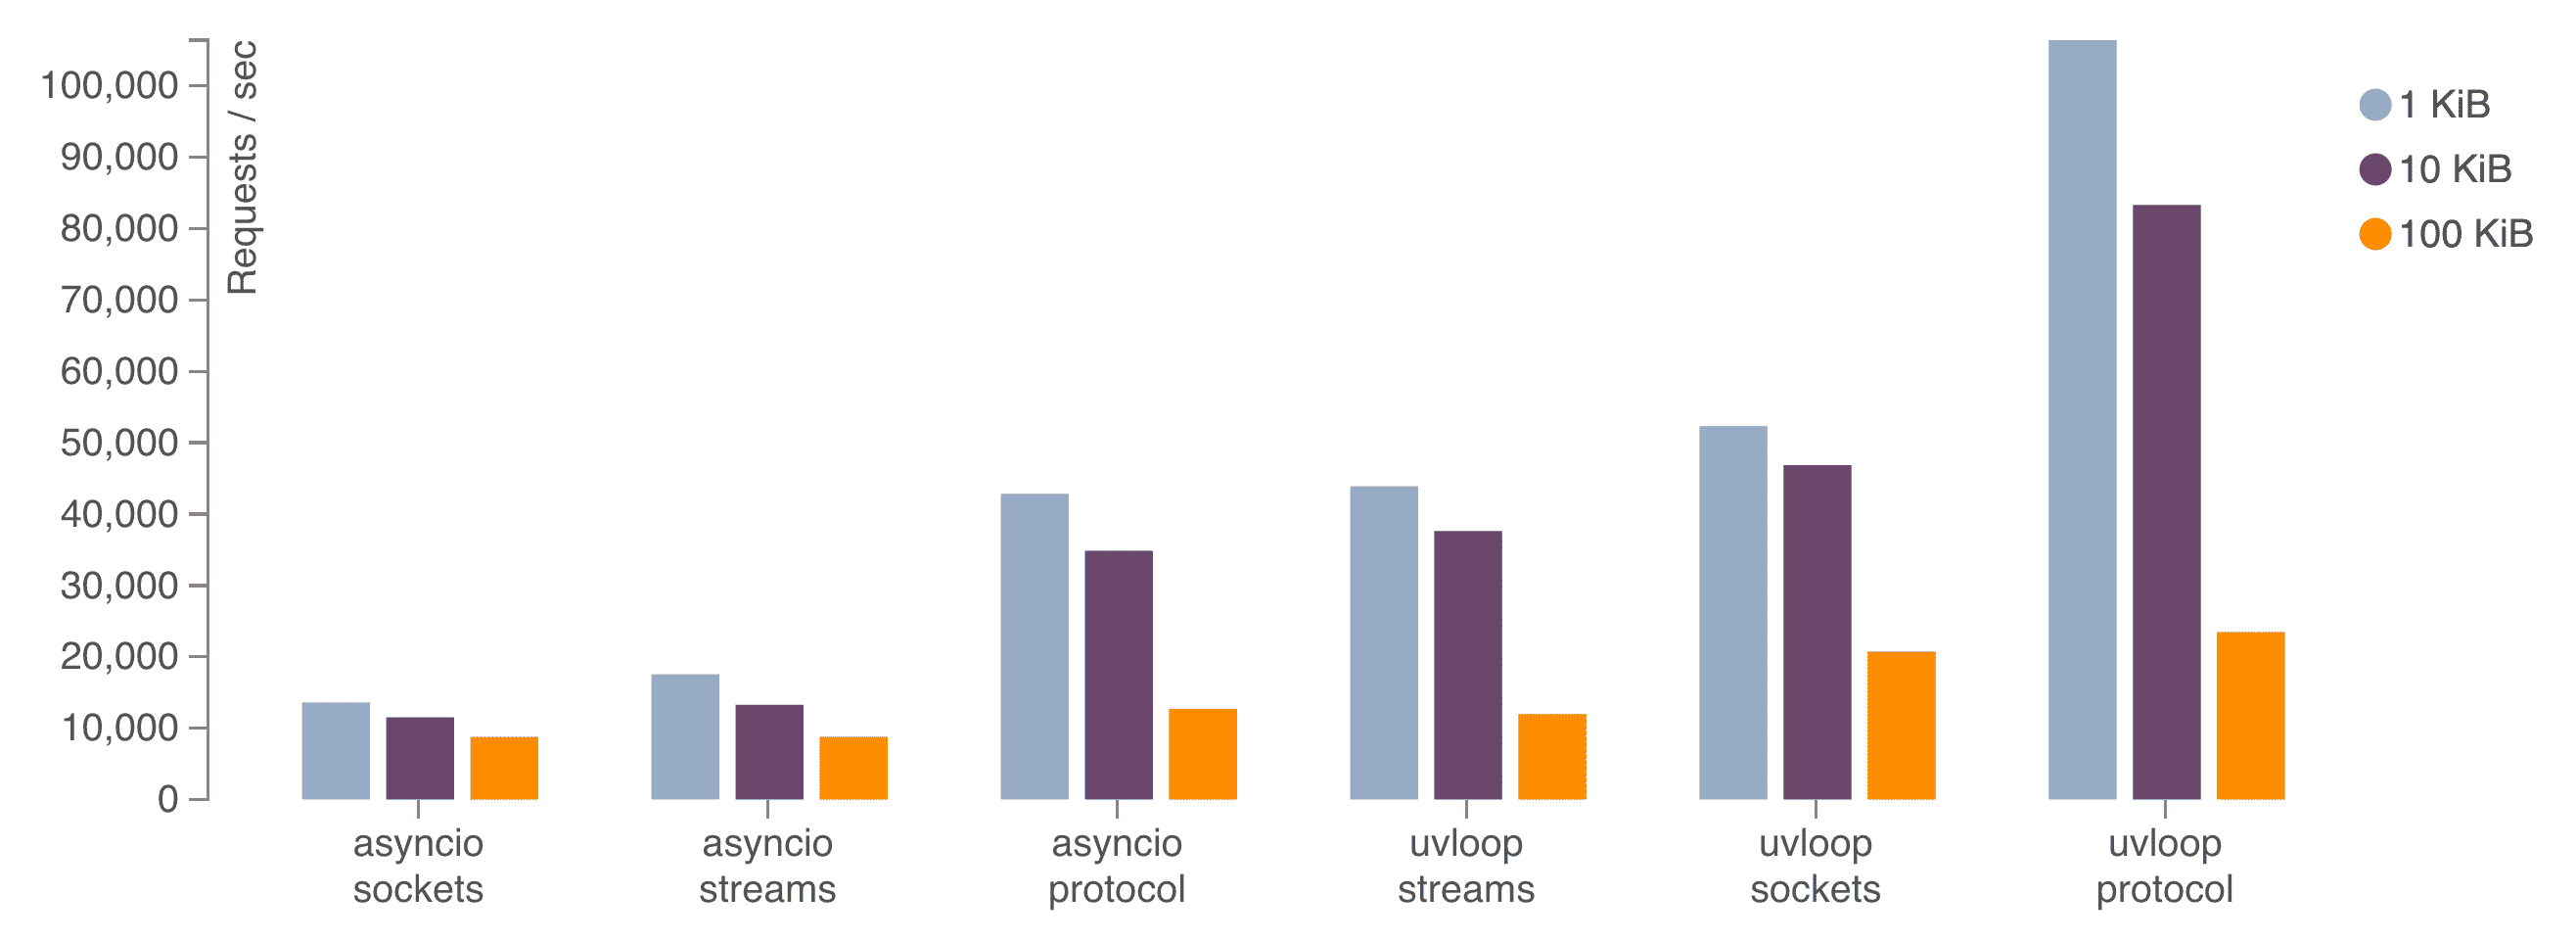
The above chart shows the performance of an echo server with different message sizes. The sockets benchmark uses loop.sock_recv() and loop.sock_sendall() methods; the streams benchmark uses asyncio high-level streams, created by the asyncio.start_server() function; and the protocol benchmark uses loop.create_server() with a simple echo protocol. Read more about uvloop in a blog post about it.
Installation
uvloop requires Python 3.8 or greater and is available on PyPI. Use pip to install it:
$ pip install uvloop
Note that it is highly recommended to upgrade pip before installing uvloop with:
$ pip install -U pip
Using uvloop
As of uvloop 0.18, the preferred way of using it is via the uvloop.run() helper function:
import uvloop

async def main():
    # Main entry-point.
    ...

uvloop.run(main())
uvloop.run() works by simply configuring asyncio.run() to use uvloop, passing all of the arguments to it, such as debug, e.g. uvloop.run(main(), debug=True).
With Python 3.11 and earlier the following alternative snippet can be used:
import asyncio
import sys

import uvloop

async def main():
    # Main entry-point.
    ...

if sys.version_info >= (3, 11):
    with asyncio.Runner(loop_factory=uvloop.new_event_loop) as runner:
        runner.run(main())
else:
    uvloop.install()
    asyncio.run(main())
Building From Source
To build uvloop, you’ll need Python 3.8 or greater:
Clone the repository:
$ git clone --recursive git@github.com:MagicStack/uvloop.git
$ cd uvloop
Create a virtual environment and activate it:
$ python3 -m venv uvloop-dev
$ source uvloop-dev/bin/activate
Install development dependencies:
$ pip install -e .[dev]Build and run tests:
$ make
$ make test
License
uvloop is dual-licensed under MIT and Apache 2.0 licenses.
Release history Release notifications | RSS feed

Download files
Download the file for your platform. If you're not sure which to choose, learn more about installing packages.
Source Distribution
File details
Details for the file gerokgak-0.22.1.tar.gz.
File metadata
- Download URL: gerokgak-0.22.1.tar.gz
- Upload date:
- Size: 2.4 MB
- Tags: Source
- Uploaded using Trusted Publishing? No
- Uploaded via: twine/6.2.0 CPython/3.12.11
File hashes
| Algorithm | Hash digest | |
|---|---|---|
| SHA256 |
f0bc8de107144a731abe55f3431fdbaffc9dcf6618ff2ea58b17b2e8d4136ef6
|
|
| MD5 |
c3c089024af0ddce7e0bb31c0da1be2a
|
|
| BLAKE2b-256 |
52377a596f1b4342b21d59246bf898cc68f090f0c9dc33ce967172b6bcac1bc6
|






