Automatic determination of accuracy of wearable eye tracker recordings.

Project description


GlassesValidator v3.2.0
Tool for automatic determination of data quality (accuracy and precision) of wearable eye tracker recordings.
If you use this tool or any of the code in this repository, please cite:
Niehorster, D.C., Hessels, R.S., Benjamins, J.S., Nyström, M. and Hooge, I.T.C. (2023). GlassesValidator:
A data quality tool for eye tracking glasses. Behavior Research Methods. doi: 10.3758/s13428-023-02105-5 (BibTeX)
How to acquire
GlassesValidator is available from https://github.com/dcnieho/glassesValidator, and supports Python 3.11 on Windows, MacOS and Linux (newer versions of Python should work fine but are not tested).
Complete installation instruction for using the glassesValidator GUI on Windows, MacOS and Linux users are available below.
Note that the standaloen executable version of glassesValidator is discontinued. The last executable was for the 2.3.0 release.
For users on Windows, Mac (14 Sonoma or later) or Linux who wish to use glassesValidator in their Python code, the easiest way to acquire
glassesValidator is to install it directly into your Python distribution using the command
python -m pip install glassesValidator.
If you run into problems on MacOS to install the imgui_bundle package, you can
try to install it first with the command SYSTEM_VERSION_COMPAT=0 pip install --only-binary=:all: imgui_bundle==1.6.2. Note that this repository itself is pip-installable as well:
python -m pip install git+https://github.com/dcnieho/glassesValidator.git#egg=glassesValidator. NB: on some platforms you may have
to replace python with python3 in the above command lines.
Once pip-installed in your Python distribution, there are three ways to run the GUI on any of the supported operating systems:
- Directly in the terminal of your operating system, type
glassesValidatorand run it (NB: this does not appear to work in Anaconda environments, use one of the below methods for those). - Open a Python console. From such a console, running the GUI requires only the following two lines of code:
import glassesValidator
glassesValidator.GUI.run()
- If you run the glassesValidator's GUI from a script, make sure to wrap your script in
if __name__=="__main__". This is required for correct operation from a script because the GUI uses multiprocessing functionality. Do as follows:if __name__=="__main__": import glassesValidator glassesValidator.GUI.run()
Complete instructions for Windows
Installing and running glassesValidator on Windows will involve some use of the terminal. In this section we will show you step by step how to install, and then what to do every time you want to run glassesValidator.
Installing glassesValidator
- If you do not yet have Python on your machine, you need to first install it. In these instructions we use the Miniforge clone of conda, but Anaconda or a bare Python installation (3.11 or later) would also work. To acquire and manage Python, install Miniforge by following these instructions.
- Once Miniforge is installed, open the Miniforge Prompt from the Start menu.
- You now first need to make an environment with the correct Python version in which you can then install glassesValidator. To do so, type
conda create -n glassesValidator-env python=3.11 pipand run the command.glassesValidator-envis the name of the environment you create with this comment. - Activate the environment you have just created:
conda activate glassesValidator-env. - Now you need to install glassesValidator into this environment. To do so, type and run
pip install glassesValidator.
Running glassesValidator
If you have followed the above instructions to install glassesValidator, do the following each time you want to run glassesValidator:
- Open the Miniforge Prompt application.
- Activate the environment in which you have glassesValidator installed: type and run
conda activate glassesValidator-env, whereglassesValidator-envis the name of the environment you created using the above instructions. If you use an environment with a different name, replace the name in the command. - Type and run
glassesValidatorin the Powershell prompt.
Updating glassesValidator
If you already have glassesValidator installed but want to update it to the latest version, do the following:
- Open the Miniforge Prompt application.
- Activate the environment in which you have glassesValidator installed: type and run
conda activate glassesValidator-env, whereglassesValidator-envis the name of the environment you created using the above instructions. If you use an environment with a different name, replace the name in the command. - Type and run
pip install glassesValidator --upgrade.
Complete instructions for MacOS
Installing and running glassesValidator on a Mac will involve some use of the terminal. In this section we will show you step by step how to install, and then what to do every time you want to run glassesValidator. MacOS 14 (Sonoma) or later are supported.
Note that it is critical on MacOS that glassesValidator is installed natively, and not under Rosetta or Parallels. That will lead to an error when importing the polars package, and other unfixable errors. If you are not sure what kind of system you have, consult this page to learn how to find out.
Installing glassesValidator
- To acquire and manage Python, install Miniforge either by following these instructions, or by issuing
brew install miniforgeif you have homebrew installed. Additional notes:- Ensure that you choose the correct installer for your system (Intel or Apple Silicon). If you are not sure what kind of system you have, consult this page to learn how to find out.
- Once Miniforge is installed, open the Terminal application.
- You now first need to make an environment with the correct Python version in which you can then install glassesValidator. To do so, type
conda create -n glassesValidator-env python=3.11 pipand run the command.glassesValidator-envis the name of the environment you create with this comment. - Activate the environment you have just created:
conda activate glassesValidator-env. - Now you need to install glassesValidator. Do the following in the below order:
- Type and run
SYSTEM_VERSION_COMPAT=0 pip install --only-binary=:all: imgui_bundle==1.6.2 - Type and run
pip install glassesValidator.
- Type and run
Running glassesValidator
If you have followed the above instructions to install glassesValidator, do the following each time you want to run glassesValidator:
- Open the Terminal application.
- Activate the environment in which you have glassesValidator installed: type and run
conda activate glassesValidator-env, whereglassesValidator-envis the name of the environment you created using the above instructions. If you use an environment with a different name, replace the name in the command. - Start the Python interpreter: type and run
python. - Type and run
import glassesValidator. - Type and run
glassesValidator.GUI.run().
Updating glassesValidator
If you already have glassesValidator installed but want to update it to the latest version, do the following:
- Open the Terminal application.
- Activate the environment in which you have glassesValidator installed: type and run
conda activate glassesValidator-env, whereglassesValidator-envis the name of the environment you created using the above instructions. If you use an environment with a different name, replace the name in the command. - Type and run
SYSTEM_VERSION_COMPAT=0 pip install --only-binary=:all: imgui_bundle==1.6.2 - Type and run
pip install glassesValidator --upgrade.
Complete instructions for Linux
Installing and running glassesValidator on Linux will involve some use of the terminal. In this section we will show you step by step how to install, and then what to do every time you want to run glassesValidator.
Installing glassesValidator
- You may well already have Python installed on your machine. To check, type and run
python3 --versionin a terminal. If this command completes successfully and shows you have Python 3.11 or later, you can skip to step 3. - To install Python, check what is the appropriate command for your Linux distribution. Examples would be
sudo apt-get update && sudo apt-get install python3.11for Ubuntu and its derivatives, andsudo dnf install python3.11for Fedora. You can replacepython3.11in this command with a different version (minimum 3.11). You may also opt to install Miniforge by following these instructions. - Make a new folder from where you want to run glassesValidator, e.g.
mkdir glassesValidator. Enter this folder:cd glassesValidator. - You now first need to make an environment in which you can then install glassesValidator. To do so, type
python3 -m venv .venvand run the command. - Activate the environment you have just created:
source .venv/bin/activate. - Now you need to install glassesValidator. To do so, type and run
pip install glassesValidator.
Running glassesValidator
If you have followed the above instructions to install glassesValidator, do the following each time you want to run glassesValidator:
- Open the Terminal application.
- Navigate to the glassesValidator install location and activate the environment in which you have glassesValidator installed: type and run
source .venv/bin/activatein the location where you installed glassesValidator. - Type and run
glassesValidator.
Updating glassesValidator
If you already have glassesValidator installed but want to update it to the latest version, do the following:
- Open the Terminal application.
- Navigate to the glassesValidator install location and activate the environment in which you have glassesValidator installed: type and run
source .venv/bin/activatein the location where you installed glassesValidator. - Type and run
pip install glassesValidator --upgrade.
Usage
The glassesValidator validation procedure consists of two parts, 1) a poster and validation procedure that is used during a recording, and 2) Python software for offline processing of the recording to estimate data quality measures. The glassesValidator package includes a graphical user interface (GUI) that can be used to perform all processing. Below we describe an example workflow using the GUI. Advanced users can however opt to call all the GUI's functionality directly from their own Python scripts without making use of the graphical user interface. The interested reader is referred to the API section below for further details regarding how to use the glassesValidator functionality directly from their own scripts.
Workflow and example data
Here we first present an example workflow using the GUI. More detailed information about using the GUI, or the programming API, are provided below.
- Before recording, the researcher prints the poster included with glassesValidator on A2 paper. See the instructions in the section about the poster for checking if the poster is printed correctly.
- Before recording, the researcher hangs the printed poster on a flat surface, such as a wall. Vertical positioning of the poster depends on the experiment setting, but we think that a suitable default is to hang the poster such that the top row of fixation targets is at eye height for an average-length participant.
- The operator positions the participant in front of the glassesValidator poster. An easy method for positioning the participant is to ask them to stretch their
arm out straight forward and stand at a distance where their fist touches the poster. The operator then issues the following suggested instructions:
Look at the nine fixation targets in reading order for one second each. Start with the top-left (red) target. When looking at the fixation targets, keep your head as still as possible, move only your eyes.These verbal instructions could be accompanied by pointing at the fixation targets in the desired looking order to further help the participant to follow the instructions. - To start calculating accuracy and precision, the researcher imports the recordings for which data quality should be determined into a glassesValidator project (after any preprocessing if required), for instance by drag-dropping a folder with recordings onto the glassesValidator GUI window and selecting the import action.
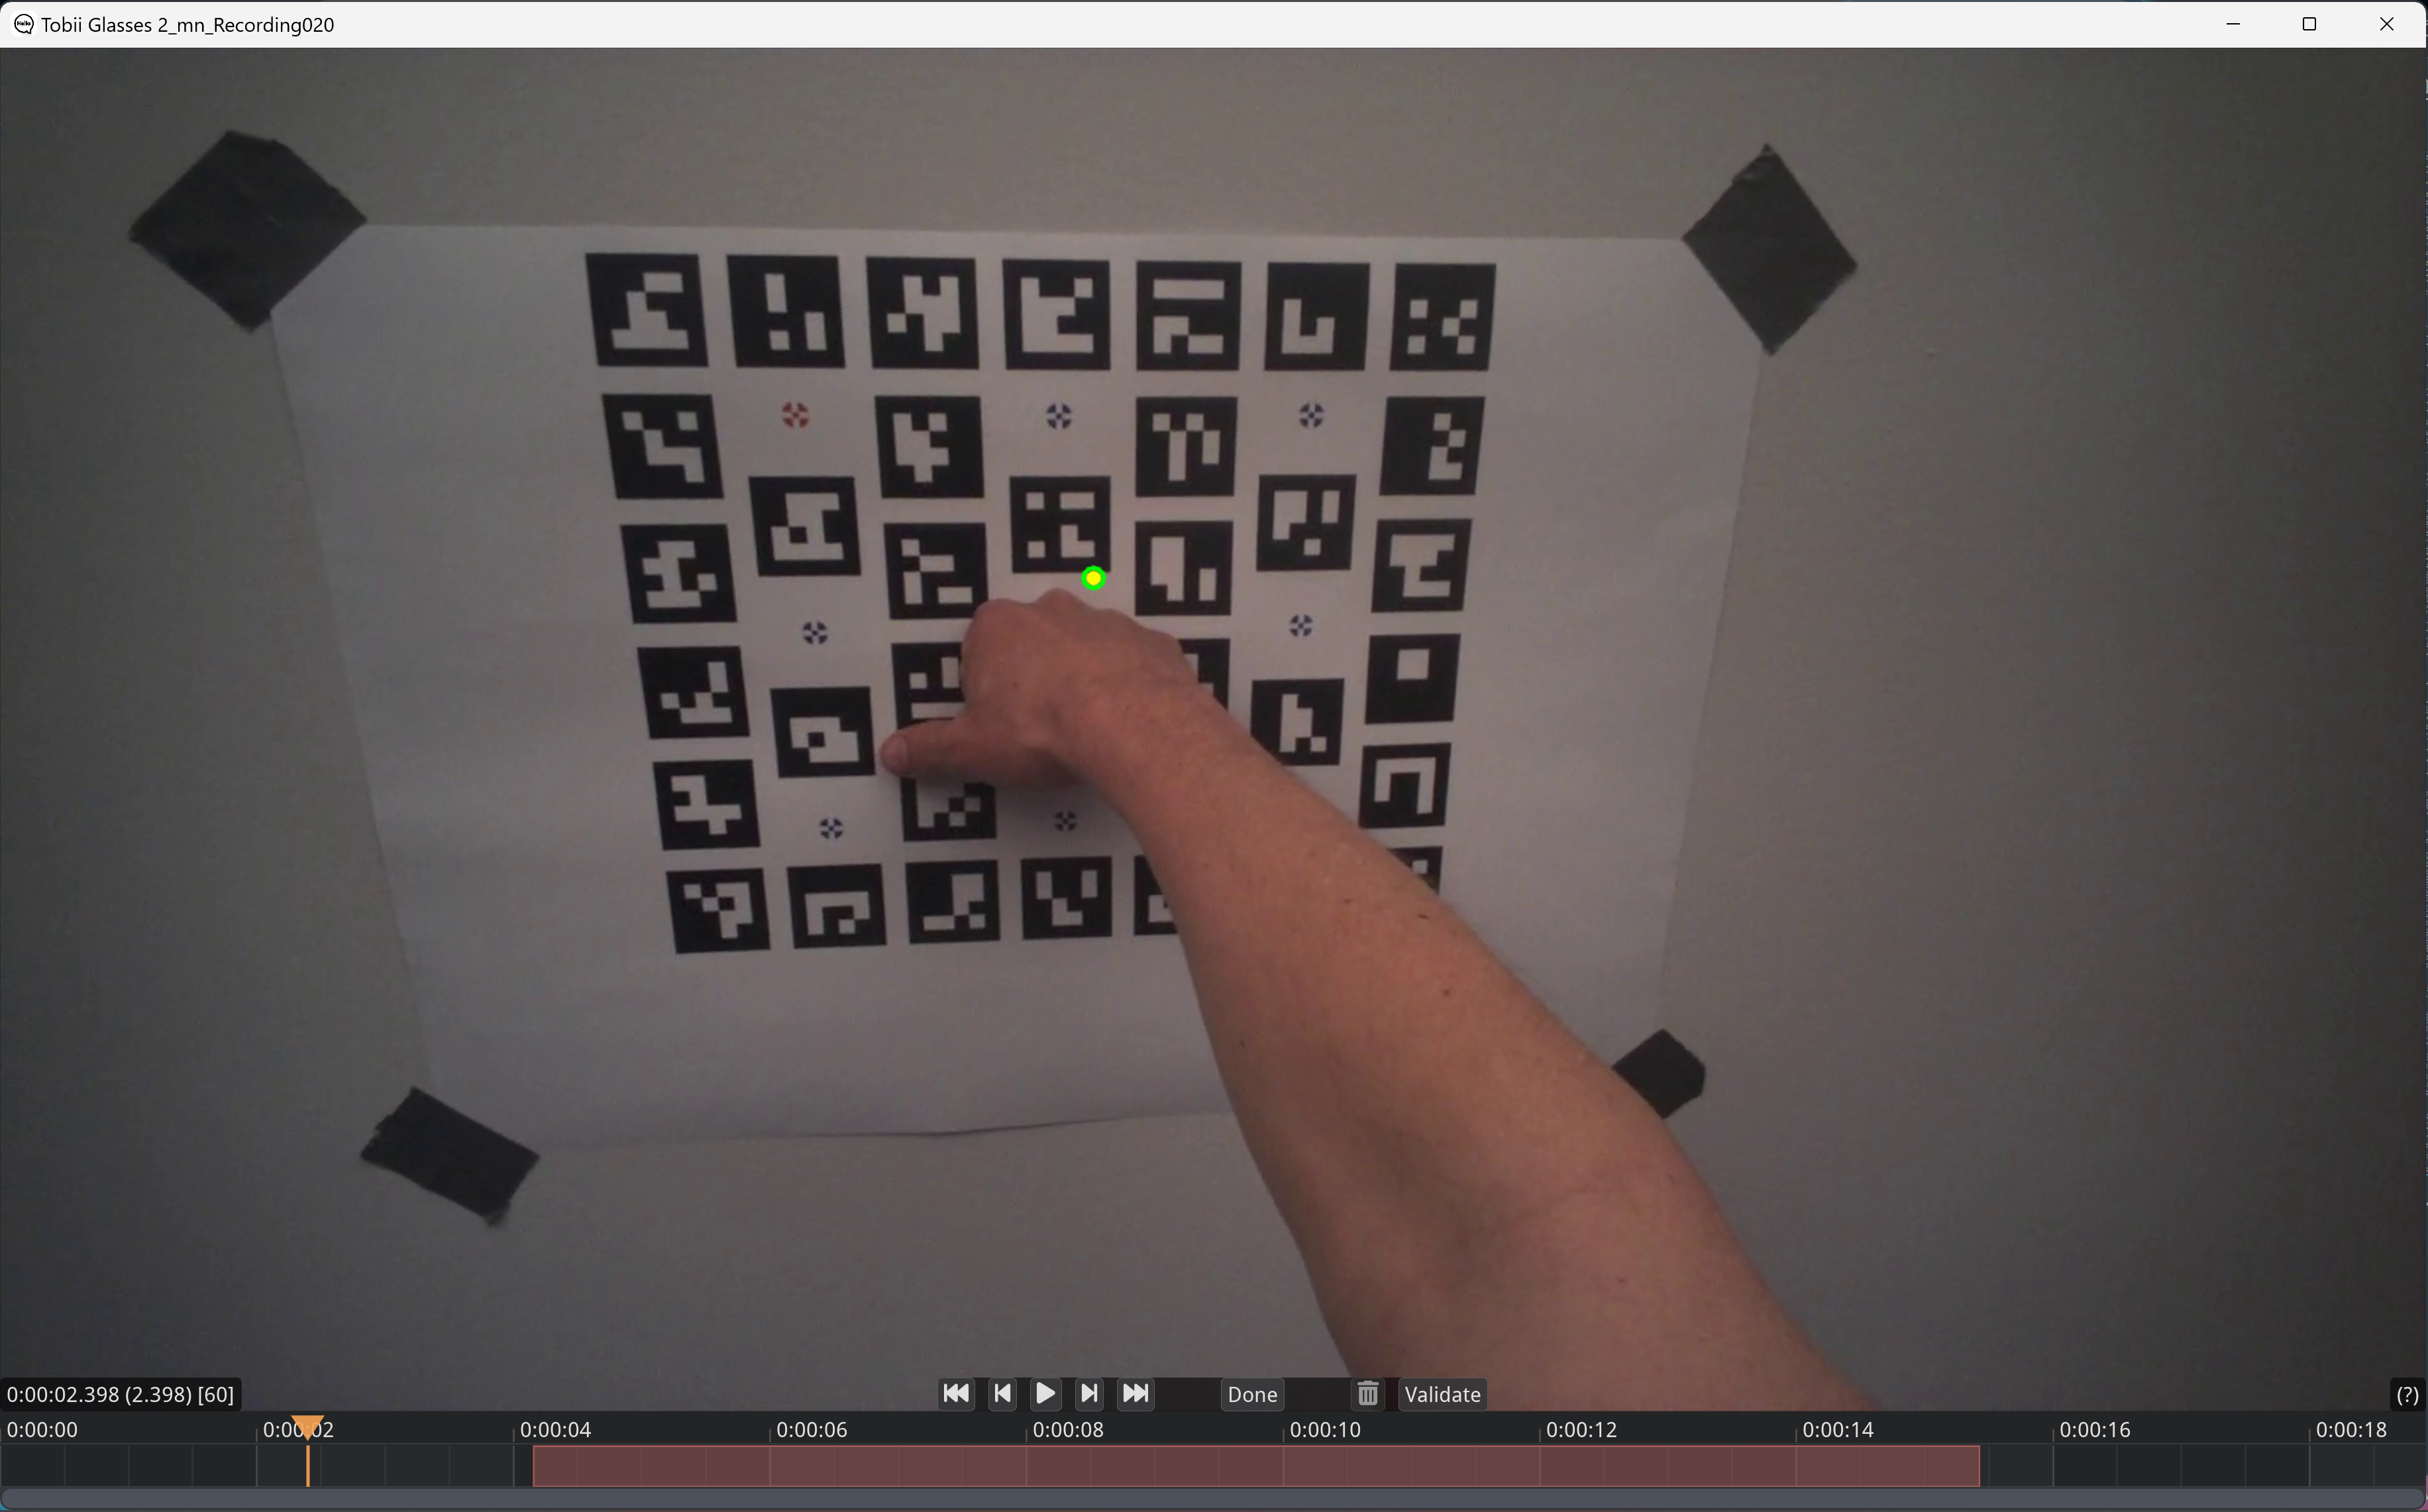
- Once imported, the researcher indicates which episode(s) of each recording contain a validation using a graphical interface included with glassesValidator. As described in the step-by-step annotation instructions below, a validation interval is a single continuous time span during which a participants looks at the validation poster, spanning from the start of the look at the first fixation target to the end of the look at the last target. Do not include multiple episodes where the participants looks at the targets on the poster in a single annotated interval (for instance when you do validation twice at different distances, annotate these two validations as two separate episodes) and do not make intervals for looks to each individual validation target (glassesValidator automatically parses the gaze data and assigns looks to individual validation targets). When performing this annotation step, a GUI appears for each recording, playing back the scene video with gaze overlaid. To code one or multiple validation intervals, do the following:
- The scene video will start playing automatically. You can perform actions in the GUI using key presses or presses on the on-screen buttons (make sure scene video GUI has focus so that the key presses are received). All actions you can perform are listed by hovering your mouse over the
(?)icon in the bottom right of the GUI. - Seek in the video to the start of the validation interval. To skip forward one second in the video, press the right arrow key. To skip forward 10 seconds, hold down shift while pressing the right arrow key. To go one second backward in the video, press the left arrow key (hold down shift while pressing the arrow key for ten seconds). You can also drag the orange time indicator in the time line underneath the video, or pres on the timeline (a the height of the orange triangle) to jump to a specific time point in the recording.
- Pause playback by pressing the space bar, and use the
JandKkeys to go forward and backward by one frame to precisely locate where the observer starts fixating the first validation target (which shift held down, you go forward or backward by ten frames). - Press
Vto mark this frame as the start of a validation interval. - Seek in the video to the end of the validation interval (where the observer stops looking at the last validation target). Pressing
spacerestarts playback of the video. Once at the end of the validation interval, pause again and again useJandKto find the precise frame where the fixation on the last validation target ends. - Press
Vto mark this frame as the end of a validation interval. An interval should now be highlighted on the timeline below the video. - If you have more validation intervals in the video, then seek further in the video to the next interval(s) and repeat the above actions to mark each.
- Once done, press
enterto close the GUI and store the coded validation intervals to file (markerInterval.tsv). See the below screenshot for coding of one of the included example recordings:
- The scene video will start playing automatically. You can perform actions in the GUI using key presses or presses on the on-screen buttons (make sure scene video GUI has focus so that the key presses are received). All actions you can perform are listed by hovering your mouse over the
- The recordings are then further processed automatically, and data quality is determined for validation episodes in the recording.
- Finally, once all recordings have been processed, the researcher exports the data quality measures from the recordings in the project into a summary Excel file. This summary function can optionally average the data quality values over the fixation targets for each recording.
Example recordings with which steps 4-7 can be practiced are included in the example_data subfolder. This folder contains example recordings of a
participant executing the validation procedure with a Pupil Invisible and a Tobii Pro Glasses 2. You can import these recordings directly into glassesValidator.
Also included in each recordings subfolder is an example markerInterval.tsv file for denoting where the validation interval is in the recording (step 5 above).
To use these files, after importing a recording into your glassesValidator project (step 4 above), copy the corresponding
markerInterval.tsv to the recording's folder in the glassesValidator project before running the Code validation intervals action.
glassesValidator projects
The glassesValidator GUI organizes recordings into a project folder. Each recording to be processed is imported into this project folder
(one folder per recording) and all further processing is done inside it. The source directories containing the original recordings remain
untouched when running glassesValidator. The glassesValidator project folder can furthermore contain a folder specifying the configuration
of the project. Such a configuration should be made if you used a poster different from the default (if no configuration folder is present,
the default settings are automatically used), and can be deployed with the Deploy config button in the GUI, or the
glassesTools.validation.config.deploy_validation_config() call from Python.
When not using the GUI and running glassesValidator using your own scripts, such a project folder organization is not required. Working folders
for a recording can be placed anywhere, and a folder for a custom configuration, if used, can also be placed anywhere. The
glassesValidator.process](#glassesvalidatorprocess) functions simply take the path to a working folder and, optionally, the path to a configuration
folder.
Output
During the importing and processing of a recording, a series of files are created in the working folder of a recording. These are the following:
| file | produced by |
input for |
description |
|---|---|---|---|
worldCamera.mp4 |
glassesValidator.preprocess functions |
glassesValidator.process.code_marker_interval, glassesValidator.process.detect_markers, glassesValidator.process.gaze_to_plane (optional) |
Copy of the scene camera video. |
recording_glassesValidator.json |
glassesValidator.preprocess functions |
Information about the recording. | |
gazeData.tsv |
glassesValidator.preprocess functions |
glassesValidator.process.code_marker_interval, glassesValidator.process.gaze_to_plane |
Gaze data cast into the glassesTools common format used by glassesValidator. |
frameTimestamps.tsv |
glassesValidator.preprocess functions |
glassesValidator.process.code_marker_interval, glassesValidator.process.detect_markers |
Timestamps for each frame in the scene camera video. |
calibration.xml |
glassesValidator.preprocess functions |
glassesValidator.process.detect_markers, glassesValidator.process.gaze_to_plane (optional) |
Camera calibration parameters for the scene camera. |
markerInterval.tsv |
glassesValidator.process.code_marker_interval |
glassesValidator.process.detect_markers (optional), glassesValidator.process.gaze_to_plane (optional), glassesValidator.process.classify_fixations, glassesValidator.process.assign_fixations, glassesValidator.process.calculate_data_quality |
File denoting the validation intervals to be processed. This is produced with the coding interface included with glassesValidator. Can be manually created or edited to override the coded intervals. |
pose.tsv |
glassesValidator.process.detect_markers |
glassesValidator.process.code_marker_interval (optional), glassesValidator.process.gaze_to_plane |
File with information about poster pose w.r.t. the scene camera for each frame where the poster was detected. |
gazePlane.tsv |
glassesValidator.process.gaze_to_plane |
glassesValidator.process.code_marker_interval (optional), glassesValidator.process.classify_fixations |
File with gaze data projected to the poster surface. |
fixations_interval_*.tsv |
glassesValidator.process.classify_fixations |
glassesValidator.process.assign_fixations, glassesValidator.process.calculate_data_quality |
Files containing the fixations classified for the gaze data projected to the validation plane, using I2MC. |
fixationAssignment.tsv |
glassesValidator.process.assign_fixations |
glassesValidator.process.calculate_data_quality |
File containing the time interval in the recording for each validation target for which the data quality measures should be calculated. These are determined by a procedure to match fixations to validation targets. Can be manually created or edited to override the episode in the recording used for each validation target. |
fixations_interval_*.png |
glassesValidator.process.classify_fixations |
Timeseries plot of the detected fixations on the validation plane. | |
fixationAssignment_interval_*.png |
glassesValidator.process.assign_fixations |
x-y plot of the detected fixations on the validation plane and matching of fixations to validation targets. | |
dataQuality.tsv |
glassesValidator.process.calculate_data_quality |
glassesValidator.process.export_data_quality |
See below. |
dataQuality.tsv
The dataQuality.tsv file in the working folder of a recording contains the information we're after when using glassesValidator: information about the accuracy/offset of fixations during validation, and other data quality measures. This file may also be produced using the glassesValidator.process.calculate_data_quality function in the API. The dataQuality.tsv file produced when pressing the "Export data quality" button in the GUI to export the data quality values of multiple recordings, or when using a call to the glassesValidator.process.export_data_quality function to do so, contains the same information, possibly for a subset of validation targets and possible averaged over the validation targets.
Both files are tab-separated spreadsheet files that contain the following columns:
| column name | description |
|---|---|
acc_x |
The horizontal (signed) offset between the fixation and the validation target. |
acc_y |
The vertical (signed) offset between the fixation and the validation target. |
acc |
The 2D offset (unsigned) between the fixation and the validation target. |
rms_x |
The RMS-S2S noise level in the horizontal eye movement data during the fixation on the validation target. See Niehorster et al. (2020). |
rms_y |
The RMS-S2S noise level in the vertical eye movement data during the fixation on the validation target. See Niehorster et al. (2020). |
rms |
The total RMS-S2S noise level in the eye movement data during the fixation on the validation target. See Niehorster et al. (2020). |
std_x |
The standard deviation (noise level) of the horizontal eye movement data during the fixation on the validation target. See Niehorster et al. (2020). |
std_y |
The standard deviation (noise level) of the horizontal eye movement data during the fixation on the validation target. See Niehorster et al. (2020). |
std |
The total standard deviation (noise level) of the eye movement data during the fixation on the validation target. See Niehorster et al. (2020). |
data_loss |
Data loss during the fixation on the validation target. This field is optional and by default not produced. |
For the noise measures, see: Niehorster, D. C., Zemblys, R., Beelders, T., & Holmqvist, K. (2020). Characterizing gaze position signals and synthesizing noise during fixations in eye-tracking data. Behavior Research Methods, 52(6), 2515–2534. doi: 10.3758/s13428-020-01400-9
Eye trackers
glassesValidator supports the following eye trackers:
- AdHawk MindLink
- Argus Science ETVision
- Generic*
- Meta Project Aria Generation 1
- Pupil Core
- Pupil Invisible
- Pupil Neon
- SeeTrue STONE
- SMI ETG 1 and ETG 2
- Tobii Pro Glasses 2
- Tobii Pro Glasses 3
- Viewpointsystem VPS 19
- The generic eye tracker allows users to import recordings made with unsupported eye trackers into tools built upon glassesTools, if the user has already converted the recording to the glassesTools format themselves. The name of the eye tracker can be set in the recording info file through the
eye_tracker_nameproperty, so that recordings from different devices imported as generic eye tracker recordings can be distinguished.
Pull requests or partial help implementing support for further wearable eye trackers are gladly received. To support a new eye tracker, implement it in glassesTools.
Required preprocessing outside glassesValidator
For some eye trackers, the recording delivered by the eye tracker's recording unit or software can be directly imported into glassesValidator. Recordings from some other eye trackers however require some steps to be performed in the manufacturer's software before they can be imported into glassesValidator. These are:
- Pupil Labs eye trackers: Recordings should either be preprocessed using Pupil Player (Pupil Core and Pupil Invisible),
Neon Player (Pupil Neon) or exported from Pupil Cloud (Pupil Invisible and Pupil Neon).
- Using Pupil Player (Pupil Core and Pupil Invisible) or Neon player (Pupil Neon): Each recording should 1) be opened
in Pupil/Neon Player, and 2) an export of the recording (
ehotkey) should be run from Pupil/Neon Player. Make sure to disable theWorld Video Exporterin thePlugin Managerbefore exporting, as the exported video is not used by glassesTools and takes a long time to create. If you want pupil diameters, make sure to enableExport Pupil Positionsin theRaw Data Exporter, if available. Note that importing a Pupil/Neon Player export of a Pupil Invisible/Neon recording may require an internet connection. This is used to retrieve the scene camera calibration from Pupil Lab's servers in case the recording does not have acalibration.binfile. - Using Pupil Cloud (Pupil Invisible and Pupil Neon): Export the recordings using the
Timeseries data + Scene videoaction. - For the Pupil Core, for best results you may wish to do a scene camera calibration yourself, see https://docs.pupil-labs.com/core/software/pupil-capture/#camera-intrinsics-estimation. If you do not do so, a generic calibration will be used by Pupil Capture during data recording, by Pupil Player during data analysis and by the glassesTools processing functions, which may result in incorrect accuracy values.
- Using Pupil Player (Pupil Core and Pupil Invisible) or Neon player (Pupil Neon): Each recording should 1) be opened
in Pupil/Neon Player, and 2) an export of the recording (
- Meta Project Aria Generation 1:
- First, open a recording in Aria Studio on the computer.
- In Aria Studio, request a MPS run for eye gaze (if you haven't already done so), and wait for it to complete successfully.
- Open the
meta_aria_gen1_exporter.pyscript provided in glassesTools and set the variablevrs_fileto the full path to the recording's.vrsfile. By default, it is assumed that the recording's.vrsfile and the MPS results are in the same folder and have the default names used by Aria Studio, e.g.some_folder/recording.vrsandsomefolder/mps_recording_vrs. If the MPS results are located elsewhere, you can provide the path to them using themps_foldervariable (optional). - Run the script (ensure you have the right packages installed, see the comment atop the script). An export of the recording will
be made in a format that can be imported by gazeMapper and by default stored in the folder
somefolder/export_recording. If you wish to use another export folder, set the variableoutput_folder(optional).
- SMI ETG: For SMI ETG recordings, access to BeGaze is required and the following steps should be performed:
- Export gaze data:
Export->Legacy: Export Raw Data to File.- In the
Generaltab, make sure you select the following:Channel: enable both eyesPoints of Regard (POR): enableGaze position,Eye position,Gaze vectorBinocular: enableGaze positionMisc Data: enableFrame counter- disable everything else
- In the Details tab, set:
Decimal placesto 4Decimal separatortopointSeparatortoTab- enable
Single file output
- This will create a text file with a name like
<experiment name>_<participant name>_<number> Samples.txt(e.g.005-[5b82a133-6901-4e46-90bc-2a5e6f6c6ea9]_005_001 Samples.txt). Move this file/these files to the recordings folder and rename them. If, for instance, the folder contains the files005-2-recording.avi,005-2-recording.idfand005-2-recording.wav, amongst others, for the recording you want to process, rename the exported samples text file to005-2-recording.txt.
- In the
- Export the scene video:
- On the Dashboard, double click the scene video of the recording you want to export to open it in the scanpath tool.
- Right click on the video and select settings. Make the following settings in the
Cursortab:- set
Gaze cursortotranslucent dot - set
Line widthto 1 - set
Sizeto 1
- set
- Then export the video,
Export->Export Scan Path Video. In the options dialogue, make the following settings:- set
Video Sizeto the maximum (e.g.(1280,960)in my case) - set
Frames per secondto the framerate of the scene camera (24 in my case) - set
EncodertoPerformance [FFmpeg] - set
QualitytoHigh - set
Playback speedto100% - disable
Apply watermark - enable
Export stimulus audio - finally, click
Save as, navigate to the folder containing the recording, and name it in the same format as the gaze data export file we created above but replacingrecordingwithexport, e.g.005-2-export.avi.
- set
- Export gaze data:
The poster
The default poster is available 1) here, 2) from the GUI with the Get poster pdf button, and 3) can also be acquired from a Python script by calling
glassesTools.validation.config.plane.deploy_default_pdf().
The default poster should be printed at A2 size, as defined
in the pdf file, and is designed to cover a reasonable field of view when participants view it at arms length (i.e., 20 x 17.5 deg
at 60 cm).
A version of the default poster that is printed as two A3 files that you can then put together into one poster is available
here.
In order to check that the poster was printed at the correct scale, one should measure the sides of the ArUco markers.
We strongly recommend performing this check because printers may not be calibrated. In the case of the default glassesValidator
poster, the distance between the left side of the left-most column of ArUco markers and the right side of the right-most column of
ArUco markers should be 35.6 cm (each ArUco marker should have sides that are 4.19 cm long). If the poster was printed at the wrong
scale, one must adapt the glassesValidator configuration to match the size and position of the ArUco markers and fixation targets
on your poster (see "Customizing the poster" below).
Customizing the poster
The poster pdf file is generated by the LaTeX file in the same folder as the pdf.
Its looks are defined in the files in the config folder. As described above, this configuration can be
deployed and then edited. The edited configuration can both be used to generate a new poster with LaTeX and for performing the
data quality calculations.
Specifically, the files markerPositions.csv and
targetPositions.csv define where the ArUco markers and fixation targets
(respectively) are placed on the poster. Each coordinate in these files is for the center of the marker or gaze target and the origin
(0,0) is in the bottom left of the poster. The validationSetup.txt configuration file
contains the following settings for the poster:
| setting | default value |
description |
|---|---|---|
distance |
60 | Viewing distance in cm, used to convert coordinates and sizes in degrees to cm. Only used when mode is deg. |
mode |
cm | cm or deg. Sets the unit for the markerSide and targetDiameter below as well as for interpreting the coordinates in the marker and target position files. |
markerSide |
4.18945 | Size of ArUco markers. In cm or deg, see mode setting. |
markerPosFile |
markerPositions.csv |
File in the config folder where the markers to draw are specified. |
targetPosFile |
targetPositions.csv |
File in the config folder where the targets to draw are specified. |
targetType |
Thaler | Type of targer to draw, can be Tobii (the calibration marker used by Tobii) or Thaler (layout ABC in the lower panel of Fig. 1 in Thaler et al., 2013). |
targetDiameter |
1.04736 | Diameter of the gaze target. In cm or deg, see mode setting. Ignored if targetType is Tobii and useExactTobiiSize is 1. |
useExactTobiiSize |
0 | 0 or 1. If 1, the gaze targets have the exact dimensions of a Tobii calibration marker (though possibly different colors). I.e., the targetDiameter parameter is ignored. Only used if targetType is Tobii. |
showGrid |
0 | 0 or 1. If 1, a gridCols x gridRows grid is drawn behind the markers and gaze targets. The size of each grid cell is 1 cm if mode is cm, or 1 degree if mode is deg. |
gridCols |
35.6102 | Number of grid columns to draw if showGrid is 1. |
gridRows |
30.3734 | Number of grid rows to draw if showGrid is 1. |
showAnnotations |
0 | 0 or 1. If 1, text annotations informing about the size of grid cells and markers is printed on the poster below the marker arrangement. |
markerBorderBits |
1 | Setting for border thickness of ArUco markers. Used by the glassesValidator tool when deploying a configuration and glassesTools.validation.config.plane.deploy_marker_images() function for generating the marker images that are placed on the poster by the poster generation LaTeX file. Also used when detecting ArUco markers during recording processing. |
To check your custom configuration, you can generate a poster pdf using the steps below. Furthermore, a png image showing the poster will be generated in the configuration folder when any of glassesValidator's processing steps are run.
The above settings are furthermore used by glassesValidator when processing recordings. For instance, the distance parameter is
used as the assumed viewing distance when computing the viewpos_vidpos_homography data quality type (see the discussion in the
Advanced settings section below). Three further settings are present in the validationSetup.txt configuration
file that are only used by the glassesValidator processing tool, and not for the poster:
| setting | default value |
description |
|---|---|---|
minNumMarkers |
3 | During recording processing, minimum number of detected markers required to perform estimation of homography transformation and camera pose estimation. |
centerTarget |
5 | The ID of the fixation target (in the targetPositions.csv file) that is the origin of the poster. The center of this marker will be (0,0) in the poster coordinate system. |
referencePosterWidth |
1920 | Width (in pixels) of the poster png image generated by the glassesValidator tool and stored in the config directory when loading a configuration. |
Steps for making your own poster
- Deploy the default configuration using the
Deploy configbutton in the GUI, or theglassesTools.validation.config.deploy_validation_config()call from Python. - Edit the
validationSetup.txtconfiguration file and themarkerPositions.csvandtargetPositions.csvfiles in the configuration folder to design the layout and look of the poster that you want. NB: if you edit themarkerBorderBitsvariable, you have to run theglassesTools.validation.config.plane.deploy_marker_images()to regenerate the marker images contained in theall-markersfolder with the new border setting. - Compile the
markerBoard/board.texLaTeX file withpdfTex, such as provided in the TeX Live distribution. - Done, you should now have a pdf file with the poster as you defined.
The GUI
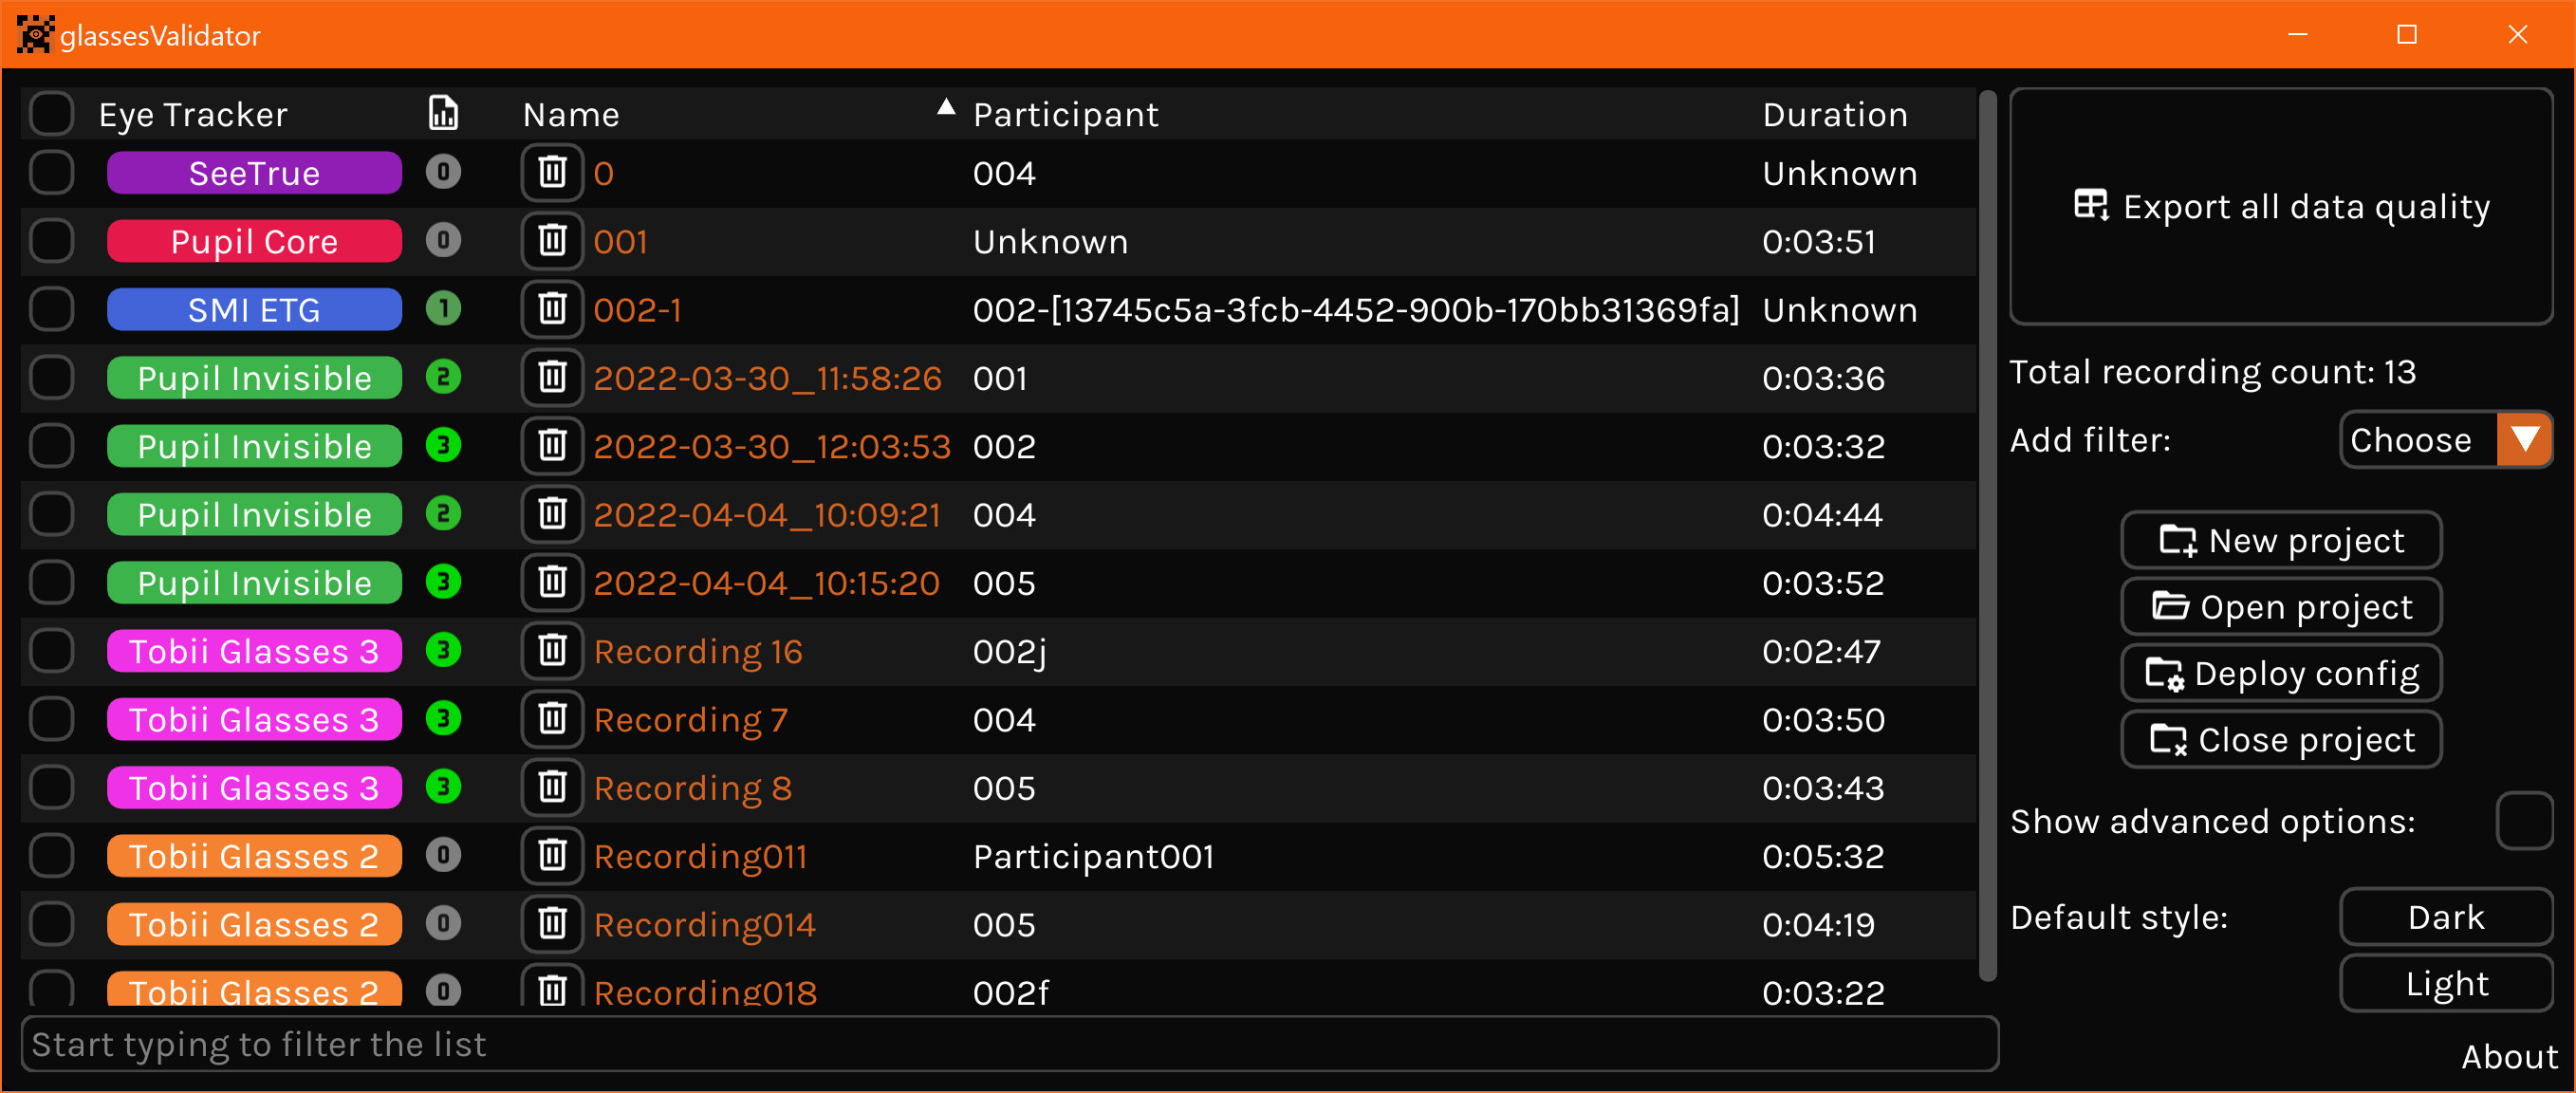
The simplest way to use glassesValidator is by means of its GUI, see above. The full workflow can be performed in the GUI. Specifically, it supports:
-
GlassesValidator project management, such as making new projects or opening them.
-
Importing recordings into a glassesValidator project. Recordings can be found by glassesValidator by drag-dropping one or multiple directories onto the GUI or by clicking the
Add recordingsbutton (not shown) and selecting one or multiple directories. The selected directories and all their subdirectories are then searched for recordings, and the user can select which of the found recordings should be added to the glassesValidator import. Once listed in the GUI, the import action can then be started, which copies over data from the selected recording to the glassesValidator project folder, and transforms it to a common format. -
Showing a listing of the recordings in the project and several properties about them, where available. these properties currently are:
- Eye tracker type (e.g. Pupil Invisible or Tobii Glasses 2)
- Status, indicating whether a recording has been imported, coded, analyzed
- Recording name
- Participant name
- Project name
- Recording duration
- Recording start time
- Working directory for the recording inside the glassesValidator project
- Original source directory from which the recording was imported
- Firmware version
- Glasses serial number
- Recording unit serial number
- Recording software version
- Scene camera serial number
- Scene video file name
The GUI can be configured to show any combination of these columns in any order, and the listing can be sorted by any of these columns. The listing can furthermore be filtered to show only a subset of recordings by search string, eye tracker type and status.
-
Annotating recordings to indicate the episode(s) in the recording that contain a validation using a separate GUI.
-
Calculating data quality (accuracy and precision) for recordings.
-
Exporting the data quality values of multiple recordings to a summary tab-separated spreadsheet file.
-
Deploying the default configuration to a glassesValidator project so that it can be edited (see "Customizing the poster" above).
Advanced settings
Several advanced settings can be made in the right bar of the glassesValidator GUI. For standard use, these are not of interest. Each setting is explained by means of a help text that pops up when hovering over the setting. Nonetheless, the specific group of advanced settings for configuring what type of data quality to compute is discussed here in more detail.
glassesValidator can compute data quality in multiple ways. When deciding how to determine accuracy and precision, several decisions have to be made. By default the most appropriate decisions for standard use are selected and most users can skip this section, but another configuration might be more suited for some advanced use cases. The following decisions are made:
-
Determining location of the participant:
- The researcher can assume a fixed viewing distance and provide this to glassesValidator in the project configuration. In this mode, it is assumed that the eye is located exactly in front of the center of the poster and that the poster is oriented perpendicularly to the line of sight from this assumed viewing position.
- If the scene camera is calibrated (i.e. its properties such as focal length and distortion parameters have been estimated by a calibration procedure), it is possible to use the array of ArUco markers to estimate the position of the participant relative to the poster at each time point during a validation.
When a scene camera calibration is available, glassesValidator will by default use mode ii, otherwise mode i will be used. Six of the nine wearable eye trackers supported by glassesValidator provide the calibration of the scene camera of a specific pair of glasses, and glassesValidator will by default use this calibration for these eye trackers (mode ii.). Currently, the Adhawk, SeeTrue and Pupil Core do not provide a specific camera calibration. However, for each the manufacturer has provided a default/generic scene camera calibration which enables glassesValidator to work without having to assume a viewing distance (mode i.), but which may be somewhat different from the intrinsics of the specific scene camera, which may result in incorrect accuracy values.
-
Transforming gaze positions from the scene camera reference frame to positions on the validation poster:
- Performed by means of homography.
- Performed using recovered camera pose and gaze direction vector, by means of intersection of gaze vector with the validation poster plane.
Mode ii is used by default. However, like for decision 1, mode ii requires that a camera calibration is available. If a camera calibration is not available, mode i will be used instead.
-
Which data is used for determining gaze position on the validation poster:
- The gaze position in the scene camera image.
- The gaze position in the world (often binocular gaze point).
- Gaze direction vectors in a head reference frame.
When operating in mode i., the eye tracker's estimate of the (binocular) gaze point in the scene camera image is used. This is the appropriate choice for most wearable eye tracking research, as it is this gaze point that is normally used for further analysis. However, in some settings and when the eye tracker provides a (3D) gaze position in the world and/or gaze direction vectors for the individual eyes along with their origin, a different mode of operation may be more appropriate. Specifically, when using the wearable eye tracker's world gaze point or gaze vectors instead of the gaze point in the scene video in their analysis, the researcher should compute the accuracy and precision of this world gaze point/gaze vectors. NB: for most of the currently supported eye trackers, modes i. and ii. are equivalent (i.e., the gaze position in the camera image is simply the gaze position in the world projected to the camera image). This is however not always the case. The AdHawk MindLink for instance has an operating mode that corrects for parallax error in the projected gaze point using the vergence signal, which leads to the eye tracker reporting a different gaze position in the scene video than a direct projection of gaze position in the world to the scene camera image.
Altogether, combining these decisions, the following seven types of data quality can be calculated using glassesValidator. NB: All API
names are members of the enum.Enum glassesTools.validation.DataQualityType
| Name in GUI | Name in API | description |
|---|---|---|
| Homography + view distance | viewpos_vidpos_homography |
Use a homography transformation to map gaze position from the scene video to the validation poster, and use an assumed viewing distance (see the project's configuration) to compute data quality measures in degrees with respect to the scene camera. In this mode, it is assumed that the eye is located exactly in front of the center of the poster and that the poster is oriented perpendicularly to the line of sight from this assumed viewing position. Default mode when no camera calibration is available. |
| Homography + pose | pose_vidpos_homography |
Use a homography transformation to map gaze position from the scene video to the validation poster, and use the determined pose of the scene camera (requires a calibrated camera) to compute data quality measures in degrees with respect to the scene camera. |
| Video ray + pose | pose_vidpos_ray |
Use camera calibration to turn gaze position from the scene video into a direction vector, and determine gaze position on the validation poster by intersecting this vector with the poster. Then, use the determined pose of the scene camera (requires a calibrated camera) to compute data quality measures in degrees. If the eye tracker provides a 3D gaze point (e.g. the Tobii Pro Glasses 2 and 3), this 3D gaze point is used in lieu of a gaze direction vector derived from the gaze position in the scene camera with respect to the scene camera. Default mode when a camera calibration is available. |
| World gaze position + pose | pose_world_eye |
Use the gaze position in the world provided by the eye tracker (often a binocular gaze point) to determine gaze position on the validation poster by turning it into a direction vector with respect to the scene camera and intersecting this vector with the poster. Then, use the determined pose of the scene camera (requires a calibrated camera) to compute data quality measures in degrees with respect to the scene camera. |
| Left eye ray + pose | pose_left_eye |
Use the gaze direction vector for the left eye provided by the eye tracker to determine gaze position on the validation poster by intersecting this vector with the poster. Then, use the determined pose of the scene camera (requires a camera calibration) to compute data quality measures in degrees with respect to the left eye. |
| Right eye ray + pose | pose_right_eye |
Use the gaze direction vector for the right eye provided by the eye tracker to determine gaze position on the validation poster by intersecting this vector with the poster. Then, use the determined pose of the scene camera (requires a camera calibration) to compute data quality measures in degrees with respect to the right eye. |
| Average eye rays + pose | pose_left_right_avg |
For each time point, take angular offset between the left and right gaze positions and the fixation target and average them to compute data quality measures in degrees. Requires 'Left eye ray + pose' and 'Right eye ray + pose' to be enabled |
In summary, by default for eye trackers for which a camera calibration is available the gaze position in the scene camera is
transformed to a gaze position on the validation poster by means of intersecting a camera-relative gaze direction vector with the
validation poster plane. Accuracy and precision are then computed using the angle between the vectors from the scene camera to the
fixation target and to the gaze position on the poster (glassesTools.validation.DataQualityType.pose_vidpos_ray). For eye trackers
for which no camera calibration is available, a homography transformation is used to determine gaze position on the poster and accuracy
and precision are computed using an assumed viewing distance configured in the glassesValidator project's configuration file, along
with the assumptions that the eye is located exactly in front of the center of the poster and that the poster is oriented perpendicularly
to the line of sight (glassesTools.validation.DataQualityType.viewpos_vidpos_homography). As discussed in the "Assuming a fixed
viewing distance" section of the glassesValidator paper (Niehorster et al., 2023),
differences in computed values between these two modes are generally small. Nonetheless, it is up to the researcher to decide whether
the level of error introduced when operating without a camera calibration is acceptable and whether they should perform their own
camera calibration.
Matching gaze data to fixation targets
This section discusses how to decide which part of the gaze data constitutes a fixation on each of the fixation targets. By default, to associate gaze data with fixation targets, glassesValidator first uses the I2MC fixation classifier to classify the fixations in the gaze position data on the poster. Then, for each fixation target, the nearest fixation in poster-space that is at least 50 ms long is selected from all the classified fixations during the validation procedure. This matching is done in such a way that no fixation is matched to more than one fixation target.
The matching between fixations and fixation targets produced by this procedure is stored in a file analysisInterval.tsv in each
recording's directory in the glassesValidator project. The advanced user can provide their own matching by changing the contents of
this file.
Coordinate system of data
Gaze data in validation plane space in the gazePlane.tsv file of a processed recording has its origin (0,0) at the center of the position
of the fixation target that was indicated to be the center target with the centerTarget setting in the validationSetup.txt
configuration file.
The positive x-axis points to the right and the positive y-axis downward, which means that (-,-) coordinates are to the left and above of
the poster origin, and (+,+) to the right and below.
Angular accuracy values in the dataQuality.tsv file of a processed recording use the same sign-coding as the gaze data in validation plane space.
That is, for the horizontal component of reported accuracy values, positive means gaze is to the right of the fixation target and
negative to the left. For the vertical component, positive means gaze is below the fixation target, and negative that it is above the
fixation target.
API
All of glassesValidator's functionality is exposed through its API. Below are all functions that are part of the public API. Many functions share common input arguments. These are documented here and linked to in the API overview below. glassesValidator makes extensive use of the functionality of glassesTools, which houses all the core algorithms, as well as the generic interface to different eye trackers. See the glassesTools documentation for more information about these functions.
glassesValidator.GUI
| function | inputs | description |
|---|---|---|
run() |
|
Open the glassesValidator GUI. |
glassesValidator.preprocess
| function | inputs | description |
|---|---|---|
do_import() |
|
Import the specified recording to a subdirectory of output_dir. Either device or rec_info must be specified. Does nothing if directory does not contain a recording made with the specified eye tracker. |
The functions in glassesValidator.preprocess are thin wrappers around the functionality in glassesTools.importing. See the glassesTools documentation for more information.
glassesValidator.process
| function | inputs/members | description |
|---|---|---|
do_coding() |
Show GUI for indicating which episode(s) in the recording contain a validation. Simplified alias of glassesValidator.process.code_marker_interval(). |
|
do_process() |
Perform all steps to compute data quality for a recording for which the validation episodes have been coded. Use the below functions instead for granular control over which steps are run. | |
export_data_quality |
|
Export the data quality values of multiple recordings to a summary tab-separated spreadsheet file. |
code_marker_interval() |
|
Show GUI for indicating which episode(s) of each recording contain a validation. |
detect_markers() |
|
Detect ArUco markers on the validation plane in the scene video and determine camera pose with respect to the scene camera (if scene camera is calibrated) and homography to transform between scene camera and validation plane coordinates. |
gaze_to_plane() |
|
Transform gaze data in scene camera reference frame to positions on the validation plane. |
classify_fixations() |
Classify fixation for the gaze data on the validation plane, using I2MC. | |
assign_fixations() |
|
Automatically determine which episodes during the validation constitute looks to each fixation target. |
calculate_data_quality() |
|
Compute data quality for all fixation targets. |
glassesValidator.utils
| function | inputs/members | description |
|---|---|---|
make_video() |
|
Export annotated scene video showing gaze, detected ArUco markers and detected poster. Also exports a video showing gaze on the validation plane. |
Common input arguments
| argument | module(s) | description |
|---|---|---|
config_dir |
glassesValidator.processglassesValidator.utils |
Path to directory containing a glassesValidator setup. If None, the default setup is used. |
source_dir |
glassesValidator.preprocess |
Path to directory containing one (or for some eye trackers potentially multiple) eye tracker recording(s) as stored by the eye tracker's recording hardware or software. |
output_dir |
glassesValidator.preprocess |
Path to the directory to which recordings will be imported. Each recording will be placed in a subdirectory of the specified path. |
working_dir |
glassesValidator.processglassesValidator.utils |
Path to a glassesValidator recording directory. |
rec_info |
glassesValidator.preprocess |
Recording info (glassesTools.recording.Recording) or list of recording info specifying what is expected to be found in the specified source_dir, so that this does not have to be rediscovered and changes can be made e.g. to the recording name that is used for auto-generating the recording's working_dir, or even directly specifying the working_dir by filling the working_directory field before import. |
Citation
If you use this tool or any of the code in this repository, please cite:
Niehorster, D.C., Hessels, R.S., Benjamins, J.S., Nyström, M. and Hooge, I.T.C. (2023). GlassesValidator:
A data quality tool for eye tracking glasses. Behavior Research Methods. doi: 10.3758/s13428-023-02105-5
BibTeX
@article{niehorster2023glassesValidator,
    Author = {Niehorster, Diederick C. and
              Hessels, R. S. and
              Benjamins, J. S. and
              Nystr{\"o}m, Marcus and
              Hooge, I. T. C.},
    Journal = {Behavior Research Methods},
    Number = {},
    Title = {{GlassesValidator}: A data quality tool for eye tracking glasses},
    Year = {2023},
    doi = {10.3758/s13428-023-02105-5}
}
Release history Release notifications | RSS feed


Download files
Download the file for your platform. If you're not sure which to choose, learn more about installing packages.
Source Distribution
Built Distribution
Filter files by name, interpreter, ABI, and platform.
If you're not sure about the file name format, learn more about wheel file names.
Copy a direct link to the current filters
File details
Details for the file glassesvalidator-3.2.0.tar.gz.
File metadata
- Download URL: glassesvalidator-3.2.0.tar.gz
- Upload date:
- Size: 149.5 kB
- Tags: Source
- Uploaded using Trusted Publishing? No
- Uploaded via: twine/6.1.0 CPython/3.12.8
File hashes
| Algorithm | Hash digest | |
|---|---|---|
| SHA256 |
8c1e57bd821b2a605900e68337b88fdccaf2ac5043f45cdc0d56fba87dc5c1c1
|
|
| MD5 |
3cf9b1cdd7d12293c81b864ed2f5c89e
|
|
| BLAKE2b-256 |
36a5ea7229d5c0871b29d5afda742a0b77645fe8f32a57828b96a916e365c4e0
|
File details
Details for the file glassesvalidator-3.2.0-py3-none-any.whl.
File metadata
- Download URL: glassesvalidator-3.2.0-py3-none-any.whl
- Upload date:
- Size: 122.2 kB
- Tags: Python 3
- Uploaded using Trusted Publishing? No
- Uploaded via: twine/6.1.0 CPython/3.12.8
File hashes
| Algorithm | Hash digest | |
|---|---|---|
| SHA256 |
d730f6b64815d08abd5fb3b1875473ab521447ad5c3d6785f8462f9e9dfbec22
|
|
| MD5 |
ef548783c9e07b13fdc0c0e2c0046f42
|
|
| BLAKE2b-256 |
7f4dc5972e3b3f5a88b246e167571bbc6749cd9fc6f963c3bee6c6d80fd093ff
|


