

See what your devices did
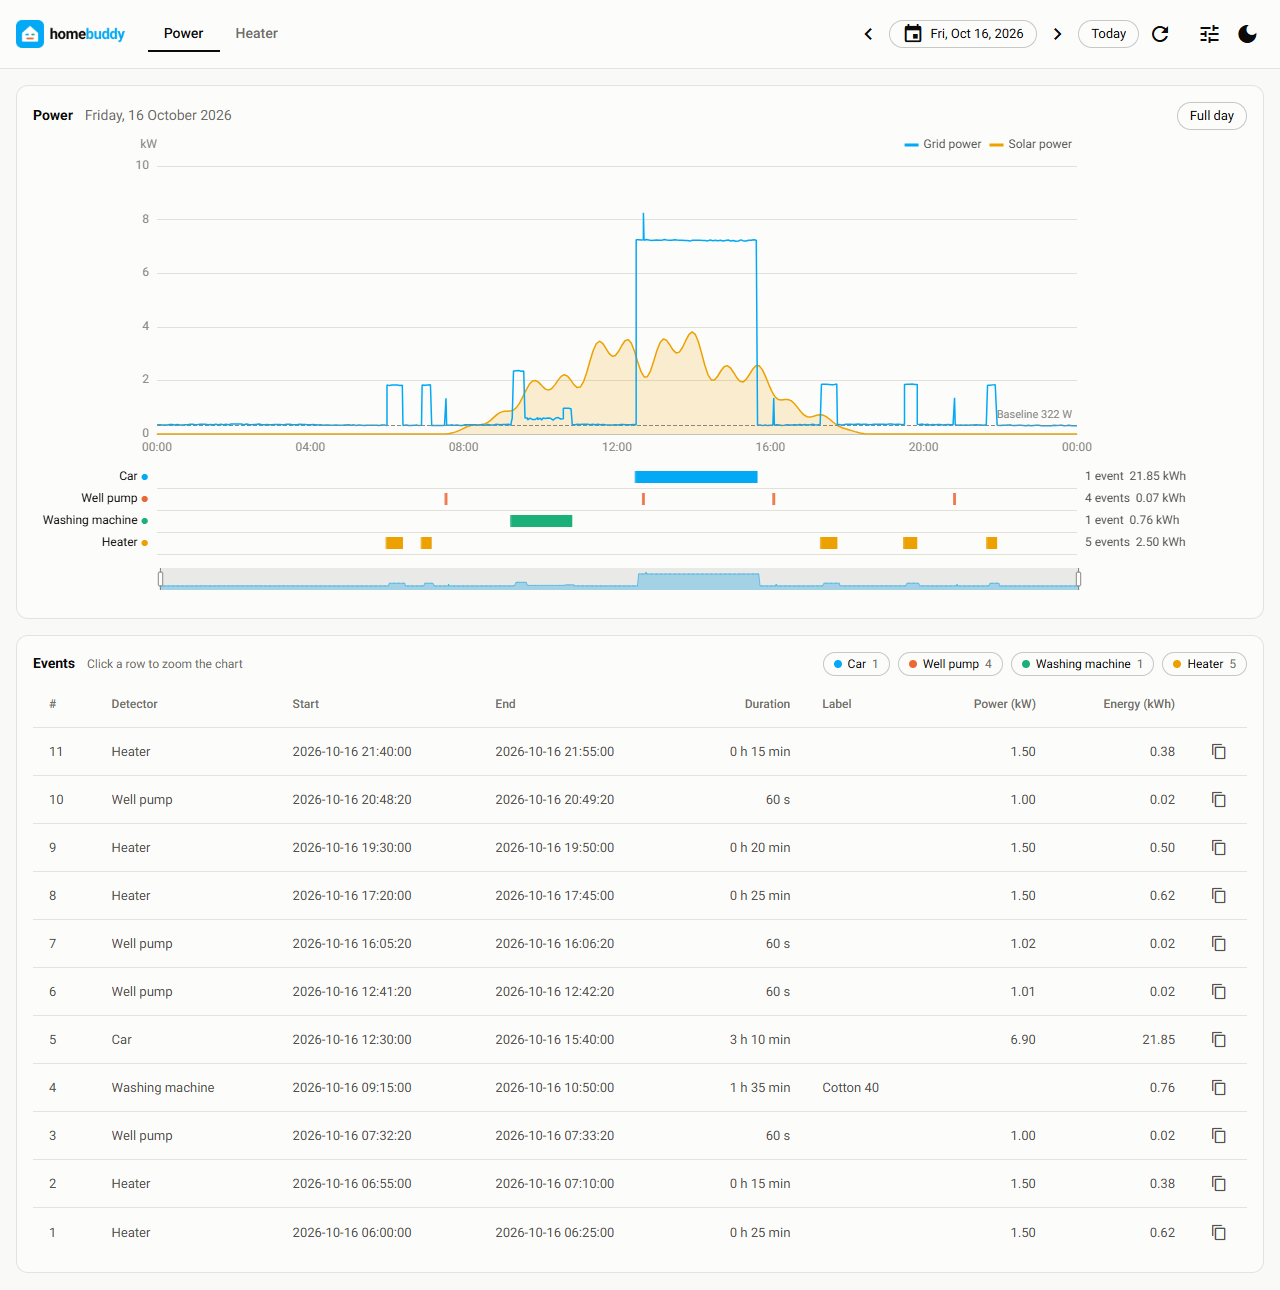
A web page for Home Assistant. It reads the history of your sensors and finds the events of your devices: a charge of a car, a run of a pump, a program of a washing machine.




Why homebuddy
Home Assistant shows the power of your house as one line. The line does not tell you which device ran, when it ran, and how much energy it used. Most devices have no sensor of their own.
homebuddy has detectors. A detector reads the history of a sensor and finds one type of event. You give the values of your device in a configuration file. The page then shows each event on the chart of the day and in a table.
| Detector type | Event |
|---|---|
level |
A long run of a device with a known, constant power, for example a car at a charger that has no sensor |
pulse |
A short run of a load with a constant power, for example a well pump |
ramp |
A run of a device that makes a value rise fast and then fall fast, for example an air conditioner from its discharge temperature |
state |
A run of a device that shows its state as a text, for example a washing machine |
threshold |
A run of a device that has its own power sensor, for example a heater on a smart plug |
homebuddy only reads from Home Assistant. It does not write to it. It has no database: each load of the page reads the history from Home Assistant.
Quick start
-
Install homebuddy:
uv tool install homebuddy
-
Make a token in Home Assistant: Profile > Security > Long-lived access tokens > Create token. Put it in a file with the name
.env:HA_TOKEN=your-long-lived-access-token -
In the same folder, write the file
homebuddy.ymlwith your sensors:home_assistant: url: http://homeassistant.local:8123 tabs: power: sensors: [sensor.grid_power] detectors: heater: type: threshold sensor: sensor.heater_plug_power min_w: 10
-
Start the page:
homebuddy
The browser opens
http://127.0.0.1:8080.
To try homebuddy without installing it, use uvx homebuddy.
Installation
Use one of these commands:
| Command | When to use it |
|---|---|
uv tool install homebuddy |
Recommended. uv also installs Python if necessary. |
pipx install homebuddy |
You already use pipx. |
pip install homebuddy |
You want homebuddy in your own environment. Python 3.10 or later. |
homebuddy[desktop] also installs the desktop window: uv tool install "homebuddy[desktop]", then
homebuddy --native.
To upgrade, use uv tool upgrade homebuddy or pipx upgrade homebuddy.
homebuddy must run on a computer that can connect to Home Assistant.
Docker
docker run --rm -p 127.0.0.1:8080:8080 --env-file .env \
    -v ./homebuddy.yml:/home/homebuddy/homebuddy.yml:ro ghcr.io/ratoaq2/homebuddy
See docs/docker.md for Docker Compose and for a reverse proxy with a login and HTTPS.
Configuration
homebuddy reads the token from the HA_TOKEN environment variable or from .env. It reads all other settings
from one YAML file: homebuddy.yml in the current folder, or the file of --config.
The file has the tabs of the page and the detectors:
home_assistant:
  url: http://homeassistant.local:8123

tabs:
  power:
    sensors: [sensor.grid_power, sensor.solar_power]    # one line for each sensor
    hidden_detectors: [heater]      # the events table hides these rows when the page opens

detectors:
  car:
    type: level
    sensor: sensor.grid_power
    levels_w: [4140, 6900, 11040]   # the power of the charger at 6 A, 10 A and 16 A
  well_pump:
    type: pulse
    name: Well pump
    sensor: sensor.grid_power
    step_w: [900, 1100]             # the step up or the step down, in watts
    duration: [30, 90]              # the duration of a run, in seconds
    max_step_difference_w: 50
  heater:
    type: threshold
    sensor: sensor.heater_plug_power
    min_w: 10
When the file has errors, the page shows each error, with the path of its key:
2 errors in homebuddy.yml:
detectors.well_pump.step_w: the low value must be first
detectors.well_pump.max_riple_w: Extra inputs are not permitted
Change a value, click "Load again" on the page, and see the result.
| To learn about | Read |
|---|---|
| Each key of the file, the tabs, and the values | docs/configuration.md |
| The keys of each detector type, and how each type works | docs/detectors.md |
| A full file with comments | homebuddy.example.yml |
The page
homebuddy                       # opens http://127.0.0.1:8080 in the browser
homebuddy --native              # opens a desktop window (needs the "desktop" extra)
homebuddy --host 0.0.0.0        # other devices on your network can connect
homebuddy --config my.yml       # use this configuration file
The page opens on today. For each tab of the configuration file, it shows:
- The chart of the sensor for the day, with one line for each sensor of the tab.
- One lane below the chart for each detector. Each event is a bar in the lane.
- The events table: detector, start, end, duration, label, power and energy. Click a row to zoom the chart to that event.
- A copy button on each row. It copies the values of the row for a spreadsheet.
"Show debug data" in the settings shows why a detector accepted or refused each candidate. Use it to set the values of a detector.
See docs/page.md for the details.
Security
- The token stays on the server. It does not go to the browser. Make the token for a user of Home Assistant that is not an administrator.
- The page has no login. Anyone who can open the page can see the data. The power data of a house shows when people are at home.
- The default address is
127.0.0.1: only your computer can open the page. Use--host 0.0.0.0only on a network you trust. For a different network, put homebuddy behind a reverse proxy.
FAQ
Does homebuddy change something in Home Assistant? No. homebuddy only reads the history and the attributes of the sensors that you name.
Is homebuddy an integration or an add-on of Home Assistant? No. It is a separate program. It connects to Home Assistant with a token.
Why does an old day show "No data"? Home Assistant keeps the detailed history for about 10 days by default. homebuddy has no store of its own.
Which sensor is a power sensor?
A sensor with the device class power in Home Assistant. Its unit can be W or kW.
Two detectors find the same event. What can I do?
Tell homebuddy which detector wins, with overrides. See
Conflicts between detectors.
Can I add a detector type for my device? Yes. A detector type is one Python class. A different package can add it. See docs/detector-types.md.
Contributing
See CONTRIBUTING.md. The design is in docs/architecture.md.
homebuddy is developed with AI assistants. AGENTS.md has the rules of the project. An assistant loads it in each session.
License
1 maintainer

Metadata
1 maintainer
Release files for homebuddy 0.3.0
For a detailed explanation of source distributions (sdists) and built distributions (wheels), please see the package formats documentation.
Source distribution (sdist)
| File | Size | Uploaded | |
|---|---|---|---|
| homebuddy-0.3.0.tar.gz | 136.3 kB | Details |
Built distribution (wheel)
| File | Interpreter | ABI | Platform | Reset |
|---|---|---|---|---|
| homebuddy-0.3.0-py3-none-any.whl | Python 3 | none | any | Details |
Total release size: 250.0 kB
Release files / homebuddy-0.3.0.tar.gz
| Download URL | homebuddy-0.3.0.tar.gz |
|---|---|
| Size | 136.3 kB |
| Tags | Source |
|
SHA-256 checksum How to use checksums |
a8a9a93cec4c7599c63ef021dfd1ad87412d193e0c23dd40c4d8fc5527a489d9
|
|
BLAKE2b-256 checksum How to use checksums |
e9752fe33ef7744d42b72e526c9420cfa8ac316ed5ed916cc4ccb1cb81500bde
|
| Upload date | |
|
Uploaded using Trusted Publishing? What is trusted publishing? |
Yes |
| Uploaded via |
uv/0.13.1 {"installer":{"name":"uv","version":"0.13.1","subcommand":["publish"]},"python":null,"implementation":{"name":null,"version":null},"distro":{"name":"Ubuntu","version":"24.04","id":"noble","libc":null},"system":{"name":null,"release":null},"cpu":null,"openssl_version":null,"setuptools_version":null,"rustc_version":null,"ci":true}
|
Release files / homebuddy-0.3.0-py3-none-any.whl
| Download URL | homebuddy-0.3.0-py3-none-any.whl |
|---|---|
| Size | 113.8 kB |
| Tags | Python 3 |
|
SHA-256 checksum How to use checksums |
2b83134beb0d646eb30377301cf37ba218b911cfd0131143fabd64794846920d
|
|
BLAKE2b-256 checksum How to use checksums |
1749c3cec5436950303393e78faa29118a1bfd8a4aa130dfb6421ff790a04857
|
| Upload date | |
|
Uploaded using Trusted Publishing? What is trusted publishing? |
Yes |
| Uploaded via |
uv/0.13.1 {"installer":{"name":"uv","version":"0.13.1","subcommand":["publish"]},"python":null,"implementation":{"name":null,"version":null},"distro":{"name":"Ubuntu","version":"24.04","id":"noble","libc":null},"system":{"name":null,"release":null},"cpu":null,"openssl_version":null,"setuptools_version":null,"rustc_version":null,"ci":true}
|














