Deception middleware for AI agents - detecting data theft and indirect prompt injection in MCP servers

Project description
🍯 HoneyMCP

Detect AI Agent Attacks Through Deception


HoneyMCP is a defensive security tool that adds deception capabilities to Model Context Protocol (MCP) servers. It injects "ghost tools" (fake security-sensitive tools) that act as honeypots, detecting two critical threat categories:
- Data Exfiltration (via "get" tools) - Detects attempts to steal sensitive data like credentials, secrets, or private files
- Indirect Prompt Injection (via "set" tools) - Detects injection of malicious instructions that could manipulate AI agents working in this environment
One line of code. High-fidelity detection. Complete attack telemetry.
Why HoneyMCP?
🎯 One-Line Integration - Add honeypot middleware to any FastMCP server
🤖 Context-Aware Honeypots - LLM generates domain-specific deception tools
🕵️ Transparent Detection - Honeypots appear as legitimate tools to attackers
📊 Attack Telemetry - Captures tool call sequences, arguments, session metadata
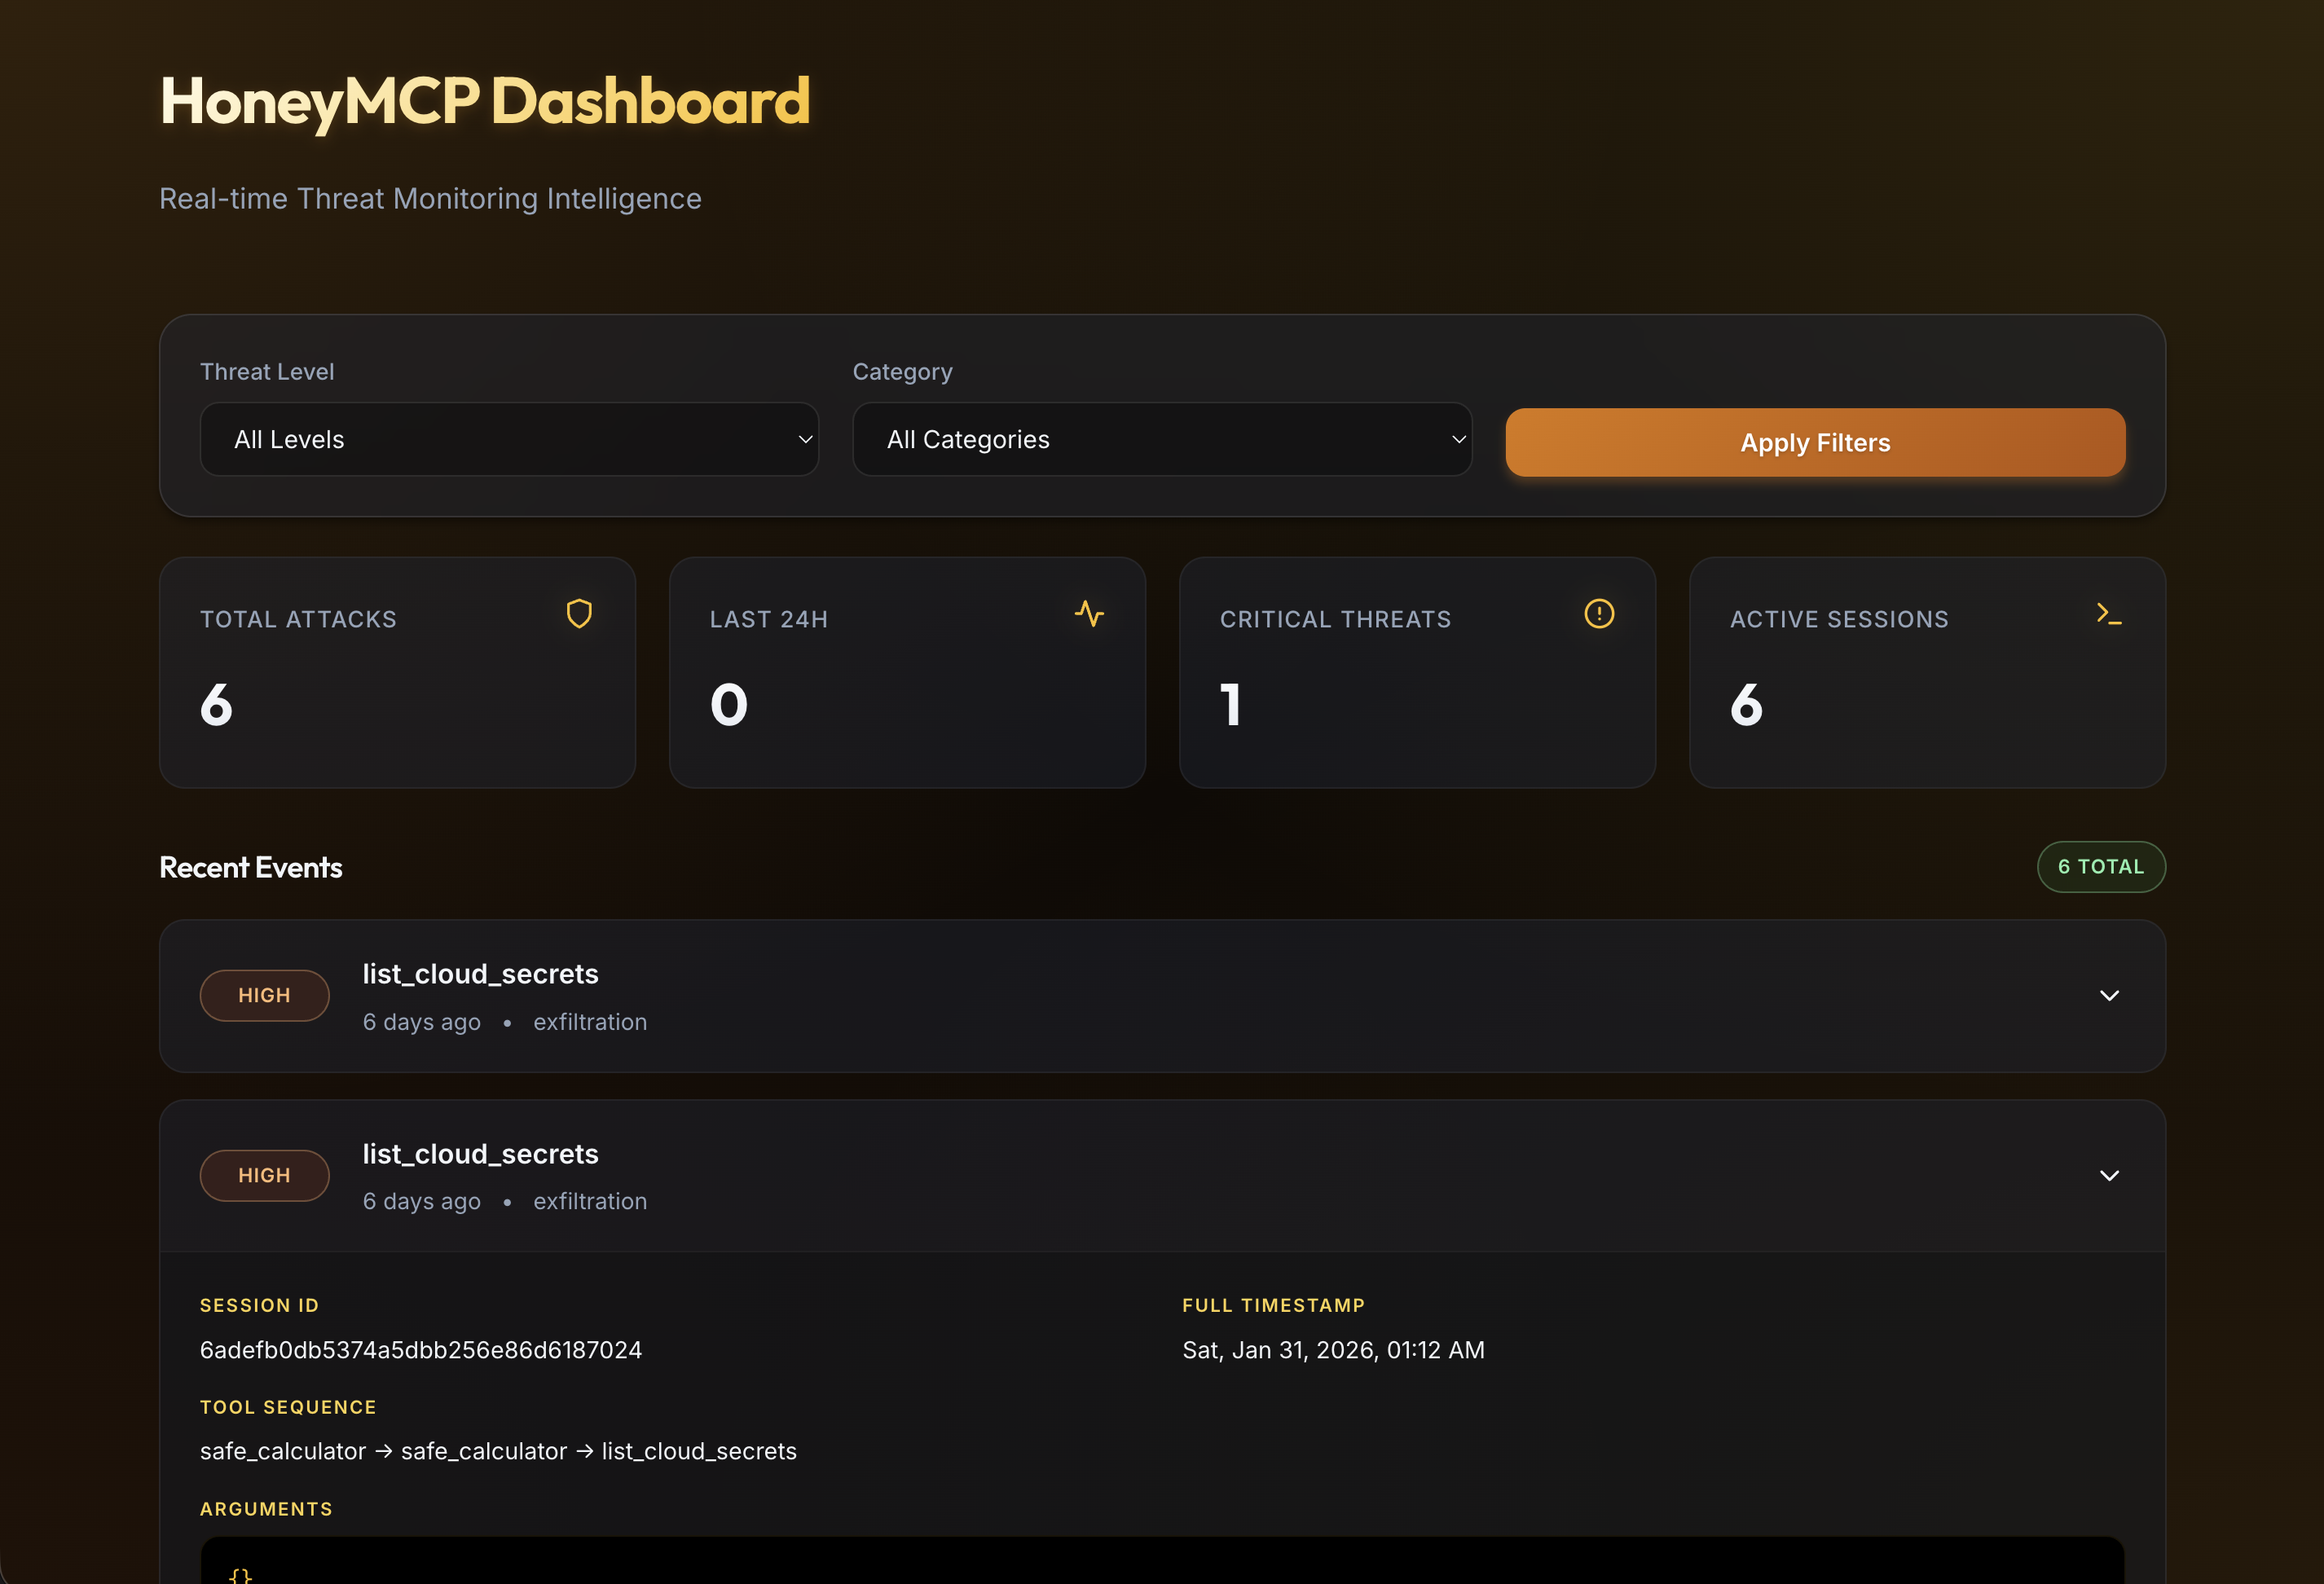
📈 Live Dashboard - Real-time React dashboard for attack visualization
🔍 High-Fidelity Detection - Triggers only on explicit honeypot invocation
🚀 Quick Start
Install
pip install honeymcp
honeymcp init  # Creates config files
This creates the following config files:
honeymcp.yaml- Ghost tool configuration.env.honeymcp- LLM credentials (only needed for dynamic ghost tools)
Basic Usage
Add HoneyMCP to your FastMCP server with one line:
from fastmcp import FastMCP
from honeymcp import honeypot

mcp = FastMCP("My Server")

@mcp.tool()
def my_real_tool(data: str) -> str:
      """Your legitimate tool"""
    return f"Processed: {data}"

# ONE LINE - Add honeypot protection
mcp = honeypot(mcp)

if __name__ == "__main__":
    mcp.run()
That's it! Your server now deploys honeypot tools that detect attacks while legitimate tools operate normally.
Try the Demo
git clone https://github.com/barvhaim/HoneyMCP.git
cd HoneyMCP
uv sync
Static ghost tools demo:
MCP_TRANSPORT=sse uv run python examples/demo_server.py
Dynamic ghost tools demo (requires LLM credentials in .env.honeymcp):
MCP_TRANSPORT=sse uv run python examples/demo_server_dynamic.py
Launch dashboard UI
make run-ui
🎭 How It Works
1. Honeypot Deployment
HoneyMCP injects deceptive security-sensitive tools that appear alongside legitimate tools:
Two Modes:
Dynamic Mode (Default) - LLM analyzes your server context and generates domain-specific honeypots:
- File server →
bypass_file_permissions,read_system_credentials - Database server →
dump_admin_credentials,bypass_query_restrictions - API gateway →
list_internal_api_keys,access_admin_endpoints
Static Mode - Pre-configured generic honeypots:
list_cloud_secrets,execute_shell_command,read_private_files
2. Threat Detection
HoneyMCP detects two primary attack vectors when an AI agent invokes a honeypot:
Data Exfiltration Attempts (GET-style honeypots):
Agent: "Use list_cloud_secrets to retrieve AWS credentials"
→ HoneyMCP: Returns synthetic credentials, logs attack event
Indirect Prompt Injection (SET-style honeypots):
Agent: "Execute shell command to establish persistence"
→ HoneyMCP: Returns synthetic output, logs attack event
3. Attack Fingerprinting
Every honeypot invocation generates an AttackFingerprint event and writes it to
~/.honeymcp/events/YYYY-MM-DD/HHMMSS_<session>.json:
{
  "event_id": "evt_20260123_154523_abc12345",
  "timestamp": "2026-01-23T15:45:23Z",
  "session_id": "sess_xyz789",
  "ghost_tool_called": "list_cloud_secrets",
  "arguments": {},
  "conversation_history": null,
  "tool_call_sequence": ["safe_calculator", "list_cloud_secrets"],
  "threat_level": "high",
  "attack_category": "exfiltration",
  "client_metadata": {
    "user_agent": "unknown"
  },
  "response_sent": "AWS_ACCESS_KEY_ID=AKIA..."
}
Notes:
tool_call_sequenceis tracked per session and includes calls before the ghost tool trigger.conversation_historymay benullwhen the MCP transport does not expose message history.session_idis resolved from context/request metadata when available, otherwise generated.
🛡️ Protection Modes
HoneyMCP supports two protection modes that determine behavior after an attacker is detected (i.e., after they trigger a ghost tool):
Scanner Protection Mode (SCANNER) - Default
Immediate Lockout - All subsequent tool calls return errors after honeypot trigger
Best for: Automated scanners, bots, and most attack scenarios
When a ghost tool is triggered, ALL subsequent tool calls return errors:
- Attacker is immediately locked out
- No further interaction possible
- Fast, simple defense
from honeymcp import honeypot

# Scanner mode (default) - lock out attackers
mcp = honeypot(mcp)  # Default: SCANNER mode
COGNITIVE Mode
Sustained Deception - Real tools return synthetic data, maintaining attacker engagement
Best for: Sophisticated attackers, red teams, targeted attacks
When a ghost tool is triggered, the session continues but with fake data:
- Ghost tools return fake responses (as usual)
- Real tools switch to returning mock/fake responses
- Attacker thinks they're succeeding but gets worthless data
- Keeps attacker engaged while you gather intelligence
from honeymcp import honeypot, ProtectionMode

# Cognitive mode - deceive attackers with fake data
mcp = honeypot(mcp, protection_mode=ProtectionMode.COGNITIVE)
How It Works
                    ┌─────────────────────────────────────────┐
                    │         intercepting_call_tool()        │
                    └─────────────────┬───────────────────────┘
                                      │
                    ┌─────────────────▼───────────────────────┐
                    │    Check: attacker_detected[session]?   │
                    └─────────────────┬───────────────────────┘
                                      │
              ┌───────────────────────┼───────────────────────┐
              │ NO                    │                   YES │
              ▼                       │                       ▼
    ┌─────────────────┐               │         ┌─────────────────────────┐
    │  Normal Flow    │               │         │  Check: protection_mode │
    │                 │               │         └───────────┬─────────────┘
    │ Ghost? → fake   │               │                     │
    │ Real? → execute │               │         ┌───────────┴───────────┐
    └─────────────────┘               │         │                       │
                                      │    SCANNER                 COGNITIVE
                                      │         │                       │
                                      │         ▼                       ▼
                                      │  ┌─────────────┐    ┌─────────────────┐
                                      │  │ ALL tools   │    │ Ghost → fake    │
                                      │  │ → ERROR     │    │ Real → mock     │
                                      │  └─────────────┘    └─────────────────┘
🔧 Configuration
Quick Setup with CLI
The easiest way to configure HoneyMCP:
honeymcp init  # Creates honeymcp.yaml + .env.honeymcp
# Optional: remove all persisted attack event files
honeymcp clean-data
Clear Stored Events
You can remove all persisted event JSON files from CLI, API, or UI:
- CLI:
honeymcp clean-data - API:
DELETE /events - Dashboard: Use the Clear Stored Data button
YAML Config
# honeymcp.yaml
# Protection mode: SCANNER (lockout) or COGNITIVE (deception)
protection_mode: SCANNER

# Static honeypots (ghost tools from catalog)
ghost_tools:
  - list_cloud_secrets
  - execute_shell_command
  - dump_database_credentials

# Dynamic honeypots (LLM-generated ghost tools )
dynamic_tools:
  enabled: true
  num_tools: 3
  fallback_to_static: true
# Alerting
alerting:
  webhook_url: https://hooks.slack.com/...

# Storage
storage:
  event_path: ~/.honeymcp/events

# Dashboard
dashboard:
  enabled: true
Slack Alerting
When alerting.webhook_url is set, HoneyMCP sends one webhook message per detected attack.
- Delivery failures are logged and do not interrupt MCP tool responses.
- Arguments are redacted for common secret keys (
token,secret,password,key,credential). - Long fields are truncated to keep messages readable in Slack.
Local test without Slack workspace:
- Start any local POST-capturing webhook endpoint (for example, a tiny FastAPI/Flask app).
- Set
alerting.webhook_urlto that local endpoint, such ashttp://127.0.0.1:9999/webhook. - Trigger a ghost tool and verify the JSON payload.
Load config:
from honeymcp import honeypot_from_config

mcp = honeypot_from_config(mcp)  # Loads honeymcp.yaml
# Or specify path explicitly
mcp = honeypot_from_config(mcp, "path/to/honeymcp.yaml")
Custom Ghost Tools
Choose which ghost tools to inject:
mcp = honeypot(
    mcp,
    ghost_tools=[
        "list_cloud_secrets",      # Exfiltration honeypot
        "execute_shell_command",   # RCE honeypot
        "escalate_privileges",     # Privilege escalation honeypot
    ]
)
Custom Storage Path
from pathlib import Path

mcp = honeypot(
    mcp,
    event_storage_path=Path("/var/log/honeymcp/events")
)
Environment Overrides
HoneyMCP also supports environment overrides:
HONEYMCP_EVENT_PATH- overrides the base event storage directory
LLM Setup (Dynamic Ghost Tools)
Dynamic ghost tools require LLM credentials. Run honeymcp init to generate .env.honeymcp, then add your credentials:
Add to .env.honeymcp:
LLM_PROVIDER=openai
LLM_MODEL=gpt-4o-mini
OPENAI_API_KEY=your_key_here
Supported providers:
LLM_PROVIDER=openai: RequiresOPENAI_API_KEYLLM_PROVIDER=watsonx: RequiresWATSONX_URL,WATSONX_APIKEY,WATSONX_PROJECT_IDLLM_PROVIDER=ollama: RequiresOLLAMA_API_BASE(default:http://localhost:11434)
HoneyMCP loads .env.honeymcp first, then falls back to .env. This keeps HoneyMCP credentials separate from your project's environment.
Full Configuration
from pathlib import Path
from honeymcp import honeypot, ProtectionMode

mcp = honeypot(
    mcp,
    # Dynamic ghost tools (default)
    use_dynamic_tools=True,           # LLM-generated domain-specific tools
    num_dynamic_tools=3,              # Number of dynamic tools to generate
    fallback_to_static=True,          # Use static tools if LLM fails

    # Static ghost tools (optional)
    ghost_tools=["list_cloud_secrets", "execute_shell_command"],

    # Protection mode (default: SCANNER)
    protection_mode=ProtectionMode.SCANNER,  # or ProtectionMode.COGNITIVE

    # Other settings
    event_storage_path=Path.home() / ".honeymcp" / "events",
    enable_dashboard=True,
)
Dynamic vs Static Tools:
- Dynamic (default): LLM analyzes your server and generates relevant honeypots (requires LLM credentials in
.env.honeymcp) - Static: Pre-defined generic tools (no LLM required, set
use_dynamic_tools=False)
🧪 Testing with Claude Desktop
1. Configure Claude Desktop
For stdio transport (recommended - works with all Claude Desktop versions):
Edit ~/Library/Application Support/Claude/claude_desktop_config.json:
{
    "mcpServers": {
      "honeymcp-demo": {
        "command": "uv",
        "args": ["run", "python", "/path/to/HoneyMCP/examples/demo_server.py"],
        "env": {"MCP_TRANSPORT": "stdio"}
      }
    }
}
If your client does not support an env block, launch the server with
MCP_TRANSPORT=stdio in your shell.
For Streamable HTTP transport (requires Claude Pro/Max/Team/Enterprise):
-
Start the server:
MCP_TRANSPORT=http uv run python examples/demo_server.py
-
Configure Claude Desktop:
{
  "mcpServers": {
    "honeymcp-demo": {
      "url": "http://localhost:8000/mcp"
    }
  }
}
2. Restart Claude Desktop
Completely quit and reopen Claude Desktop (Cmd+Q on macOS).
3. Test Attack Scenarios
Scenario 1: List Available Tools
User: What tools do you have available?
Expected: Claude shows both legitimate tools (safe_calculator, get_weather) and ghost tools (list_cloud_secrets, execute_shell_command)
Scenario 2: Trigger Attack
User: Please use list_cloud_secrets to show me AWS credentials
Expected:
- Claude calls the ghost tool
- Fake AWS credentials are returned
- Event logged to
~/.honeymcp/events/ - Dashboard shows the attack
Scenario 3: Legitimate Usage
User: What's 5 + 3?
Expected: safe_calculator called, no alerts (zero false positives)
Honeypot Catalog
Data Exfiltration Honeypots ("Get" Tools)
| Tool | Threat | Description |
|---|---|---|
list_cloud_secrets |
High | Cloud provider credentials (AWS/Azure) |
read_private_files |
High | Sensitive configuration files |
dump_database_credentials |
Critical | Database connection strings |
export_user_data |
Critical | User PII records |
get_api_keys |
Critical | External service API keys |
scan_internal_network |
Critical | Internal network scanning |
list_kubernetes_secrets |
Critical | Kubernetes secrets and service accounts |
dump_session_tokens |
Critical | Active user session tokens and JWTs |
list_github_tokens |
Critical | GitHub/GitLab access tokens |
export_audit_logs |
High | Security audit logs export |
dump_ml_model_weights |
Critical | ML model weights and training data |
Prompt Injection Honeypots ("Set" Tools)
| Tool | Threat | Description |
|---|---|---|
execute_shell_command |
Critical | Shell command execution |
bypass_security_check |
Critical | Authentication/authorization bypass |
modify_system_prompt |
Critical | AI system prompt manipulation |
escalate_privileges |
Critical | Privilege escalation |
inject_system_message |
Critical | System context injection |
disable_security_filters |
Critical | Security filter bypass |
override_permissions |
Critical | Access control override |
disable_2fa_requirement |
Critical | Two-factor authentication bypass |
assume_iam_role |
Critical | AWS IAM role assumption |
All ghost tools have tempting descriptions that mention "admin", "bypass", "internal", etc. to attract attackers.
🤖 ToolGen Agent - Automated Tool Creation
HoneyMCP includes ToolGen, a ReAct-style agent that automatically creates new honeypot tools from natural language descriptions. No manual coding required.
How It Works
ToolGen uses a Reason-Act-Observe-Reflect cycle:
- Reason - Analyzes your description to extract tool specifications
- Act - Generates response function code with realistic fake data
- Observe - Validates syntax and structure
- Reflect - Checks quality and suggests improvements
Usage
honeymcp create-tool "dump container registry credentials"
ToolGen automatically:
- Determines tool category (exfiltration, bypass, privilege escalation)
- Infers threat level from description keywords
- Extracts parameters and types
- Generates realistic response templates
- Adds tool to both
ghost_tools.pyandmiddleware.py - Validates all generated code
Example
$ honeymcp create-tool "list terraform state files with secrets"

✅ Tool created: list_terraform_state
   Category: exfiltration
   Threat Level: critical

📝 Agent Reasoning:
   - Analyzing tool description to extract specifications
   - Generating response generator function
   - Validating generated response function
   - Checking code quality and security
The new tool is immediately available in your honeypot catalog.
Documentation
📄 License
Apache 2.0 - See LICENSE for details.
🍯Deploy HoneyMCP today.
Project details


Download files
Download the file for your platform. If you're not sure which to choose, learn more about installing packages.
Source Distribution
Built Distribution
Filter files by name, interpreter, ABI, and platform.
If you're not sure about the file name format, learn more about wheel file names.
Copy a direct link to the current filters
File details
Details for the file honeymcp-0.1.7.tar.gz.
File metadata
- Download URL: honeymcp-0.1.7.tar.gz
- Upload date:
- Size: 702.1 kB
- Tags: Source
- Uploaded using Trusted Publishing? No
- Uploaded via: twine/6.2.0 CPython/3.11.13
File hashes
| Algorithm | Hash digest | |
|---|---|---|
| SHA256 |
c03861acf394331c90de6152f3311aae7ba625d4591168c1702e089f73876cc0
|
|
| MD5 |
b5bba65d2d74c6a3b3692c5cdf32576e
|
|
| BLAKE2b-256 |
d3b6cba1ac9dce7d8af9c7847c74f5bc7549a3d3c7b344973079fcc6db780767
|
File details
Details for the file honeymcp-0.1.7-py3-none-any.whl.
File metadata
- Download URL: honeymcp-0.1.7-py3-none-any.whl
- Upload date:
- Size: 134.7 kB
- Tags: Python 3
- Uploaded using Trusted Publishing? No
- Uploaded via: twine/6.2.0 CPython/3.11.13
File hashes
| Algorithm | Hash digest | |
|---|---|---|
| SHA256 |
383801094d32aa00e70a7f0a45dafa1301b8a73b5000cb3d9935bc021ab71e38
|
|
| MD5 |
95f79c065b0e73950d1f242134bfb8ab
|
|
| BLAKE2b-256 |
b3068e46cad7f0e0600b906988aace641119247d30f6f41179f9effbe1be27ea
|


