No project description provided
Project description
This library was created for the course IB110 - Introduction to Informatics at MUNI FI.
INSTALLATION
Python version >=3.6 is required in order to use the library. Using virtual environment for installation is of course optional, but recommended.
# Bash
$ python3 -m venv <name>
$ source <name>/bin/activate
$ pip install ib110hw
# Windows Powershell
PS> py -m venv <name>
PS> <name>\Scripts\Activate.ps1
PS> pip install ib110hw
Below is an overview of how these computational models can be used. Further documentation is located in the files with the implementation.
FINITE AUTOMATA
This library supports deterministic and nondeterministic finite automata. You can find the implementation of these models in the module automaton. Consider the class located in the base.py as abstract, its only purpose is to avoid duplicity in the implementation of these models.
In order to create an automaton you will need to specify the five-tuple (Q, Σ, δ, q0, F), where:
- The set of states
Qis represented bySet[str] - The set of alphabet symbols
Σis represented bySet[str] - The transition function
δis represented by eitherDFATransitionsorNFATransitions. These types are described below. - The set of final states
Fis represented bySet[str]
DFA and NFA objects can be created in two ways:
- If you know exactly how the automaton should look like you can create it directly - section Example use-case of DFA and Example use-case of NFA.
- If you are implementing an algorithm, for example, you can use helper functions - described in section DFA helper functions and NFA helper functions.
Deterministic finite automata (DFA)
The implementation for DFA can be found in the file automaton/dfa.py.
Example use-case of DFA
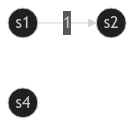
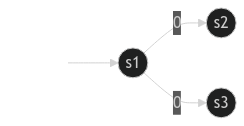
The DFATransitions is an alias to Dict[str, Dict[str, str]]. Keys of this dictionary are symbols where the transition begins. Values are nested dictionaries with alphabet symbols as keys and states where the transition ends as values.
Example of a DFA transition function
Transition shown above can be written like so:
transition_fn: DFATransitions = {
    "s1": { # from s1
        "0": "s2", # via 0 to s2
        "1": "s2", # via 1 to s2
    },
}
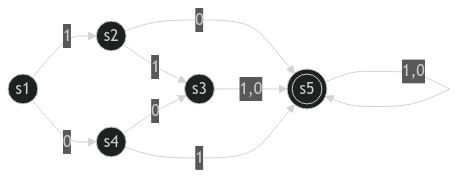
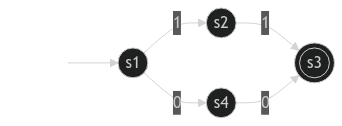
More complex DFA example
from ib110hw.automaton.dfa import DFA, DFATransitions

dfa_transitions: DFATransitions = {
    "s1": {
        "1": "s2",
        "0": "s4"
    },
    "s2": {
        "1": "s3",
        "0": "s5"
    },
    "s3": {
        "1": "s5",
        "0": "s5"
    },
    "s4": {
        "1": "s5",
        "0": "s3"
    },
    "s5": {
        "1": "s5",
        "0": "s5"
    },
}

automaton = DFA(
    states={"s1", "s2", "s3", "s4", "s5" },
    alphabet={"1", "0"},
    initial_state="s1",
    final_states={"s3"},
    transitions=dfa_transitions,
)
Helper functions for DFA
Below are described some use-cases of the implemented helper functions. If you want to learn more about them, check the automaton/dfa.py file containing the implementation with further documentation.
Helper functions for getting information about a DFA
The following examples will use the DFA object created above.
# returns next state from the provided state by symbol
automaton.get_transition("s1", "1") # returns "s2"
automaton.get_transition("s1", "0") # returns "s4"
# returns set of symbols between two (directly) adjacent states
automaton.get_symbols_between_states("s1", "s2") # returns {"1"}
automaton.get_symbols_between_states("s3", "s5") # returns {"1", "0"}
automaton.get_symbols_between_states("s1", "s3") # returns set()
# returns True if the given string is accepted by the automaton, False otherwise
# IMPORTANT: the automaton needs to be valid (see below) to be able to test
automaton.is_accepted("11") # False
automaton.is_accepted("00") # False
automaton.is_accepted("10") # True
# Checks whether the DFA is valid:
#     1. The states set is not empty.
#     2. The initial state is in states.
#     3. Final states are subset of states.
#     4. The alphabet does not contain ε ('').
#     5. The transition function contains characters only from its alphabet.
#     6. The transition function contains states only from its states set.
#     7. The transition function is total.
automaton.is_valid() # returns True
Helper functions for altering a DFA
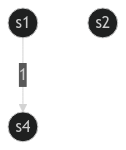
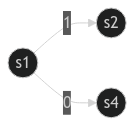
The DFA class contains some helper functions to alter the automata if you wish to implement an algorithm for example. Some use-cases are described below, with pictures of automata to show how it progressively changes.
# all params are optional, but to be able to check whether it accepts a given input,
# it needs to have them all defined
showcase_dfa: DFA = DFA(alphabet={"a", "b", "c"})

# adds a singular state to automaton
# second param specifies if the state is final - defaults to False
showcase_dfa.add_state("s1", False) # returns True - automaton was altered
showcase_dfa.add_state("s1") # returns False - nothing changed, since state s1 already exists
showcase_dfa.add_state("s2")
showcase_dfa.add_state("s4")
# adds a transition from s1 to s2 by '1'
showcase_dfa.add_transition("s1", "s2", "1") # returns True - it changed the automaton

# this will not change the automaton, since transition from s1 by '1' already exists
showcase_dfa.add_transition("s1", "s4", "1") # returns False - nothing changed
# this method either adds a transition like above, or overwrites the existing one
# the transition from s1 by '1' gets redirected to the state s4
dfa_showcase.set_transition("s1", "s4", "1") # returns None
showcase_dfa.set_transition("s1", "s2", "1")
showcase_dfa.set_transition("s1", "s4", "0")
showcase_dfa.add_state("s3")
showcase_dfa.add_transition("s2", "s3", "1")
showcase_dfa.add_transition("s4", "s3", "0")

# add the final state
showcase_dfa.add_state("s5", True)

showcase_dfa.add_transition("s2", "s5", "0")
showcase_dfa.add_transition("s3", "s5", "0")
showcase_dfa.add_transition("s3", "s5", "1")
showcase_dfa.add_transition("s4", "s3", "1")
showcase_dfa.add_transition("s5", "s5", "0")
showcase_dfa.add_transition("s5", "s5", "1")
The dfa pictured above is still not a valid DFA, since it lacks an initial state. This can be fixed by simply editing the initial_state property. The automaton is now equivalent to the More complex example shown above.
dfa_showcase.is_valid() # returns False

dfa_showcase.initial_state = "s1"

dfa_showcase.is_valid() # returns True
# strings can now be tested
automaton.is_accepted("11") # True
automaton.is_accepted("00") # True
automaton.is_accepted("10") # False
Transitions and states can also be removed:
# removes the transition from s1 by '0'
dfa_showcase.remove_transition("s1", "0")
# removes the state s3 and every transition associated with it
dfa_showcase.remove_state("s")
Visualization
DFA objects can be visualized in two ways: print and automaton_to_graphviz. The following example uses the automaton object from the More complex example section.
from ib110.automaton.utils import automaton_to_graphviz

print(automaton)
# alphabet: 0,1
# states: s1,s5,s3,s2,s4
# final states: s3
#
#      DFA      |    0    |    1
# ----------------------------------
# -->  s1       |   s4    |   s2
#      s2       |   s5    |   s3
# <--  s3       |   s5    |   s5
#      s4       |   s3    |   s5
#      s5       |   s5    |   s5
The following produces a .dot (graphviz) file which can then be viewed by either downloading an extension/plugin (vscode link, jetbrains link) or by going here and pasting the result.
automaton_to_graphviz(automaton, path="./automaton.dot")
Nondeterministic finite automata (NFA)
The implementation for the NFA can be found in the file nfa.py with a description of each function.
Example use-case of NFA
Transition function of an NFA is described by the NFATransitions. It is an alias to Dict[str, Dict[str, Set[str]]]. It is similar to the DFATransitions but instead of the next-state string, there is a set of next-state strings.
Example of a NFA transition function
Transition shown above can be implemented like so:
transition_fn: NFATransitions = {
    "s1": {
        "0": {"s2", "s3"},
        "1": set(), # specifying this is unnecessary
    },
}
More complex NFA example
from ib110hw.automaton.nfa import NFA, NFATransitions

nfa_transitions: NFATransitions = {
    "s1": {
        "1": { "s2" },
        "0": { "s4" },
    },
    "s2": {
        "1": { "s3" },
    },
    "s4": {
        "0": { "s3" },
    },
}

automaton = NFA(
    states={"s1", "s2", "s3", "s4", "s5" },
    alphabet={"1", "0"},
    initial_state="s1",
    final_states={"s3"},
    transitions=nfa_transitions,
)

automaton.is_accepted("11") # True
automaton.is_accepted("00") # True
automaton.is_accepted("10") # False
NFA helper functions
Below are described some use-cases of the implemented helper functions. If you want to learn more about them, check the automaton/nfa.py file containing the implementation with further documentation.
Helper functions for getting information about an NFA
All of the NFA class methods for getting information about the automaton. The difference is only in the is_valid method which has different requirements:
#Checks whether the NFA is valid:
#    1. States set is not empty.
#    2. Initial state is in states.
#    3. Final states are subset of states.
#    4. The transition function contains characters only from its alphabet.
#    5. The transition function contains states only from its states set.
automaton.is_valid() # returns true
Helper functions for altering an NFA
All of the NFA class methods for altering the automaton are used the same way as with DFA class instead of one:
# this method either adds a transition, or overwrites the existing one
# the difference compared to the DFA is that it takes a *set* of next states
automaton.set_transition("s1", {"s2"}, "1")
TURING MACHINE
This library supports deterministic and multi-tape Turing machines. You can find the implementation in the module turing. Consider the class located in the base.py as abstract, its only purpose is to avoid duplicity in the implementation of these models.
In order to create a Turing machine you will need to specify the seven-tuple (Q, Σ, Γ, δ, q0, q_acc, q_rej), where:
- The set of states
Qis represented bySet[str] - The set of alphabet symbols
Σis represented bySet[str] - The transition function
δis represented by eitherDTMTransitionsorMTMTransitions. These types are described below. - The initial state
q0is represented bystr - The accepting state
q_accis represented bystr - The rejecting state
q_rejis represented bystr
Tape
The implementation of the tape for the Turing machine can be found in the file tape.py. The tape class is only used internally by the DTM and MTM objects - you will probably not use it directly.
from ib110hw.turing.tape import Tape

tape: Tape = Tape()
tape.write("Hello")
print(tape)         # | H | e | l | l | o |   |
                    #   ^

tape.move_left()
print(tape)         # |   | H | e | l | l | o |   |
                    #   ^

tape.move_right()
tape.move_right()
print(tape)         # |   | H | e | l | l | o |   |
                    #           ^

tape.write_symbol("a")
print(tape)         # |   | H | a | l | l | o |   |
                    #           ^

tape.clear()        # |   |
                    #   ^
The module tape also contains enum for the direction of tape head:
class Direction(Enum):
    LEFT = -1
    STAY = 0
    RIGHT = 1

    # shorthand aliases
    L = -1
    S = 0
    R = 1

    def __repr__(self):
        return self.name
Deterministic Turing Machine (DTM)
The following DTM checks whether the input string is a palindrome:
from ib110hw.turing.dtm import DTM, DTMTransitions

transitions: DTMTransitions = {
    "init": {
        ">": ("mark", ">", Direction.RIGHT),
    },
    "mark": {
        "a": ("foundA", "X", Direction.RIGHT),
        "b": ("foundB", "X", Direction.RIGHT),
        "X": ("accept", "X", Direction.STAY),
        "": ("accept", "", Direction.STAY),
    },
    "foundA": {
        "a": ("foundA", "a", Direction.RIGHT),
        "b": ("foundA", "b", Direction.RIGHT),
        "X": ("checkA", "X", Direction.LEFT),
        "": ("checkA", "", Direction.LEFT),
    },
    "checkA": {
        "a": ("back", "X", Direction.LEFT),
        "b": ("reject", "b", Direction.STAY),
        "X": ("accept", "X", Direction.STAY),
    },
    "foundB": {
        "a": ("foundB", "a", Direction.RIGHT),
        "b": ("foundB", "b", Direction.RIGHT),
        "X": ("checkB", "X", Direction.LEFT),
        "": ("checkB", "", Direction.LEFT),
    },
    "checkB": {
        "a": ("reject", "a", Direction.STAY),
        "b": ("back", "X", Direction.LEFT),
        "X": ("accept", "X", Direction.STAY),
    },
    "back": {
        "a": ("back", "a", Direction.LEFT),
        "b": ("back", "b", Direction.LEFT),
        "X": ("mark", "X", Direction.RIGHT)
    }
}

machine: DTM = DTM(
    states={"init", "mark", "gotoEndA", "checkA", "gotoEndB", "checkB", "accept", "reject"},
    input_alphabet={"a", "b"},
    acc_states="accept",
    rej_states="reject",
    initial_state="init",
    transitions=transitions
)

machine.write_to_tape("aabbabbaa")
DTM Transition function
A DTM transition function is represented by a nested dictionary defined by the type DTMTransitions.
The keys of this dictionary are states of the turing machine, and values are dictionaries with read symbols as keys and a tuple containing the next state, symbol to be written and the tape head direction as values.
Rule δ(init, >) -> (next, >, 1) can be defined like so:
function: DTMransitions = {
    "init": {
        ">": ("next", ">", Direction.RIGHT)
        }
}
Loading From a File
DTM can also be loaded from a file. Format is shown below:
# name of the initial state
init init

# name of the accepting state
acc acc

# name of the rejecting state
rej rej

# alphabet characters without start_symbol
alphabet a b

---

# current read -> next write direction(L, R, S)
# ! underscore (_) is used to depict <space> !
init    > -> mark   > R
mark    a -> foundA X R
mark    b -> foundB X R
mark    X -> acc    X S
mark    _ -> acc    _ S
foundA  a -> foundA a R
foundA  b -> foundA b R
foundA  X -> checkA X L
foundA  _ -> checkA _ L
checkA  a -> back   X L
checkA  b -> acc    b S
checkA  X -> rej    X S
foundB  a -> foundB a R
foundB  b -> foundB b R
foundB  X -> checkB X L
foundB  _ -> checkB _ L
checkB  a -> reject a S
checkB  b -> reject X L
checkB  X -> reject X S
back    a -> back   a L
back    b -> back   b L
back    X -> mark   X R
The file above can then be simply loaded using the import_dtm(...):
from ib110hw.turing.utils import import_dtm

machine = import_dtm("./dtm_file")
Multi-tape Turing Machine (MTM)
On top of the properties required to create DTM, you will need to specify the number of tapes as well. The default tape count is set to 2.
The following MTM has the same function as the DTM above:
from ib110hw.turing.mtm import MTM, MTMTransitions
from ib110hw.turing.tape import Direction

transitions: MTMTransitions = {
    "init": {
        (">", ""): ("copy", (">", ""), (Direction.R, Direction.S))
    },
    "copy": {
        ("a", ""): ("copy", ("a", "a"), (Direction.R, Direction.R)),
        ("b", ""): ("copy", ("b", "b"), (Direction.R, Direction.R)),
        ("", ""): ("goToStart", ("", ""), (Direction.L, Direction.S)),
    },
    "goToStart": {
        ("a", ""): ("goToStart", ("a", ""), (Direction.L, Direction.S)),
        ("b", ""): ("goToStart", ("b", ""), (Direction.L, Direction.S)),
        (">", ""): ("check", (">", ""), (Direction.R, Direction.L))
    },
    "check": {
        ("a", "a"): ("check", ("a", "a"), (Direction.R, Direction.L)),
        ("b", "b"): ("check", ("b", "b"), (Direction.R, Direction.L)),
        ("", ""): ("accept", ("", ""), (Direction.S, Direction.S)),
        ("a", "b"): ("reject", ("a", "b"), (Direction.S, Direction.S)),
        ("b", "a"): ("reject", ("b", "a"), (Direction.S, Direction.S)),
    }
}

machine: MTM = MTM(
    states={"init", "goToEnd", "goToStart", "check", "accept", "reject"},
    initial_state="init",
    input_alphabet={"a", "b"},
    acc_states="accept",
    rej_states="reject",
    transitions=transitions)

machine.write_to_tape("aabbabbaa")
MTM Transition Function
A MTM transition function is represented by a nested dictionary defined by the type MTMTransitions. Compared to DTMTransitions, it takes a tuple of read symbols instead of a singular symbol and a tuple of directions instead of a singular direction. Length of these tuples is the amount of tapes.
Rule δ(init, (>, ␣)) = (next, (>, a), (1, 0)) can be defined like so:
function: MTMransitions = {
    "init": {
        (">", ""): ("next", (">", "a"), (Direction.RIGHT, Direction.LEFT))
        }
}
MTM can also be loaded from a file. Format is shown below:
# name of the initial state
init init

# name of the accepting state
acc acc

# name of the rejecting state
rej rej

# alphabet characters without start_symbol
alphabet a b c

# the amount of tapes (>= 2)
tapes 2

---

# current (reads) -> next [writes] [directions]([L(eft), R(ight), S(tay)])
# ! _ (underscore) is used to depict <space> !
# such spacing is not required
init        (> _) -> copy         (> _) (R S)
copy        (a _) -> copy         (a a) (R R)
copy        (b _) -> copy         (b b) (R R)
copy        (_ _) -> goToStart    (_ _) (L S)
goToStart   (a _) -> goToStart    (a _) (L S)
goToStart   (b _) -> goToStart    (b _) (L S)
goToStart   (> _) -> check        (> _) (R L)
check       (a a) -> check        (a a) (R L)
check       (b b) -> check        (b b) (R L)
check       (_ _) -> acc          (_ _) (S S)
check       (a b) -> rej          (a b) (S S)
check       (b a) -> rej          (b a) (S S)
The file above can then be simply loaded using the import_mtm(...):
from ib110hw.turing.utils import import_mtm

machine = import_mtm("./mtm_file")
DTM and MTM Simulation
You can simulate the Turing machine using the provided function simulate(...). By default, every step of the Turing machine will be printed to console with 0.5s delay in-between. This behavior can be changed by setting the to_console and delay parameters. If the parameter to_console is set to False, the delay will be ignored.
machine.simulate(to_console=True, delay=0.3) # True
There is also an option to simulate the calculation step-by-step, i.e., the TM will wait for user input (arrow keys). It allows for going back and forward in the calculation. This can be enabled by setting the step_by_step parameter to True. The delay and to_console parameters are ignored.
machine.simulate(step_by_step=True)
If you want to look at the whole history, you can set parameter to_file to True. Every step will be printed to file based on the path provided in the parameter path. Default path is set to ./simulation.md.
machine.simulate(to_console=False, to_file=True, path="~/my_simulation.md")
The BaseTuringMachine class contains the attribute max_steps to avoid infinite looping. By default, it is set to 100. The computation will stop if the simulation exceeds the value specified by this attribute. This can be an issue on larger inputs, so setting it to a bigger number may be needed.
turing.max_steps = 200
Simulation in PyCharm
For the optimal visualization of the simulation in PyCharm you need to enable the Terminal emulation.
You can do so by going to Run > Edit configurations ... and then checking the Emulate terminal in output console box.
Project details
Release history Release notifications | RSS feed
Download files
Download the file for your platform. If you're not sure which to choose, learn more about installing packages.


