Fancy image to ASCII/ANSI converter
Project description
Image2ASCII
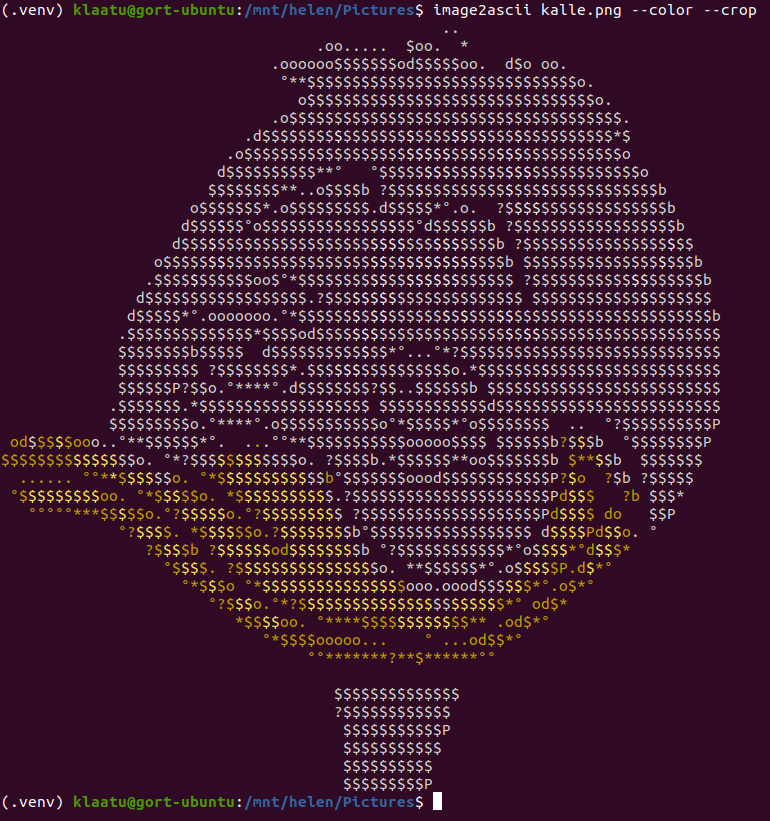
Converts images to ASCII, with a twist; it traces edges in the image and attempts to render them with suitably formed characters, à la good old handmade ASCII art:
It can also crop, output ANSI colour, adjust contrast/colour balance/brightness, invert, and other nice stuff, as well as render HTML.
Installation
From PyPI
# Minimal install:
pip install image2ascii
# Install with WSGI capabilities (see below):
pip install image2ascii[www]
From source
# You do use virtual envs, right?
python3 -m venv .venv
source .venv/bin/activate
# Minimal install:
pip install -e .
# Install with WSGI capabilities (see below):
pip install -e .[www]
Usage
CLI
Installation per instructions above creates an image2ascii command; run it for more info. Play around with various combinations of --invert, --negative, --contrast, --brightness, and --color-balance, until the results are to your liking. --color and --crop are also highly recommended.
WSGI
Image2ASCII can run as a simple WSGI application, courtesy of Flask. Just make sure you have installed it with the necessary extra requirements, either by running pip install image2ascii[www] or manually installing Flask and requests.
For this purpose, a fully working web implementation is also included. Not only does it leverage Image2ASCII's various features, it also enables drag-and-drop and pasting of images, and includes all sovereign state flags from Wikipedia for the user to choose from. A live version is (at the time of writing) available here.
Installation via pip will also create an image2ascii_testserver command with an optional port number argument (default is port 8000). Use it to fire up a basic web server on localhost and try it out. (Executing wsgi.py directly from the command line achieves the same thing.)
Here is a suggested (albeit untested) Supervisor setup:
/etc/supervisor/conf.d/image2ascii.ini:
[program:image2ascii]
directory = /path/to/image2ascii
command = /path/to/image2ascii/.venv/bin/uwsgi --ini config.ini
/path/to/image2ascii/config.ini:
[uwsgi]
module = image2ascii.wsgi:application
master = true
processes = 5
socket = /tmp/image2ascii.sock
chmod-socket = 666
vacuum = true
Configuration
The CLI looks for config files in these locations, by order of priority:
- Path set via
--configparameter ~/.image2asciidefaults.confin application directory (i.e. the directory whereconfig.pyis located)
The WSGI application looks for these config files, by order of priority:
web_defaults.confin application directory (a default one is included)~/.image2asciidefaults.confin application directory
Config files follow a normal INI file structure (key=value). For available keys, refer to config.py (more specifically: config.Config._fields).
Everything else
This project is totally in beta, and so its API should not be considered stable.
Shouts out to:
Project details
Download files
Download the file for your platform. If you're not sure which to choose, learn more about installing packages.
Source Distribution
Built Distribution
Filter files by name, interpreter, ABI, and platform.
If you're not sure about the file name format, learn more about wheel file names.
Copy a direct link to the current filters
File details
Details for the file image2ascii-0.6.2.tar.gz.
File metadata
- Download URL: image2ascii-0.6.2.tar.gz
- Upload date:
- Size: 2.3 MB
- Tags: Source
- Uploaded using Trusted Publishing? No
- Uploaded via: twine/4.0.2 CPython/3.11.6
File hashes
| Algorithm | Hash digest | |
|---|---|---|
| SHA256 |
5b792cbdf144cf8029080e7454a7149b1994bb27b59aa6bbc3d372ff20ccb16b
|
|
| MD5 |
08407164490bfc89ccad579c3039168e
|
|
| BLAKE2b-256 |
65b4c917368093dce27164e83156d53921fbbbc0d0110ec196a4c1a2f0e314e2
|
File details
Details for the file image2ascii-0.6.2-py3-none-any.whl.
File metadata
- Download URL: image2ascii-0.6.2-py3-none-any.whl
- Upload date:
- Size: 2.4 MB
- Tags: Python 3
- Uploaded using Trusted Publishing? No
- Uploaded via: twine/4.0.2 CPython/3.11.6
File hashes
| Algorithm | Hash digest | |
|---|---|---|
| SHA256 |
cf82dafc6670442a8f61e7ff7fb2654b11be5131b2602fad87990eaf6e7d8945
|
|
| MD5 |
d088597d6686953387d09add28717621
|
|
| BLAKE2b-256 |
1307b89d71a864d9c42e35d532000e7a1d1fbe651e09fc6687af94cf65d292a8
|


