A powerful image annotation and segmentation tool with GUI, CLI, and Python API

Project description
Image-Baker


An example of baked images. (Each object is a layer and an annotation will also be extracted for all layers.)
Let's bake an image.
Why is it relevant?
When training computer vision models (especially for detection and segmentation), labeling large amounts of data is crucial for better model performance. Often, the process involves multiple cycles of labeling, training, and evaluation. By generating multiple realistic labeled datasets from a single image, the time spent on labeling can be significantly reduced.
What's up with the name?
The concept involves extracting portions of an image (e.g., objects of interest) using tools like polygons or models such as Segment Anything. These extractions are treated as layers, which can then be copied, pasted, and manipulated to create multiple instances of the desired object. By combining these layers step by step, a new labeled image with annotations in JSON format is created. The term "baking" refers to the process of merging these layers into a single cohesive image.
Getting Started
ImageBaker can be used in three ways:
- GUI Application - Visual interface for interactive image composition
- CLI Tool - Command-line interface for automation and scripting
- Python Library - Programmatic API for integration into your projects
Installation
Using PIP
This project is also available on the PyPI server.
pip install imagebaker
Developing
Please, clone this repository and install it locally:
For Windows users:
git clone https://github.com/q-viper/image-baker.git
cd image-baker
python -m venv .venv       # create a virtual environment
.venv\Scripts\activate     # activate the virtual environment
pip install -e .
For Linux/macOS users:
git clone https://github.com/q-viper/image-baker.git
cd image-baker
pip install -e .
Usage
🖥️ GUI Mode
Launch the visual interface for interactive work:
# Simple launch (default)
imagebaker

# Or with explicit gui command
imagebaker gui

# With models
imagebaker gui --models-file examples/loaded_models.py
⌨️ CLI Mode
Automate image composition from the command line:
# Simple composition
imagebaker cli bake simple bg.png fg.png -o output.png \
    --positions "0,0;100,100" --opacities "1.0,0.5"

# Config-based baking
imagebaker cli bake from-config config.py

# Get image info
imagebaker cli info image.png

# Check version
imagebaker cli version
🐍 Python API
Integrate into your projects programmatically:
from imagebaker import ImageBaker

baker = ImageBaker()
layer1 = baker.add_layer_from_file("background.png")
layer2 = baker.add_layer_from_file("foreground.png")
baker.set_layer_position(layer2, 100, 100)
baker.set_layer_opacity(layer2, 0.7)

result = baker.bake()
baker.save(result, "output.png")
📚 Documentation:
- Quick Start Guide - Get started in 5 minutes
- Full API Reference - Comprehensive documentation
- Implementation Details - Technical details
🎨 Examples:
- GUI: Traditional visual interface (unchanged)
- CLI:
examples/bake_config.py- Configuration file example - API:
examples/api_example.py- Full Python example - Samples:
assets/demo/api_samples/- Generated outputs
Features
- Annotating Images: Load a folder of images and annotate them using bounding boxes or polygons.
- Model Testing: Define models for detection, segmentation, and prompts (e.g., points or rectangles) by following the base model structure in imagebaker/models/base_model.py. See examples/loaded_models.py for a working example.
- Layerifying: Crop images based on annotations to create reusable layers. Each cropped image represents a single layer.
- Baking States: Arrange layers to create image variations by dragging, rotating, adjusting opacity, and more. Save the state using the Save State button or Ctrl + S.
- Playing States: Replay saved states, export them locally, or use them for further predictions.
- Exporting States: Export the final annotated JSON and the baked multilayer image.
- Drawing On Layers: First select a layer then draw upon it. Only selected layer will be drawn. And if no layers are selected, then the drawing will not be exported.
Shortcuts
- Ctrl + C: Copy selected annotation/layer.
- Ctrl + V: Paste copied annotation/layer in its parent image/layer if it is currently open.
- Delete: Delete selected annotation/layer.
- Left Click: Select an annotation/layer on mouse position.
- Left Click + Drag: Drag a selected annotation/layer.
- Double Left Click: When using polygon annotation, completes the polygon.
- Right Click: Unselect an annotation/layer. While annotating the polygon, undo the last point.
- Ctrl + Mouse Wheel: Zoom In/Out on the mouse position, i.e., resize the viewport.
- Ctrl + Drag: If done on the background, the viewport is panned.
- Ctrl + S: Save State on Baker Tab.
- Ctrl + D: Draw Mode on Baker Tab. Drawing can happen on a selected or main layer.
- Ctrl + E: Erase Mode on Baker Tab.
- Ctrl + H: Opens a help window.
- Wheel: Change the size of the drawing pointer.
- Q: Point mode on annotation.
- W: Polygon mode on annotation. Moves selected layer one step up in layer lists in baker.
- S: Moves selected layer one step down in layer list in baker.
- E: Rectangle mode on annotation.
- H: Hides/un-hides selected annotation/layer.
- L: Creates layer from an annotation. If any annotation selected, creates only its, else creates layers from all visible annotations.
- C: If any annotation is selected, a input box for Caption is created. It can be edited on baker tab as well and is state aware.
- Numerics: Selecting number 1, 2, till 9 selects label. If not available, asks for a new label.
- Escape: Closes the application.
Demo
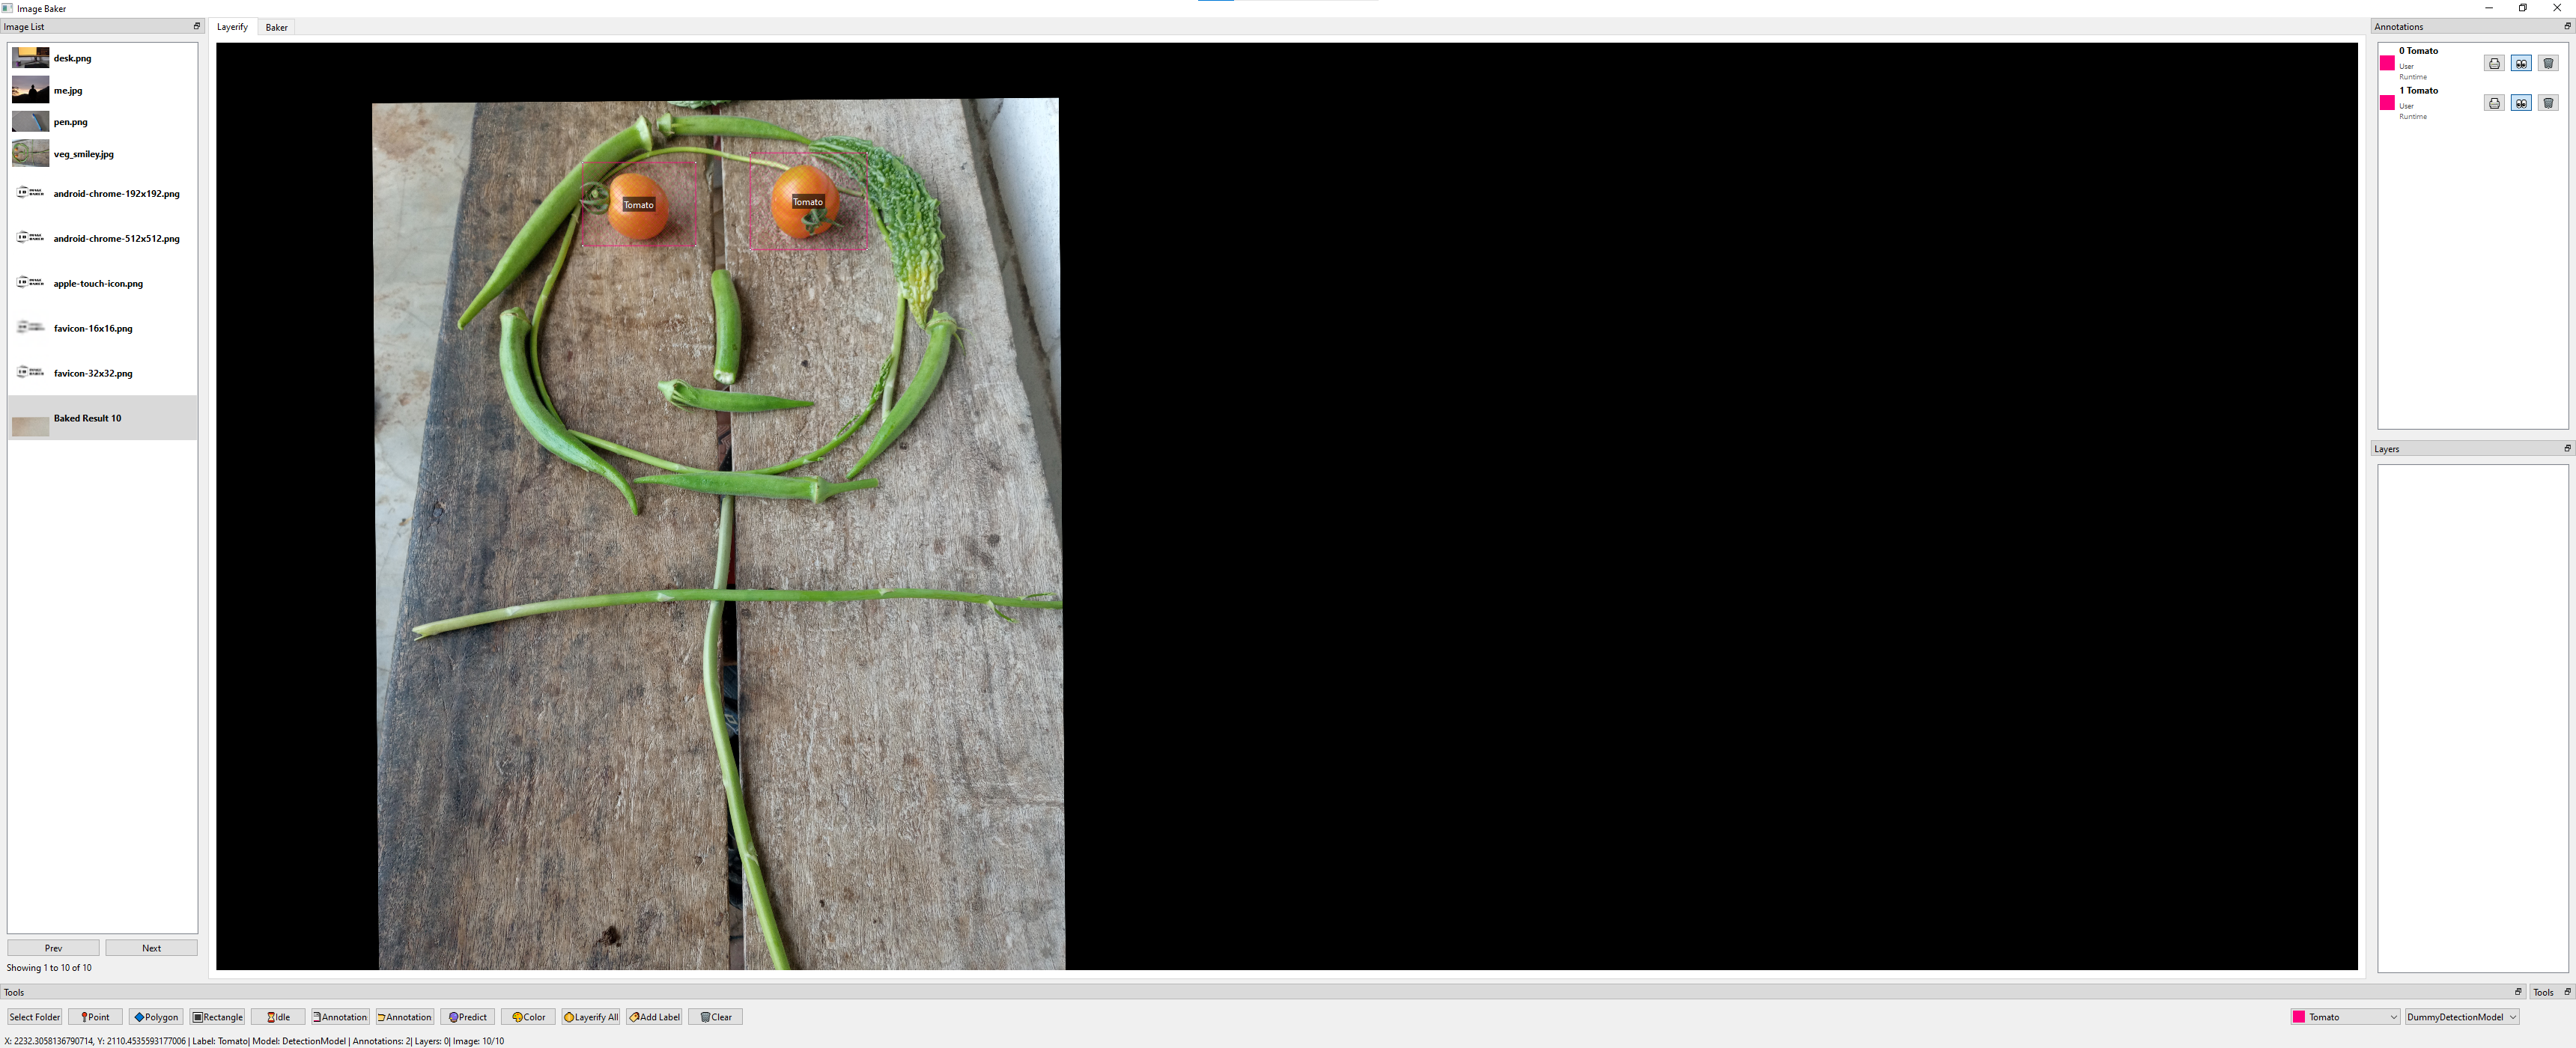
Annotation Page
This is where the loading of the image folder and annotation, connection with the model running in the backend, and layerifying happen.
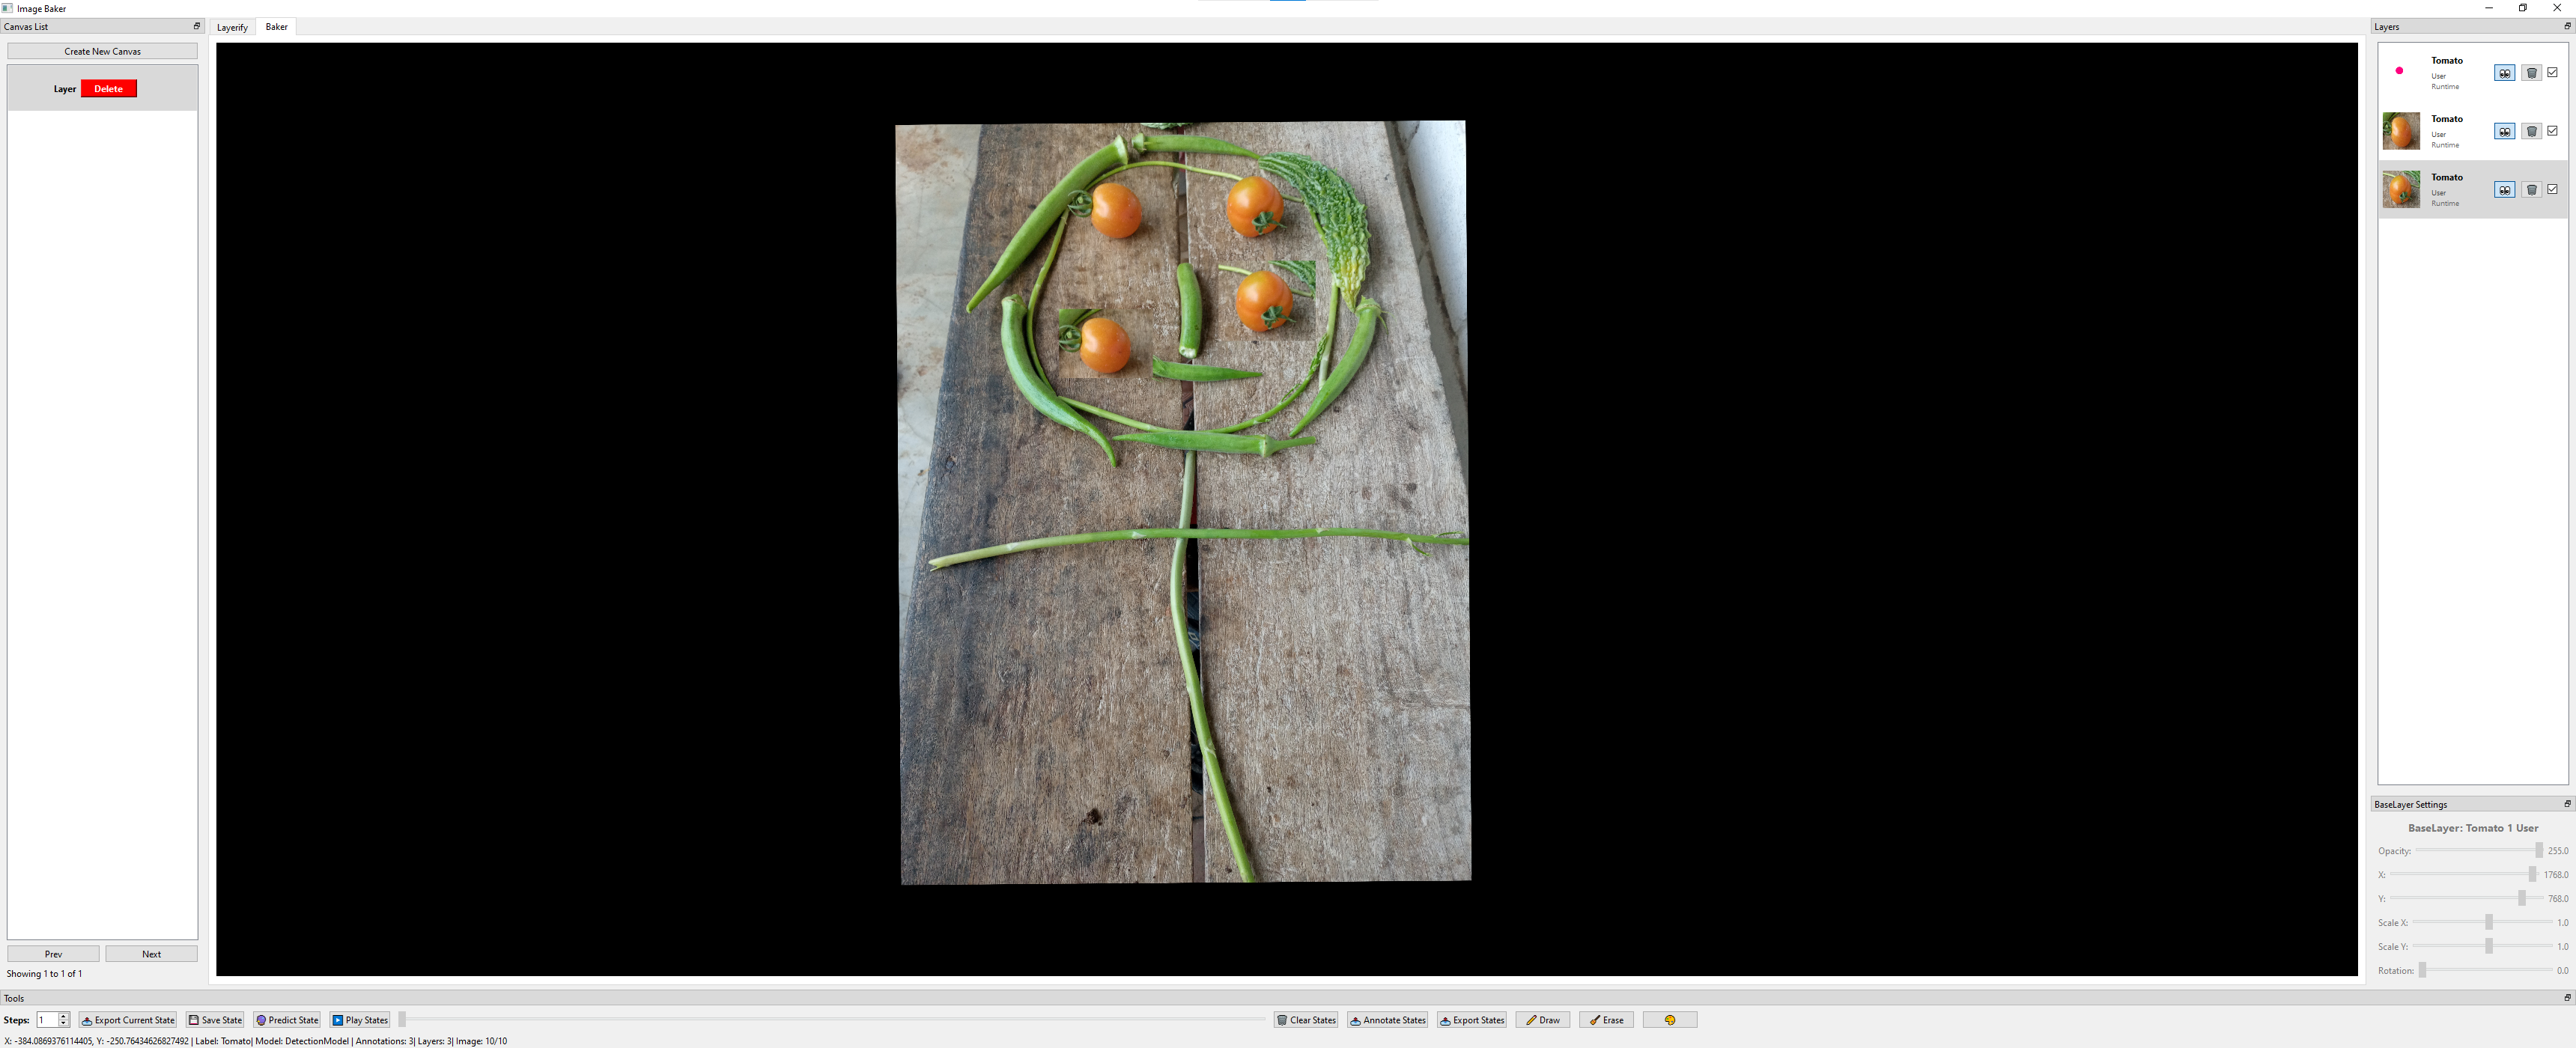
Baker Page
This is where the layer baking happens. And the extraction of the layers as well.
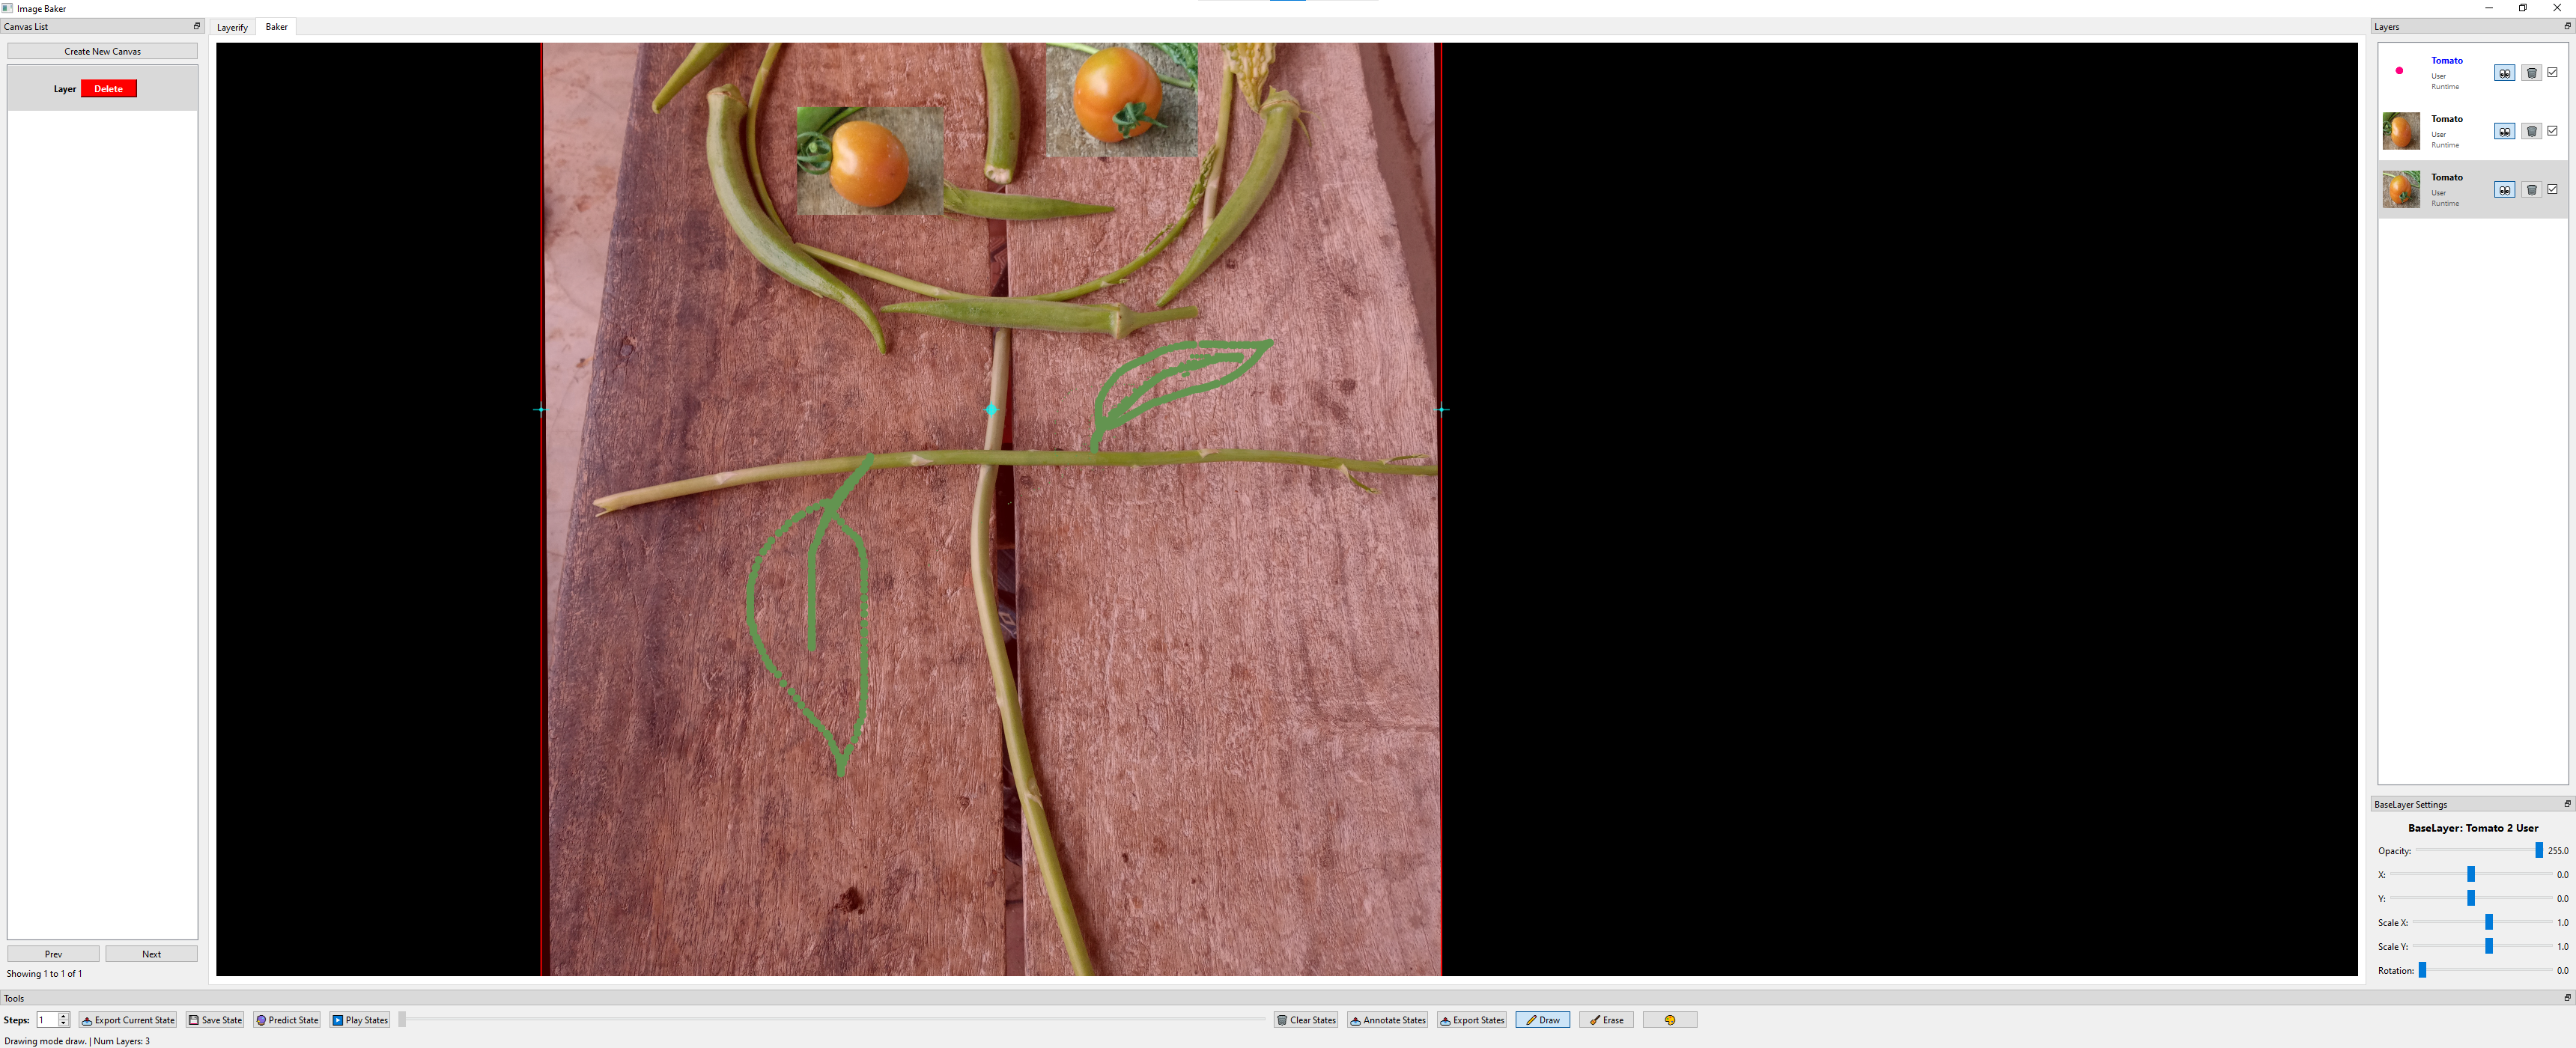
An example of drawing:
Annotated
The JSON and the baked image will be exported to the local folder, and in debug mode, the annotations and the mask for each layer will be exported too.

Demo Video
To see the tool in action, check out the demo video below:

Click on the image above to play the video on YouTube.
Contributions
Contributions are welcome!
Do you find this project to be useful and are you looking for some features that are not implemented yet? Feel free to open issues or submit pull requests to improve the project.
For more please visit CONTRIBUTING.
Release history Release notifications | RSS feed


Download files
Download the file for your platform. If you're not sure which to choose, learn more about installing packages.
Source Distribution
Built Distribution
Filter files by name, interpreter, ABI, and platform.
If you're not sure about the file name format, learn more about wheel file names.
Copy a direct link to the current filters
File details
Details for the file imagebaker-0.0.62.tar.gz.
File metadata
- Download URL: imagebaker-0.0.62.tar.gz
- Upload date:
- Size: 941.3 kB
- Tags: Source
- Uploaded using Trusted Publishing? No
- Uploaded via: twine/6.2.0 CPython/3.10.20
File hashes
| Algorithm | Hash digest | |
|---|---|---|
| SHA256 |
78135e19205dc49a5871f11664b65d2f5cedc2161145d4d8f2dd4b11e009a8fb
|
|
| MD5 |
edc5a91d27c077d8149aeda106cbebae
|
|
| BLAKE2b-256 |
25441bccdbdac5aed447523d75c25651e74058166cddb04e0706daf8bfc464dc
|
File details
Details for the file imagebaker-0.0.62-py3-none-any.whl.
File metadata
- Download URL: imagebaker-0.0.62-py3-none-any.whl
- Upload date:
- Size: 123.0 kB
- Tags: Python 3
- Uploaded using Trusted Publishing? No
- Uploaded via: twine/6.2.0 CPython/3.10.20
File hashes
| Algorithm | Hash digest | |
|---|---|---|
| SHA256 |
6af4a6d461c7f8478069da5eed6960566b332724d3b46cdd57914538ddfbde4c
|
|
| MD5 |
7f7b48a423b03b78e8dba0dc545f9677
|
|
| BLAKE2b-256 |
0cef2230f3857aa083003940539a83c768ac7eb0f9784df7ef62174f2ac45949
|


