
ImageGrains 






A software library for segmenting and measuring of sedimentary particles in images. The segmentation is done with Cellpose-SAM, designed for cell and nucleus segmentation in biomedical images. Its segmentation capability is transferred to geoscientific applications throurgh re-training of the model with images of sediment particles. Pretrained segmentation models from our data are available or custom models can be trained (see paper for details).

:sparkles: New Release: Version 2.0 :sparkles:
The major update to 2.0 includes:
- Switching to Cellpose-SAM (
4.0.1+) as default segmentation model, which improves the segmentation accuracy and generalization a lot. For more details, see the paper. - New models trained on a larger dataset (IG2) that includes different types of grains and imagery.
- Including 3D segmentation of CT-scan stacks; see Notebook and Schuster et al. (2025).
- A graphical user interface (GUI).
Try ImageGrains 2.0 with Cellpose-SAM in Colab with your own data in google drive:
Complete grain size and shape analysis.ipynb

Citation
If you use ImageGrains, please cite:
-
Mair, D., Witz, G., Do Prado, A., Garefalakis, P., Wild, A., Ville, F., Schuster, B., Horn, M., Österle, J., Fabbri, S. C., Litty, C., Achleitner, S., Leistner, S., Hiller, C., and Schlunegger, F.: ImageGrains 2.0: Improved precision and generalization for grain segmentation, EGUsphere [preprint], https://doi.org/10.5194/egusphere-2025-6346.
-
Pachitariu, M., Rariden, M., Stringer, C.. Cellpose-SAM: superhuman generalization for cellular segmentation. bioRxiv 2025.04.28.651001; https://doi.org/10.1101/2025.04.28.651001
If you use legacy versions with Cellpose 2 (e.g., by using ImageGrains 1.x or IG1 models), please cite the Cellpose 1.0 paper:
-
Mair, D., Witz, G., Do Prado, A.H., Garefalakis, P. & Schlunegger, F. (2023) Automated detecting, segmenting and measuring of grains in images of fluvial sediments: The potential for large and precise data from specialist deep learning models and transfer learning. Earth Surface Processes and Landforms, 1–18. https://doi.org/10.1002/esp.5755.
-
Stringer, C.A., Pachitariu, M., (2021). Cellpose: a generalist algorithm for cellular segmentation. Nat Methods 18, 100–106. https://doi.org/10.1038/s41592-020-01018-x.
If you use ImageGrains to calculate percentile uncertainties please also cite:
- Mair, D., Henrique, A., Prado, D., Garefalakis, P., Lechmann, A., Whittaker, A., and Schlunegger, F. (2022): Grain size of fluvial gravel bars from close-range UAV imagery-uncertainty in segmentation-based data, Earth Surf. Dyn., 10,953-973. https://doi.org/10.5194/esurf-10-953-2022.
Local installation
The easiest way to install the software is by using the conda package manager. If you do not have conda installed, please follow the instructions on the conda website. If you encounter problems during installation, have a look here. If these methods do not solve them, please open an issue.
To install the software, open an anaconda prompt / command prompt, then create a new environment with:
conda create --name imagegrains -c conda-forge python=3.10
and activate it with:
conda activate imagegrains
Then install the package using
pip install imagegrains
:exclamation: Please notet that this will install Cellpose 4.0.1 or newer. The new Cellpose-SAM architecture is not compatible with older models! To use older models, install the last version of ImageGrains 1.x with:
pip install imagegrains==1.2.1
GPU support
By default, Cellpose will run on the CPU if no GPU is available. From version 4.0.1 on, it uses a transformer (Cellpose-SAM) as backbone segmentation model, which is much larger than the previous model. Using a GPU on local machines is strongly recommended.
Mac: Cellpose (version 4.0.1 and later) supports Apple GPUs (M1 and newer) out-of-the-box.
Windows or Linux: To use a GPU, you will have to make sure you have a GPU compatible PyTorch version. For this:
-
Uninstall the PyTorch version that gets installed by default with Cellpose:
pip uninstall torch -
Make sure your have up-to-date drivers for your GPU installed.
-
Re-install a GPU version of PyTorch via conda using a command that you can find here (this takes care of the cuda toolkit, cudnn etc. so no need to install manually anything more than the driver). The command will look like this:
pip3 install torch torchvision --index-url https://download.pytorch.org/whl/cu118
How does it work?
ImageGrains is organised in 3 main modules for Segmentation, Grain size measurements and Grain size distribution (GSD) analysis. There are several ways to use them:
1 - User Interface: The most convienient option is to use the GUI built as napari plugin: https://github.com/guiwitz/napari-imagegrains.
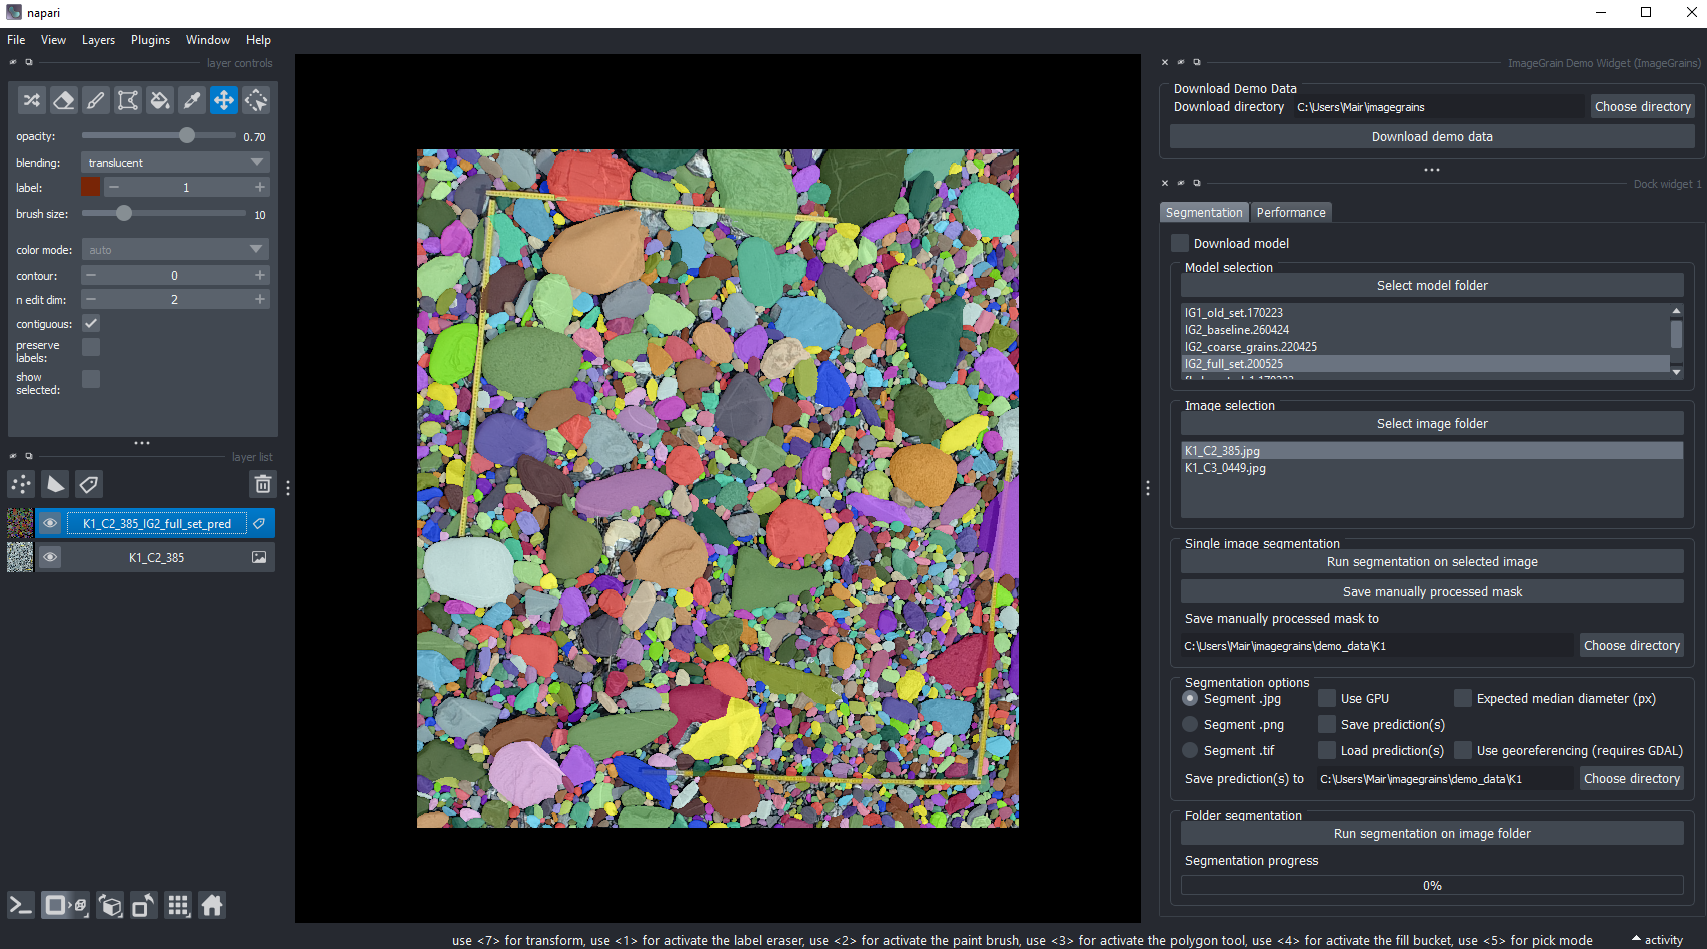
You can simply install it with:
pip install git+https://github.com/dmair1989/napari-imagegrains.git
Afterwards, you can start the program by running:
napari
For instructions, please refer to the docs.
2 - Console: The most basic option is to run ImageGrains from the console by first activating the enviromnent:
conda activate imagegrains
Then download the pretrained models and demo data by executing:
python -m imagegrains --download_data True
To start an analysis from the console run:
python -m imagegrains --img_dir F:/REPLACE_WITH_PATH_TO_FOLDER_OF_IMAGES_(JPEG)
This will run the main application with the default settings on images in the provided location. You can use --help to see all input options.
3 - Notebooks: Alternatively, you can run the jupyter notebooks in /notebooks in their order. They offer more options and information for most workflow steps. Of course, any modules and functions can be combined in custom scripts or notebooks.
Workflow
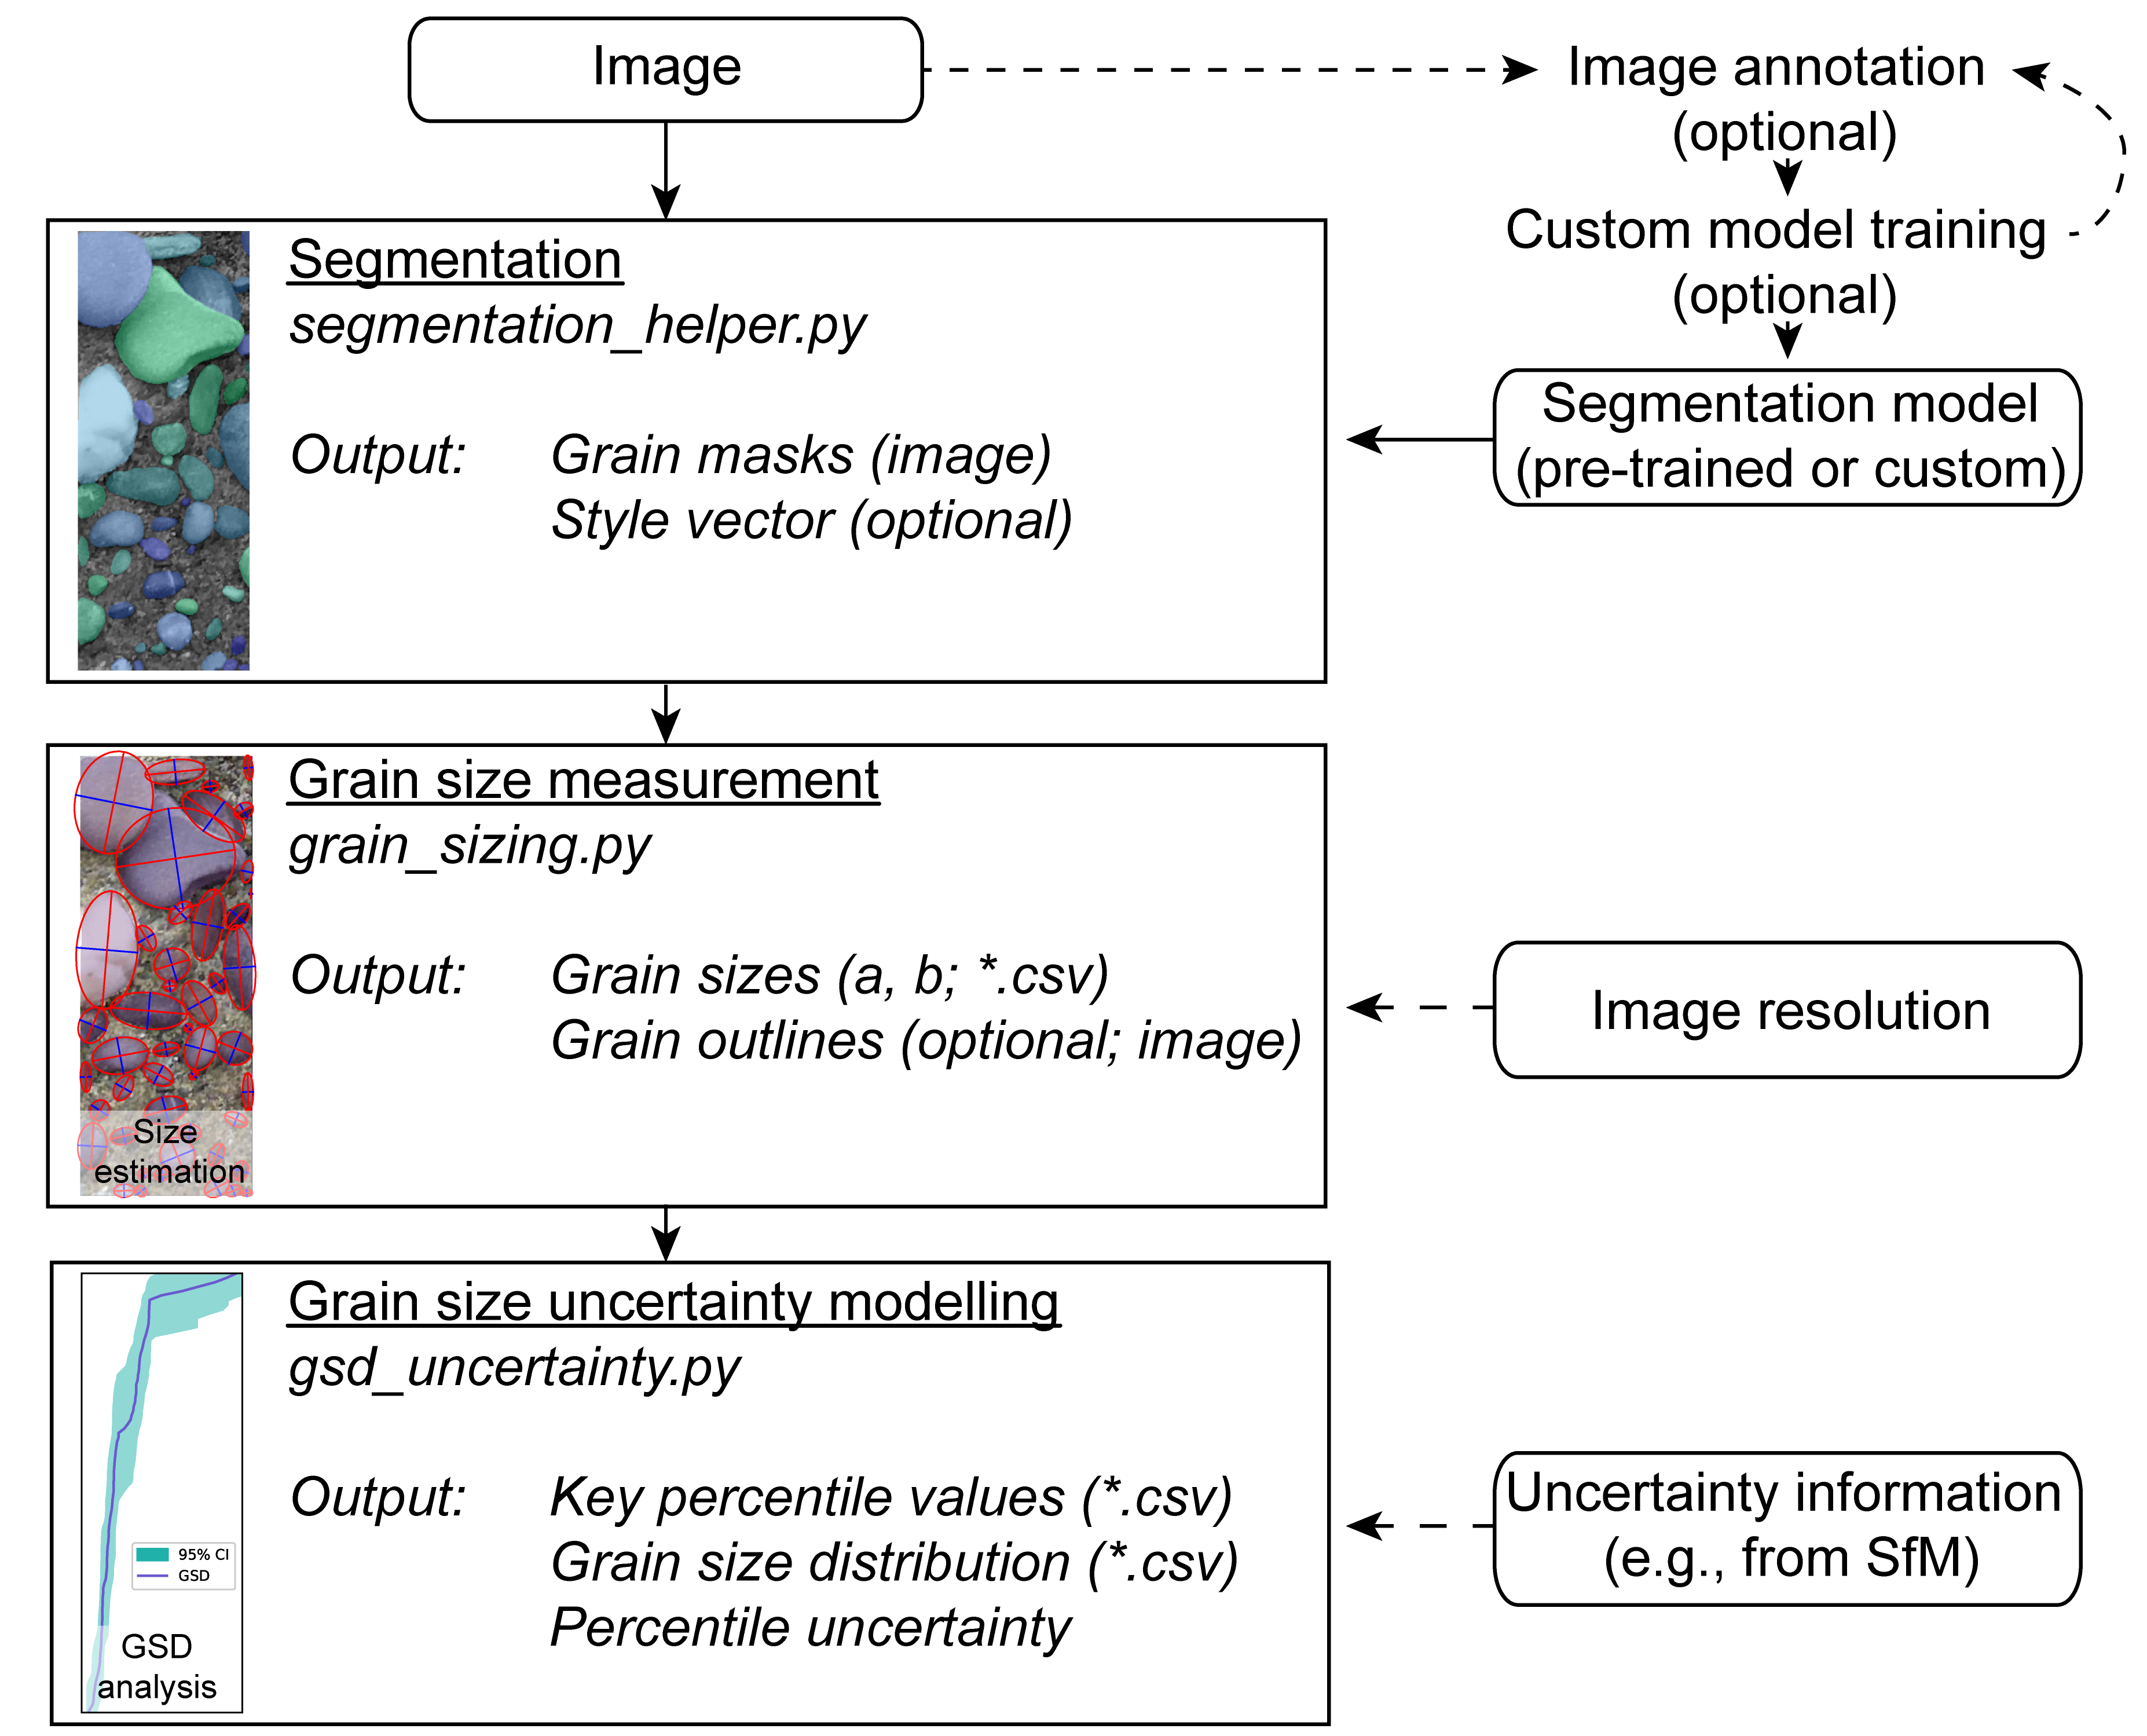
The main concept of ImageGrains is to first segment grains in images, then to measure and scale them with the respective image resolution before finally estimating the uncertainty on an image base. The whole workflow is designed to use individual images or a set of images in a specific folder. During the processing steps, all intermediate outputs can be stored. Short versions of the entire workflow are available in Complete grain size and shape analysis.ipynb and notebooks/complete_imagegrains_analysis.
Segmentation of own images
For details on how to segment own images with pre-trained models, see the corresponding jupyter notebook notebooks/1_image_segmentation.ipynb. To use it locally, open the console and activate the environment (conda activate imagegrains) and start your jupyter instance (e.g., viajupyter lab). Then, open the notebook and follow the instructions. You can use pre-trained models or train a custom model (see below).
Grain size and shape measurements
For details on how to measure grain sizes, see the jupyter notebook notebooks/2_grain_sizes.ipynb. It will load the segmented grain masks and calculate the grain size and shape for each grain on an image-by-image basis. Several options for outline fitting are available. The grain size is then scaled with the image resolution and stored in an output file. It is also possible to export individual grain outlines for further analysis.
Grain size distribution (GSD) and uncertainty
For details on how to analyze the GSD, see the jupyter notebook notebooks/3_gsd_analysis.ipynb. It will load the grain size measurements and calculate the GSD. Several options for uncertainty estimation are available. The uncertainty by default is calculated for each perecentile as 95% confidence interval. The GSD is then stored in an output file.
Training of custom models
If you want to train your own models, you can use the jupyter notebook notebooks/4_train_cellposeSAM_model.ipynb with the full funcitionality of Cellpose-SAM. To train custom models, you will first need manually annotated ground truth data ("labels"). This can be done with any dedicated annotation tool. We used the napari-based GUI and previously the labkit plugin for ImageJ. Please note, that each grain has to have a unique class value.
Troubleshooting
- If you have problems with the pip installation, you can also install the package directly from the repository. If you have trouble building from the repository, make sure you have
gitinstalled and to have it in your path (this can be tricky on Windows). To install from the repository, use:
pip install git+https://github.com/dmair1989/imagegrains.git
- If you still have trouble, you can install the dependencies manually and use the jupyter notebooks in
/notebooksto run the software and locally import the python files (i.e., by making sure the notebooks and files fromsrc/imagegrains/are in the same folder and by changing any import statementfrom imagegrains importtoimport). The dependencies are:
cellpose
matplotlib
scikit-image
pandas
scanpy
jupyter lab
- If you run into problems with OpenMP and libiomp5, you can try to create the environment using the
nomklpackage (more details here) before installing imagegrains with:
conda create --name imagegrains -c conda-forge python=3.10 imagecodecs nomkl
1 maintainer

Download files
Download the file for your platform. If you're not sure which to choose, learn more about installing packages.
Source Distribution
Built Distribution
Filter files by name, interpreter, ABI, and platform.
If you're not sure about the file name format, learn more about wheel file names.
Copy a direct link to the current filters
File details
Details for the file imagegrains-2.0.2.tar.gz.
File metadata
- Download URL: imagegrains-2.0.2.tar.gz
- Upload date:
- Size: 64.6 MB
- Tags: Source
- Uploaded using Trusted Publishing? No
- Uploaded via:
twine/6.1.0 CPython/3.13.12
File hashes
| Algorithm | Hash digest | |
|---|---|---|
| SHA256 |
066b6842aa00f99d652ad303d5b6191f4980579cd6ffad78bd6320f1a2678b7f
|
|
| MD5 |
adc60512ebd6f6381d3e77c20a5be06b
|
|
| BLAKE2b-256 |
c07c6edc224629b81b32591c3d2e5dbf3dcba28e1049732e4995bdc76e618a2a
|
File details
Details for the file imagegrains-2.0.2-py3-none-any.whl.
File metadata
- Download URL: imagegrains-2.0.2-py3-none-any.whl
- Upload date:
- Size: 51.2 kB
- Tags: Python 3
- Uploaded using Trusted Publishing? No
- Uploaded via:
twine/6.1.0 CPython/3.13.12
File hashes
| Algorithm | Hash digest | |
|---|---|---|
| SHA256 |
573c79f60bc0ceb6f7d568bf9364e4b5cb42858d804c1c62e89da9c10ceaea38
|
|
| MD5 |
7901af28947a94cc500ccbb03b59c9dd
|
|
| BLAKE2b-256 |
718f5bfcd4e64ef473eb5dc18d218b8e78785a212e7d3bf15d8e77a94c99a6db
|







