
ImFusion WebAppKit



The ImFusion WebAppKit serves Python imaging algorithms in a medical web viewer over HTTP, so you can demo them to colleagues and clinicians without writing any web code. You register a function, the kit builds the matching button and controls, and whatever you return shows up in the viewer.
The kit already includes the viewer, the HTTP server, and a session model that isolates each browser connection. What you write is the imaging logic, which runs on the ImFusion Python SDK thread rather than in the browser.
This is an early prototype, so interfaces may still change between versions. The kit itself is MIT-licensed, but it runs on the ImFusion SDK, which is free for non-commercial use and needs a commercial licence otherwise.
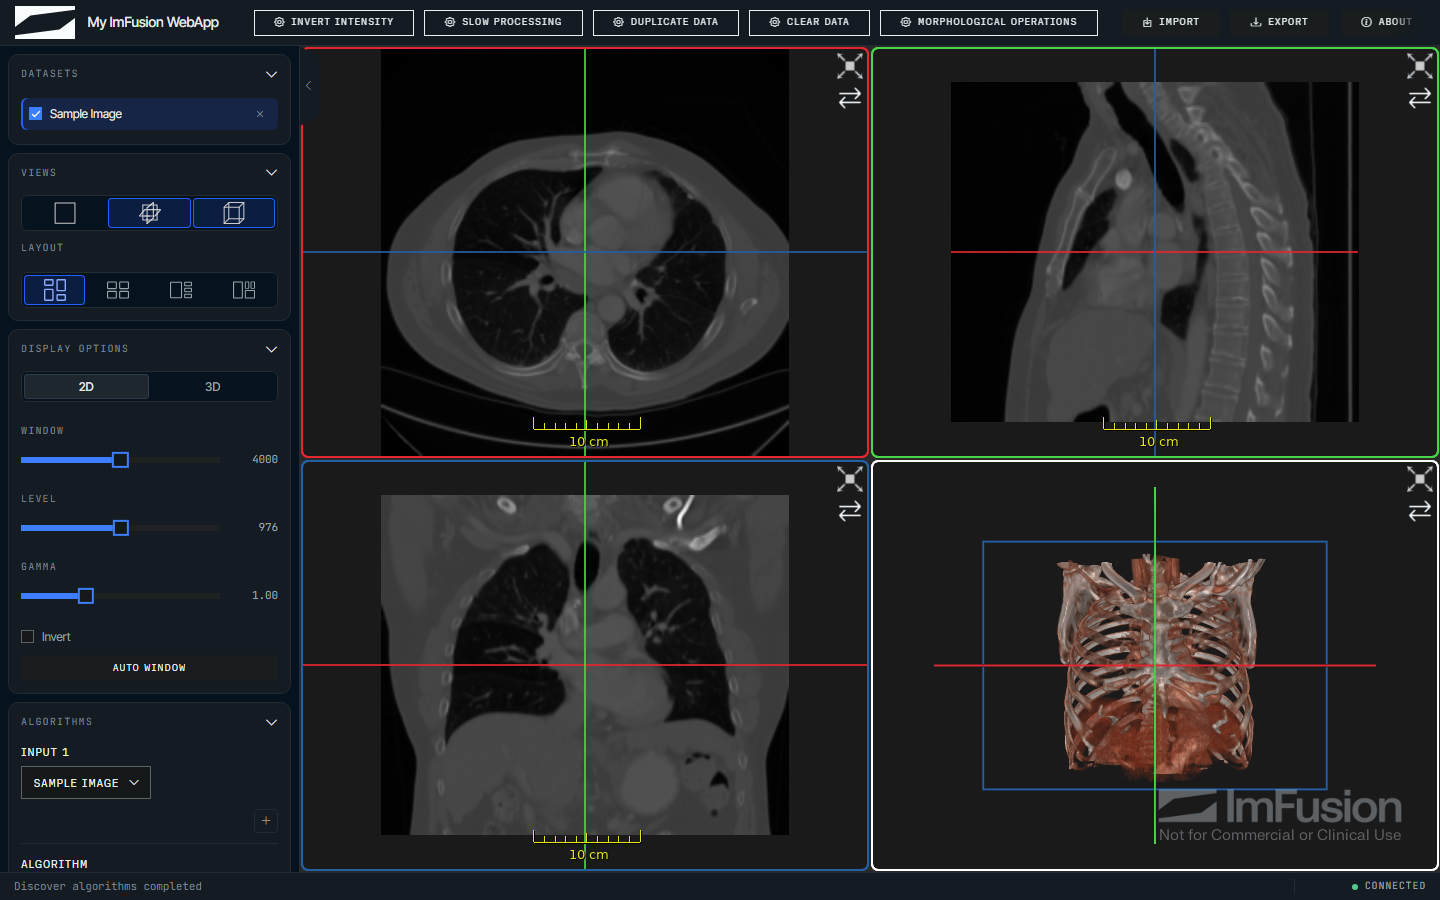
Creating an app
Annotate a function and give it the name you want on the button, and WebAppKit builds the matching controls and runs the call on the ImFusion SDK thread. Argument types pick the controls, so a float with bounds arrives as a slider and an image argument as a dataset selector. You can also expose an existing ImFusion algorithm by name.
import numpy as np
import imfusion

from imfusion_webappkit import FloatParameter, ImFusionWebApp

app = ImFusionWebApp(title="Image Tools")


@app.register(
    "Threshold",
    parameters=[
        FloatParameter(
            "threshold", default=100.0, minimum=0.0, maximum=1000.0,
        ),
    ],
)
def apply_threshold(
    imageset: imfusion.SharedImageSet,
    *,
    threshold: float,
) -> imfusion.SharedImageSet:
    image = imageset[0]
    label = imfusion.SharedImage((image.numpy() >= threshold).astype(np.uint8))
    label.image_to_world_matrix = image.image_to_world_matrix
    label.spacing = image.spacing

    mask = imfusion.SharedImageSet()
    mask.add(label)
    mask.modality = imfusion.Data.Modality.LABEL
    return mask


app.run()
Open http://127.0.0.1:8000, load an image, select it, and run the action.
What's included
The imaging work stays in Python, while the kit owns the parts that usually force you into a frontend project.
The viewer. MPR, 3D, and 2D views with the display options and interactions
people already know from ImFusion Suite. Layout and which views are visible are
set from Python (ViewLayout, LayoutConfig).
The data model. Add, rename, or clear data through app.data_model, and the
browser follows without any message passing of your own.
A session per visitor. Every browser connection gets its own data and workflow state, so several people can open the app at once.
Your branding. Logo, colors, panel widths, an About dialog, and bundled
sample datasets can be configured (BrandingConfig, ThemeConfig).
A command line. doctor checks the environment, demo runs a sample app,
init scaffolds a project, and record writes a snapshot you can host with no
backend.
Guided workflows
If a study has to run in a fixed order, define a workflow as a list of steps. The kit handles the UI and keeps state per session, including progress and cancellation. A reviewer can reject a result and step back without restarting.
The built-in steps cover loading and input roles, parameters, processing, brush
correction, annotations, validation, and export, and a CustomStep composes a
panel of your own when none of them fits.
app.set_workflow([
    MessageStep("Welcome", "Load, segment, correct, export."),
    InputSelectionStep("Select Image", inputs=[image]),
    ParameterStep("Configure", parameters=[threshold]),
    ProcessingStep("Segment", callback=threshold_segment),
    BrushStep("Correct Segmentation", radius_mm=5.0),
    SegmentationSummaryStep(label_map_from="process"),
    ValidationStep("Review", "Is this acceptable?"),
    ExportStep("Export Segmentation"),
])
The snippet is the segmentation example, with eight steps in the order they run
and a validation step that can send the operator back to the brush.
SegmentationSummaryStep is not one of the built-ins: the example defines it as
a CustomStep, which is how a workflow gets a panel the kit does not ship.
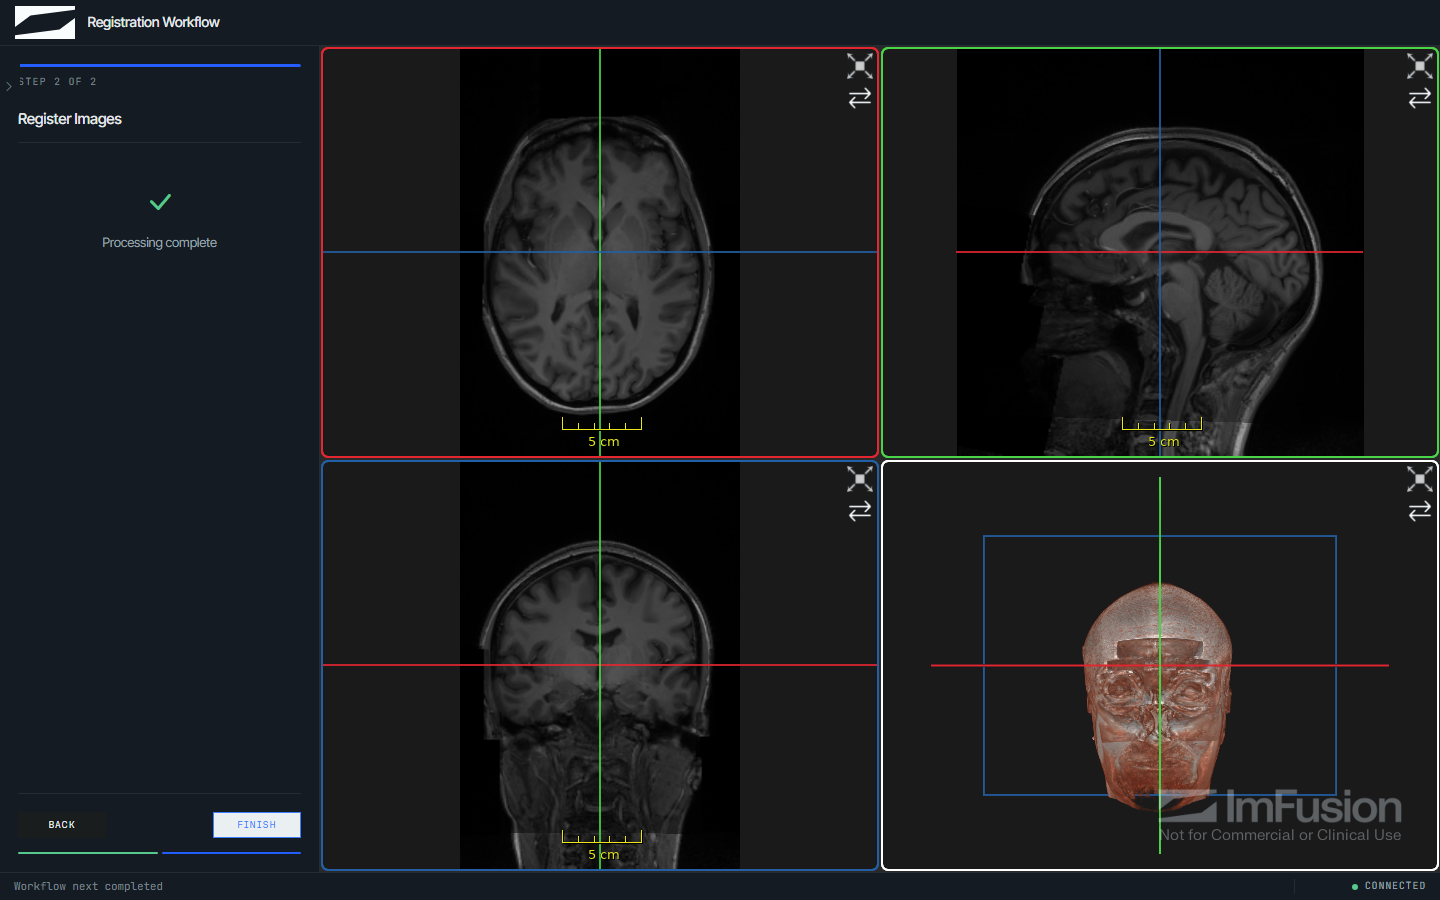
The screenshot is a different workflow from the snippet above, where two steps assign fixed and moving images by role and the registered result then lands in the data model.
Start from a template
imfusion-webappkit init creates a runnable project. The default is a single
action; the other flags pick a different shape.
--template simple. A button, the parameters you declared, and your
function behind them.
--template workflow. Load, process, brush-correct, and a review the
operator has to accept before export.
--template monai. The spleen bundle from the MONAI Model Zoo, run on the
sample CT. The download, tensor layout, and coordinate conversions are already
in the template.
--template chat. A dataset-aware chat panel with a placeholder reply
function, ready to connect to your own model provider.
Get started
The kit needs Python 3.10 or newer, uv, and valid ImFusion Suite and Web SDK licenses. Releases are published to PyPI, but the ImFusion SDK underneath them comes from the ImFusion index instead, so an install has to name both:
uv pip install imfusion-webappkit --extra-index-url https://pypi.imfusion.com/simple
imfusion-webappkit demo
From a checkout of this repository the index is already configured in
pyproject.toml, so uv sync resolves everything on its own:
uv sync
uv run imfusion-webappkit demo
That starts the packaged demo with a small bundled NIfTI image at
http://127.0.0.1:8000. Add --workflow to launch the guided, multi-step demo
instead.
The checkout includes the compiled browser client, so Node.js and npm are not needed to run it. They are only required to modify the frontend; see the development guide.
To scaffold your own project:
uv run imfusion-webappkit init my-demo
cd my-demo
uv sync
uv run python app.py
The generated project runs as soon as it is created, with app.py holding the
application, algorithm.py the processing function you replace, and AGENTS.md
the session, threading, and geometry conventions that coding agents need. Pass
--theme gray for the gray theme instead of the default dark one, and see the
command-line documentation for the other templates and flags.
Documentation
If the kit does not fit how you work, or you need a commercial ImFusion SDK licence, email info@imfusion.com.
1 maintainer

Release files for imfusion-webappkit 0.3.1
For a detailed explanation of source distributions (sdists) and built distributions (wheels), please see the package formats documentation.
Source distribution (sdist)
| File | Size | Uploaded | |
|---|---|---|---|
| imfusion_webappkit-0.3.1.tar.gz | 19.6 MB | Details |
Built distribution (wheel)
| File | Interpreter | ABI | Platform | Reset |
|---|---|---|---|---|
| imfusion_webappkit-0.3.1-py3-none-any.whl | Python 3 | none | any | Details |
Total release size: 39.3 MB
Release files / imfusion_webappkit-0.3.1.tar.gz
| Download URL | imfusion_webappkit-0.3.1.tar.gz |
|---|---|
| Size | 19.6 MB |
| Tags | Source |
|
SHA-256 checksum How to use checksums |
4b6eaaa0ba12d38276b1f3e5efdc1549fc656e18f33a5660dab1d6fa9d654ba9
|
|
BLAKE2b-256 checksum How to use checksums |
40d83dbb29b27ea2dd1d71fef31a2a3d02fd1bb4f744e3f31d67aa81b8c86bc4
|
| Upload date | |
|
Uploaded using Trusted Publishing? What is trusted publishing? |
Yes |
| Uploaded via |
twine/7.0.0 CPython/3.13.14
|
Provenance
Provenance describes where a file came from. On PyPI, provenance is shared via attestations, which provide a verifiable record of the build or publishing details. View details, limitations and caveats.


PyPI Publish Attestation
PyPI verified that this artifact, at this checksum, originated from the publisher listed below.
Signed by GitHub Actions, verified by PyPI on Sep 25, 2026.
Transparency logRelease files / imfusion_webappkit-0.3.1-py3-none-any.whl
| Download URL | imfusion_webappkit-0.3.1-py3-none-any.whl |
|---|---|
| Size | 19.7 MB |
| Tags | Python 3 |
|
SHA-256 checksum How to use checksums |
964a54c815cd5800895bfce850228b80b2b721659182e263043b0cec2ead453c
|
|
BLAKE2b-256 checksum How to use checksums |
f289f2e8304cc71578adae47282b3bbfe7451579ec4822b6ccfe58d9ebf0ce3e
|
| Upload date | |
|
Uploaded using Trusted Publishing? What is trusted publishing? |
Yes |
| Uploaded via |
twine/7.0.0 CPython/3.13.14
|
Provenance
Provenance describes where a file came from. On PyPI, provenance is shared via attestations, which provide a verifiable record of the build or publishing details. View details, limitations and caveats.
PyPI Publish Attestation
PyPI verified that this artifact, at this checksum, originated from the publisher listed below.
Signed by GitHub Actions, verified by PyPI on Sep 25, 2026.
Transparency log













