Intelligent image to SVG vectorization with AI-powered optimization

Project description
img2vector
![PyPI version]fury.io/py/img2vector.svg)

An intelligent image to SVG vectorization tool with AI-powered optimization.
Features
- AI-Based Image Analysis: Automatically detects image type and optimizes conversion parameters
- High-Quality Vectorization: Convert raster images to clean, editable SVG vectors
- Preprocessing Options: Multiple levels of image preprocessing for optimal results
- Batch Processing: Convert multiple images in parallel
- SVG Optimization: Reduce file size while maintaining quality
- Web Interface: User-friendly Gradio UI for easy conversion
- Python API: Use as a library in your Python projects
Installation
pip install img2vector
Quick Start
Basic Usage
# Simple conversion with default settings (auto-optimization)
from img2vector import convert_image

convert_image("input.jpg", "output.svg")
Advanced Usage
from img2vector import Img2Vector

# Create a converter instance
converter = Img2Vector()

# Convert with specific parameters
converter.convert(
    "input.jpg",
    output_path="output.svg",
    auto_optimize=True,  # Will still respect your manual parameters
    preprocessing_level="medium",
    colormode="binary",
    hierarchical="stacked"
)
Batch Processing
from img2vector import batch_convert

# Convert all images in a folder
batch_convert(
    "input_folder/",
    "output_folder/",
    num_workers=4,  # Process 4 images in parallel
    recursive=True,  # Include subfolders
    preprocessing_level="light"
)
SVG Optimization
from img2vector import optimize_svg

# Optimize an SVG file to reduce file size
result = optimize_svg("input.svg", "optimized.svg", level="moderate")
output_path, size_before, size_after, reduction_percentage = result

print(f"File size reduced by {reduction_percentage:.1f}%")
print(f"Original: {size_before/1024:.1f} KB → Optimized: {size_after/1024:.1f} KB")
Web Interface
To launch the user-friendly web interface:
from img2vector.app import main

main()
Or, when installed as a package:
img2vector ui
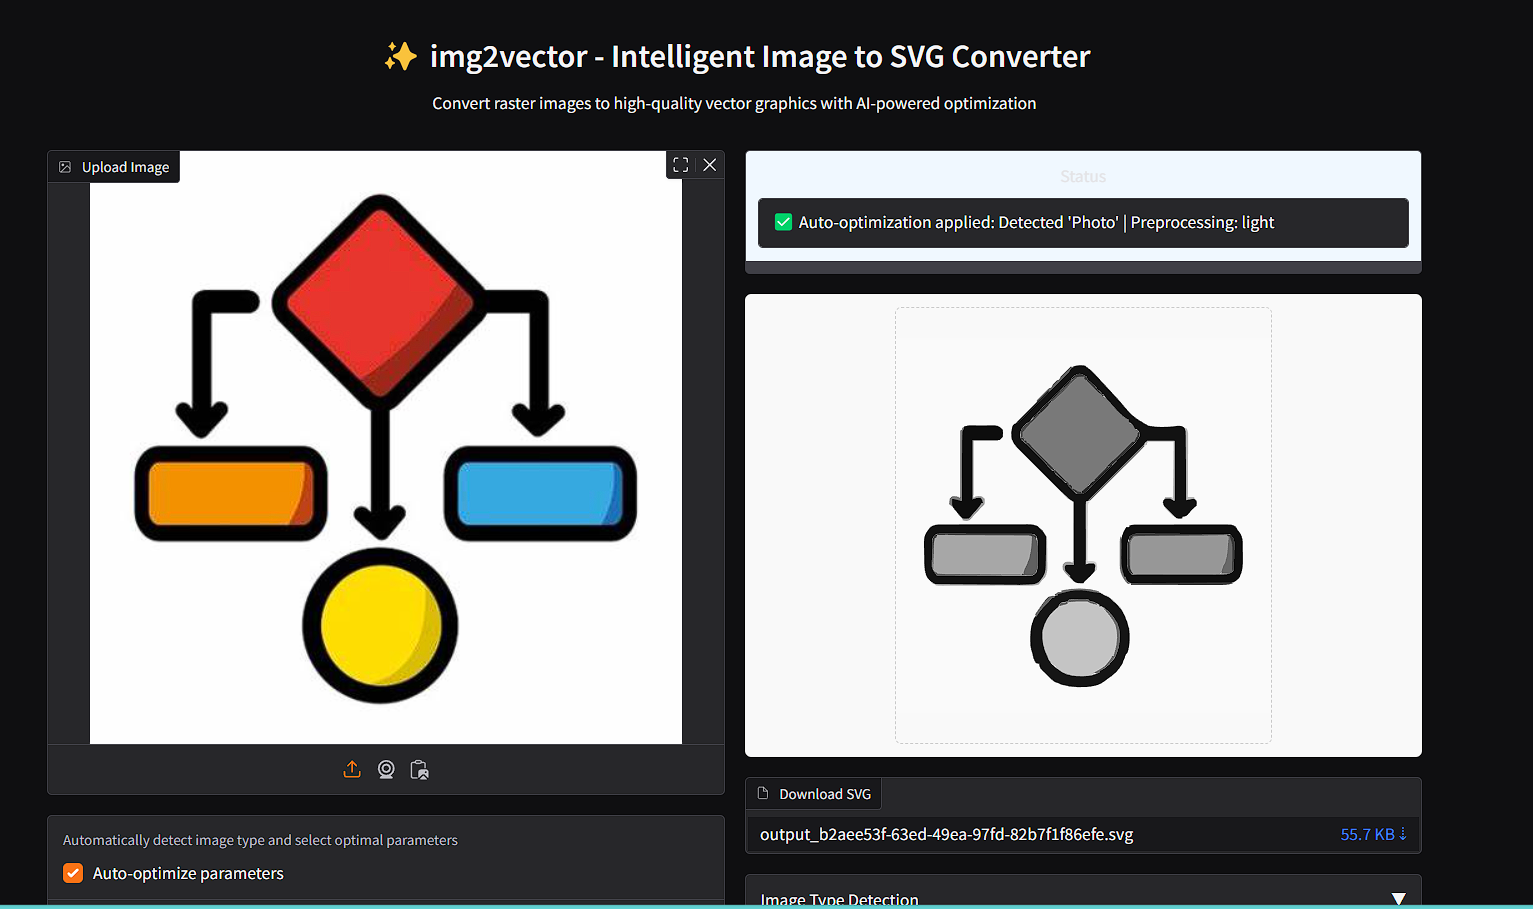
With preprocessing as light
With preprocessing as None
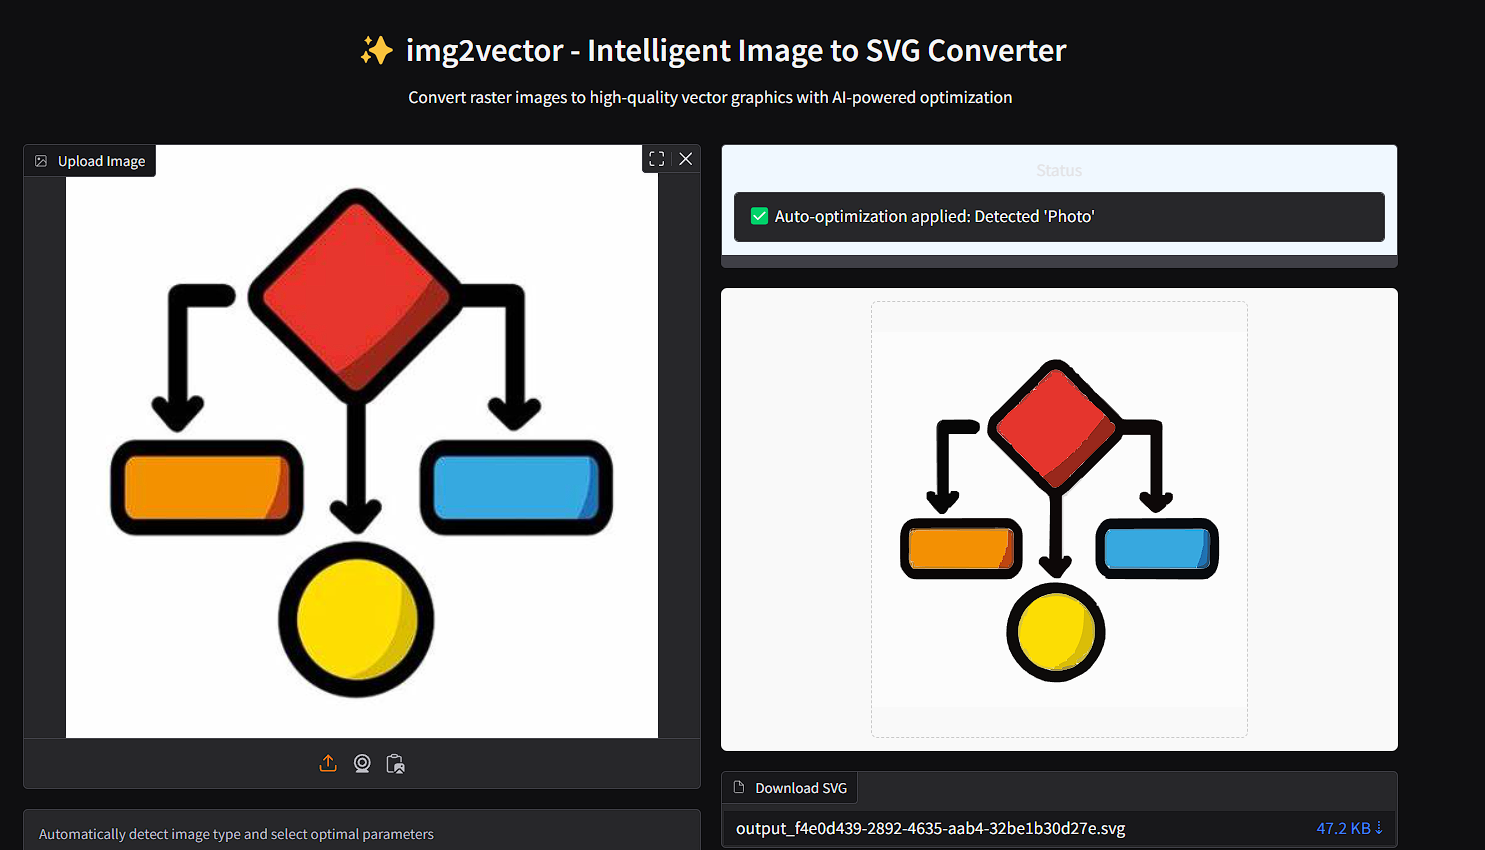
UI details
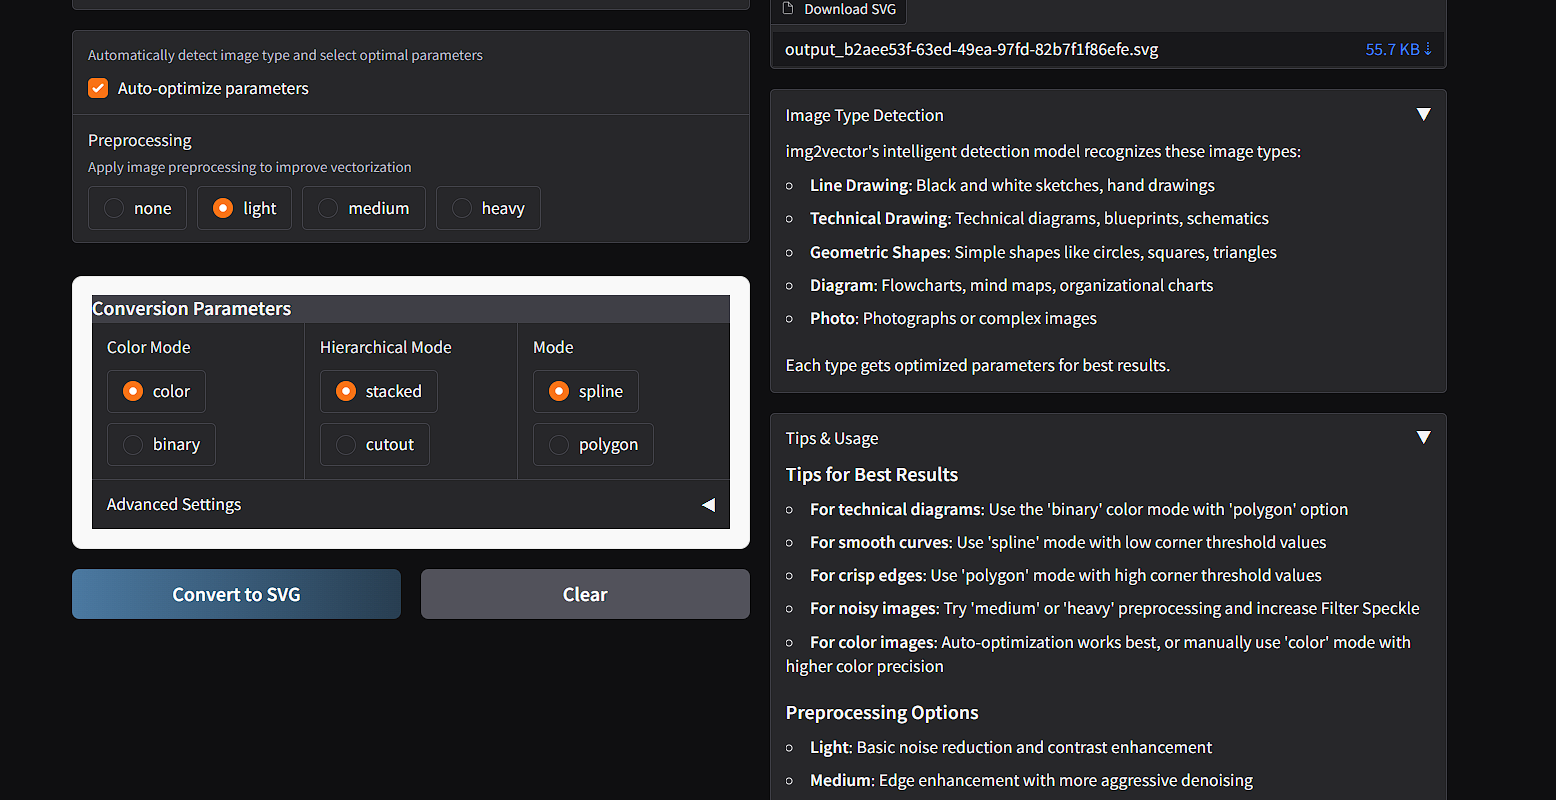
Image Type Detection
img2vector's intelligent detection model recognizes these image types and applies optimal parameters for each:
- Line Drawing: Black and white sketches, hand drawings
- Technical Drawing: Technical diagrams, blueprints, schematics
- Geometric Shapes: Simple shapes like circles, squares, triangles
- Diagram: Flowcharts, mind maps, organizational charts
- Photo: Photographs or complex images
Parameters
Basic Parameters
- auto_optimize (bool): Enable AI-based parameter optimization
- preprocessing_level (str): "none", "light", "medium", or "heavy"
- colormode (str): "color" or "binary" vectorization mode
- hierarchical (str): "stacked" or "cutout" layering style
- mode (str): "spline" (smooth curves) or "polygon" (straight lines)
Advanced Parameters
- filter_speckle (int): Speckle filtering level (0-20)
- color_precision (int): Color precision level (1-10)
- layer_difference (int): Layer difference threshold (1-32)
- corner_threshold (int): Corner detection threshold (0-180)
- length_threshold (float): Length threshold for path simplification (0-10)
- max_iterations (int): Maximum iterations for path optimization (1-20)
- splice_threshold (int): Splice threshold for path joining (0-90)
- path_precision (int): Path coordinate precision (1-10)
Tips for Best Results
- For technical diagrams: Use the 'binary' color mode with 'polygon' option
- For smooth curves: Use 'spline' mode with low corner threshold values
- For crisp edges: Use 'polygon' mode with high corner threshold values
- For noisy images: Try 'medium' or 'heavy' preprocessing and increase filter_speckle
- For color images: Auto-optimization works best, or manually use 'color' mode with higher color precision
- For smaller file sizes: Use lower path_precision values and higher filter_speckle values
Preprocessing Levels
- none: No preprocessing, use original image
- light: Basic noise reduction and contrast enhancement
- medium: More aggressive denoising and edge enhancement
- heavy: Thresholding and morphological operations for maximum clarity
Examples
Converting a Photo with Auto-Optimization
from img2vector import convert_image

# Auto-detect that it's a photo and apply optimal parameters
convert_image("photo.jpg", "photo.svg")
Converting a Line Drawing to Binary SVG
from img2vector import Img2Vector

converter = Img2Vector()
converter.convert(
    "sketch.png",
    output_path="sketch.svg",
    colormode="binary",
    mode="spline",
    preprocessing_level="light"
)
Converting a Technical Diagram
from img2vector import convert_image

convert_image(
    "diagram.png",
    "diagram.svg",
    auto_optimize=False,
    colormode="binary",
    mode="polygon",
    corner_threshold=80,
    length_threshold=2.0
)
Using a PIL Image
from PIL import Image
from img2vector import Img2Vector

# Open with PIL and process before vectorizing
img = Image.open("input.jpg")
img = img.resize((800, 600))
img = img.convert("RGB")

converter = Img2Vector()
converter.convert(img, output_path="processed.svg")
API Reference
Main Functions
convert_image(input_path, output_path=None, auto_optimize=True, preprocessing_level="none", **kwargs)
The primary helper function for simple conversions.
- input_path (str): Path to the input image file
- output_path (str, optional): Path to save the output SVG file. If None, returns SVG content.
- auto_optimize (bool): Whether to automatically optimize parameters based on image type
- preprocessing_level (str): Level of preprocessing ("none", "light", "medium", "heavy")
- kwargs: Additional parameters to pass to the converter
batch_convert(input_folder, output_folder, num_workers=4, recursive=False, file_extensions=('.jpg', '.jpeg', '.png', '.bmp', '.gif'), auto_optimize=True, preprocessing_level="none", **kwargs)
Convert multiple images to SVG in batch mode with parallel processing.
- input_folder (str): Path to folder containing input images
- output_folder (str): Path to folder for output SVG files
- num_workers (int): Number of parallel workers (default: 4)
- recursive (bool): Whether to search for images in subfolders
- file_extensions (tuple): Supported file extensions
- auto_optimize (bool): Whether to use auto-optimization
- preprocessing_level (str): Preprocessing level
- kwargs: Additional parameters to pass to the converter
optimize_svg(svg_path, output_path=None, level='moderate')
Optimize an SVG file to reduce file size.
- svg_path (str): Path to SVG file
- output_path (str, optional): Path to save optimized SVG. If None, overwrites input file.
- level (str): Optimization level - 'light', 'moderate', or 'aggressive'
Returns a tuple: (output_path, size_before, size_after, reduction_percentage)
Classes
Img2Vector
The core converter class with full parameter control.
converter = Img2Vector()
converter.convert(
    input_image,      # Path or PIL Image
    output_path=None, # Output path (if None, returns SVG content)
    auto_optimize=True,
    preprocessing_level="none",
    colormode="color",
    hierarchical="stacked",
    mode="spline",
    filter_speckle=4,
    color_precision=6,
    layer_difference=16,
    corner_threshold=60,
    length_threshold=4.0,
    max_iterations=10,
    splice_threshold=45,
    path_precision=3
)
Troubleshooting
Common Issues
SVG Output Has Missing Elements or Strange Artifacts
- Try different preprocessing levels - "medium" or "heavy" can help with noisy images
- For binary images with thin lines, using "light" preprocessing may preserve more details
- Adjust filter_speckle: lower values (1-2) keep more details, higher values remove noise
Conversion is Too Slow
- Use a lower color_precision value (3-5) for faster processing
- Set mode="polygon" which is generally faster than "spline"
- For batch processing, adjust num_workers based on your CPU cores (usually cores-1)
File Size is Too Large
- Decrease path_precision (try 2 or 1)
- Increase filter_speckle to remove small details
- Use SVG optimization with level="aggressive"
- Try mode="polygon" instead of "spline"
Paths Are Too Jagged or Smooth
- For jagged paths: use mode="spline" with lower corner_threshold (30-50)
- For smoother corners: increase corner_threshold (70-90)
- Adjust length_threshold: lower values (1-2) preserve more details, higher values simplify paths
Advanced Usage
Handling Multiple Image Types in a Single Batch
If you have a mix of different image types in a batch process:
import os
from img2vector import batch_convert, convert_image

# Define custom parameters for specific file patterns
def custom_conversion(input_path, output_path):
    # Use specific parameters based on filename patterns
    filename = os.path.basename(input_path).lower()

    if "diagram" in filename or "tech" in filename:
        # Technical drawings
        return convert_image(
            input_path,
            output_path,
            auto_optimize=True,
            colormode="binary",
            mode="polygon"
        )
    elif "sketch" in filename or "drawing" in filename:
        # Hand-drawn content
        return convert_image(
            input_path,
            output_path,
            auto_optimize=True,
            preprocessing_level="light",
            mode="spline"
        )
    else:
        # Default photos
        return convert_image(
            input_path,
            output_path,
            auto_optimize=True
        )

# Process each file in a directory
input_dir = "mixed_images/"
output_dir = "mixed_output/"
os.makedirs(output_dir, exist_ok=True)

for filename in os.listdir(input_dir):
    if filename.lower().endswith(('.jpg', '.jpeg', '.png')):
        input_path = os.path.join(input_dir, filename)
        output_path = os.path.join(output_dir, os.path.splitext(filename)[0] + '.svg')
        custom_conversion(input_path, output_path)
Performance Considerations
Memory Usage
The vectorization process can be memory-intensive, especially for large images or complex conversion parameters. To optimize memory usage:
- Resize very large images before conversion
- For batch processing, limit num_workers to avoid excessive memory usage
- Set color_precision to lower values (4-6) for complex color images
Execution Time
Conversion time depends on:
- Image size: Larger images take longer to process
- Image complexity: More details and colors increase processing time
- Color mode: "binary" is generally faster than "color"
- Mode: "polygon" is usually faster than "spline"
- Parameters: Higher precision values increase processing time
Typical processing times on modern hardware:
- Small binary diagrams (800×600): 1-3 seconds
- Medium photos (1200×800): 5-15 seconds
- Large complex images (2000×1500): 15-60 seconds
Changelog (v1.1.0)
Fixed
- Fixed parameter handling to respect manually specified parameters when auto_optimize=True
- Improved file path handling for more reliable conversion
- Better error messages for common failures
Added
- Batch processing with parallel execution
- SVG optimization to reduce file size
- Progress tracking for batch operations
- Enhanced error handling and validation
Enhanced
- More robust preprocessing options
- Better documentation and examples
- Improved temporary file handling
Contributing
Contributions to img2vector are welcome! Here are some ways you can contribute:
- Report bugs and suggest features
- Improve documentation
- Add examples and tutorials
- Implement new features or fix bugs
License
MIT License
Credits
This project wouldn't be possible without:
Release history Release notifications | RSS feed

Download files
Download the file for your platform. If you're not sure which to choose, learn more about installing packages.
Source Distribution
Built Distribution
Filter files by name, interpreter, ABI, and platform.
If you're not sure about the file name format, learn more about wheel file names.
Copy a direct link to the current filters
File details
Details for the file img2vector-1.2.0.tar.gz.
File metadata
- Download URL: img2vector-1.2.0.tar.gz
- Upload date:
- Size: 16.9 kB
- Tags: Source
- Uploaded using Trusted Publishing? No
- Uploaded via: twine/6.1.0 CPython/3.12.7
File hashes
| Algorithm | Hash digest | |
|---|---|---|
| SHA256 |
ab3e1dc943a9ab6fbfd5cbb0493d25c438ef01e339e930d42341832414264f6f
|
|
| MD5 |
4fc3cf2929262b128cd54a2b195610d5
|
|
| BLAKE2b-256 |
ee9d23fb29193b833a13f0944932261780646a2642bc29fb2a2e7227dec985a4
|
File details
Details for the file img2vector-1.2.0-py3-none-any.whl.
File metadata
- Download URL: img2vector-1.2.0-py3-none-any.whl
- Upload date:
- Size: 14.1 kB
- Tags: Python 3
- Uploaded using Trusted Publishing? No
- Uploaded via: twine/6.1.0 CPython/3.12.7
File hashes
| Algorithm | Hash digest | |
|---|---|---|
| SHA256 |
7afc1ff66818f0eab1bf105b4a2eda278d185aafe6345fc8e1d62d1fe984b6ca
|
|
| MD5 |
79d27d0851d511b37de1aae65103478a
|
|
| BLAKE2b-256 |
6dea95aca9833a0ac01f7f8eb42eae145ec37c90df739a0fc5625dfaa8acfca7
|


