Running ImJoy in Jupyter notebooks.


Project description
ImJoy Jupyter Extension
Try the demo here:

Using ImJoy with Jupyter Notebook and JupyterLab
This extension utilizes the imjoy-rpc library to enable bidirectional RPC calls between the ImJoy core and plugins.
The library has an abstract transport interface that can support different types of transport. For now, we support Jupyter comms message which is a custom message protocol used in Jupyter notebooks (for example powers jupyter widgets).
To use it, you need to install the imjoy-jupyter-extension in Python which will also include the imjoy-rpc as a dependency (see below).
Install the extension for Jupyter Notebook or JupyterLab
For Jupyter Notebooks
pip install -U imjoy-jupyter-extension
You can verify the installation by running:
jupyter nbextension list
And you should see something like imjoy_jupyter_extension/index enabled in the output.
If you still have issue, you can try to install it manually.
git clone https://github.com/imjoy-team/imjoy-jupyter-extension.git
cd imjoy-jupyter-extension
jupyter nbextension install imjoy_jupyter_extension --py # add --sys-prefix if using virtualenv or conda
jupyter nbextension enable imjoy_jupyter_extension --py # add --sys-prefix if using virtualenv or conda
jupyter nbextension list
For Jupyter Lab
pip install -U imjoy-jupyter-extension

jupyter labextension install imjoy-jupyter-extension
Use ImJoy plugins inside Jupyter notebooks
Now you can start a jupyter notebook via for example jupyter notebook command, you should be able to see an ImJoy icon in the toolbar if everything goes well.

For JupyterLab, start it via jupyter lab command, then create a notebook and you should see an ImJoy button in the toolbar:

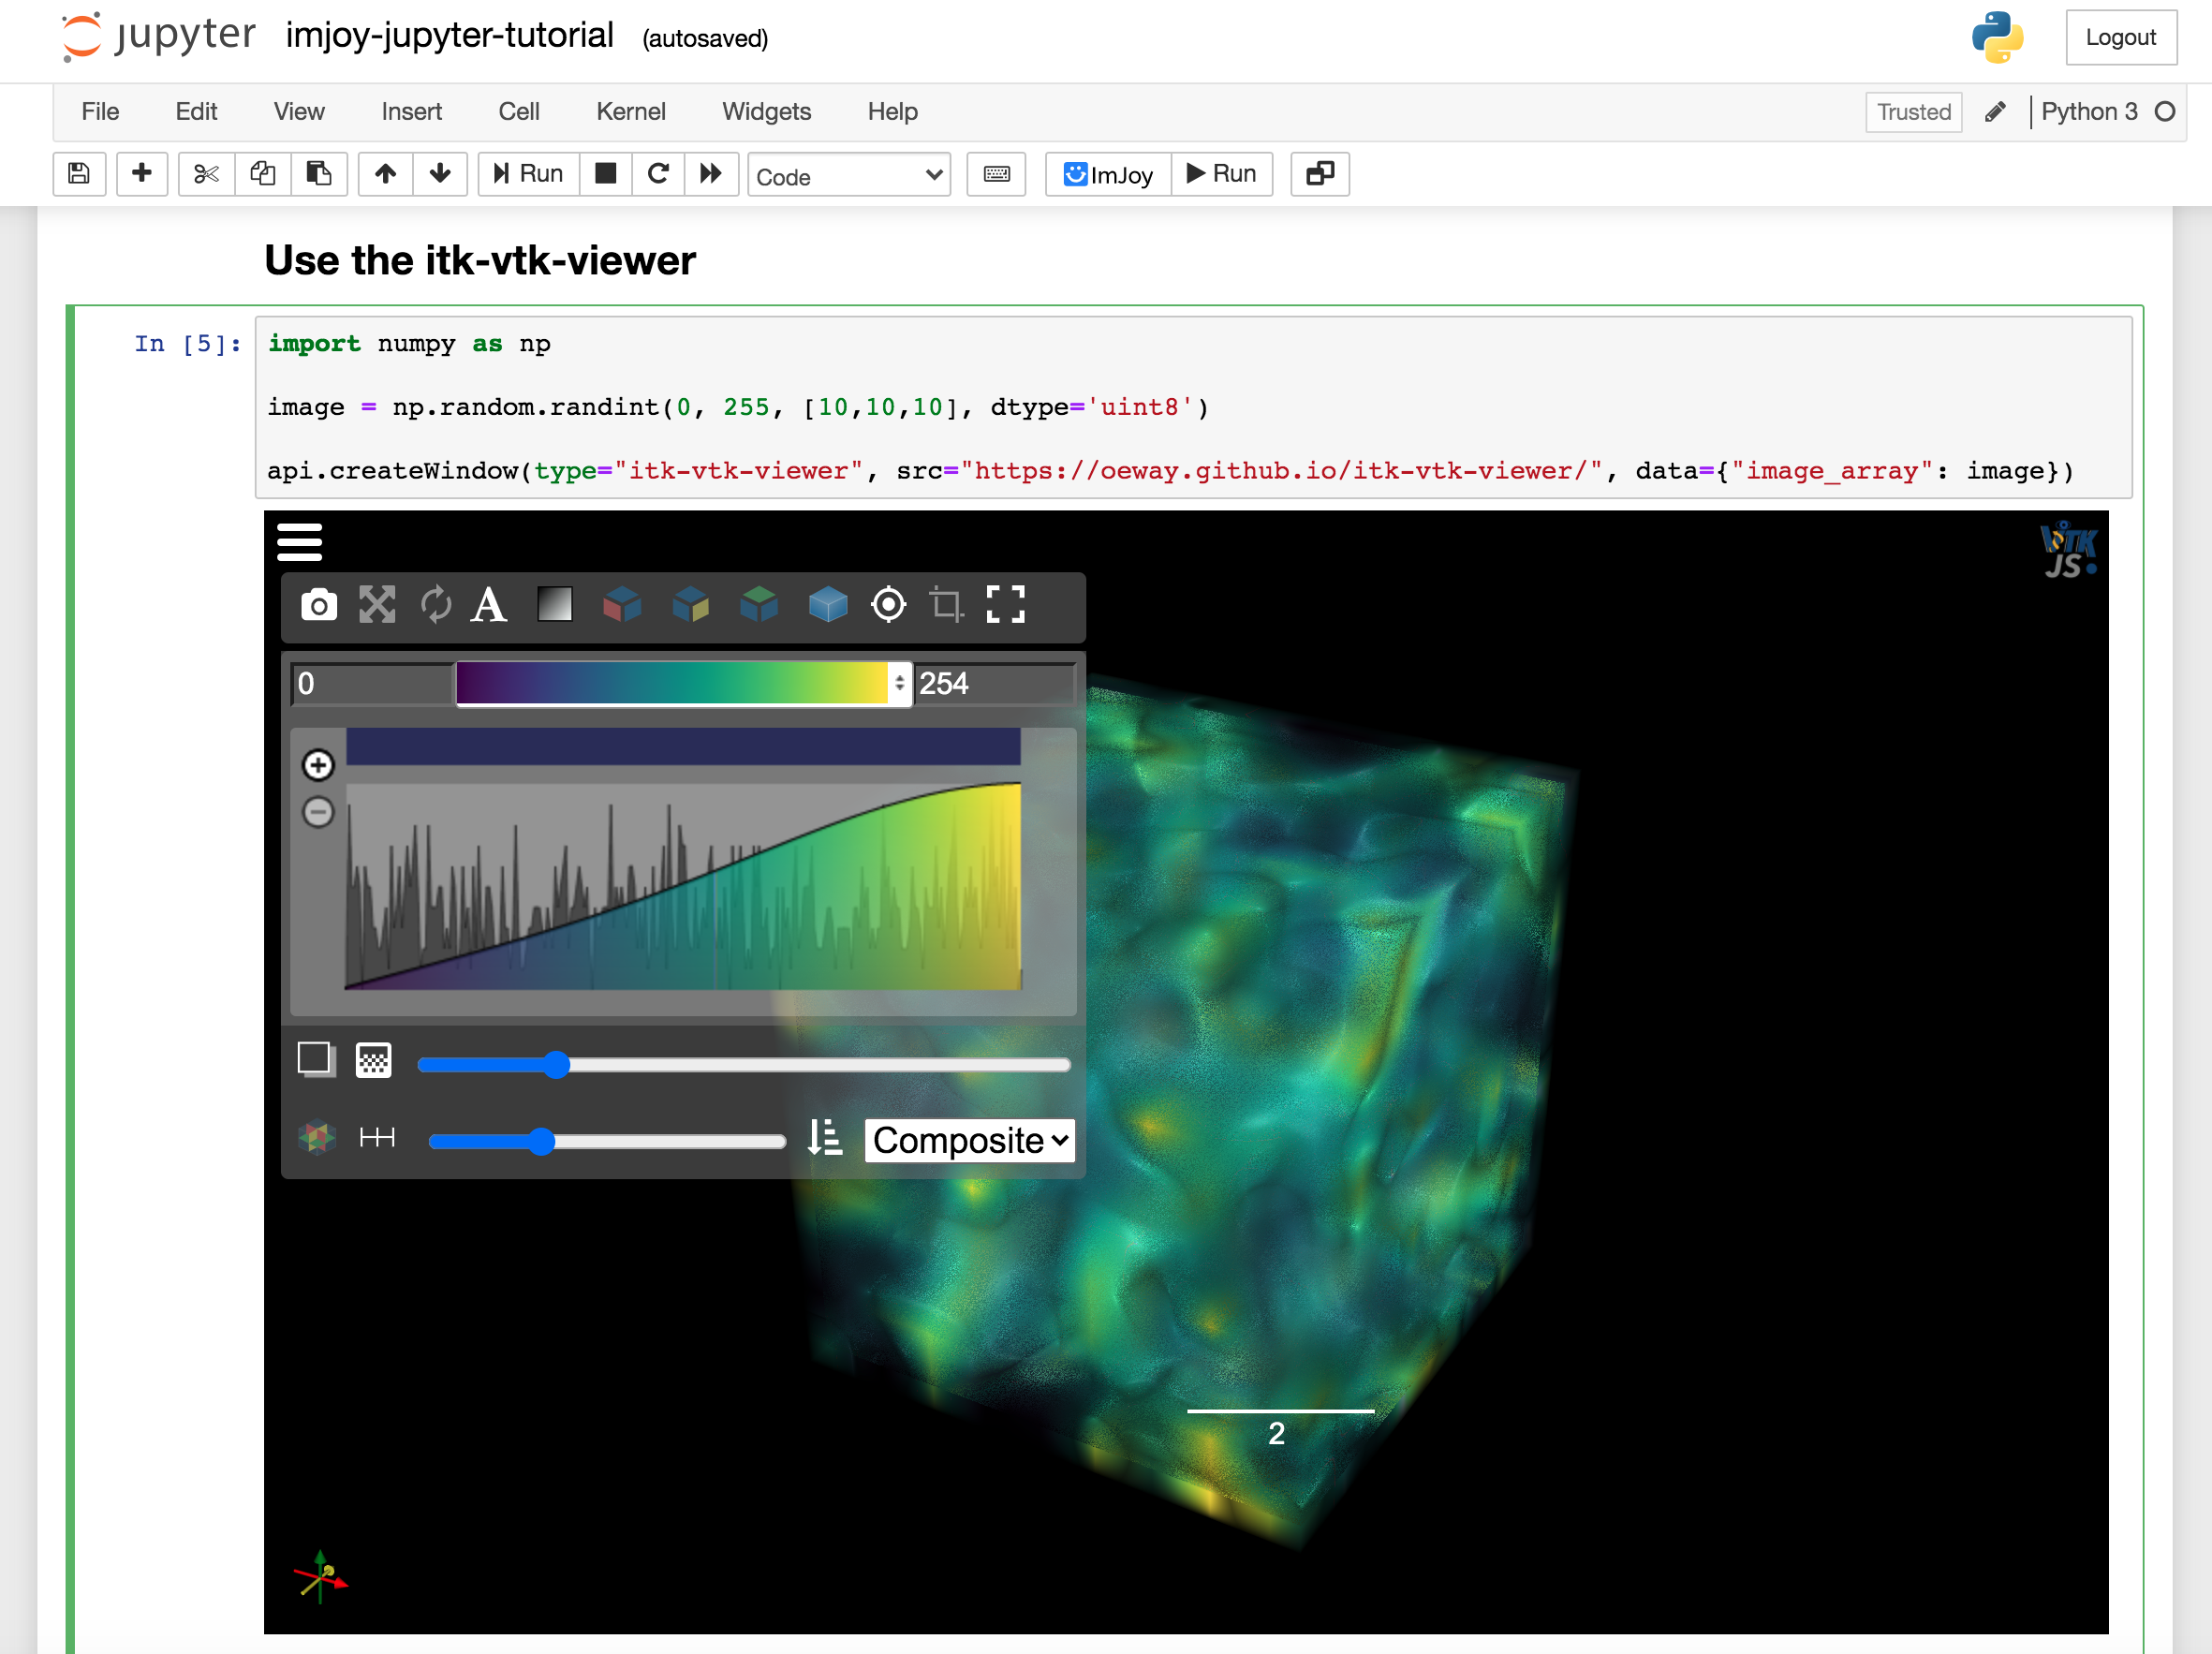
Now run ImJoy plugins in a cell, see an example that uses itk-vtk-viewer to visualize images:
import imageio
import numpy as np
from imjoy_rpc import api

class ImJoyPlugin():
    def setup(self):
        api.log('plugin initialized')

    async def run(self, ctx):
        viewer = await api.showDialog(src="https://kitware.github.io/itk-vtk-viewer/app/")

        # show a 3D volume
        image_array = np.random.randint(0, 255, [10,10,10], dtype='uint8')

        # show a 2D image
        # image_array = imageio.imread('imageio:chelsea.png')

        await viewer.setImage(image_array)

api.export(ImJoyPlugin())
With the above code, you created an ImJoy plugin. To run it, click the Run button with the ImJoy icon. It will then call the run function of your plugin.
- GIF Demo: Visualizing 2D image
- GIF Demo: Visualizing 3D volume
- GIF Demo: Load ImageAnnotator
You can also do the reverse by running a notebook inside ImJoy, to do that, please first create an empty jupyter notebook. Then copy and paste the url into the "+ PLUGINS" dialog, press enter and install the plugin. Click the newly installed plugin and you will get a notebook page open in ImJoy.
Try to copy and paste the itk-vtk-viewer example to a cell and execute it. Similarily, if you now click the run ImJoy button in the toolbar, you will get the viewer open insided ImJoy.
Load plugin dynamically in a notebook
There are different ways to load a plugin in a notebook, you can load from URL for the source code of the plugin (e.g. gist or github file url) or a hosted web app (e.g. the itk-vtk-viewer app used above). Besides that, you can also write a window plugin directly in a notebook. This is practical especially for debugging window plugin for your GUI.
You can directly pass a string with the plugin source code to api.getPlugin, api.createWindow(src=...) or api.showDialog(src=...), however, that doesn't give you syntax highliting in a Jupyter notebook cell. A workaround solution (which also works for Google Colab) is to write plugin code in a seperate cell startting with ## ImJoy Plugin and wrap the source code with IPython.display.HTML(). For example:
## ImJoy Plugin
from IPython.display import HTML
my_plugin_source = HTML('''
<docs lang="markdown">
[TODO: write documentation for this plugin.]
</docs>

<config lang="json">
{
  "name": "Untitled Plugin",
  "type": "window",
  "tags": [],
  "ui": "",
  "version": "0.1.0",
  "cover": "",
  "description": "[TODO: describe this plugin with one sentence.]",
  "icon": "extension",
  "inputs": null,
  "outputs": null,
  "api_version": "0.1.8",
  "env": "",
  "permissions": [],
  "requirements": [],
  "dependencies": [],
  "defaults": {"w": 20, "h": 10}
}
</config>

<script lang="javascript">
class ImJoyPlugin {
  async setup() {
    api.log('initialized')
  }

  async run(ctx) {

  }
}

api.export(new ImJoyPlugin())
</script>

<window lang="html">
  <div>
    <p>
    Hello World
    </p>
  </div>
</window>

<style lang="css">

</style>
''')
Then in another cell, you can passing the plugin source code to api.getPlugin, api.createWindow(src=...) or api.showDialog(src=...) to make an actually plugin:
from imjoy_rpc import api
class ImJoyPlugin():
    async def setup(self):
        pass

    async def run(self, ctx):
        # for regular plugin
        # p = await api.getPlugin(my_plugin_source)

        # or for window plugin
        # await api.createWindow(src=my_plugin_source)
        await api.showDialog(src=my_plugin_source)

api.export(ImJoyPlugin())
Development
To develop the JupyterLab extension, open a terminal and run:
cd imjoy_jupyterlab_extension
npm run watch
In another terminal window run:
cd imjoy_jupyterlab_extension
npm run build
jupyter labextension link .
jupyter lab
Release history Release notifications | RSS feed


Download files
Download the file for your platform. If you're not sure which to choose, learn more about installing packages.
Source Distribution
Built Distribution
Filter files by name, interpreter, ABI, and platform.
If you're not sure about the file name format, learn more about wheel file names.
Copy a direct link to the current filters
File details
Details for the file imjoy-jupyter-extension-0.3.0.tar.gz.
File metadata
- Download URL: imjoy-jupyter-extension-0.3.0.tar.gz
- Upload date:
- Size: 25.0 kB
- Tags: Source
- Uploaded using Trusted Publishing? No
- Uploaded via: twine/3.6.0 importlib_metadata/4.6.3 pkginfo/1.7.1 requests/2.25.1 requests-toolbelt/0.9.1 tqdm/4.61.2 CPython/3.9.6
File hashes
| Algorithm | Hash digest | |
|---|---|---|
| SHA256 |
1a87372b05201e3e08821ce1ebf0551af510051b4f5d5aab8d767f6ef42f06e1
|
|
| MD5 |
172d719ae93671721ff74897427fe656
|
|
| BLAKE2b-256 |
6f4b5b0b8c5f940aa32e4fb8cb718eb659892d086e798144cebee541dc865456
|
File details
Details for the file imjoy_jupyter_extension-0.3.0-py3-none-any.whl.
File metadata
- Download URL: imjoy_jupyter_extension-0.3.0-py3-none-any.whl
- Upload date:
- Size: 39.4 kB
- Tags: Python 3
- Uploaded using Trusted Publishing? No
- Uploaded via: twine/3.6.0 importlib_metadata/4.6.3 pkginfo/1.7.1 requests/2.25.1 requests-toolbelt/0.9.1 tqdm/4.61.2 CPython/3.9.6
File hashes
| Algorithm | Hash digest | |
|---|---|---|
| SHA256 |
0cc095e6fa9e73d0631c280095a14582ffad88a3e82847939bd5d2ae041a052e
|
|
| MD5 |
16e23eb48e29ec4b0f70384aef044396
|
|
| BLAKE2b-256 |
6a4a711bbce20f0d9ec5927a0b7f40508b417d76d386e407b8ba1344400d1e3f
|


