Package for instanseg-torch PyPi

Project description


Overview
InstanSeg is a pytorch-based cell and nucleus segmentation pipeline for fluorescence and brightfield microscopy images. This README provides instructions for setting up the environment, installing dependencies, and using the provided tools and models.
Why should I use InstanSeg?
- InstanSeg is freely available and open source.
- It's faster than other cell segmentation methods… sometimes much faster.
- It's capable of accurately segmenting both nuclei and whole cells.
- InstanSeg can be entirely compiled in TorchScript - including postprocessing! This means it's not only easy to use in Python but also works with LibTorch alone. This allows you to run InstanSeg directly in QuPath!
- You can use InstanSeg on multiplexed images (images that have more than three channels) on novel biomarker panels, without retraining or manual intervention.
- We plan to release more InstanSeg models trained on public datasets. If there's a nucleus and/or cell segmentation dataset under a permissive open license (e.g. CC0 or CC-BY) that we missed, let us know, and we may be able to increase our InstanSeg model zoo.
InstanSeg has its own QuPath extension!
InstanSeg can be found in the latest QuPath release candidate, so you can start using InstanSeg immediately. You can find the QuPath extension source code in its GitHub repository.
How to cite InstanSeg:
If you use InstanSeg for nucleus segmentation of brightfield histology images, please cite:
Goldsborough, T. et al. (2024) ‘InstanSeg: an embedding-based instance segmentation algorithm optimized for accurate, efficient and portable cell segmentation’. arXiv. Available at: https://doi.org/10.48550/arXiv.2408.15954.
If you use InstanSeg for nucleus and/or cell segmentation in fluorescence images, please cite:
Goldsborough, T. et al. (2024) ‘A novel channel invariant architecture for the segmentation of cells and nuclei in multiplexed images using InstanSeg’. bioRxiv, p. 2024.09.04.611150. Available at: https://doi.org/10.1101/2024.09.04.611150.
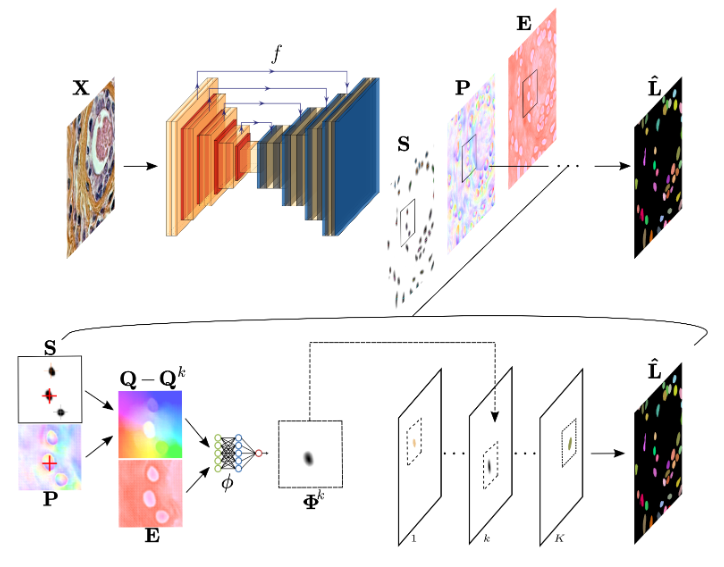
Table of Contents
- Overview
- Why should I use InstanSeg?
- InstanSeg has its own QuPath extension!
- How to cite InstanSeg:
- Table of Contents
- Installing using pip
- Usage
Installing using pip
For a minimal installation:
pip install instanseg-torch
if you want all the requirements used for training:
pip install instanseg-torch[full]
You can get started immediately by calling the InstanSeg class:
from instanseg import InstanSeg
instanseg_brightfield = InstanSeg("brightfield_nuclei", image_reader= "tiffslide", verbosity=1)

labeled_output = instanseg_brightfield.eval(image = "../instanseg/examples/HE_example.tif",
                                            save_output = True,
                                            save_overlay = True)
Alternatively, if you want more control over the intermediate steps:
image_array, pixel_size = instanseg_brightfield.read_image("../instanseg/examples/HE_example.tif")

labeled_output, image_tensor  = instanseg_brightfield.eval_small_image(image_array, pixel_size)

display = instanseg_brightfield.display(image_tensor, labeled_output)

from instanseg.utils.utils import show_images
show_images(image_tensor,display, colorbar=False, titles = ["Normalized Image", "Image with segmentation"])
Setup Repository (for training or development)
For local development or to train your own models, follow these steps:
- Clone the repository
git clone https://github.com/instanseg/instanseg.git
cd instanseg
- Create a new environment (recommended)
# Using mamba (faster) or conda
mamba create -n instanseg-env python=3.11
mamba activate instanseg-env
- Install in editable mode
For basic usage:
pip install -e .
For development with all training dependencies:
pip install -e ".[full]"
For development with test dependencies:
pip install -e ".[full,test]"
- Verify installation
python -c "from instanseg import InstanSeg; print('InstanSeg installed successfully!')"
Verify CUDA is available (Optional, if your machine has a GPU):
python -c "import torch; print('CUDA available:', torch.cuda.is_available())"
Usage
Download Datasets
To download public datasets and example images, follow the instructions under instanseg/notebooks/load_datasets.ipynb
To train InstanSeg on your own dataset, extend the instanseg/notebooks/load_datasets.ipynb with one of the templates provided.
Training Models
To train models using InstanSeg, use the train.py script under the scripts folder.
For example, to train InstanSeg on the TNBC_2018 dataset over 250 epochs at a pixel resolution of 0.25 microns/pixel, run the following command:
cd instanseg/scripts
python train.py -data segmentation_dataset.pth -source "[TNBC_2018]" --num_epochs 250 --experiment_str my_first_instanseg --requested_pixel_size 0.25
To train a channel invariant InstanSeg on the CPDMI_2023 dataset, predicting both nuclei and cells, run the following command:
cd instanseg/scripts
python train.py -data segmentation_dataset.pth -source "[CPDMI_2023]" --num_epochs 250 --experiment_str my_first_instanseg -target NC --channel_invariant True --requested_pixel_size 0.5
Each epoch should take approximately 1 to 3 minutes to complete (with mps or cuda support).
For more options and configurations, refer to the parser arguments in the train.py file.
Testing Models
To test trained models and obtain F1 metrics, use the following command:
python test.py --model_folder my_first_instanseg -test_set Validation --optimize_hyperparameters True
python test.py --model_folder my_first_instanseg -test_set Test --params best_params
Using InstanSeg for inference
python inference.py --model_folder my_first_instanseg --image_path ../examples
Replace "../examples" with the path to your images. If InstanSeg cannot read the image pixel size from the image metadata, the user is required to provide a --pixel_size parameter. InstanSeg provides (limited) support for whole slide images (WSIs). For more options and configurations, refer to the parser arguments in the inference.py file.
Model versioning (Ignore)
Links to different model versions are stored in instanseg/models/model-index.json. When releasing new models,
you should add entries to this JSON file, optionally removing any previous versions that shouldn't be available in future versions.
An example entry looks like this:
{
  "name": "[MODEL_NAME]",
  "url": "https://github.com/instanseg/instanseg/releases/download/[RELEASE_NAME]/[MODEL_NAME].zip",
  "version": "0.1.0",
  "license": "Apache-2.0"
}
Release history Release notifications | RSS feed


Download files
Download the file for your platform. If you're not sure which to choose, learn more about installing packages.
Source Distribution
Built Distribution
Filter files by name, interpreter, ABI, and platform.
If you're not sure about the file name format, learn more about wheel file names.
Copy a direct link to the current filters
File details
Details for the file instanseg_torch-0.1.1.tar.gz.
File metadata
- Download URL: instanseg_torch-0.1.1.tar.gz
- Upload date:
- Size: 111.6 kB
- Tags: Source
- Uploaded using Trusted Publishing? No
- Uploaded via: twine/6.1.0 CPython/3.13.7
File hashes
| Algorithm | Hash digest | |
|---|---|---|
| SHA256 |
eb1127acf4f6b2bb91a5940fe83c370807a53d17cafc2f49bfbba19a7c38026d
|
|
| MD5 |
e17d2447540f1bfa5c1eb80543028507
|
|
| BLAKE2b-256 |
97376cbb4a91a4b4b95fb4636aacc077c1ca28162f51674494d7001bf9a470e5
|
File details
Details for the file instanseg_torch-0.1.1-py3-none-any.whl.
File metadata
- Download URL: instanseg_torch-0.1.1-py3-none-any.whl
- Upload date:
- Size: 126.1 kB
- Tags: Python 3
- Uploaded using Trusted Publishing? No
- Uploaded via: twine/6.1.0 CPython/3.13.7
File hashes
| Algorithm | Hash digest | |
|---|---|---|
| SHA256 |
1a26c87925ba5c2d40efa2cbc31db93381256848df3c359c6f960db4dda329b4
|
|
| MD5 |
254c5b4e7549df0cb340757cf1daf3c1
|
|
| BLAKE2b-256 |
83c474c6ea8db68f5603f788b4e938cb5d0213826ea7faf544b1e966e9f74913
|


