A Judicious, Unified and extendable framework for multi-paradigm Machine Learning research, powered by jutility and PyTorch.

Project description
JUML
A Judicious, Unified and extendable framework for multi-paradigm Machine Learning research, powered by jutility and PyTorch.
Judicious [adjective]: having or showing reason and good judgment in making decisions

Contents
Installation
JUML is available as a Python package on PyPI, and can be installed using pip with the following commands:
python -m pip install -U pip
python -m pip install -U juml-framework
Alternatively, JUML can be installed in "editable mode" from the GitHub repository:
git clone https://github.com/jakelevi1996/juml.git
python -m pip install -U pip
python -m pip install -e ./juml
JUML depends on PyTorch. The installation instructions for PyTorch depend on which (if any) CUDA version is available, so PyTorch won't be automatically installed by pip when installing JUML. Instead, please install PyTorch following the official PyTorch installation instructions.
Overview
The purpose of JUML is to make the process of running ML experiments smoother.
For example, as described in the Extension guide, when starting a new project, all you have to do is:
- Appropriately define one or more training loops, models, and datasets (or RL environments)
- Define subclasses of
FrameworkandSweep - Override one method in each of those subclasses
- Configure your
pyproject.tomlfile appropriately
Then, JUML will automatically provide you with:
- A CLI, including configurable selection and automatic nested initialisation of objects and subcommands (without having to write any config files)
- Automatic results directory naming, so you don't have to worry about results overwriting each other, or manually naming each results file, or writing code to do this yourself, or paying a subscription for an external tool
- Automatic sweeping over multiple parameters simultaneously and plotting sweep results from the command line (without having to write any extra sweeping code)
- (and possibly more features to be added in future)
Usage examples
Once you install JUML, you can run a few commands and experiments from the command-line, without having to write any code.
First of all, view the top-level and command-specific help interfaces:
juml -h
juml TrainClassification -h
juml Sweep -h
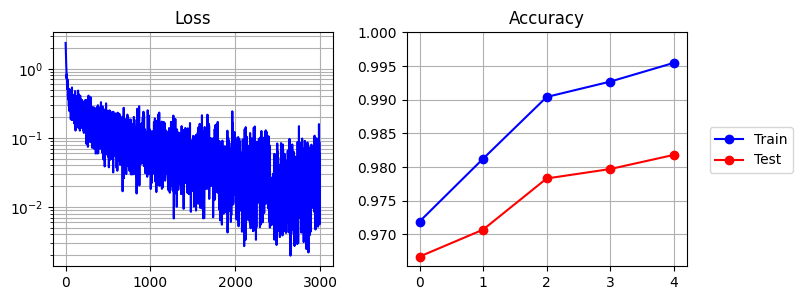
Train an MLP on MNIST to 98% test accuracy in under 30 seconds (CPU):
juml TrainClassification \
    --dataset Mnist \
    --dataset.Mnist.flat \
    --model ReluMlp \
    --model.ReluMlp.hidden_dim 1000 \
    --epochs 5
This produces the following output:
cli: Mnist(flat=True)
cli: ReluMlp(depth=2, hidden_dim=1000, input_shape=[784], output_shape=[10])
Count | Time        | Epoch      | Batch      | Loss       | Train acc  | Test acc
----- | ----------- | ---------- | ---------- | ---------- | ---------- | ----------
0     | 0.0142s     |          0 |          0 |    2.35821 |            |
91    | 1.0022s     |          0 |         91 |    0.21197 |            |
183   | 2.0046s     |          0 |        183 |    0.18111 |            |
273   | 3.0019s     |          0 |        273 |    0.18510 |            |
364   | 4.0017s     |          0 |        364 |    0.14397 |            |
456   | 5.0047s     |          0 |        456 |    0.14908 |            |
547   | 6.0080s     |          0 |        547 |    0.11449 |            |
599   | 6.5894s     |          0 |        599 |    0.07091 |            |
600   | 6.9580s     |          0 |            |            |    0.97190 |    0.96670
604   | 7.0040s     |          1 |          3 |    0.09275 |            |
694   | 8.0038s     |          1 |         93 |    0.07405 |            |
812   | 9.0012s     |          1 |        211 |    0.10806 |            |
983   | 10.0041s    |          1 |        382 |    0.08695 |            |
1150  | 11.0005s    |          1 |        549 |    0.08830 |            |
1200  | 11.2970s    |          1 |        599 |    0.03669 |            |
1201  | 11.6915s    |          1 |            |            |    0.98123 |    0.97070
1253  | 12.0027s    |          2 |         51 |    0.05098 |            |
1418  | 13.0049s    |          2 |        216 |    0.05247 |            |
1578  | 14.0035s    |          2 |        376 |    0.08137 |            |
1739  | 15.0028s    |          2 |        537 |    0.08548 |            |
1801  | 15.3885s    |          2 |        599 |    0.05897 |            |
1802  | 15.7840s    |          2 |            |            |    0.99040 |    0.97830
1838  | 16.0027s    |          3 |         35 |    0.04630 |            |
1996  | 17.0021s    |          3 |        193 |    0.12142 |            |
2148  | 18.0031s    |          3 |        345 |    0.01137 |            |
2300  | 19.0052s    |          3 |        497 |    0.01614 |            |
2402  | 19.6594s    |          3 |        599 |    0.04586 |            |
2403  | 20.0639s    |          3 |            |            |    0.99268 |    0.97970
2404  | 20.0704s    |          4 |          0 |    0.00618 |            |
2550  | 21.0057s    |          4 |        146 |    0.07377 |            |
2706  | 22.0042s    |          4 |        302 |    0.03206 |            |
2858  | 23.0003s    |          4 |        454 |    0.02141 |            |
3003  | 23.9617s    |          4 |        599 |    0.00631 |            |
3004  | 24.3791s    |          4 |            |            |    0.99547 |    0.98180
Saving in "results/trainclassification/b100dMdfTe5mRmd2mh1000s0/args.json"
Saving in "results/trainclassification/b100dMdfTe5mRmd2mh1000s0/cmd.txt"
Saving in "results/trainclassification/b100dMdfTe5mRmd2mh1000s0/metrics.json"
Saving in "results/trainclassification/b100dMdfTe5mRmd2mh1000s0/metrics.png"
Time taken for `TrainClassification` = 26.7501 seconds
Sweep over width, depth, and random seeds for the MLP:
juml Sweep \
    --params '{
        "seed": [0, 1, 2],
        "model.ReluMlp.hidden_dim": [20, 50, 100, 200, 500, 1000],
        "model.ReluMlp.depth": [1, 2, 3]
    }' \
    --PlottingConfig.target_metric final_test_acc \
    --PlottingConfig.x_key model.ReluMlp.hidden_dim \
    --PlottingConfig.c_key model.ReluMlp.depth \
    --PlottingConfig.log_x \
    TrainClassification \
    --dataset Mnist \
    --dataset.Mnist.flat \
    --model ReluMlp \
    --epochs 3
This trains 54 models in ~12 minutes, and produces the following graph:
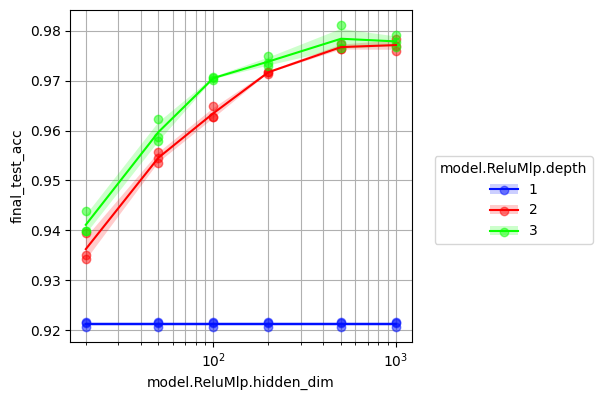
Tidy up the labels and colour scheme by using the appropriate --PlottingConfig arguments. We also provide the --name argument to the Sweep command, because although Sweep automatically names output directories, it will overwrite our previous graph if we only change --PlottingConfig arguments. The results will automatically be loaded from disk without rerunning the experiments unless we specify Sweep --force_run:
juml Sweep \
    --params '{
        "seed": [0, 1, 2],
        "model.ReluMlp.hidden_dim": [20, 50, 100, 200, 500, 1000],
        "model.ReluMlp.depth": [1, 2, 3]
    }' \
    --name tidy_mnist_sweep \
    --PlottingConfig.target_metric final_test_acc \
    --PlottingConfig.x_key model.ReluMlp.hidden_dim \
    --PlottingConfig.c_key model.ReluMlp.depth \
    --PlottingConfig.log_x \
    --PlottingConfig.x_label Width \
    --PlottingConfig.y_label 'Test acc' \
    --PlottingConfig.c_label Depth \
    --PlottingConfig.ylim 0.9 1 \
    --PlottingConfig.cool_colours \
    TrainClassification \
    --dataset Mnist \
    --dataset.Mnist.flat \
    --model ReluMlp \
    --epochs 3
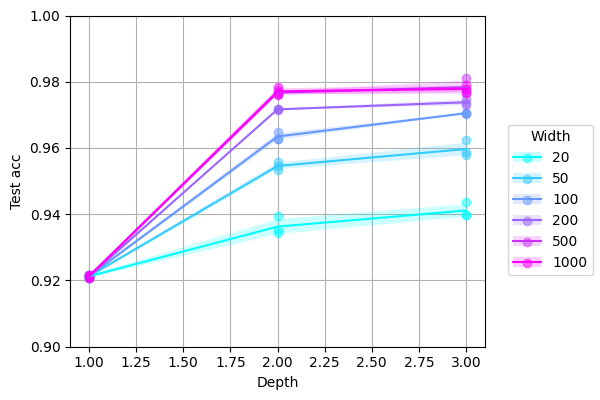
We can transpose the axes of the graph simply by swapping --PlottingConfig arguments and choosing a new name:
juml Sweep \
    --params '{
        "seed": [0, 1, 2],
        "model.ReluMlp.hidden_dim": [20, 50, 100, 200, 500, 1000],
        "model.ReluMlp.depth": [1, 2, 3]
    }' \
    --name tidy_mnist_sweep_transpose \
    --PlottingConfig.target_metric final_test_acc \
    --PlottingConfig.x_key model.ReluMlp.depth \
    --PlottingConfig.c_key model.ReluMlp.hidden_dim \
    --PlottingConfig.x_label Depth \
    --PlottingConfig.y_label 'Test acc' \
    --PlottingConfig.c_label Width \
    --PlottingConfig.ylim 0.9 1 \
    --PlottingConfig.cool_colours \
    TrainClassification \
    --dataset Mnist \
    --dataset.Mnist.flat \
    --model ReluMlp \
    --epochs 3
Extension guide
JUML is designed to be both extendable and flexible. Here we provide a guide for extending JUML in your project, step by step. You don't have to do everything in this guide, and you can do more than we outline here.
We will assume that your project is called MYPROJ, but you should replace MYPROJ with a short and descriptive (and lowercase) name for your project. All paths are relative to the top-level directory of your project.
Here are the steps:
- Define models:
- Define some model classes, each in a separate file in the directory
src/MYPROJ/models/, which are subclasses ofjuml.models.Model(seejuml.models.ReluMlpfor an example) - Make a file
src/MYPROJ/models/__init__.pywith a functionget_all_modelswhich returns a list of your defined model classes (seejuml.modelsfor an example)
- Define some model classes, each in a separate file in the directory
- Define datasets:
- Define some dataset classes, each in a separate file in the directory
src/MYPROJ/data/, which are subclasses ofjuml.data.Dataset(seejuml.data.Mnistfor an example) - Make a file
src/MYPROJ/data/__init__.pywith a functionget_all_datasetswhich returns a list of your defined dataset classes (seejuml.datafor an example)
- Define some dataset classes, each in a separate file in the directory
- Define commands:
- Define some training loops or other commands, each in a separate file in the directory
src/MYPROJ/commands/, which are subclasses ofjuml.commands.Command(seejuml.commands.TrainClassificationfor an example) - Define a class
Sweepwhich is a subclass ofjuml.commands.Sweep, override the class-methodget_subcommands, and from it return a list of your defined command classes (NOT including yourSweepsubclass itself) - Make a file
src/MYPROJ/command/__init__.pywith a functionget_all_commandswhich returns a list of your defined command classes, including yourSweepsubclass (seejuml.commandsfor an example)
- Define some training loops or other commands, each in a separate file in the directory
- Define framework:
- Define a class
Frameworkin the filesrc/MYPROJ/framework.pywhich is a subclass ofjuml.Framework, override the class-methodget_commands, and from it return a list of your defined command classes (including yourSweepsubclass) - Make a file
src/MYPROJ/__init__.pywhich includes the statemtfrom MYPROJ.framework import Framework(seejumlfor an example)
- Define a class
- Configure and install project:
- Make a file
pyproject.tomlfollowing the template below - Run the commands
python -m pip install -U pipandpython -m pip install .
- Make a file
pyproject.toml template:
[build-system]
requires = ["setuptools>=61.0"]
build-backend = "setuptools.build_meta"

[project]
name = "MYPROJ"
version = "0.0.1"

[project.scripts]
MYPROJ = "MYPROJ.framework:Framework.run"
Now you are ready to run some commands and sweeps! For example:
MYPROJ MyCommand ...
MYPROJ Sweep --params '{...}' ... MyCommand ...`
Extra tips
There are different approaches that can be taken to debugging. Perhaps the easiest is to make a new Python script which calls juml.Framework.run (or your subclass of Framework) directly with specified arguments, and then debug this like a normal script, for example:
import juml

s = (
    "TrainClassification "
    "--dataset Mnist "
    "--dataset.Mnist.flat "
    "--model ReluMlp "
    "--model.ReluMlp.hidden_dim 1000 "
    "--epochs 1"
)
juml.Framework.run(s.split())
Sometimes you may want to make more sophisticated plots beyond those produced by juml Sweep (or your subclass of Sweep), which involves iterating over arguments and loading saved metrics. Every subclass of juml.commands.Command inherits a class method load_metric_from_args, to which you can simply provide a dictionary of arguments (for example those saved in args.json by your training command) and the name of the metric you want to load. Then load_metric_from_args will load that metric for you. For example:
m = juml.commands.TrainClassification.load_metric_from_args(
    arg_dict={
        "seed": 0,
        "epochs": 5,
        "batch_size": 100,
        "dataset": "Mnist",
        "dataset.Mnist.flat": True,
        "model": "ReluMlp",
        "model.ReluMlp.depth": 2,
        "model.ReluMlp.hidden_dim": 1000
    },
    name="final_test_acc",
)
print(m)
# >>> 0.9818000197410583
Citation
If you find JUML helpful in your research, please cite:
@misc{levi_juml_2025,
    title = {{JUML}: {A} {Judicious}, {Unified} and extendable framework for multi-paradigm {Machine} {Learning} research},
    shorttitle = {{JUML}},
    url = {https://github.com/jakelevi1996/juml},
    abstract = {A Judicious, Unified and extendable framework for multi-paradigm Machine Learning research, powered by jutility and PyTorch.},
    author = {Levi, Jake},
    year = {2025},
}
Release history Release notifications | RSS feed

Download files
Download the file for your platform. If you're not sure which to choose, learn more about installing packages.
Source Distribution
Built Distribution
Filter files by name, interpreter, ABI, and platform.
If you're not sure about the file name format, learn more about wheel file names.
Copy a direct link to the current filters
File details
Details for the file juml_framework-0.0.1.tar.gz.
File metadata
- Download URL: juml_framework-0.0.1.tar.gz
- Upload date:
- Size: 44.3 kB
- Tags: Source
- Uploaded using Trusted Publishing? No
- Uploaded via: twine/6.0.1 CPython/3.10.12
File hashes
| Algorithm | Hash digest | |
|---|---|---|
| SHA256 |
a5aefe694efbcd1e6b4fe69e6e55b9536d4d8065f3f42519e9d5d6d3cd6f22d2
|
|
| MD5 |
e25b25164642b4d19e728eebca367567
|
|
| BLAKE2b-256 |
0368a3f27408c03b49091dd6be2cc046b2fe765a990e6ddf791b4563b03c9107
|
File details
Details for the file juml_framework-0.0.1-py3-none-any.whl.
File metadata
- Download URL: juml_framework-0.0.1-py3-none-any.whl
- Upload date:
- Size: 60.6 kB
- Tags: Python 3
- Uploaded using Trusted Publishing? No
- Uploaded via: twine/6.0.1 CPython/3.10.12
File hashes
| Algorithm | Hash digest | |
|---|---|---|
| SHA256 |
970bb37d85acf195d4540a3fa58838d6a42b5386779a52b88b1169bf28028b8e
|
|
| MD5 |
ed2b0641eea0557eb3fab4214adb2fe9
|
|
| BLAKE2b-256 |
d8a8a1645c2a517cc14fe58132635250236c82578e1f459c2fb1dfc081b4143b
|


