
Jupyter-Native AI Agent Engine
Verified details
These details have been verified by PyPIProject links
GitHub Statistics
Maintainers

Reason this release was yanked:
Incompatible with Pydantic AI 2.0 due to upstream packages blocker. Please use v0.1.6 for a stable environment.
Project description
JupyDeep: Your AI partner in Jupyter

JupyDeep is an AI-native extension for JupyterLab, your always-on intelligent partner powered by Pydantic AI/Agents and beyond.

JupyDeep bridges the gap between large language models and complex, high-performance data analysis workflows. By integrating an intelligent agent engine directly into the Jupyter ecosystem, it transforms your standard workspace into a reactive, collaborative, and AI-assisted environment. Crucially, instead of piping your Jupyter context to external third-party services, JupyDeep is designed to embed AI agents as native citizens within your local Jupyter environment. With it, you can configure diverse agents by simply binding them to specific MCP tools, custom skills, and a wide array of underlying features.
⚠️ Note: JupyDeep is an active proof of concept under rapid development. Because its underlying foundation—including Pydantic AI/Agents—is also evolving quickly, unexpected issues may arise. We appreciate your patience as we lay the groundwork for a mature future.
🗺️ Roadmap / Upcoming Features
- Conversation Persistence & Checkpoint Rewind (State management)
- Multimodal Capabilities (Voice, images, and visual reasoning)
- Collaborative AI Workspaces (Multi-user shared sessions)
- Cross-Domain Data Analysis Demos (Bioinformatics, network algorithm, etc.)
- And much more...
Please visit our Documentation for installation, guides, examples, and more.
🚀 Getting Started
Please install it via pip or uv first (here we use uv as an example)
  uv init
  uv add jupyterlab
  uv pip install git+https://github.com/yezhenqing/jupyter-mcp-server.git
  uv add jupydeep
Then simply launch JupyterLab as below
uv run jupyter lab --ip=0.0.0.0
After installing JupyDeep for the first time, you'll need to configure a few settings to get the engine running:
- Locate Settings: Open the JupyterLab Settings Editor and search for options prefixed with
jupydeep. - Configure Your LLM (Required) and MCP (Recommended): The agent engine requires an LLM backend to function. Set up your model provider (e.g., OpenAI) and the Jupyter MCP by following the configurations below:
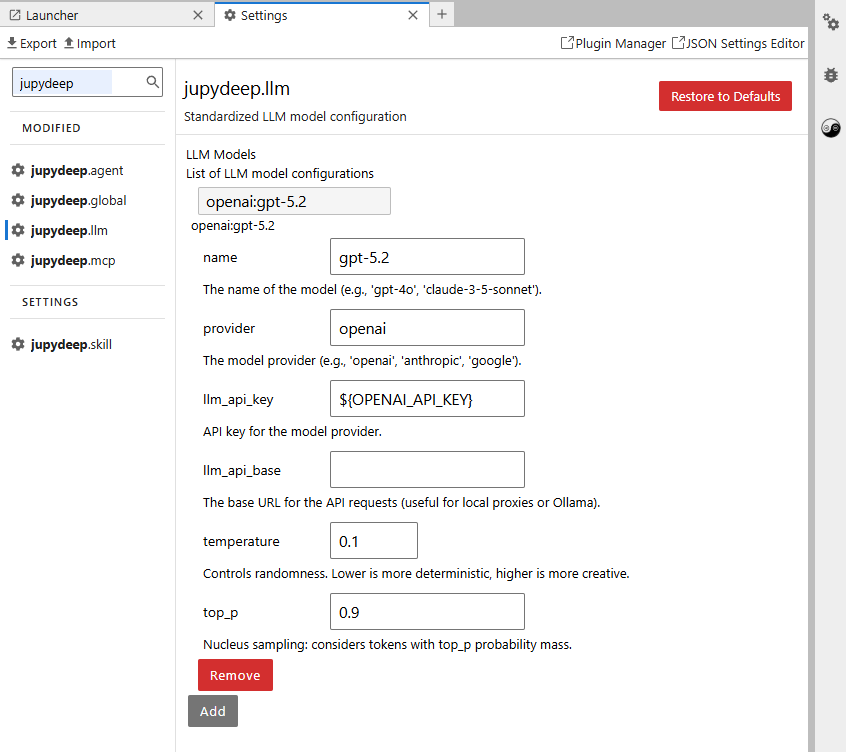 |
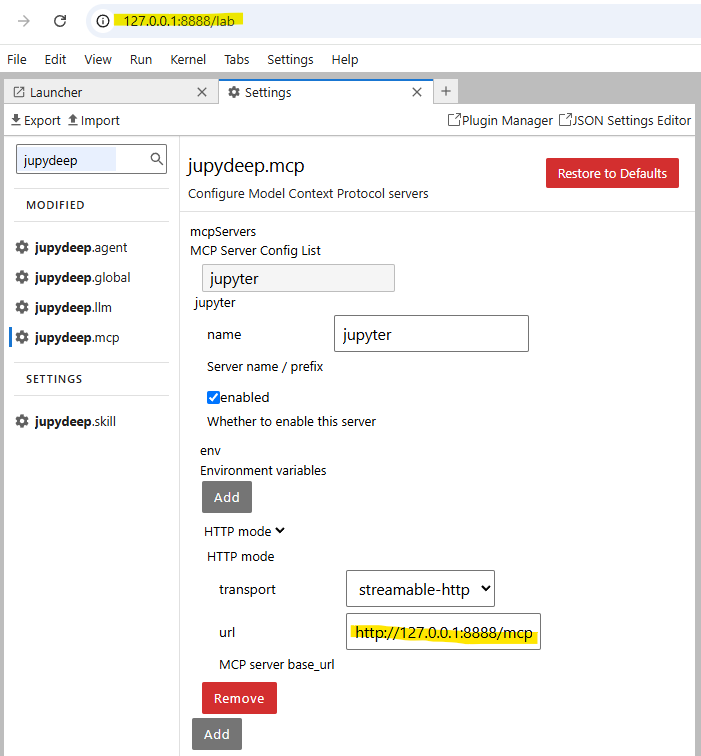 |
- Meet Your Built-in Agents: Once your LLM is connected, two default agents will instantly populate your
jupydeep.agentpanel:- 🐵 Wu Kong: Built for heavy-lifting code execution and technical problem-solving.
- 🐴 Monk Tang: Built for high-level tactical planning and orchestration.
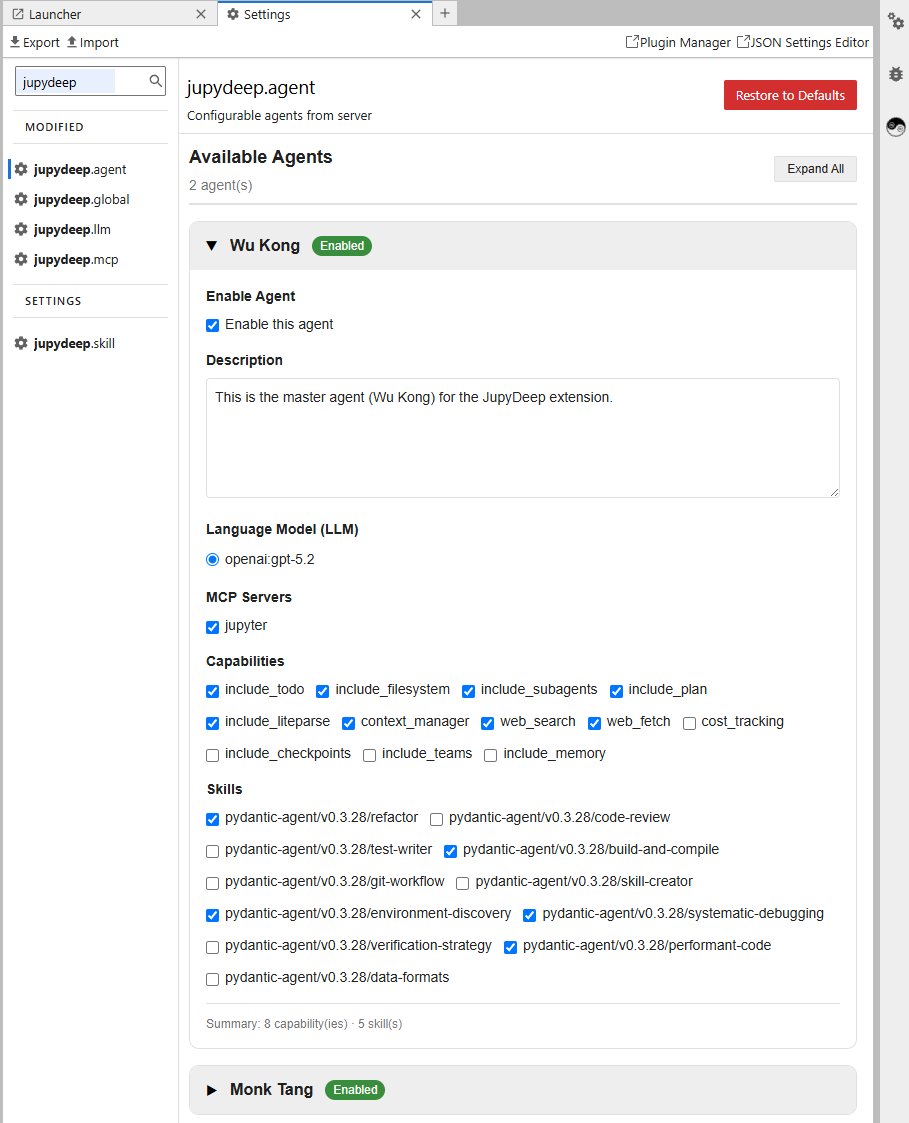
💡 Go Beyond the Defaults: You can easily tweak their skillsets or register your own custom agents in the workspace. Head over to our Documentation for the full customization guide. If the agents aren't visible, try refreshing the page; that might help.
🤝 Contributing
We welcome all forms of contributions—whether it's fixing bugs, improving documentation, or proposing new functionality.
Local Development Setup
JupyDeep consists of a Python backend (hatch / uv) and a TypeScript-based JupyterLab frontend extension (yarn / jlpm). Follow the steps below to set up your local development environment:
Clone the repository:
git clone https://github.com/yezhenqing/jupydeep.git
cd jupydeep
Install dependencies and create a virtual environment:
We highly recommend using uv for fast and robust package and environment management:
uv sync
uv pip install -e .
Since JupyDeep adheres to standard JupyterLab architecture, please refer to the official JupyterLab Extension Examples for detailed frontend compilation (jlpm build, jlpm watch) and source extension link workflows.
✨ Acknowledgments
Open-Source Credits
JupyDeep is built upon exceptional open-source projects, including the Jupyter ecosystem, Pydantic AI/Agents, and jupyter-mcp-server/tools from Datalayer, among others. We extend our deepest gratitude to all the creators and contributors who made this work possible.
AI Disclosure / Development Statement
AI was used primarily as a conversational sounding board for debugging; all core architecture and code logic remain purely human-authored.
Project details
Verified details
These details have been verified by PyPIProject links
GitHub Statistics
Maintainers
Release history Release notifications | RSS feed


Download files
Download the file for your platform. If you're not sure which to choose, learn more about installing packages.
Source Distribution
Built Distribution
Filter files by name, interpreter, ABI, and platform.
If you're not sure about the file name format, learn more about wheel file names.
Copy a direct link to the current filters
File details
Details for the file jupydeep-0.1.5.tar.gz.
File metadata
- Download URL: jupydeep-0.1.5.tar.gz
- Upload date:
- Size: 6.6 MB
- Tags: Source
- Uploaded using Trusted Publishing? Yes
- Uploaded via: twine/6.2.0 CPython/3.12.13
File hashes
| Algorithm | Hash digest | |
|---|---|---|
| SHA256 |
966e25566adff5358801dbcc94a31951e1e94c254234c3afc064f95da46ef738
|
|
| MD5 |
16d224c4089a340f4c1e8840f2a8939d
|
|
| BLAKE2b-256 |
93e8fc8ae53b5a5cf04c36175709abbc64e96177bff3f867b4ca755814a1f2e2
|
File details
Details for the file jupydeep-0.1.5-py3-none-any.whl.
File metadata
- Download URL: jupydeep-0.1.5-py3-none-any.whl
- Upload date:
- Size: 5.8 MB
- Tags: Python 3
- Uploaded using Trusted Publishing? Yes
- Uploaded via: twine/6.2.0 CPython/3.12.13
File hashes
| Algorithm | Hash digest | |
|---|---|---|
| SHA256 |
f0b0d4a7248e5893b3b090a4d42d6c14058dd0545e6acb6c979c84609c5bca3d
|
|
| MD5 |
30bff16b1ec4b3add7690e0d1678b592
|
|
| BLAKE2b-256 |
a2ddd204ecbe538f438c7978d318d88393f481fad655f945e395f1bfb7fb5d07
|






