A Jupyter widget for annotating images with bounding boxes

Project description

jupyter_bbox_widget
A Jupyter widget for annotating images with bounding boxes. See a live demo on Binder.
from jupyter_bbox_widget import BBoxWidget
widget = BBoxWidget(
    image='fruit.jpg',
    classes=['apple', 'orange', 'pear'],
)
widget
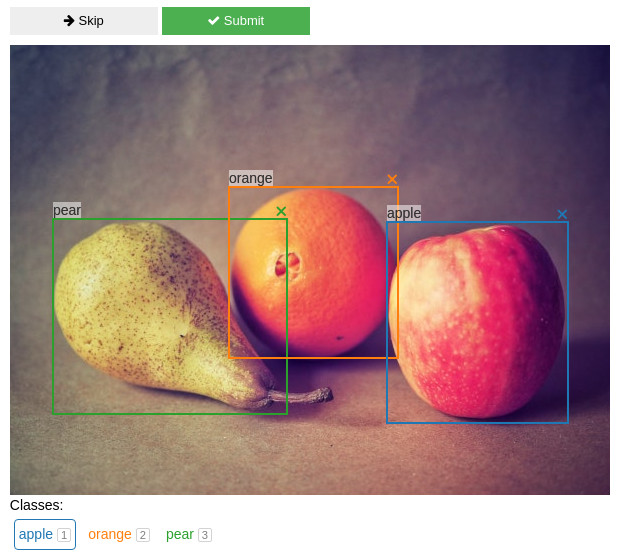
Create, edit, move, resize and delete bounding box annotations using the mouse.
Use widget.bboxes to get current annotations values:
widget.bboxes
# [{'x': 377, 'y': 177, 'width': 181, 'height': 201, 'label': 'apple'},
#  {'x': 219, 'y': 142, 'width': 169, 'height': 171, 'label': 'orange'},
#  {'x': 43,  'y': 174, 'width': 234, 'height': 195, 'label': 'pear'}]
You can also assign to widget.bboxes to display any annotations. For example, use the output of an object detection model to do model-assisted labeling.
widget.bboxes = [
    {'x': 377, 'y': 177, 'width': 181, 'height': 201, 'label': 'apple'},
    {'x': 219, 'y': 142, 'width': 169, 'height': 171, 'label': 'orange'},
    {'x': 43,  'y': 174, 'width': 234, 'height': 195, 'label': 'pear'}
]
Fruit photo by Umanoide on Unsplash
Installation
You can install using pip:
pip install jupyter_bbox_widget
If you are using Jupyter Notebook 5.2 or earlier, you may also need to enable the nbextension:
jupyter nbextension enable --py [--sys-prefix|--user|--system] jupyter_bbox_widget
Usage
Create and edit annotations with the mouse
- click and drag to create a bbox
- click and drag corners or edges to resize a bbox
- click and drag inside a bbox to move it
- in order to change a label select a new label below the image and click on label text
Keyboard shortcuts
When you click inside the widget area it will gain focus and start receiving keyboard events. An outline usually indicates that the element is focused. Normal Jupyter keyboard shortcuts won't work in this state. To unfocus the widget area click outside it or press Esc.
Some shortcuts act on the selected bbox. New bboxes are selected automatically when created. You can also select a bbox by clicking on it. Selected bbox is displayed on top of others and with a thicker border.
- Digit keys 1-9 and 0 select a class label.
Escunfocuses the widgetEnteris the same as pressing Submit buttonSpaceis the same as pressing Skip buttonTab/Shift-Tabselect next/previous bbox.- Keys acting on the selected bbox (assuming a QWERTY keyboard, other layouts should use any keys in the same locations):
Wmove upAmove leftSmove downDmove rightQshrink widthEgrow widthRgrow heightFshrink heightCassign selected class label- Holding
Shiftwhile pressing movement keys will increase step size
Skip and Submit events
You can define functions that will be called automatically when you press Skip or Submit buttons. This is useful for creating a workflow for annotating multiple images.
def skip():
    # move on to the next image
def save():
    # do stuff to save current annotations

widget.on_skip(skip)
widget.on_submit(save)
There is an example of a simple annotation workflow in examples/introduction.ipynb notebook.
View only mode
You can disable editing of annotations by setting widget.view_only = True. This is useful for viewing annotation outputs without accidentally changing them.
Recording additional data
Sometimes you need to record more info about an object than just a location and a class label. For example, you might want to specify whether the object is in focus or blurred, record its size or other properties.
Let's say we want to apply a rating on a scale from 1 to 5 to every object in the image. We create a slider widget to edit the rating values:
w_rating = widgets.IntSlider(value=3, min=1, max=5, description='Rating')
And we attach it to the bbox widget.
widget.attach(w_rating, name='rating')
As a result all bboxes created afterwards will have a rating property and the w_rating widget can be used to display and manipulate the rating of the currently selected bbox.
Any number and any kind of ipywidgets widgets may be used in this way for creating richer annotations - number inputs, text inputs, checkboxes and so on (see widget list).
The notebook in examples/introduction.ipynb has an example and a more detailed explanation of this feature.
Development Installation
This project was inspired by a blogpost Creating Reactive Jupyter Widgets With Svelte and was created based on widget-svelte-cookiecutter template.
# First install the python package. This will also build the JS packages.
pip install -e .
When developing your extensions, you need to manually enable your extensions with the notebook / lab frontend. For lab, this is done by the command:
jupyter labextension install @jupyter-widgets/jupyterlab-manager --no-build
jupyter labextension install .
For classic notebook, you can run:
jupyter nbextension install --sys-prefix --symlink --overwrite --py jupyter_bbox_widget
jupyter nbextension enable --sys-prefix --py jupyter_bbox_widget
Note that the --symlink flag doesn't work on Windows, so you will here have to run
the install command every time that you rebuild your extension. For certain installations
you might also need another flag instead of --sys-prefix, but we won't cover the meaning
of those flags here.
How to see your changes
Typescript:
To continuously monitor the project for changes and automatically trigger a rebuild, start Jupyter in watch mode:
jupyter lab --watch
And in a separate session, begin watching the source directory for changes:
npm run watch
After a change wait for the build to finish and then refresh your browser and the changes should take effect.
Python:
If you make a change to the python code then you will need to restart the notebook kernel to have it take effect.
Release history Release notifications | RSS feed


Download files
Download the file for your platform. If you're not sure which to choose, learn more about installing packages.
Source Distribution
Built Distribution
Filter files by name, interpreter, ABI, and platform.
If you're not sure about the file name format, learn more about wheel file names.
Copy a direct link to the current filters
File details
Details for the file jupyter_bbox_widget-0.3.3.tar.gz.
File metadata
- Download URL: jupyter_bbox_widget-0.3.3.tar.gz
- Upload date:
- Size: 563.0 kB
- Tags: Source
- Uploaded using Trusted Publishing? No
- Uploaded via: twine/3.4.1 importlib_metadata/4.3.1 pkginfo/1.7.0 requests/2.25.1 requests-toolbelt/0.9.1 tqdm/4.61.1 CPython/3.7.12
File hashes
| Algorithm | Hash digest | |
|---|---|---|
| SHA256 |
af411e1dc7d6c8e6e1f4313b1186e5a10d0625bc194dbfb1ef1dc7e708cd9181
|
|
| MD5 |
da1399e4de89d334c88498af89198f62
|
|
| BLAKE2b-256 |
439da94e18cafa5901514209309f20933e03dc9a3eda1d9be6d13042d26e5a63
|
File details
Details for the file jupyter_bbox_widget-0.3.3-py2.py3-none-any.whl.
File metadata
- Download URL: jupyter_bbox_widget-0.3.3-py2.py3-none-any.whl
- Upload date:
- Size: 282.0 kB
- Tags: Python 2, Python 3
- Uploaded using Trusted Publishing? No
- Uploaded via: twine/3.4.1 importlib_metadata/4.3.1 pkginfo/1.7.0 requests/2.25.1 requests-toolbelt/0.9.1 tqdm/4.61.1 CPython/3.7.12
File hashes
| Algorithm | Hash digest | |
|---|---|---|
| SHA256 |
2cf44b3eba2570c85d2db58fae451a3f6b8a6ac5bd5b732718888337120f53cd
|
|
| MD5 |
7f33358d00c4cee59ebb448ac0bb94e9
|
|
| BLAKE2b-256 |
67fdf43a287ec92d44148dd1c21d84367d2aff60f32b64126107135345ecebb2
|


