GitHub Copilot for Jupyter

Project description
jupyter_copilot
A GitHub Copilot extension for JupyterLab. This extension uses the language server provided by copilot.vim and the @jupyter/completer module to provide native GitHub Copilot autocomplete into notebooks.
⚠️ WARNING: You should not use this for remote notebooks over SSH as authentication for the extension server is currently disabled. Also, This extension also only supports JupyterLab, Jupyter Notebook 7 but not the Classic Notebook (v6)
This extension is still very new and may be rough around the edges. If you experience any bugs or have any feature requests please feel free to open an issue or make a PR :)
Features
- Inline completions with GitHub Copilot 🤖
- Native GitHub authentication 🔐
- Custom keybindings 🔥
- Multilanguage support
Requirements
- JupyterLab >= 4.1.0 or Jupyter Notebook >= 7.1.0
- Node.js >= 18.x
Setup
To install the extension, execute:
pip install jupyter_copilot
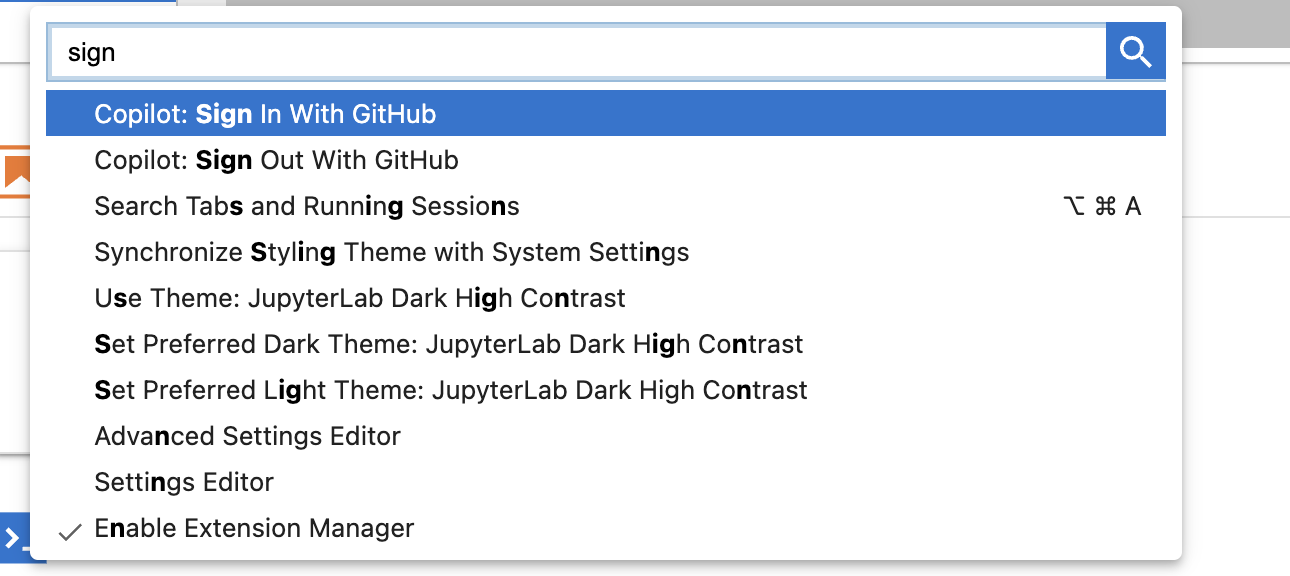
To login to copilot open the command palette with Ctrl+Shift+C (Cmd+Shift+C on mac) then select the Sign In With Github command and follow the instructions.

Once signed in open any notebook and the extension should run!
Settings
To change settings go to Settings > Settings Editor then search for Copilot.
| Setting | Description |
|---|---|
| Enable/Disable | Enables or disables the extension |
| Accept Keybind | The keybind you want to use to accept a completion, default value is Ctrl + J. This setting is just a string and is not validated to see if works. Currently using Tab for completions does not work, and you must refresh the notebook to see changes in effect. |
Uninstall
To remove the extension, execute:
pip uninstall jupyter_copilot
Troubleshoot
If you are seeing the frontend extension, but it is not working, check that the server extension is enabled:
jupyter server extension list
If the server extension is installed and enabled, but you are not seeing the frontend extension, check the frontend extension is installed:
jupyter labextension list
Contributing
Development install
Note: You will need NodeJS to build the extension package.
The jlpm command is JupyterLab's pinned version of
yarn that is installed with JupyterLab. You may use
yarn or npm in lieu of jlpm below.
# First install jupyterlab with pip
# Clone the repo to your local environment
# Change directory to the jupyter_copilot directory
# Install package in development mode
pip install -e "."
# Link your development version of the extension with JupyterLab
jupyter labextension develop . --overwrite
# Server extension must be manually installed in develop mode
jupyter server extension enable jupyter_copilot
# Rebuild extension Typescript source after making changes
jlpm build
You can watch the source directory and run JupyterLab at the same time in different terminals to watch for changes in the extension's source and automatically rebuild the extension.
# Watch the source directory in one terminal, automatically rebuilding when needed
jlpm watch
# Run JupyterLab in another terminal
jupyter lab
With the watch command running, every saved change will immediately be built locally and available in your running JupyterLab. Refresh JupyterLab to load the change in your browser (you may need to wait several seconds for the extension to be rebuilt).
By default, the jlpm build command generates the source maps for this extension to make it easier to debug using the browser dev tools. To also generate source maps for the JupyterLab core extensions, you can run the following command:
jupyter lab build --minimize=False
Development uninstall
# Server extension must be manually disabled in develop mode
jupyter server extension disable jupyter_copilot
pip uninstall jupyter_copilot
In development mode, you will also need to remove the symlink created by jupyter labextension develop
command. To find its location, you can run jupyter labextension list to figure out where the labextensions
folder is located. Then you can remove the symlink named jupyter_copilot within that folder.
Layout and structure
This extension is composed of a Python package named jupyter_copilot
for the server extension and a NPM package named jupyter_copilot
for the frontend extension.
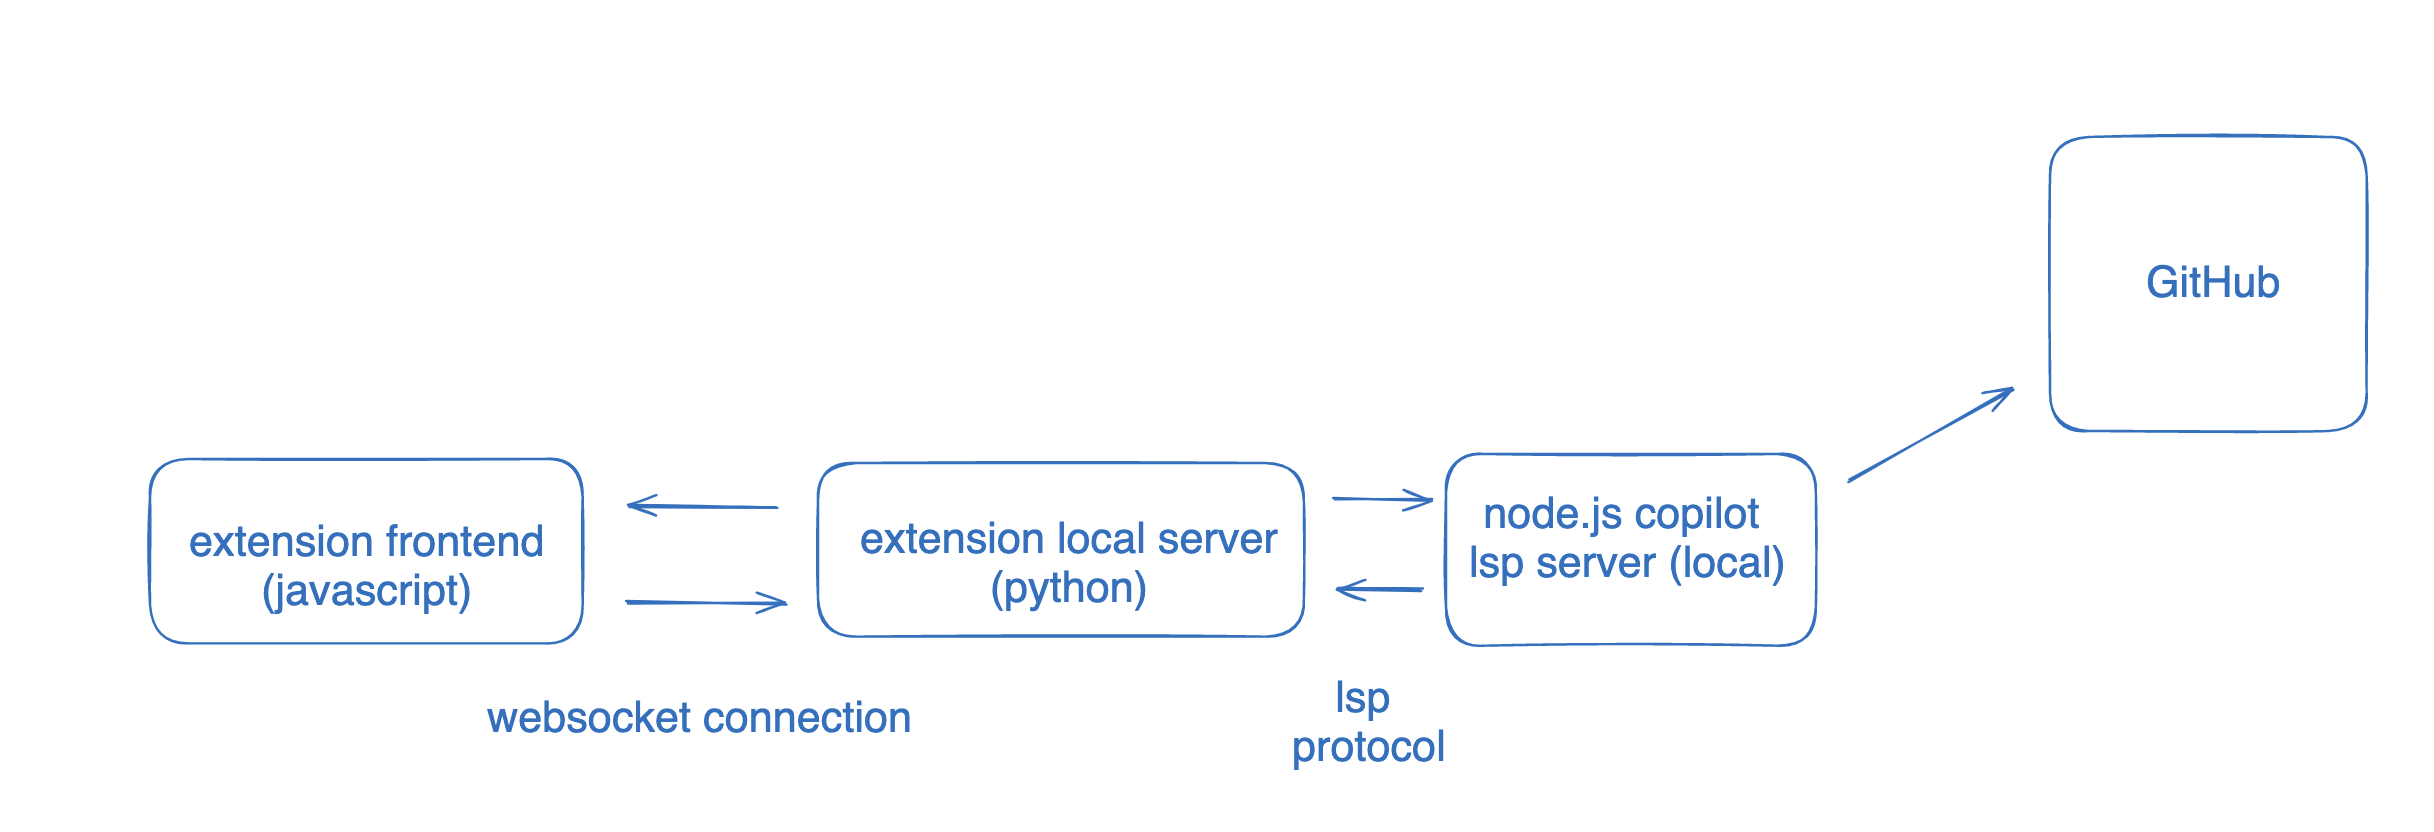
The extension uses the language server provided by copilot.vim for authentication and to actually fetch completions from GitHub. The language server is packaged as a node module caleld copilot-node-server.
The frontend is connected to the local extension server via websocket for updates to notebooks and to fetch completions from the LSP server.
jupyter_copilot
This is the code for the local server. handler.py has the handles any websocket messages from the frontend through a queue as to not break stuff. The handling of websocket messages is done in NotebookLSPHandler. There is another class NotebookHandler which creates an in-memory representation of the code from a notebook. This works by having an array for each code block, then indexing into the array and changing its content when theres an update. This class also uses the lsp_client to communicate with the LSP server.
The actual node.js Copilot LSP server is spawned in as a process in lsp.py. The server is located in node_modules/copilot-node-server/dist/copilot/language-server.js and is spawned as. lsp.py provides an interface to communicate with this LSP server, and restart if it crashes.
When you make changes to this folder npm run watch will not detect the change, so you need to restart the Jupyter instance in the terminal to see changes take effect
TODO
- Completions inside brackets
- Find out a better keybind system
- Copilot chat (?)
- Custom providers (?)
- Port to notebooks (?)
Huge thank you to these projects ❤️
Packaging the extension
See RELEASE


Download files
Download the file for your platform. If you're not sure which to choose, learn more about installing packages.
Source Distribution
Built Distribution
Filter files by name, interpreter, ABI, and platform.
If you're not sure about the file name format, learn more about wheel file names.
Copy a direct link to the current filters
File details
Details for the file jupyter_copilot-0.1.5.tar.gz.
File metadata
- Download URL: jupyter_copilot-0.1.5.tar.gz
- Upload date:
- Size: 5.6 MB
- Tags: Source
- Uploaded using Trusted Publishing? No
- Uploaded via: twine/6.1.0 CPython/3.13.1
File hashes
| Algorithm | Hash digest | |
|---|---|---|
| SHA256 |
b6c462be303b1b22d8698c2cd070c719c51cf3ea2960d515d5d108c3a82a521f
|
|
| MD5 |
f59e3fec0eaf76f64349f49b3be1b437
|
|
| BLAKE2b-256 |
eb4636fe385dfdf3be45e6e3c3b628773d435451267b7e8dfd5079539b0627ed
|
File details
Details for the file jupyter_copilot-0.1.5-py3-none-any.whl.
File metadata
- Download URL: jupyter_copilot-0.1.5-py3-none-any.whl
- Upload date:
- Size: 9.7 MB
- Tags: Python 3
- Uploaded using Trusted Publishing? No
- Uploaded via: twine/6.1.0 CPython/3.13.1
File hashes
| Algorithm | Hash digest | |
|---|---|---|
| SHA256 |
caa694aae2f13cec45ca7b9a2405603e8c7a504fe43d0fa8cb90b7c6b7297963
|
|
| MD5 |
1c719265e31240b0f4d25c0656d2a149
|
|
| BLAKE2b-256 |
d976557b3890e226a0ae6880f8dcdf8c29514c9aa1b86d6d83dd98edca7e9348
|


