
jupyter-iframe-commands


A JupyterLab extension to facilitate integration with a host page via an iframe
[!WARNING] This project is still in an early development stage.
Requirements
- JupyterLab >= 4.0.0 or Jupyter Notebook >= 7.0.0
Try it in your browser
Try out the extension in your browser:
Usage
This repository provides two packages:
- The extension package:
jupyter-iframe-commands. This is the JupyterLab extension that provides the API to execute JupyterLab commands from a host page. - The host package:
jupyter-iframe-commands-host. This is a package that provides a bridge to communicate with JupyterLab running in an iframe.
Host Package
The host package provides a bridge to communicate with JupyterLab running in an iframe. To use it in your application:
- Install the package:
npm install jupyter-iframe-commands-host
- Import and use the
CommandBridge:
import { createBridge } from 'jupyter-iframe-commands-host';

// Initialize the bridge with your iframe ID
const commandBridge = createBridge({ iframeId: 'your-jupyter-iframe-id' });

// Execute JupyterLab commands
// Example: Toggle the left sidebar
await commandBridge.execute('application:toggle-left-area');

// Example: Change the theme
await commandBridge.execute('apputils:change-theme', {
  theme: 'JupyterLab Dark'
});

// List available JupyterLab commands
const commands = await commandBridge.listCommands();
console.log(commands);
Extension Package
The JupyterLab extension should be installed in the JupyterLab environment running in the iframe.
To install the extension:
pip install jupyter-iframe-commands
Customizing the user interface
The Jupyter UI can be customized in different ways.
Example
On the following screenshot:
@jupyterlab/mainmenu-extensionis disabled to remove the menu entries@jupyter-notebook/lab-extensionis disabled to remove the interface switcher from the notebook toolbar- The
visibleproperty of the@jupyter-notebook/application-extension:topplugin is set tono, to hide the top bar
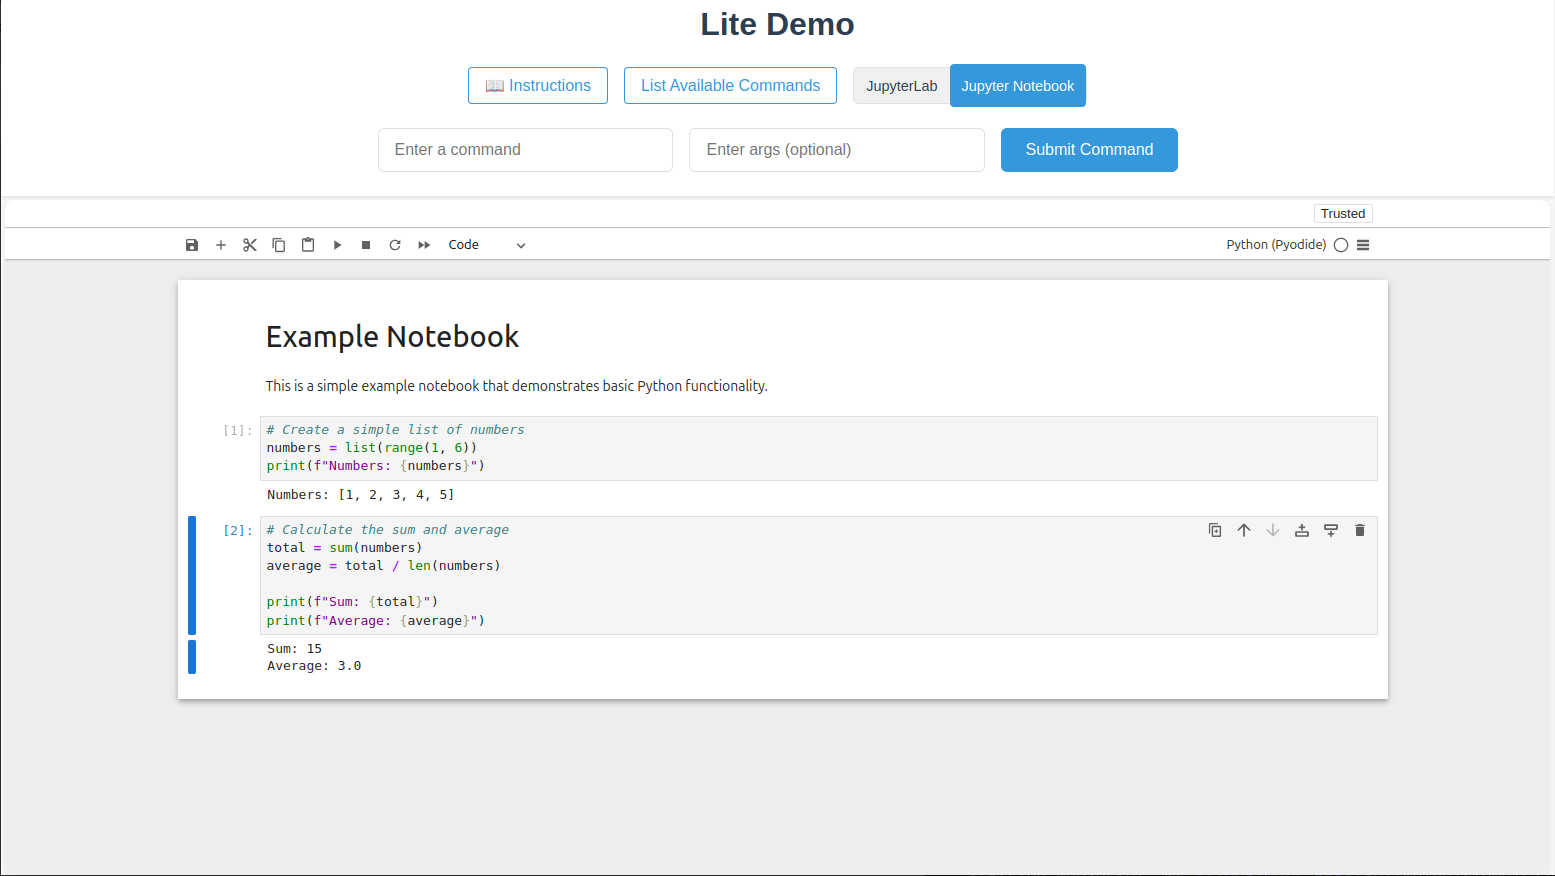
For the demo in this repo, this configuration is provided via two files:
overrides.json: This file is used to override the default settings of the JupyterLab and Jupyter Notebook applicationsjupyter-lite.json: This file is used to set a list ofdisabledExtensions, which can be used to disabled invidual plugins
Configuring JupyterLab
JupyterLab can be configured in a smilar way, using well-known files at specific locations:
page_config.json: https://jupyterlab.readthedocs.io/en/latest/user/directories.html#labconfig-directoriesoverrides.json: https://jupyterlab.readthedocs.io/en/latest/user/directories.html#overridesjson
Available Commands
[!NOTE] The list of available commands may depend on:
- The JupyterLab version
- Whether your JupyterLab configuration disables some core plugins or extensions
- Third-party extensions available in the JupyterLab environment
Some examples of available commands:
application:toggle-left-areaapputils:activate-command-paletteapputils:display-shortcutsextensionmanager:show-panelnotebook:create-newnotebook:insert-cell-below
Examples of commands with arguments:
apputils:change-theme{ 'theme': 'JupyterLab Dark' }settingeditor:open{ 'settingEditorType': 'json' }
[!TIP] For reference JupyterLab defines a list of default commands here: https://jupyterlab.readthedocs.io/en/latest/user/commands.html#commands-list
Adding Additional Commands
This package utilizes a bridge mechanism to transmit commands from the host to the extension running in Jupyter. To expand functionality beyond what's currently offered, you can develop a custom extension that defines new commands. If this custom extension is installed within the same Jupyter environment as the jupyter-iframe-commands extension, those commands will become available.
For further information please consult the Jupyter documentation:
- Creating an extension: https://jupyterlab.readthedocs.io/en/stable/extension/extension_dev.html
- Adding commands to the command registry: https://jupyterlab.readthedocs.io/en/stable/extension/extension_points.html#commands
Registering Callbacks
If you would like to register a callback to be executed when a particular event occurs in the JupyterLab, you can make use of the createProxy function from the jupyter-iframe-commands-host package. This function allows you to create a proxy to be passed to the IFrame as a command args, so it can be invoked in a JupyterLab command.
On the host, define the callback function:
import { createBridge, createProxy } from 'jupyter-iframe-commands-host';

const commandBridge = createBridge({ iframeId: 'jupyterlab' });

const kernelStatus = async ({ displayName, isBusy }) => {
  console.log('Received kernel status update from the iframe');
  console.log('Display Name:', displayName);
  console.log('Is Busy:', isBusy);
};

await commandBridge.execute('kernel-status', createProxy({ kernelStatus }));
In your custom JupyterLab extension, you can define a command:
const demoPlugin: JupyterFrontEndPlugin<void> = {
  id: 'jupyter-iframe-commands:demo-callback',
  autoStart: true,
  description: 'Using host callbacks',
  requires: [ILabStatus, INotebookTracker],
  activate: async (
    app: JupyterFrontEnd,
    labStatus: ILabStatus,
    tracker: INotebookTracker
  ) => {
    const { commands } = app;

    commands.addCommand('kernel-status', {
      label: 'Kernel Status',
      execute: args => {
        const kernelStatus = args['kernelStatus'] as unknown as (
          args?: any
        ) => void;

        labStatus.busySignal.connect(async () => {
          const kernelSpec =
            await tracker.currentWidget?.sessionContext?.session?.kernel?.spec;
          const displayName = kernelSpec
            ? kernelSpec.display_name
            : 'Loading...';
          kernelStatus({ displayName, isBusy: labStatus.isBusy });
        });
      }
    });
  }
};
[!WARNING] The returned value of
createProxymust be passed as theargsof the command so the underlying proxy can properly be transferred by Comlink.createProxycan proxy an entire object, so you can pass multiple callbacks and other data as well at once. For example:const proxy = createProxy({ kernelStatus, anotherCallback, someData: { foo: 'bar' } }); await commandBridge.execute('kernel-status', proxy);
Demos
Local Demo
To run the demo on a local Jupyter Lab instance:
- Follow the development install instructions
cd demo- Start JupyterLab:
jlpm start:lab
- In another terminal, start the demo app:
jlpm start:local
Open http://localhost:8080 in your browser.
Lite Demo
To run the demo on a Jupyter Lite instance:
- Follow the development install instructions
cd demo- Build and start the demo app:
# Build the lite assets
jlpm build:lite

# Build the demo
jlpm build:ghpages

# Start the development server
jlpm start:lite
Uninstall
To remove the extension, execute:
pip uninstall jupyter-iframe-commands
Contributing
Development install
[!NOTE] You will need NodeJS to build the extension package.
The jlpm command is JupyterLab's pinned version of
yarn that is installed with JupyterLab. You may use
yarn or npm in lieu of jlpm below.
# Clone the repo to your local environment
# Change directory to the jupyter-iframe-commands directory
# Install package in development mode
pip install -e "."
# Install dependencies
jlpm install
# Build extension Typescript source after making changes
jlpm build
# Link your development version of the extension with JupyterLab
jupyter labextension develop . --overwrite
You can watch the source directory and run JupyterLab at the same time in different terminals to watch for changes in the extension's source and automatically rebuild the extension.
# Watch the source directory in one terminal, automatically rebuilding when needed
jlpm watch
# Run JupyterLab in another terminal
jupyter lab
With the watch command running, every saved change will immediately be built locally and available in your running JupyterLab. Refresh JupyterLab to load the change in your browser (you may need to wait several seconds for the extension to be rebuilt).
By default, the jlpm build command generates the source maps for this extension to make it easier to debug using the browser dev tools. To also generate source maps for the JupyterLab core extensions, you can run the following command:
jupyter lab build --minimize=False
Development uninstall
pip uninstall jupyter-iframe-commands
In development mode, you will also need to remove the symlink created by jupyter labextension develop
command. To find its location, you can run jupyter labextension list to figure out where the labextensions
folder is located. Then you can remove the symlink named jupyter-iframe-commands within that folder.
Testing the extension
Integration tests
This extension uses Playwright for the integration tests (aka user level tests). More precisely, the JupyterLab helper Galata is used to handle testing the extension in JupyterLab.
More information are provided within the ui-tests README.
Packaging the extension
See RELEASE


Release files for jupyter-iframe-commands 0.3.0
For a detailed explanation of source distributions (sdists) and built distributions (wheels), please see the package formats documentation.
Source distribution (sdist)
| File | Size | Uploaded | |
|---|---|---|---|
| jupyter_iframe_commands-0.3.0.tar.gz | 293.4 kB | Details |
Built distribution (wheel)
| File | Interpreter | ABI | Platform | Reset |
|---|---|---|---|---|
| jupyter_iframe_commands-0.3.0-py3-none-any.whl | Python 3 | none | any | Details |
Total release size: 315.5 kB
Release files / jupyter_iframe_commands-0.3.0.tar.gz
| Download URL | jupyter_iframe_commands-0.3.0.tar.gz |
|---|---|
| Size | 293.4 kB |
| Tags | Source |
|
SHA-256 checksum How to use checksums |
072b1648621670d09439ac636aba901c6c403cfe6524e89e37b9e5f1ede75f30
|
|
BLAKE2b-256 checksum How to use checksums |
5a2c5c3262e490190b72f69ad14a74af1d781aec99c7389ec4705ec27c45f419
|
| Upload date | |
|
Uploaded using Trusted Publishing? What is trusted publishing? |
No |
| Uploaded via |
twine/6.1.0 CPython/3.13.1
|
Release files / jupyter_iframe_commands-0.3.0-py3-none-any.whl
| Download URL | jupyter_iframe_commands-0.3.0-py3-none-any.whl |
|---|---|
| Size | 22.1 kB |
| Tags | Python 3 |
|
SHA-256 checksum How to use checksums |
601965568d4c0e2d39e194c8f27a26591cebee80e4ca282a60cfee49c4a31582
|
|
BLAKE2b-256 checksum How to use checksums |
195b865636146efcdc49f545c3c56c245be276c5b18fec1998aaa37dd2de39a5
|
| Upload date | |
|
Uploaded using Trusted Publishing? What is trusted publishing? |
No |
| Uploaded via |
twine/6.1.0 CPython/3.13.1
|














