简单易用的python Web UI库

Project description
jxWebUI是为python程序员开发的简单易用的WebUI库,通过简单的文本定义即可定义各种web界面发布使用。适合不追求炫酷的界面,而是侧重快速实现功能的python程序员。
jxWebUI的使用非常简单,主要包括几个步骤: 1、导入依赖
from jxWebUI import jxWebLogger, jxWebServer, jxWebCapa, jxWebGetUser, jxWebSQLGetDBConnection
2、创建一个capa
capa = jxWebCapa('test.first_page')
capa就是一个桥【可以理解为一个功能模块】,把web界面和python代码衔接起来。这里定义了一个名为【test.first_page】的capa。对于名字,capa本身并无特殊要求,这里是为了便于代码组织,采用了点分方式。
3、给capa定义一个界面
@capa.page
def test_web(ci, db, ctx):
''
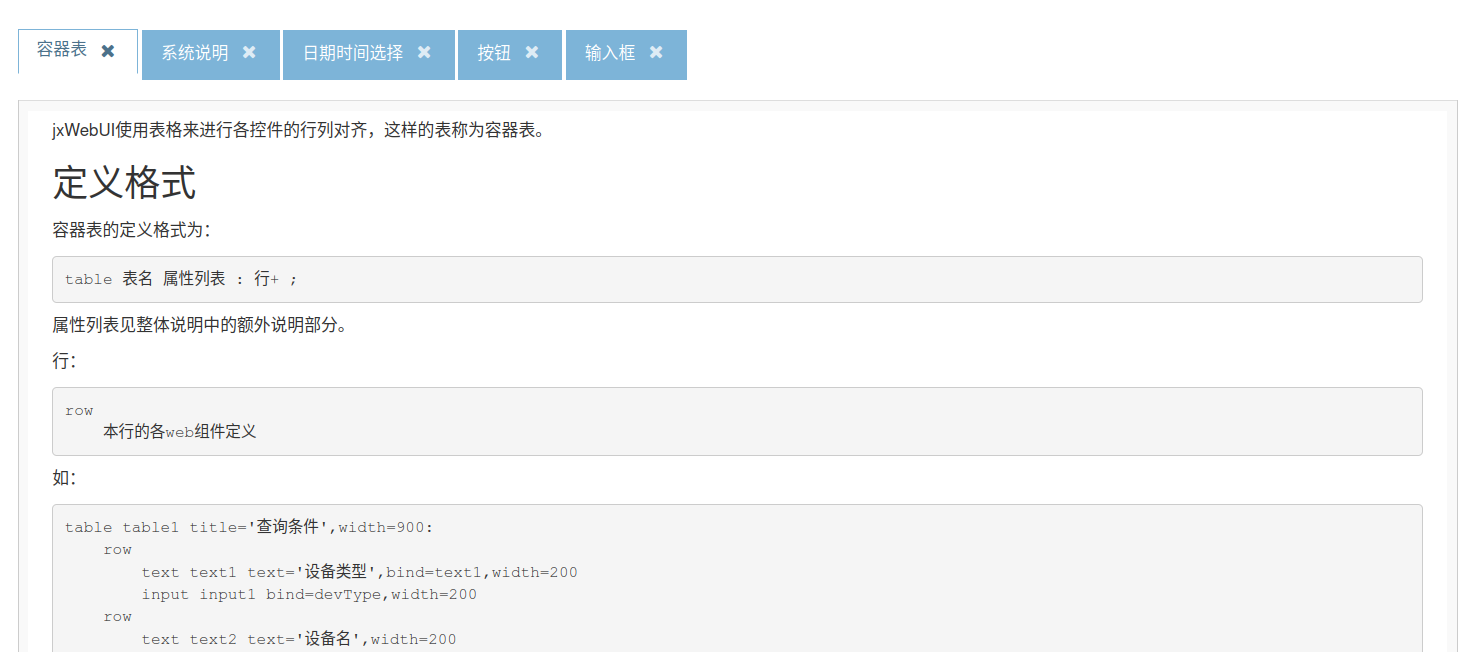
table table1 width=900:
row
text text1 text='文本框1',bind=text1,width=200
input input1 bind=input1,width=200
;
''
jxWebLogger.info(f'testUI_tms::test_web')
ci.setOutput('input1', '测试输出3')
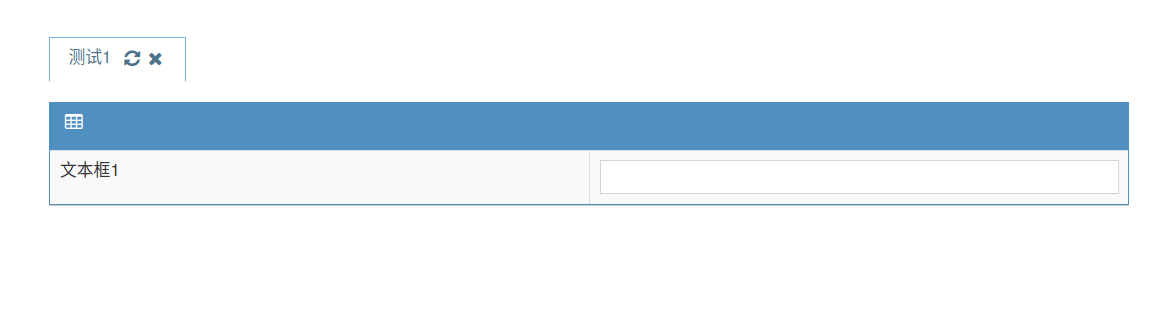
这就定义了一个【test_web】的页面:
4、定义一个打开这个界面的快捷栏菜单
capa.shortCutTree_add_item('测试', '测试1', 'test_web')
这会在左侧的快捷工具栏中出现一个二级目录:测试->测试1
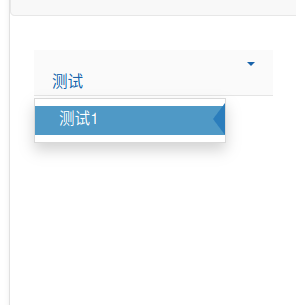
点击【测试1】就会显示上面的【test_web】页面。
5、定义一个获取登录用户信息的函数并送给jxWebUI
class User:
    def __init__(self, name):
        self._name = name
        self._abbr = name
        self._roles = [ ]

    def name(self):
        return self._name
    def abbr(self):
        return self._abbr
    def roles(self):
        return self._roles

def get_user(user, pwd):
    return User(user)
jxWebGetUser(get_user)
jxWebUI必须登录才可以使用,所以需要通过jxWebGetUser设置一个用户登录验证与用户信息获取的函数。因为是示例,所以这里就是简单把用户登录时输入的登录名直接封装成了一个User对象返回给jxWebUI,并未做验证。
如果需要验证,则修改get_user函数,对登录名和密码进行校验即可。返回None则代表登录失败,用户将无法登入。
返回的是用户自定义的一个对象,但必须要有name、abbr、roles三个函数,否则会执行失败,无法返回左侧的快捷栏,则用户见到的就会是一个空白页面。
6、启动web服务
jxWebServer.start(port=10068)
启动后,打开: http://127.0.0.1:10068/tms.html# 会弹出一个登录窗口,因为我们送入的get_user并未做用户的登录验证,所以随便输入用户名和密码就会登入。
因为jxWebUI需要做一点初始化的工作,所以可能要等两三秒中,就会在左侧的快捷栏,出现【测试->测试1】。点击测试1就会弹出test_web界面。
需要注意的是,和上面的截图不同,输入框中会出现:【测试输出3】。这是因为test_web函数不仅仅只是定义一个页面,其函数体中的代码:
jxWebLogger.info(f'testUI_tms::test_web')
ci.setOutput('input1', '测试输出3')
也会在页面打开时得到执行。这两条代码中:
jxWebLogger.info(f'testUI_tms::test_web')
会将字符串【testUI_tms::test_web】以info级别记入jxWebLogger。其对应的日志文件位于执行程序所在目录的子目录【./logs】中的【rolling.log】。
ci.setOutput('input1', '测试输出3')
是将一个字符串【测试输出3】输出到web界面的【input1】中。
总的代码是:
from jxWebUI import jxWebLogger, jxWebServer, jxWebCapa, jxWebGetUser, jxWebSQLGetDBConnection

capa = jxWebCapa('test.first_page')

@capa.page
def test_web(ci, db, ctx):
    ''
    table table1 width=900:
        row
            text text1 text='文本框1',bind=text1,width=200
            input input1 bind=input1,width=200
    ;
	''
	jxWebLogger.info(f'testUI_tms::test_web')
    ci.setOutput('input1', '测试输出3')

capa.shortCutTree_add_item('测试', '测试1', 'test_web')

class User:
    def __init__(self, name):
        self._name = name
        self._abbr = name
        self._roles = [ ]

    def name(self):
        return self._name
    def abbr(self):
        return self._abbr
    def roles(self):
        return self._roles

def get_user(user, pwd):
    return User(user)
jxWebGetUser(get_user)

jxWebServer.start(port=10068)
将上述代码保存为testUI_tms.py,然后在命令行执行:
python3 testUI_tms.py
然后在浏览器中打开: http://127.0.0.1:10068/tms.html# 进行查看。
jxWebUI编程指南
请在python解释器中执行:
>>> from jxWebUI import startJxWebUIManualServer
>>> `startJxWebUIManualServer(port=10068, web_def=True)`
然后在浏览器中打开: http://127.0.0.1:10068/tms.html# 随便输入用户名、密码登录后,就可以查看到编程手册的目录:
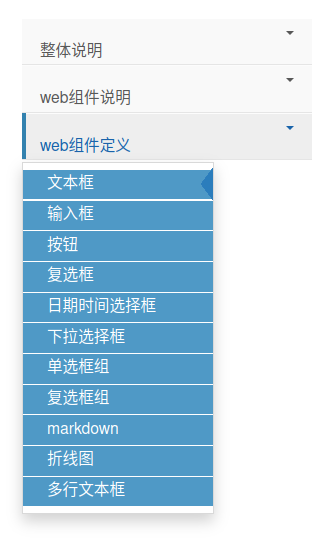
整体说明菜单下是jxWebUI编程的总体概念和API说明等,web组件说明菜单下则详细介绍了已开放的web组件的说明和属性等。点击这二者的章节会以markdown的形式提供相应的说明:
web组件定义菜单下则提供了一个jxWebUI自举的web组件定义和展示功能:

安装jxWebUI
pip install jxWebUI
测试jxWebUI
从jxWebUI测试代码处可以下载testUI_tms.py文件,将该py文件复制到任一目录【用户有写权限】,并在该目录中创建logs子目录,然后在命令行执行:
cd <testUI_tms.py所在目录>
python3 testUI_tms.py
然后打开 http://127.0.0.1:10068/tms.html# 即可。
logs子目录中会创建两个日志文件:
- rolling.log:是jxWebUI的运行日志,包括用户的操作等
- web.log:jxWebUI的web服务所依赖的tornado的日志
这两种日志都是30个日志文件、每个日志文件500M进行循环,所以如长期运行需注意硬盘空间的使用情况。
Release history Release notifications | RSS feed


Download files
Download the file for your platform. If you're not sure which to choose, learn more about installing packages.
Source Distribution
Built Distribution
Filter files by name, interpreter, ABI, and platform.
If you're not sure about the file name format, learn more about wheel file names.
Copy a direct link to the current filters
File details
Details for the file jxwebui-0.1.2.tar.gz.
File metadata
- Download URL: jxwebui-0.1.2.tar.gz
- Upload date:
- Size: 12.7 MB
- Tags: Source
- Uploaded using Trusted Publishing? No
- Uploaded via: twine/6.1.0 CPython/3.8.20
File hashes
| Algorithm | Hash digest | |
|---|---|---|
| SHA256 |
52704ef508c509f930c6758a38d2341f5f9eee32d067607ca2b11fc682aeae62
|
|
| MD5 |
cd0e790cd64d2eb319a24f7481572c06
|
|
| BLAKE2b-256 |
bb95e1be553c33222a4f0fe30bdfb6692b27697e6379c3d6fcfbe1c50400429f
|
File details
Details for the file jxwebui-0.1.2-py3-none-any.whl.
File metadata
- Download URL: jxwebui-0.1.2-py3-none-any.whl
- Upload date:
- Size: 13.6 MB
- Tags: Python 3
- Uploaded using Trusted Publishing? No
- Uploaded via: twine/6.1.0 CPython/3.8.20
File hashes
| Algorithm | Hash digest | |
|---|---|---|
| SHA256 |
1381913fcfc367cdd6cd3fae62f99c0c679e2e51038b26e1443dbdb963c546d2
|
|
| MD5 |
a28ccee154151f8ac5b35956384472d8
|
|
| BLAKE2b-256 |
c7c14a90332beec68ce3a939a51b9b4ef95d04e9ed49e62e74d3481fdc79f616
|


