
An AI debugging engineer that continuously tests, analyzes, and improves your AI agents and LLM applications

Project description
Kaizen Agent - AI Debugging Engineer for AI Agents


Test, debug, and improve your AI agents automatically. Kaizen Agent runs your agents, analyzes failures, and fixes code and prompts using AI.
How It Works
🎥 Watch Kaizen Agent in Action:

Kaizen Agent acts as an AI debugging engineer that continuously tests, analyzes, and improves your AI agents and LLM applications. Here's how it works at a high level:
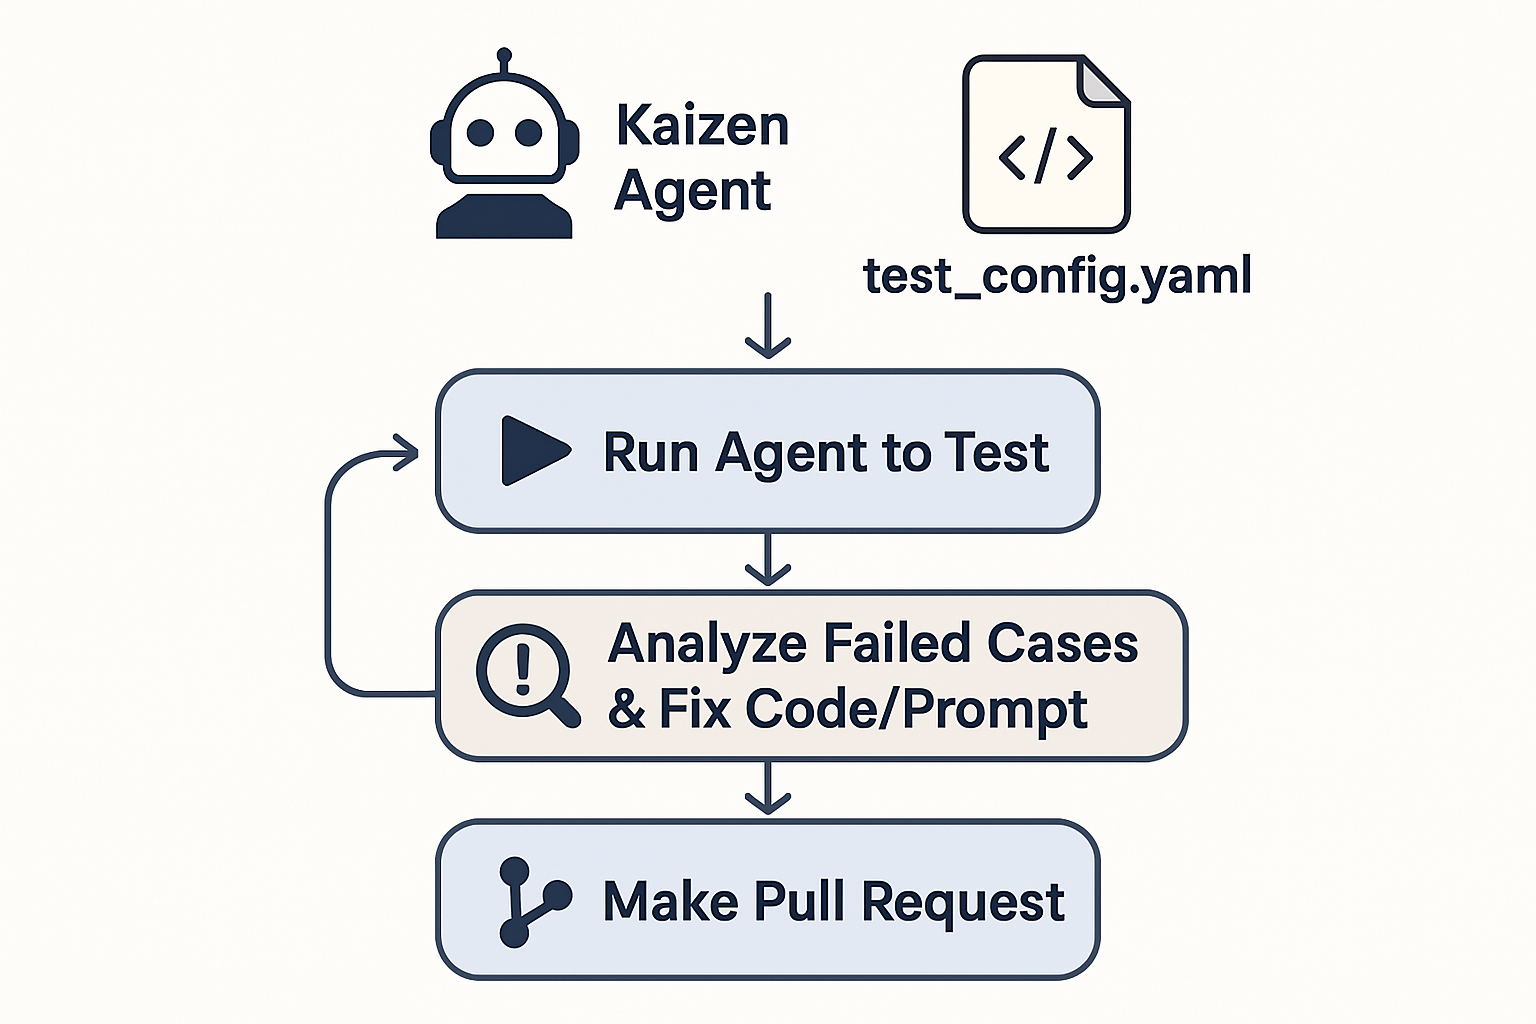
When Kaizen Agent is Useful
Kaizen Agent is most valuable during the development phase of your AI agents, right after you've written the initial code but before deployment.
Perfect Timing: Pre-Deployment Testing & Tuning
After writing your agent code, you typically need to:
- Test with various inputs to ensure reliability
- Tweak prompts for better performance
- Debug edge cases and failure scenarios
- Optimize code based on test results
Kaizen Agent automates this entire process. Instead of manually writing test cases and debugging failures, you simply:
- Define your test inputs and evaluation criteria in YAML
- Run
kaizen test-all --auto-fix - Let Kaizen automatically test, analyze failures, and improve your code
Ideal Use Cases
- 🔄 Iterative Development: Test and improve agents during development cycles
- 🚀 Pre-Deployment Validation: Ensure your agent works reliably before going live
- 🐛 Bug Detection: Catch and fix issues you might miss with manual testing
- 📈 Performance Optimization: Continuously improve prompts and code based on test results
- 🛡️ Quality Assurance: Maintain high standards as your agent evolves
When NOT to Use
- Production environments - Kaizen is for development/testing, not live systems
- Simple, stable agents - If your agent is already working perfectly, you might not need it
- Non-AI applications - Kaizen is specifically designed for AI agents and LLM applications
Quick Start (1 minute)
Requirements:
- Python 3.8+ (Python 3.9+ recommended for best performance)
1. Install & Setup
# Create a test directory for your specific agent
mkdir my-email-agent-test
cd my-email-agent-test

# Create a virtual environment (recommended)
python -m venv venv
source venv/bin/activate  # On Windows: venv\Scripts\activate

# Install Kaizen Agent from PyPI
pip install kaizen-agent

# Create .env file with your Google API key
cat > .env << EOF
GOOGLE_API_KEY=your_api_key_here
EOF

# Or set it directly in your shell
export GOOGLE_API_KEY="your_api_key_here"
2. Create Your Agent
Python Version
Create my_agent.py:
import google.generativeai as genai
import os

class EmailAgent:
    def __init__(self):
        genai.configure(api_key=os.getenv("GOOGLE_API_KEY"))
        self.model = genai.GenerativeModel('gemini-2.5-flash-preview-05-20')
        # Simple prompt that Kaizen can improve significantly
        self.system_prompt = "Improve this email draft."

    def improve_email(self, email_draft):
        full_prompt = f"{self.system_prompt}\n\nEmail draft:\n{email_draft}\n\nImproved version:"
        response = self.model.generate_content(full_prompt)
        return response.text
TypeScript Version (Mastra)
Create my_agent.ts:
import { google } from '@ai-sdk/google';
import { Agent } from '@mastra/core/agent';

export const emailFixAgent = new Agent({
  name: 'Email Fix Agent',
  instructions: `You are an email assistant. Improve this email draft.`,
  model: google('gemini-2.5-flash-preview-05-20'),
});
3. Create Test Config
🎯 No Test Code Required!
Kaizen Agent uses YAML configuration instead of traditional test files. This is a new, simpler way to test AI agents:
- ❌ Traditional approach: Write test files with
unittest,pytest, orjest - ✅ Kaizen approach: Define tests in YAML - no test code needed!
Python Version
Create kaizen.yaml:
name: Email Improvement Agent Test
file_path: my_agent.py
description: This agent improves email drafts by making them more professional, clear, and well-structured. It transforms casual or poorly written emails into polished, business-appropriate communications.
agent:
  module: my_agent
  class: EmailAgent
  method: improve_email

evaluation:
  evaluation_targets:
    - name: quality
      source: return
      criteria: "The email should be professional, polite, and well-structured with proper salutations and closings"
      weight: 0.5
    - name: format
      source: return
      criteria: "The response should contain only the improved email content without any explanatory text, markdown formatting, or additional commentary. It should be a clean, standalone email draft ready for use."
      weight: 0.5


files_to_fix:
  - my_agent.py

steps:
  - name: Professional Email Improvement
    input:
      input: "hey boss, i need time off next week. thanks"

  - name: Edge Case - Empty Email
    input:
      input: ""

  - name: Edge Case - Very Informal Email
    input:
      input: "yo dude, can't make it to the meeting tomorrow. got stuff to do. sorry!"
TypeScript Version
Create kaizen.yaml:
name: Email Improvement Agent Test
file_path: src/mastra/agents/email-agent.ts
language: typescript
description: This agent improves email drafts by making them more professional, clear, and well-structured. It transforms casual or poorly written emails into polished, business-appropriate communications.
agent:
  module: email-agent  # Just the file name without extension

evaluation:
  evaluation_targets:
    - name: quality
      source: return
      criteria: "The email should be professional, polite, and well-structured with proper salutations and closings"
      weight: 0.5
    - name: format
      source: return
      criteria: "The response should contain only the improved email content without any explanatory text, markdown formatting, or additional commentary. It should be a clean, standalone email draft ready for use."
      weight: 0.5

files_to_fix:
  - src/mastra/agents/email-agent.ts

settings:
  timeout: 180

steps:
  - name: Professional Email Improvement
    input:
      input: "hey boss, i need time off next week. thanks"

  - name: Edge Case - Very Informal Email
    input:
      input: "yo dude, can't make it to the meeting tomorrow. got stuff to do. sorry!"
4. Run Tests
# Run tests with auto-fix and save detailed logs
kaizen test-all --config kaizen.yaml --auto-fix --save-logs
This will:
- Test your email improvement agent with realistic scenarios
- Automatically improve the simple prompt to handle different email types
- Save detailed logs to
test-logs/so you can see the before/after improvements
GitHub Setup (for Pull Requests)
To create pull requests with fixes, you need to set up GitHub access:
1. Create GitHub Personal Access Token
- Go to GitHub Settings > Developer settings > Personal access tokens
- Click "Generate new token (classic)"
- Give it a descriptive name (e.g., "Kaizen AutoFix")
- Set an expiration date
- Important: Select these scopes:
- ✅
repo(Full control of private repositories)
- ✅
2. Set Up Environment Variables
Create a .env file in your project root:
# Create .env file
cat > .env << EOF
GOOGLE_API_KEY=your_google_api_key_here
GITHUB_TOKEN=ghp_your_github_token_here
EOF
3. Test GitHub Access
# Test GitHub access
kaizen test-github-access --repo your-username/your-repo-name

# Run tests with PR creation
kaizen test-all --config kaizen.yaml --auto-fix --create-pr
How to Create a Test Configuration File
Kaizen Agent uses YAML configuration files to define test suites for your AI agents. This approach eliminates the need for traditional Python test files while providing powerful testing capabilities.
Sample Configuration File
Here's a complete example that demonstrates all available configuration options:
name: Text Analysis Agent Test Suite
agent_type: dynamic_region
file_path: agents/text_analyzer.py
description: |
  Test suite for the TextAnalyzer agent that processes and analyzes text content.

  This agent performs sentiment analysis, extracts key information, and provides
  structured analysis results. Tests cover various input types, edge cases, and
  expected output formats to ensure reliable performance.

agent:
  module: agents.text_analyzer
  class: TextAnalyzer
  method: analyze_text

evaluation:
  evaluation_targets:
    - name: sentiment_score
      source: variable
      criteria: "The sentiment_score must be a float between -1.0 and 1.0. Negative values indicate negative sentiment, positive values indicate positive sentiment. The score should accurately reflect the emotional tone of the input text."
      description: "Evaluates the accuracy of sentiment analysis output"
      weight: 0.4
    - name: key_phrases
      source: variable
      criteria: "The key_phrases should be a list of strings containing the most important phrases from the input text"
      description: "Checks if key phrase extraction is working correctly"
      weight: 0.3
    - name: analysis_quality
      source: return
      criteria: "The response should be well-structured, professional, and contain actionable insights"
      description: "Evaluates the overall quality and usefulness of the analysis"
      weight: 0.3

max_retries: 3

files_to_fix:
  - agents/text_analyzer.py
  - agents/prompts.py

referenced_files:
  - agents/prompts.py
  - utils/text_utils.py

steps:
  - name: Positive Review Analysis
    description: "Analyze a positive customer review"
    input:
      file_path: agents/text_analyzer.py
      method: analyze_text
      input:
        - name: text_content
          type: string
          value: "This product exceeded my expectations! The quality is outstanding and the customer service was excellent. I would definitely recommend it to others."

      expected_output:
        sentiment_score: 0.8
        key_phrases: ["exceeded expectations", "outstanding quality", "excellent customer service"]

  - name: Negative Feedback Analysis
    description: "Analyze negative customer feedback"
    input:
      file_path: agents/text_analyzer.py
      method: analyze_text
      input:
        - name: text_content
          type: string
          value: "I'm very disappointed with this purchase. The product arrived damaged and the support team was unhelpful."

      expected_output:
        sentiment_score: -0.7
        key_phrases: ["disappointed", "damaged product", "unhelpful support"]

  - name: Neutral Text Analysis
    description: "Analyze neutral or mixed sentiment text"
    input:
      file_path: agents/text_analyzer.py
      method: analyze_text
      input:
        - name: text_content
          type: string
          value: "The product has both good and bad aspects. The design is nice but the price is high."

      expected_output:
        sentiment_score: 0.0
        key_phrases: ["good aspects", "bad aspects", "nice design", "high price"]

  - name: Object Input Analysis
    description: "Analyze text using a structured user review object"
    input:
      file_path: agents/text_analyzer.py
      method: analyze_review
      input:
        - name: user_review
          type: object
          class_path: agents.review_processor.UserReview
          args:
            text: "This product exceeded my expectations! The quality is outstanding."
            rating: 5
            category: "electronics"
            helpful_votes: 12
            verified_purchase: true
        - name: analysis_settings
          type: dict
          value:
            include_sentiment: true
            extract_keywords: true
            detect_emotions: false

      expected_output:
        sentiment_score: 0.9
        key_phrases: ["exceeded expectations", "outstanding quality", "excellent customer service"]
        review_quality: "high"

  - name: Empty Input Handling
    description: "Test how the agent handles empty or minimal input"
    input:
      file_path: agents/text_analyzer.py
      method: analyze_text
      input:
        - name: text_content
          type: string
          value: ""

      expected_output:
        sentiment_score: 0.0
        key_phrases: []
Configuration Sections Explained
Basic Information
name: A descriptive name for your test suiteagent_type: Type of agent testing (e.g.,dynamic_regionfor code-based agents)file_path: Path to the main agent file being testeddescription: Detailed description of what the agent does and what the tests cover
Agent Configuration
agent:
  module: agents.text_analyzer    # Python module path
  class: TextAnalyzer            # Class name to instantiate
  method: analyze_text           # Method to call during testing
Evaluation Criteria
⚠️ CRITICAL: This section feeds directly into the LLM for automated evaluation. Write clear, specific criteria for best results.
The evaluation section defines how Kaizen's LLM evaluates your agent's performance. Each evaluation_target specifies what to check and how to score it.
evaluation:
  evaluation_targets:
    - name: sentiment_score       # Name of the output to evaluate
      source: variable            # Source: 'variable' (from agent output) or 'return' (from method return)
      criteria: "Description of what constitutes a good result"
      description: "Additional context about this evaluation target"
      weight: 0.4                 # Relative importance (0.0 to 1.0)
Key Components:
name: Must match a field in your agent's output or return valuesource:variable: Extract from agent's output variables/attributesreturn: Use the method's return value
criteria: Most important - Instructions for the LLM evaluatordescription: Additional context to help the LLM understand the evaluationweight: Relative importance (0.0 to 1.0, total should equal 1.0)
Writing Effective Criteria:
✅ Good Examples:
- name: sentiment_score
  source: variable
  criteria: "The sentiment_score must be a float between -1.0 and 1.0. Negative values indicate negative sentiment, positive values indicate positive sentiment. The score should accurately reflect the emotional tone of the input text."
  weight: 0.4

- name: response_quality
  source: return
  criteria: "The response should be professional, well-structured, and contain actionable insights. It must be free of grammatical errors and provide specific, relevant information that addresses the user's query directly."
  weight: 0.6
❌ Poor Examples:
- name: result
  source: return
  criteria: "Should be good"  # Too vague
  weight: 1.0

- name: accuracy
  source: variable
  criteria: "Check if it's correct"  # Not specific enough
  weight: 1.0
Tips for Better LLM Evaluation:
- Be Specific: Include exact requirements, ranges, or formats
- Provide Context: Explain what "good" means in your domain
- Include Examples: Reference expected patterns or behaviors
- Consider Edge Cases: Mention how to handle unusual inputs
- Use Clear Language: Avoid ambiguous terms that LLMs might misinterpret
Testing Configuration
max_retries: Number of retry attempts if a test failsfiles_to_fix: Files that Kaizen can modify to fix issuesreferenced_files: Additional files for context (not modified)
Test Steps
Each step defines a test case with:
name: Descriptive name for the testdescription: What this test is checkinginput:file_path: Path to the agent filemethod: Method to callinput: List of parameters with name, type, and value
Input Types Supported
Kaizen supports multiple input types for test parameters:
String Input:
- name: text_content
  type: string
  value: "Your text here"
Dictionary Input:
- name: config
  type: dict
  value:
    key1: "value1"
    key2: "value2"
Object Input:
- name: user_review
  type: object
  class_path: agents.review_processor.UserReview
  args:
    text: "This product exceeded my expectations! The quality is outstanding."
    rating: 5
    category: "electronics"
    helpful_votes: 12
    verified_purchase: true
The class_path specifies the Python class to instantiate, and args provides the constructor arguments.
expected_output: Expected results for evaluation
Simple Configuration Template
For quick testing, you can use this minimal template:
name: My Agent Test
file_path: my_agent.py
description: "Test my AI agent"

agent:
  module: my_agent
  class: MyAgent
  method: process

evaluation:
  evaluation_targets:
    - name: result
      source: return
      criteria: "The response should be accurate and helpful"
      weight: 1.0

files_to_fix:
  - my_agent.py

steps:
  - name: Basic Test
    input:
      file_path: my_agent.py
      method: process
      input:
        - name: user_input
          type: string
          value: "Hello, how are you?"
      expected_output:
        result: "I'm doing well, thank you!"
CLI Commands
# Run tests
kaizen test-all --config kaizen.yaml

# With auto-fix
kaizen test-all --config kaizen.yaml --auto-fix

# Create PR with fixes
kaizen test-all --config kaizen.yaml --auto-fix --create-pr

# Save detailed logs
kaizen test-all --config kaizen.yaml --save-logs

# Environment setup
kaizen setup check-env
kaizen setup create-env-example

# GitHub access testing
kaizen test-github-access --repo owner/repo-name
kaizen diagnose-github-access --repo owner/repo-name
System Requirements
Python Version
- Minimum: Python 3.8+
- Recommended: Python 3.9+ for best performance
Dependencies
google-generativeai>=0.3.2(for LLM operations)python-dotenv>=0.19.0(for environment variables)click>=8.0.0(for CLI)pyyaml>=6.0.0(for YAML configuration)PyGithub>=2.6.1(for GitHub integration)
Release history Release notifications | RSS feed


Download files
Download the file for your platform. If you're not sure which to choose, learn more about installing packages.
Source Distribution
Built Distribution
Filter files by name, interpreter, ABI, and platform.
If you're not sure about the file name format, learn more about wheel file names.
Copy a direct link to the current filters
File details
Details for the file kaizen_agent-0.1.3.tar.gz.
File metadata
- Download URL: kaizen_agent-0.1.3.tar.gz
- Upload date:
- Size: 1.8 MB
- Tags: Source
- Uploaded using Trusted Publishing? No
- Uploaded via: twine/6.1.0 CPython/3.9.7
File hashes
| Algorithm | Hash digest | |
|---|---|---|
| SHA256 |
47285296864da9893d91019b1e0de17a51bc4cb63d1520705a64ba1e7a247485
|
|
| MD5 |
138eb6eaed63c6cd82fec47be2c4b176
|
|
| BLAKE2b-256 |
92146b1476aaa9d85a16ff5b72f16a889eb1bb20b1b4b841880b8ee3e1b47bec
|
File details
Details for the file kaizen_agent-0.1.3-py3-none-any.whl.
File metadata
- Download URL: kaizen_agent-0.1.3-py3-none-any.whl
- Upload date:
- Size: 201.6 kB
- Tags: Python 3
- Uploaded using Trusted Publishing? No
- Uploaded via: twine/6.1.0 CPython/3.9.7
File hashes
| Algorithm | Hash digest | |
|---|---|---|
| SHA256 |
46e5c836c761bd4d97f898580f8a332792bbc675644426fec37a0caae4e83059
|
|
| MD5 |
65b11a702fdc3ff3a15793a68ec84a47
|
|
| BLAKE2b-256 |
39cd3dd174b5913105dfe36f4546b43239d21b147387cdc959eec66aef383e39
|






