Passing the baton of rendered HTML from server to client

Project description
KiwiJs
✨ 🚀 Full-Stack Development Experience with Python and React ✨ 🚀
Unlike typical setups where Node.js serves as the backend for frontend applications, this project leverages Python to deliver a comprehensive full-stack solution.
Note: The KiwiJs meta-framework is currently under development. As such, features and specifications are subject to change as we refine and enhance the framework
Install KiwiJs
Python Environment and Requirements
Create a virtual environment to manage dependencies locally:
virtualenv env
Activate the virtual environment:
source env/bin/activate
Alternatively:
. env/bin/activate
Now, you need to install KiwiJs using pip. Open your terminal or command prompt and run the following command:
pip install git+https://github.com/py-react/kiwijs.git
pip install kiwijs
Create your app
kiwijs create-app
Run server
npm run dev
The application will run on port 5001 by default.
If 5001 is already in use, You can change the default port by adding port in settings.py
PORT=5001
Main Features
Some of the main py-react features include:
| Feature | Description |
|---|---|
| Routing | A file-system based router built on top of FastAPI and Server Components that supports layouts, nested routing, loading states, and more. |
| Rendering | Client-side and Server-side Rendering with Client and Server Components. Further optimized with Static and Dynamic Rendering on the server with py-react. |
| Styling | Support for your preferred styling methods, including CSS Modules, Tailwind CSS, and CSS-in-JS |
Pre-Requisite Knowledge
Although our docs are designed to be beginner-friendly, we need to establish a baseline so that the docs can stay focused on py-react functionality. We'll make sure to provide links to relevant documentation whenever we introduce a new concept.
To get the most out of our docs, it's recommended that you have a basic understanding of FastAPI,HTML, CSS, and React. If you need to brush up on your React skills, check out this React Foundations Course and FastAPI, which will introduce you to the fundamentals.
Creating your First Page
Layouts
A layout is UI that is shared between multiple routes. On navigation, layouts preserve state, remain interactive. Layouts can also be nested.
You can define a layout by default exporting a React component from a layout.jsx file. The component will be populated with a child layout (if it exists) or a page during rendering.
import React from "react";
import Header from "../components/header";
import { Outlet } from "react-router-dom";

const Layout = (props) => {
  return (
    <div className="p-4">
      <Header />
      <Outlet />
    </div>
  );
};

export default Layout;
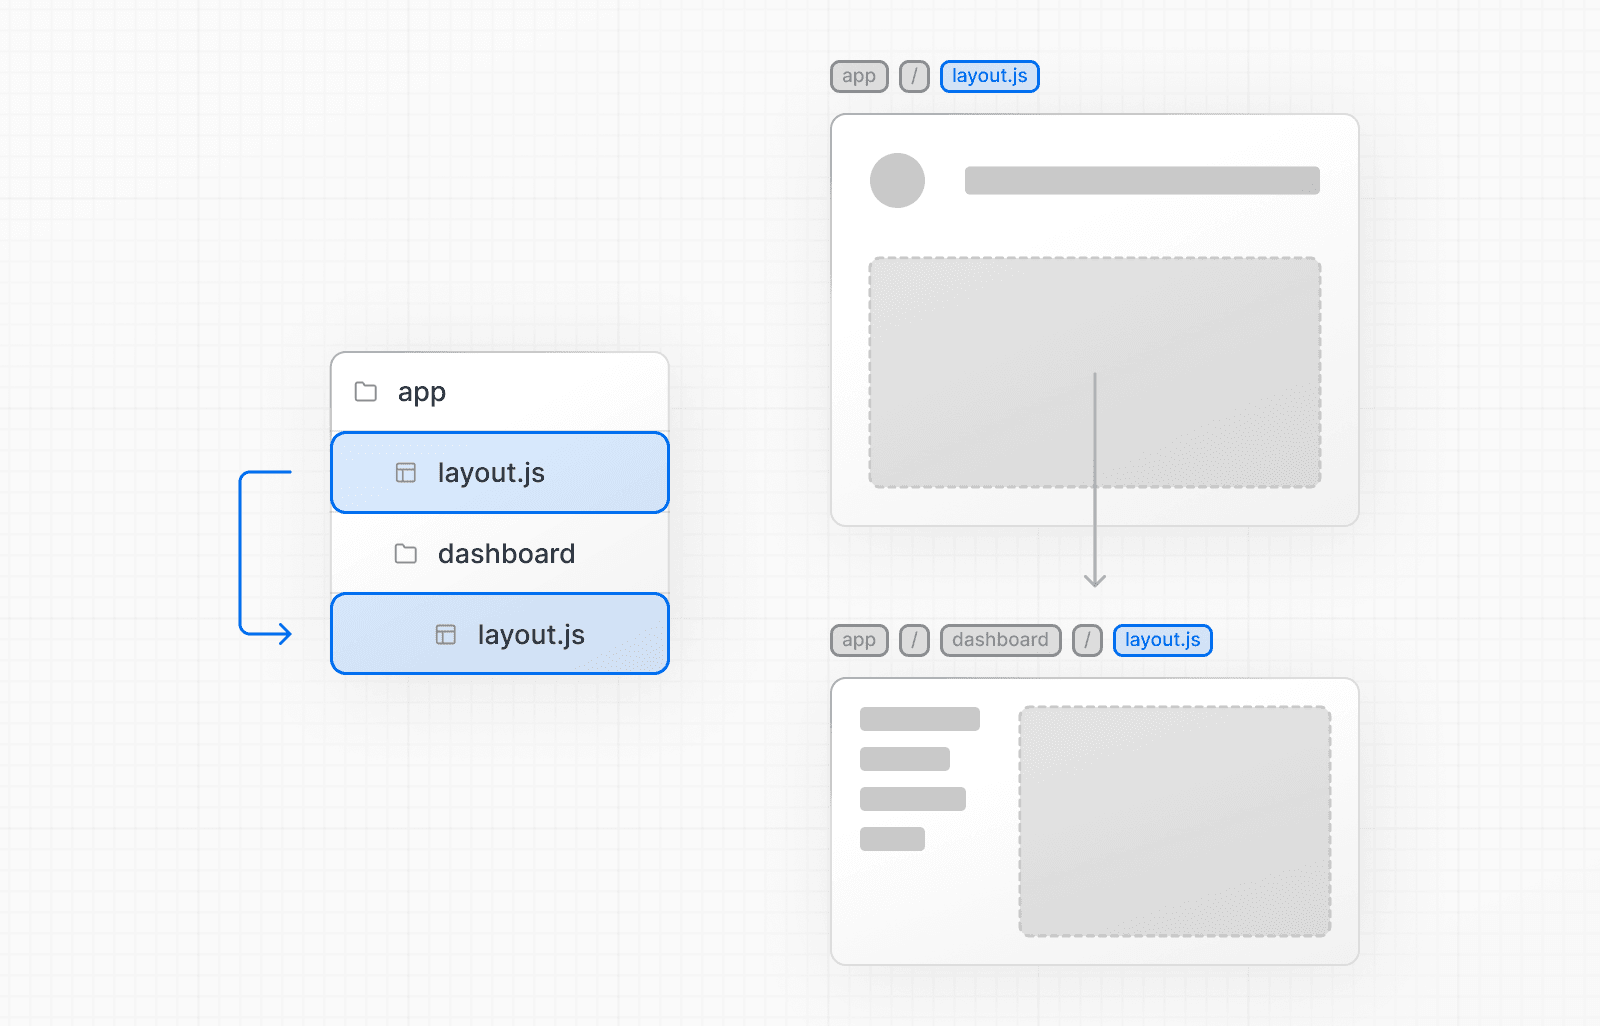
For example, the layout will be shared with the /dashboard and /dashboard/settings pages:
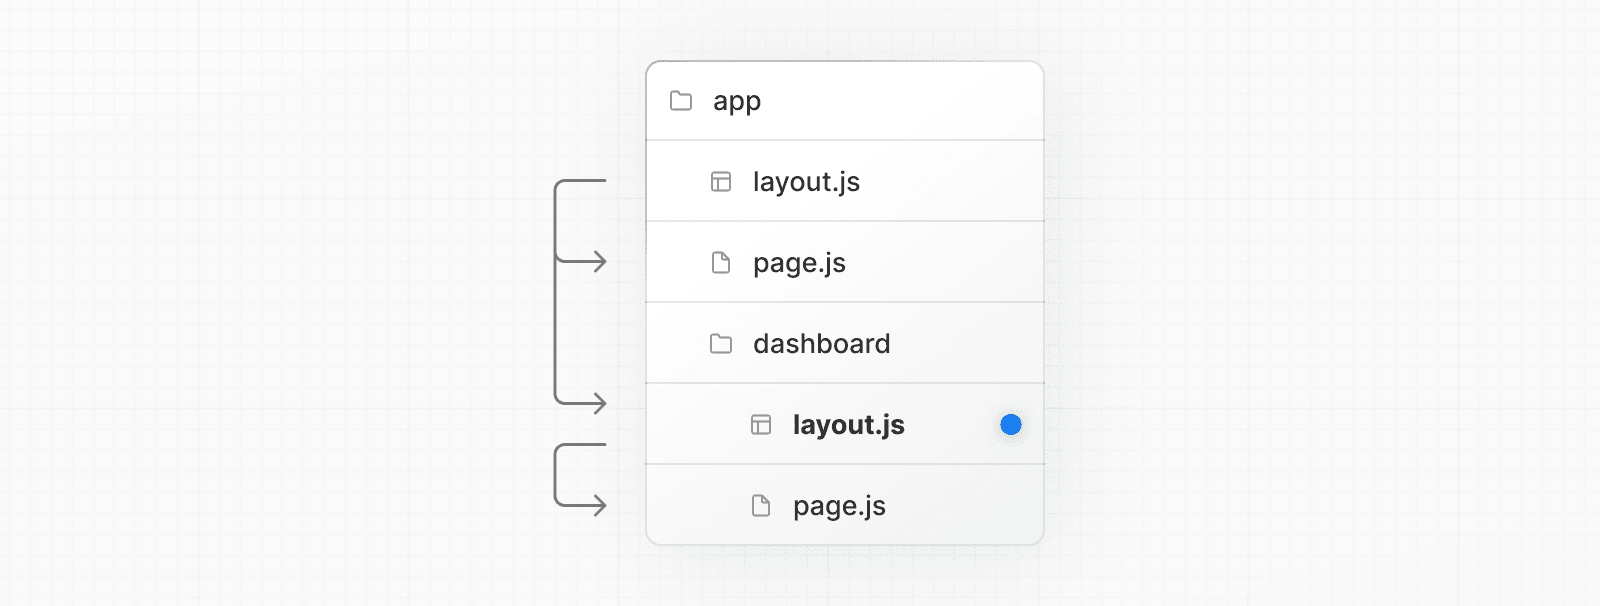
If you were to combine the two layouts above, the root layout (app/layout.jsx) would wrap the dashboard layout (app/dashboard/layout.jsx), which would wrap route segments inside app/dashboard/*.
The two layouts would be nested as such:
Linking and Navigating
There are currently two ways to navigate between routes in KiwiJs:
- Using the Link Component (currently exported from libs)
- Using the useNavigate hook (currently exported from libs)
This page will go through how to use each of these options, and dive deeper into how navigation works.
Dynamic Routes
When you don't know the exact segment names ahead of time and want to create routes from dynamic data, you can use Dynamic Segments that are filled in at request time.
Convention
A Dynamic Segment can be created by wrapping a folder's name in square brackets: [folderName]. For example, [id] or [slug].
You can use useParam hook to get the values in component/pages
For ecample if your folder structure looks like src/app/products/[productId]/index.jsx
import React, { useEffect, useState } from "react";
import { useParams } from "react-router-dom";

function Product() {
  const { productId } = useParams();
  return (
    <>
      {productId}
    </>
  );
}

export default Product;
Alternatively:
import React, { useEffect, useState } from "react";
import { useParams } from "react-router-dom";

function Product({productId}) {
  return (
    <>
      {productId}
    </>
  );
}

export default Product;
Server-Side Props
In a Python environment, you can fetch data, interact with the database, and pass the data to your page.
Convention
The server logic is placed alongside index.jsx and layout.jsx within the same folder and is named index.py.
Example
Server Example
Path Example : src/app/index.py
from fastapi import Request
import requests

async def index(request:Request):
    api_url = f'https://dummyjson.com/products/'  # Replace this with the URL of the API you want to fetch data from
    # ----or---
    # productId = request.args.get("productId")
    # api_url = f'https://dummyjson.com/products/

    response = requests.get(api_url)

    if response.status_code == 200:
        data = response.json()
        return {"products":{data}}
    return {"products":{"data": None,"error":{"message":"Something went wrong! Please try again"}}}
Component Example
Path Example : src/app/products/[productId]/index.jsx
import React, { useEffect, useState } from "react";
import { useParams } from "react-router-dom";

function Products({products}) {
  return (
    <>
      {JSON.stringify(products,null,4)}
    </>
  );
}

export default Products;
layout server Example
If you want to pass props to layout you just have to define a layout in your index.py
Path Example : src/app/index.py
from fastapi import Request

async def layout(request:Request):
    return {"serverData":"some_data"}
layout client Example
Path Example : src/app/layout.jsx (will be visible to all subroute)
function Layout({serverData}) {
  return (
    <>
      <div className="p-0 m-0">
        <Header data={serverData}/>
        <Outlet />
      </div>
    </>
  );
}

export default Layout;
Middleware Example
Or you want attach a middleware, Just define a middleware in index.py
Path Example : src/app/index.py
from fastapi import Request

async def middleware(request:Request,call_next):
    token = request.headers.get('X-Auth-Token')
    if token != 'secret-token':
      # raise 403
    return call_next(request)
Api and middleware example
Path Example : src/app/api/product/index.py
from fastapi import Request

async def GET(request:Request):
    data = {}
    for key,value in request.args.items():
        data[key] = value
    return {"query":data}


async def middleware(request:Request,call_next):
    token = request.headers.get('X-Auth-Token')
    if token != 'secret-token':
      # raise 403
    return call_next(request)
Enjoy your full-stack development experience with Python and React!
Using styled-components
Inside your root layout.jsx define getAppContext function
import { ServerStyleSheet } from 'styled-components';

async getAppContext = (ctx)=>{
  const sheet = new ServerStyleSheet();
  ctx.renderApp:()=>({
    enhanceApp:(App)=>App,
    getStyles:(App)=>sheet.collectStyles(App),
    styles:()=>sheet.getStyleTags(),
    finally:()=>{
      sheet.seal()
    }
  })
  return ctx
}
Using Theme
Inside your root layout.jsx
import React from "react";
import { Outlet } from "react-router-dom";
import { ThemeProvider } from "src/libs/theme-provider"

function Layout(props) {
  return (
    <ThemeProvider attribute="class" defaultTheme="light" enableSystem>
        <div className="p-0 m-0 dark:bg-gray-800 dark:text-white">
          {/* Layout component */}
          <Outlet />
        </div>
    </ThemeProvider>
  )
}
Add Meta Data
# add the below in your index.py file
def meta_data():
    return {
        "title": "Ginger-Js",
        "description": "Some Description",
        "og:description": "Description Here",
        "icon":"/static/images/favicon.ico"
    }
Overide config
// create a "ginger_conf.cjs" at root of the project and add the below in the file

module.exports = {
    vite:{}
}
Extend main app
from fastapi import FastAPI,Request
from starlette.middleware.base import BaseHTTPMiddleware
from starlette.requests import Request
from datetime import datetime
import time


class RequestLoggerMiddleware(BaseHTTPMiddleware):
    async def dispatch(self, request: Request, call_next):
        # Record the start time
        start_time = time.time()

        # Log request method and URL

        # Process the request and get the response
        response = await call_next(request)

        # Record the end time
        end_time = time.time()

        # Calculate the time taken for the request
        duration = round(end_time - start_time, 4)  # Duration in seconds, rounded to 4 decimal places

        # Log the response status code and time taken
        print(f"Time taken: {duration} seconds | [{request.method}] {request.url.path} | Response status code: {response.status_code} ")

        return response

# Function to extend the app by adding routes
def extend_app(app: FastAPI):
    # Add the custom RequestLoggerMiddleware
    app.add_middleware(RequestLoggerMiddleware)
Using FastAPI with Type Safety
Below snippets demonstrates how to use the FastAPI client with type safety for improved developer experience and better integration.
Step 1: Import the Service
Begin by importing the service module into your project
import { DefaultService } from "@/KiwiJs_api_client";
This will allow you to interact with the API endpoints defined in the FastAPI server.
Step 2: Call the Service
You can now call the service method using type-safe functions. For example, to make an API request to the apiTestGet endpoint:
await DefaultService.apiTestGet()
By leveraging the type safety features, you get better auto-completion, error handling, and validation during development.
Using this project locally
Clone this repo and run
pip install kiwijs
Release history Release notifications | RSS feed

Download files
Download the file for your platform. If you're not sure which to choose, learn more about installing packages.
Source Distribution
Built Distribution
Filter files by name, interpreter, ABI, and platform.
If you're not sure about the file name format, learn more about wheel file names.
Copy a direct link to the current filters
File details
Details for the file kiwijs-0.0.1.tar.gz.
File metadata
- Download URL: kiwijs-0.0.1.tar.gz
- Upload date:
- Size: 318.2 kB
- Tags: Source
- Uploaded using Trusted Publishing? No
- Uploaded via: twine/6.2.0 CPython/3.11.15
File hashes
| Algorithm | Hash digest | |
|---|---|---|
| SHA256 |
fcab369ba56026d1a25076b5adbf8b6df64fb1f9f5b323e1669cd4533e7d0718
|
|
| MD5 |
4d16ded41f374e143b6c533f2a33a156
|
|
| BLAKE2b-256 |
0cc4461fdd9ccef3faafd1d8e5516b1294569c315e1efeffa976c63b90d2bbc5
|
File details
Details for the file kiwijs-0.0.1-py3-none-any.whl.
File metadata
- Download URL: kiwijs-0.0.1-py3-none-any.whl
- Upload date:
- Size: 332.6 kB
- Tags: Python 3
- Uploaded using Trusted Publishing? No
- Uploaded via: twine/6.2.0 CPython/3.11.15
File hashes
| Algorithm | Hash digest | |
|---|---|---|
| SHA256 |
9ad30d1013951cb1d8a1fdaaa27346af628d743e34a221a57db1a137321e0312
|
|
| MD5 |
0e2acda75ff28a034c456cdcbd663afd
|
|
| BLAKE2b-256 |
0c040bafd98a059202f62f689bebdb21fe0092d50ee199d894d2ecf021b8602b
|


