Kwola makes an AI powered tool for finding bugs in software

Project description
Kwola
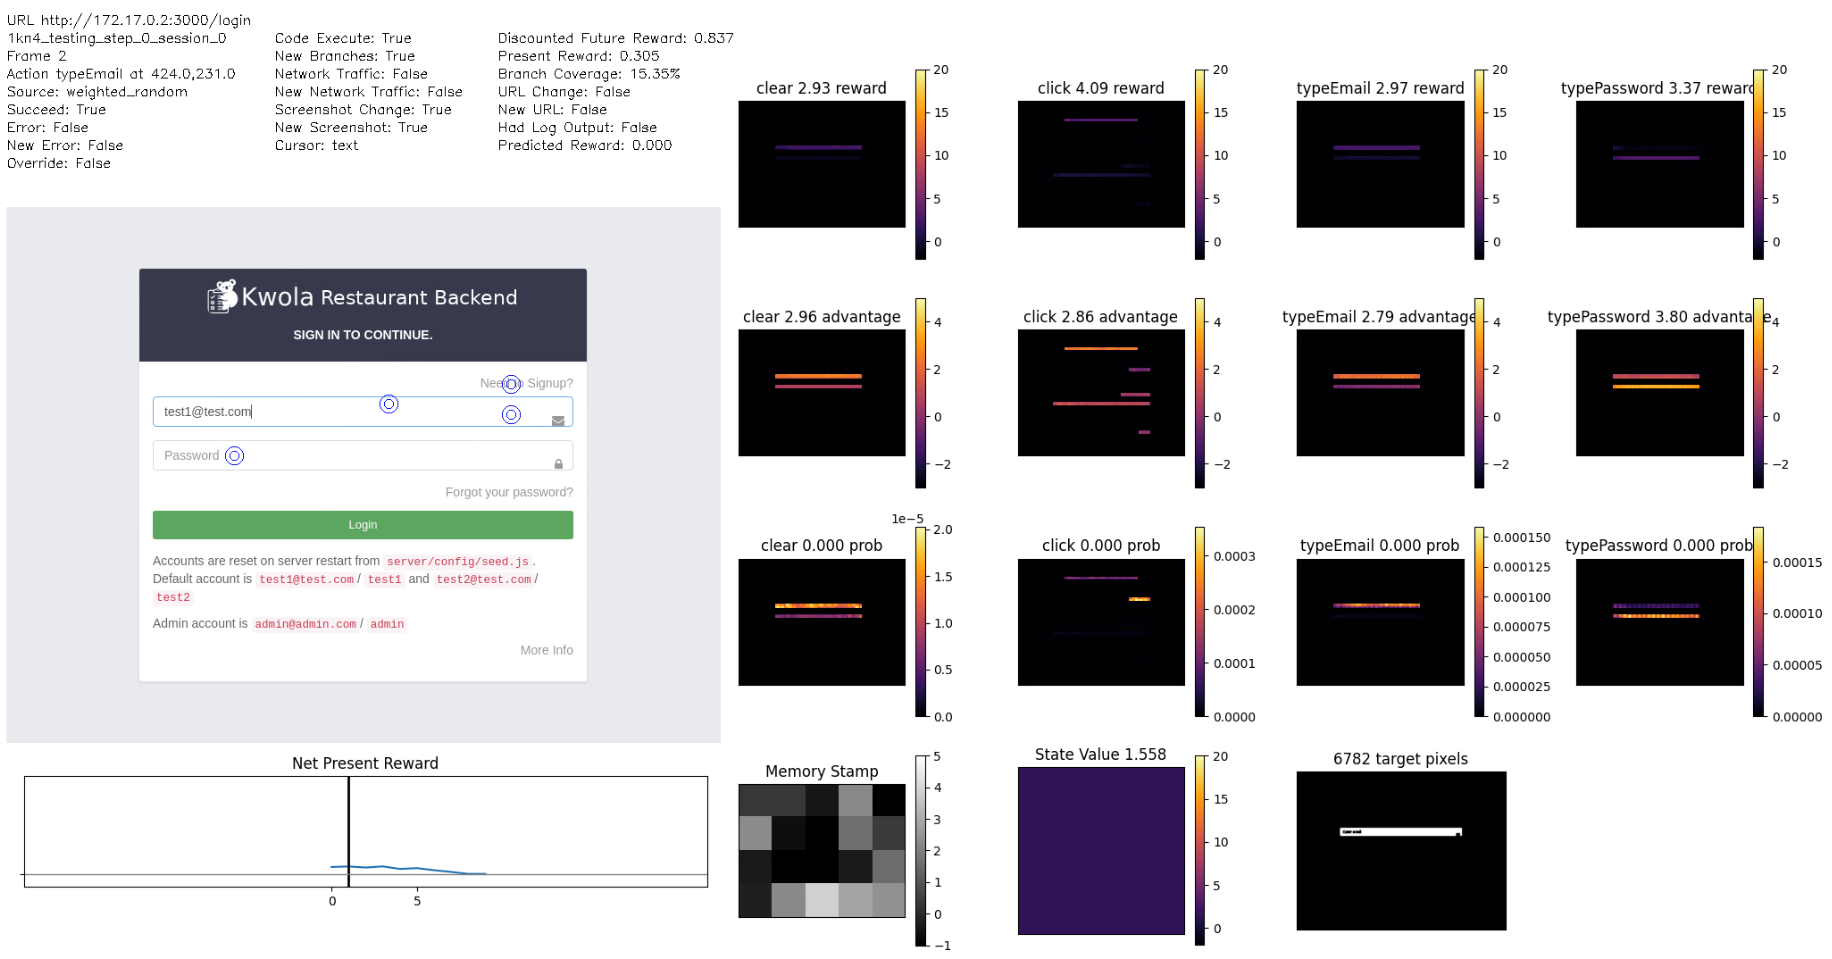
Kwola is an AI user that helps you find bugs in your software. Unlike conventional testing solutions like Selenium or Cypress, Kwola will learn to use your user-interface completely automatically, with no configuration. Kwola does not require you to spend tedious effort writing testing code or manually clicking through your app to double check it. Unleash Kwola on your URL and Kwola will be finding bugs in no time. In addition, Kwola provides you a video showing how to reproduce the bug and gives you the appropriate error messages & stack traces so you can track down the bug in the codebase.
Learn more at https://kwola.io/. Sign up for the Kwola Insider’s Development Newsletter (https://share.hsforms.com/11VTba-QcSYC6cS38VtFxUQ45177).

Installation
Dependencies
Python
Please go to https://www.python.org/downloads/ to download and install Python. You should also install the Python development headers, as some of our Python dependencies compile C / C++ code into Python modules.
At this time, Kwola requires Python version 3.6 or higher. If you run into issues, make sure are using the latest python version.
** IMPORTANT ** If you are installing on Windows, there are several errors that can occur if you either have multiple versions of Python installed, or have the 32 bit version of Python installed. Ensure that you have only a single, 64 bit version of Python installed or Torch, the neural network library, will have errors. In some instances, we have had to take the following steps with Python to get Kwola to work on Windows: - fully uninstall all versions of Python - find all folders called “python” in C:/ and delete them - find anything python related in the AppData folder of the user (such as ‘pip’ and “ProgramsPython”) and delete them - reinstall a fresh copy of the latest version of python, and specifically grab the 64bit only binary from the “Additional Downloads” section of the python website. When installing, use the “Custom” install, make sure pip is selected and that you want to install Python for all users.
On Ubuntu 18 LTS: sudo apt-get install python3-venv python3-dev
NodeJS
Please go to https://nodejs.org/en/ to install NodeJS or install it through a package manager appropriate for your distribution.
Chromium / Google Chrome
Please go to https://www.chromium.org/ to install Chromium (the open source version of Chrome), or go to https://chrome.google.com to install Google Chrome (you may have it installed already).
Chromedriver
Install chromedriver globally to your operating system. Go here: https://chromedriver.chromium.org/getting-started and install the binary appropriate for your operating system and which Chrome version you have installed.
On Windows, they don’t give you a proper installer. Its just a zip file containing a prebuilt executable. You need to put this executable in a folder thats on thr $PATH environment variable. So I usually just copy and paste the executable into the C:Windows folder.
On macOS, this article provides great installation instructions: https://www.kenst.com/2015/03/installing-chromedriver-on-mac-osx/. I’ve resigned to just installing it through Homebrew.
For example, I run the following on Linux with Chrome 80:
[user@localhost]$ wget https://chromedriver.storage.googleapis.com/80.0.3987.106/chromedriver_linux64.zip
[user@localhost]$ unzip chromedriver_linux64.zip
[user@localhost]$ sudo cp chromedriver /usr/bin/
Alternatively you can also install chromedriver just to your Python virtual environment.
Ffmpeg
You must install ffmpeg as it is used to compress the videos of Kwola interacting with the client program.
Please go to this url: https://www.ffmpeg.org/download.html to get instructions on how to install ffmpeg.
On macOS, if you have Homebrew installed (https://brew.sh/) then you can install Ffmpeg easily with:
[user@localhost]$ brew install ffmpeg
[linux / macOS] C & C++ Compiler
You need to install a c++ compiler, as it is used by some of the Python dependencies to compile highly efficient code.
On Ubuntu, you can run:
[user@localhost]$ sudo apt-get install build-essential
On Fedora, you can run:
[user@localhost]$ sudo dnf install gcc-c++
On macOS, you must install XCode or the XCode Command Line Build Tools get a compiler.
[windows] Visual Studio
Install visual studio community edition (or basically any version of visual studio) if you are using Windows.
Visual Studio is needed for the C++ compiler, used by some of our Python dependencies. Go here for the download instructions: https://visualstudio.microsoft.com/downloads/
[optional] Nvidia Drivers & Cuda
How you install NVIDIA Drivers depends on your operating system. You only need to install NVIDIA drivers if you are using GPUs. Using GPUs is recommended but optional, and you can do test runs with just the CPU.
Windows: Go here for instructions: https://docs.nvidia.com/cuda/cuda-installation-guide-microsoft-windows/index.html
MacOS: https://docs.nvidia.com/cuda/cuda-installation-guide-mac-os-x/index.html
Ubuntu: https://linuxconfig.org/how-to-install-the-nvidia-drivers-on-ubuntu-18-04-bionic-beaver-linux * Its recommended to stick to LTS releases for Ubuntu when doing high performance computing.
Fedora: https://www.if-not-true-then-false.com/2015/fedora-nvidia-guide/
[optional] Docker
Go here and follow the instructions to install Docker: https://docs.docker.com/install/
Docker not required for Kwola to operate but is used in some of the examples.
Installation Instructions
Create a virtual environment. Doing this is not 100% necessary, you can install Kwola globally, but there is a much higher likelihood of a package version conflict. Installing inside the virtual environment is the most reliable way to run Kwola. Run the following commands in your terminal on Linux / macOS or in PowerShell on Windows.
[user@localhost]$ python3 -m venv venv
[user@localhost]$ source venv/bin/activate
Install Kwola using pip.
[user@localhost]$ pip3 install kwola –upgrade –no-cache
Install babel-cli and the Kwola babel plugin globally. This makes it easier for the code to access the babel binary.
[user@localhost]$ sudo npm install @babel/cli -g
[user@localhost]$ sudo npm install @babel/core -g
[user@localhost]$ sudo npm install babel-plugin-kwola -g
Some users have been running into issues when they install the babel-plugin-kwola globally. Therefore, just run it a second time without -g to install it in your local directory for safe measure.
[user@localhost]$ npm install babel-plugin-kwola
We are still sorting out precisely what the cause of the issue is.
Lastly, if you are interested in connecting and debugging URL’s that will require a TLS connection (URLS with https:// in part of it), then you will need to install the certificate for kwolas mitm proxy as a trusted root certificate. This certificate is generated fresh for each kwola installation for security purposes, so if you reinstall kwola, you must reinstall the certificate. If you are on a computer with a full user interface with, you can do this easily using the following command:
[user@localhost]$ kwola_install_proxy_cert
If you are on a server machine, its a bit more complicated. On Ubuntu & RedHat systems, you can use the following commands to get the cert installed. First, generate the cert using the same install proxy cert command, but with a 1 at the end. The 1 forces it to exit immediately.
[user@localhost]$ kwola_install_proxy_cert 1
Next, use the certutil program to install the certificate into Chromes certificate repository:
[user@localhost]$ certutil -d sql:~/.pki/nssdb -A -n ‘mitm.it cert authority’ -i ~/.mitmproxy/mitmproxy-ca-cert.cer -t TCP,TCP,TCP
If you have issues, you can read more on the website for mitmproxy:
https://docs.mitmproxy.org/stable/concepts-certificates/
That’s it! Kwola should now be installed. You can verify your Kwola installation using tools that are bundled with Kwola. These tools are provided as diagnostics that seperately test each of the major Kwola components / dependencies. We also provide a single command that runs a short, preconfigured end-to-end test of Kwola. These tests are intended to be used to check that you have installed everything correctly.
First, check to make sure that Kwola is able to start headless browsers. This command tests that Chrome & chomedriver are installed and Kwola is correctly finding and running the binaries.
[user@localhost]$ kwola_test_chromedriver
Next, check to make sure that NodeJS, Babel and the javascript code transpiling is working correctly.
[user@localhost]$ kwola_test_javascript_rewriting
If that is looking good, its time to test the neural network. This will check to see that pytorch is installed and that Kwola is able to run on your CPU & any GPU’s installed without any issues.
[user@localhost]$ kwola_test_neural_network
Lastly, test to make sure that your kwola installation is able to run ffmpeg. ffmpeg is used for saving videos and is a critical process.
[user@localhost]$ kwola_test_ffmpeg
If all four of those commands are successful, you can now run an end-to-end test suite. This next test suite will do a very short test sequence against the Kwola demo URL. It should take just a couple minutes to complete.
[user@localhost]$ kwola_rapid_local_test_suite
If this completes successfully, then your Kwola installation is working. You are now ready to unleash Kwola onto your own URL. If you still experience issues, that likely means that there is a bug in Kwola itself and its not related to your environment or installation. Please submit an issue through Github and attach as much information as you can. Thanks!
Side-note, if you are interested in running the full end-to-end test suite for Kwola, please run the following command:
[user@localhost]$ kwola_full_internal_test_suite
Usage
Running Kwola is very straightforward. First activate your virtual environment:
[user@localhost]$ source venv/bin/activate
To initiate a Kwola testing session, run the following command. Make sure to replace the URL with the url pointing to the website you want to start testing. The URL must be a complete, fully validated url containing the http:// part and everything.
[user@localhost]$ kwola http://demo.kwolatesting.com/
Kwola will now start testing your application! Its that easy. Kwola will create a directory to hold all of its results in your current directory. You can cancel the run simply using Ctrl-C or Cmd-C in your terminal. If you want to restart the run, simply run kwola with no arguments:
[user@localhost]$ kwola
Or alternatively, you can run Kwola and give it a specific directory containing a Kwola run. This allows you to restart specific runs.
[user@localhost]$ kwola kwola_run_1
If you want to just quickly test Kwola, use our live restaurant testing demo, available at http://demo.kwolatesting.com/ You may want to visit it in your browser first to warm up the server its running on before running the console command.
You can use Kwola with any of our example codebases if you have Docker installed:
[user@localhost]$ docker run docker.io/kwola/kros-1
[user@localhost]$ kwola http://172.17.0.2:3000/
You will then see Kwola running on our restaraunt backend sample codebase.
Support
Kwola is maintained by Kwola Software Testing Inc, a Canadian company. We appreciate the feedback and support we have received to date. We actually rely on it to move this project forward. Let us know who you are by following us on Linkedin (https://www.linkedin.com/company/kwola), Twitter (https://twitter.com/kwolaINC), or sign up for our newsletter (https://share.hsforms.com/11VTba-QcSYC6cS38VtFxUQ45177).
You can contact the authors at any of the following emails: quinn@kwola.io, brad@kwola.io or daniel@kwola.io
Roadmap
Oh boy there is a lot of stuff on the roadmap for Kwola. Too much to write down today.
Contributing
We are absolutely open to contributors. If you are interested in Kwola, please reach out to brad@kwola.io via email and we will get in touch. We will accept any contributions so long as the copyrights are transferred to the Kwola Software Testing company.
Or alternatively just throw up a pull-request. That always gets peoples attention ;)
License
The project is licensed GPLv3 Affero.
Project status
As of February 2020, the project is just getting started. We are open to anyone who wants to join!
Release history Release notifications | RSS feed


Download files
Download the file for your platform. If you're not sure which to choose, learn more about installing packages.
Source Distributions
Built Distribution
Filter files by name, interpreter, ABI, and platform.
If you're not sure about the file name format, learn more about wheel file names.
Copy a direct link to the current filters
File details
Details for the file kwola-0.1.52-py3-none-any.whl.
File metadata
- Download URL: kwola-0.1.52-py3-none-any.whl
- Upload date:
- Size: 300.7 kB
- Tags: Python 3
- Uploaded using Trusted Publishing? No
- Uploaded via: twine/3.2.0 pkginfo/1.5.0.1 requests/2.24.0 setuptools/50.3.0 requests-toolbelt/0.9.1 tqdm/4.49.0 CPython/3.6.9
File hashes
| Algorithm | Hash digest | |
|---|---|---|
| SHA256 |
6c807fffc8404347f41917d69728d3bca763415ce305f4ab635293977ad8cb76
|
|
| MD5 |
a92b5626204af6ba390c9130b7ef9ba7
|
|
| BLAKE2b-256 |
c7cc0e763599b2968da63e7776c62ff508cbb9141f3601f93113c4fc44f91cba
|


