Clean minimal text-annotation tool - with buildt in control of Inter-Annotator Agreement

Project description
labton - 0.1.8
What's this then?
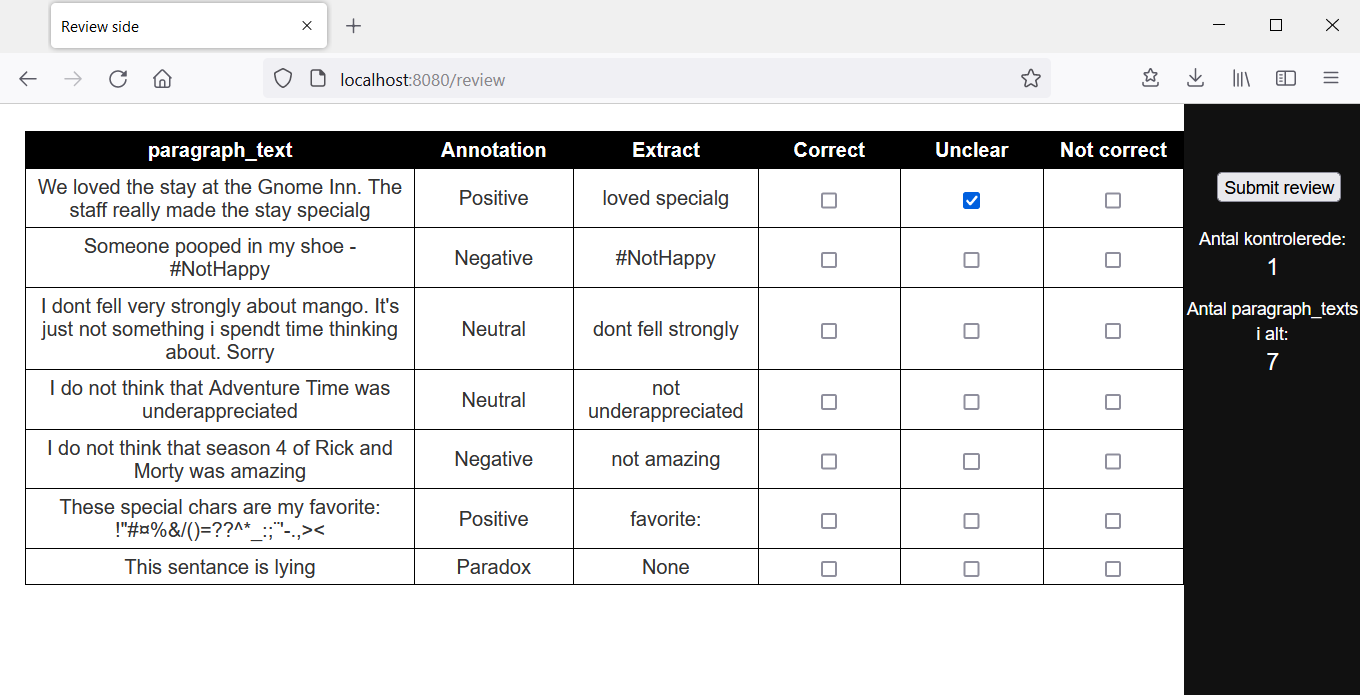
Labton (LABeling TOol Now!) is an OpenSource annotation tool for creating text data sets for machine learning models. The length of the paragraphs to annotate is defined by you. Labton also allows for extraction of words in the given pargraph - thus the labels of the paragraph can be a word from the paragraph. You can also use Labton to help control Inter-Annotator Agreement (ie. securing that your annotaters agree on the defined classes).
But why?
This tool is thus used in order to create a labeled data set of text. As such this library is for you if you:
- Are aiming to build a text-classifiaction or -extraction algorithm, and are putting together a dataset.
- Need high quality of the labels (secure Inter-Annotator Agreement)
- Want a webpage that can be used to annotate your text both on PC and smartphone.
- Prioritize getting up and running fast and efficiently (can be done in seconds if the data is ready)
- Actually wanted to use prodigy but need to do a proof a concept before spending the money;)
The following is a standart structure for the development of a NLP-project:
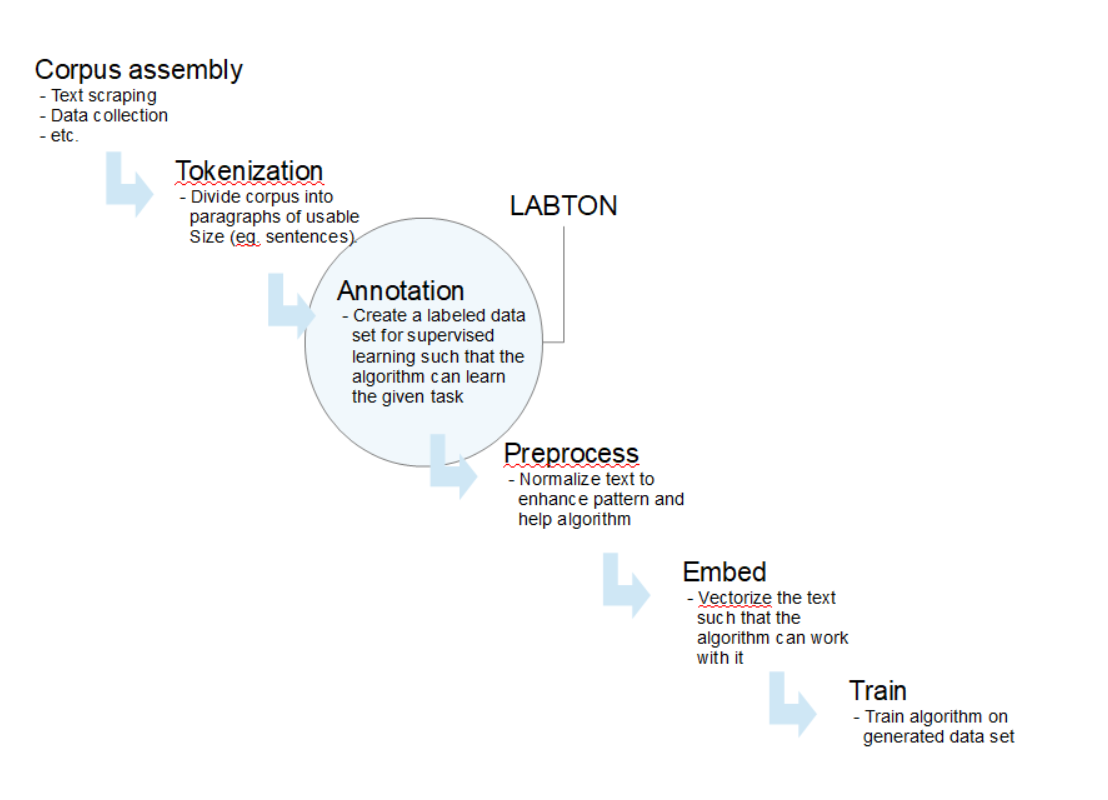
Labton is developed such that there is a painless integreation from the stages before and after the data annotation step. This is done by making both data integration and data extration possible within the same environment ie. a python IDE such as Jupyter Notebook.
How does it work?
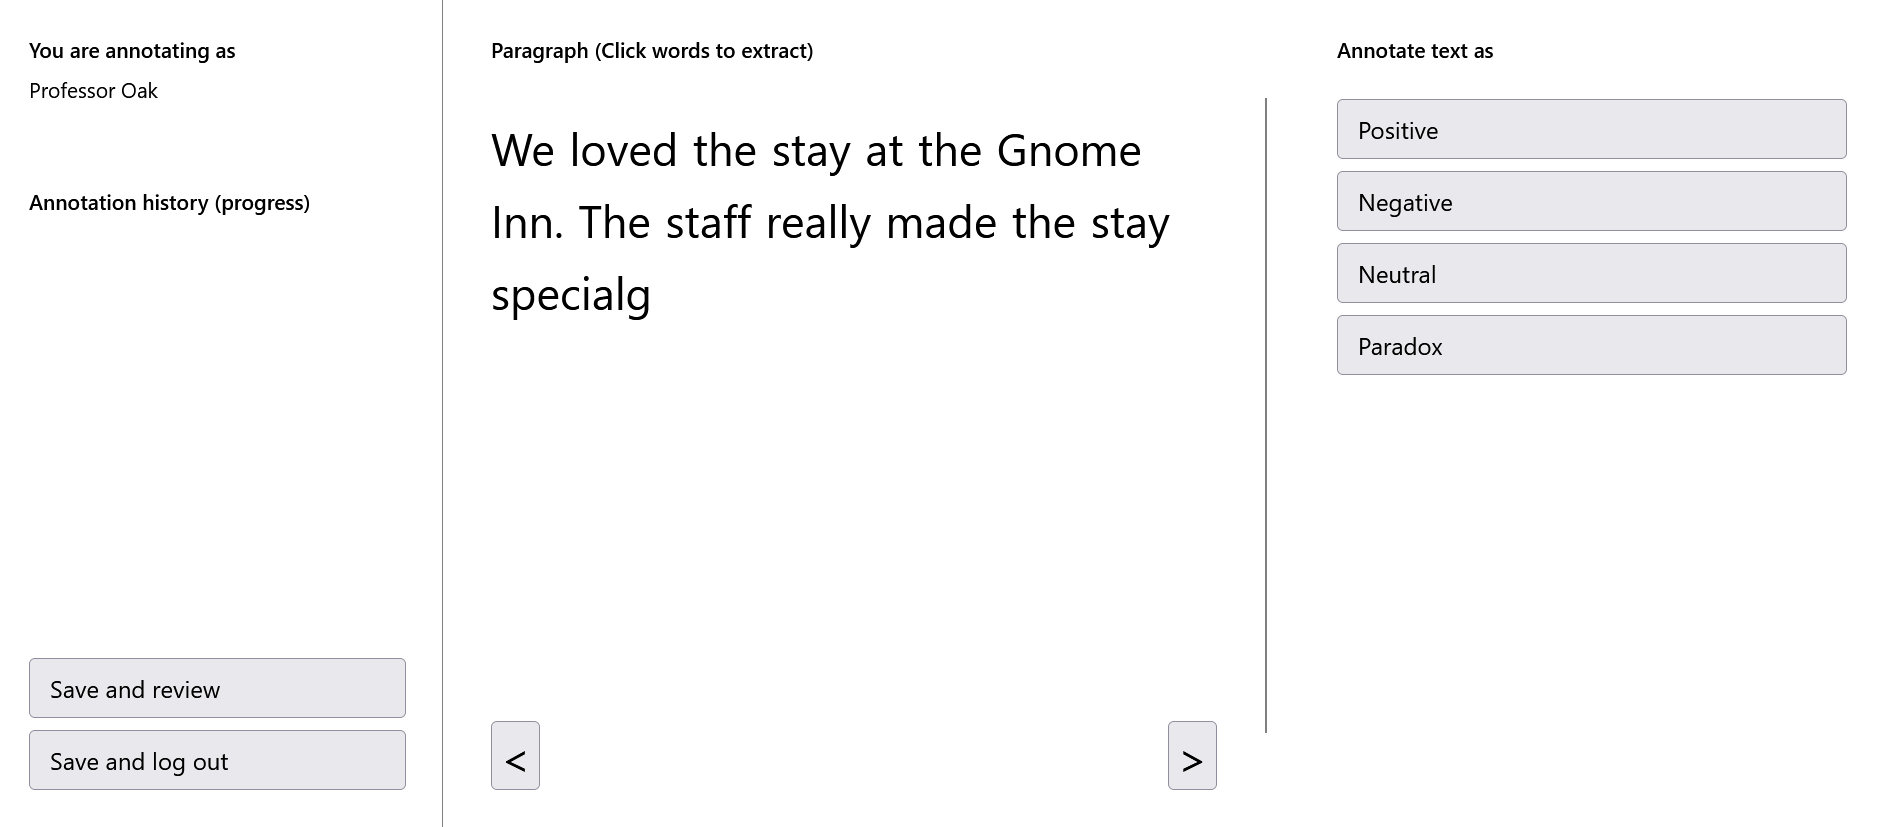
The Python library includes an easily deployable Flask web app that allows one to annotate the text in self defined classes. The app can be deployed directly from a Terminal or through a Jupyter Notebook for lighter annotation tasks. The classes, and many other aspects of the app, are easily configurable either via python or through YAML configguration files.
The data can be easily uploaded to the app. This can be done by directly pointing to a .cvs file (and specifying the delimiter) or by simply feeding in a Pandas Dataframe (and specifying the text column). The app will then structure the data and present one segment at a time for human classification in the UI.
How do I get started in a jupyter notebook (access localy)
Firstly pip install labton in your virtual environment of choice
From there simply open jupyter notebook and run the following from a cell.
In order to test the interface, with sample data from the package, simply instantiate and run the App object without any data source or classes
from labton.annotation_app import App
App().run()
The app should now be running at localhost:8080
Type any name to login (no password needed for now)
When you've verified that Labton is useable for your usecase you can go ahead and boot up the app with your own data like so:
from labton.annotation_app import App
app = App(data_source='<your data source>, classes=<your list of classes>)
<your list of classes> is a list contatining the classes you want to classify the text into. For a tweet sentiment classifier this could look like: classes=["positive", "Negative", "Neutral"]
<your data source> can either be a path to the .csv file or alternatively a pandas.DataFrame.
If a it is a Datafame the column_name of the column contatining the text needs to be defined. If a .csv file only contating the text, then the delimiter of the files need to be fed to the App object as csv_sep.
You can also set the project_name (used when running many projects from the same environment), the port, the directory you want the config- and data files created in, along with many other setings.
In order to boot up the server and start annotating simply run:
app.run()
The jupyter notebook will be occupied as long as the server is running. You can start the server again and it will continue where you left from.
At any point in the process you can extract a copy of the data as a pandas.DataFrame like so:
from labton.labton_backend.helper_funcs import get_labton_data
df_labeled_data = get_labton_data()
If you have given a your project a custom project_name hand this to the get_labton_data function in order to load the data from the correct database file.
How do I get started with running application on server (access from internet)
If you don't already have an intenet facing server I can recomend starting a free account on pythonanywhere) and booting up a server.
From here simply:
- Go to the terminal
- Create and activate a virtual environment (optional)
pip install labtonorpython3 -m pip install labton
In order to test the interface, with sample data from the package, simply go to the folder where you want to initialise the project and run the library as so:
python -m labton
This will create a folder for the config files and a folder for data base files and start the server with a few test sentances.
The server can now be accessed locally for a testrun at localhost:8080
You can now configure the YAML file found in the projects_config_files with the port, host, etc. that mathces your firewall configurations.
TODO: Add easy functionality and walkthrough for how to setup a python anywhere app
Release history Release notifications | RSS feed


Download files
Download the file for your platform. If you're not sure which to choose, learn more about installing packages.
Source Distribution
Built Distribution
Filter files by name, interpreter, ABI, and platform.
If you're not sure about the file name format, learn more about wheel file names.
Copy a direct link to the current filters
File details
Details for the file labton-0.1.10.post11.tar.gz.
File metadata
- Download URL: labton-0.1.10.post11.tar.gz
- Upload date:
- Size: 348.0 kB
- Tags: Source
- Uploaded using Trusted Publishing? No
- Uploaded via: twine/4.0.1 CPython/3.9.15
File hashes
| Algorithm | Hash digest | |
|---|---|---|
| SHA256 |
8af3cd2da7e6f151cec2619c770937d6ee3da00e4d61955439ee6db21d762c7c
|
|
| MD5 |
b34b853f2fd2d051ef0d7ec80b480fb3
|
|
| BLAKE2b-256 |
803c2d3fdc58bd6ca602227c21c99a8a693f6cf982586ea6b80e242e884e68af
|
File details
Details for the file labton-0.1.10.post11-py3-none-any.whl.
File metadata
- Download URL: labton-0.1.10.post11-py3-none-any.whl
- Upload date:
- Size: 336.1 kB
- Tags: Python 3
- Uploaded using Trusted Publishing? No
- Uploaded via: twine/4.0.1 CPython/3.9.15
File hashes
| Algorithm | Hash digest | |
|---|---|---|
| SHA256 |
9f87b7e2f60a3c406a0c7dbeeb84172f6d80252a18c9950e5b414d651349876a
|
|
| MD5 |
6c9c23f030779246a8a4cc461861f76c
|
|
| BLAKE2b-256 |
1441df88f7a9834bc5f286666248adfe2794fc5274d2e7f2f0b966fb7d54fe53
|


