
This release has been yanked by its maintainers, and will be ignored by installers, except when explicitly specified.
Consider using release 0.2.5 instead.
Reason given by maintainers: Linux-only bug in folded joints; use 0.2.3
Lamina








Turn a 3D model into flat parts you can cut, and check that they go back together.
Lamina is a free replacement for Autodesk's discontinued Slicer for Fusion 360. Load a model, pick a construction technique, and it computes every part, checks the assembly as a physical object (and fixes or explains what does not work), nests the parts on your sheets and exports cut files for a laser, CNC router, plasma table or vinyl cutter. It runs on your own machine; your models never leave it.
A quick word about the word "slicer", because it trips almost everyone up: this is not the 3D-printing kind. Lamina works out the flat pieces — layers, stacked slices, egg-crate slots, ribs, or a whole surface unfolded flat — that you cut from plywood, acrylic, cardboard, paper or steel and then put back together into the shape.
▶ Try it in your browser now
No install, no account, nothing uploaded — the Python runs in your own browser.
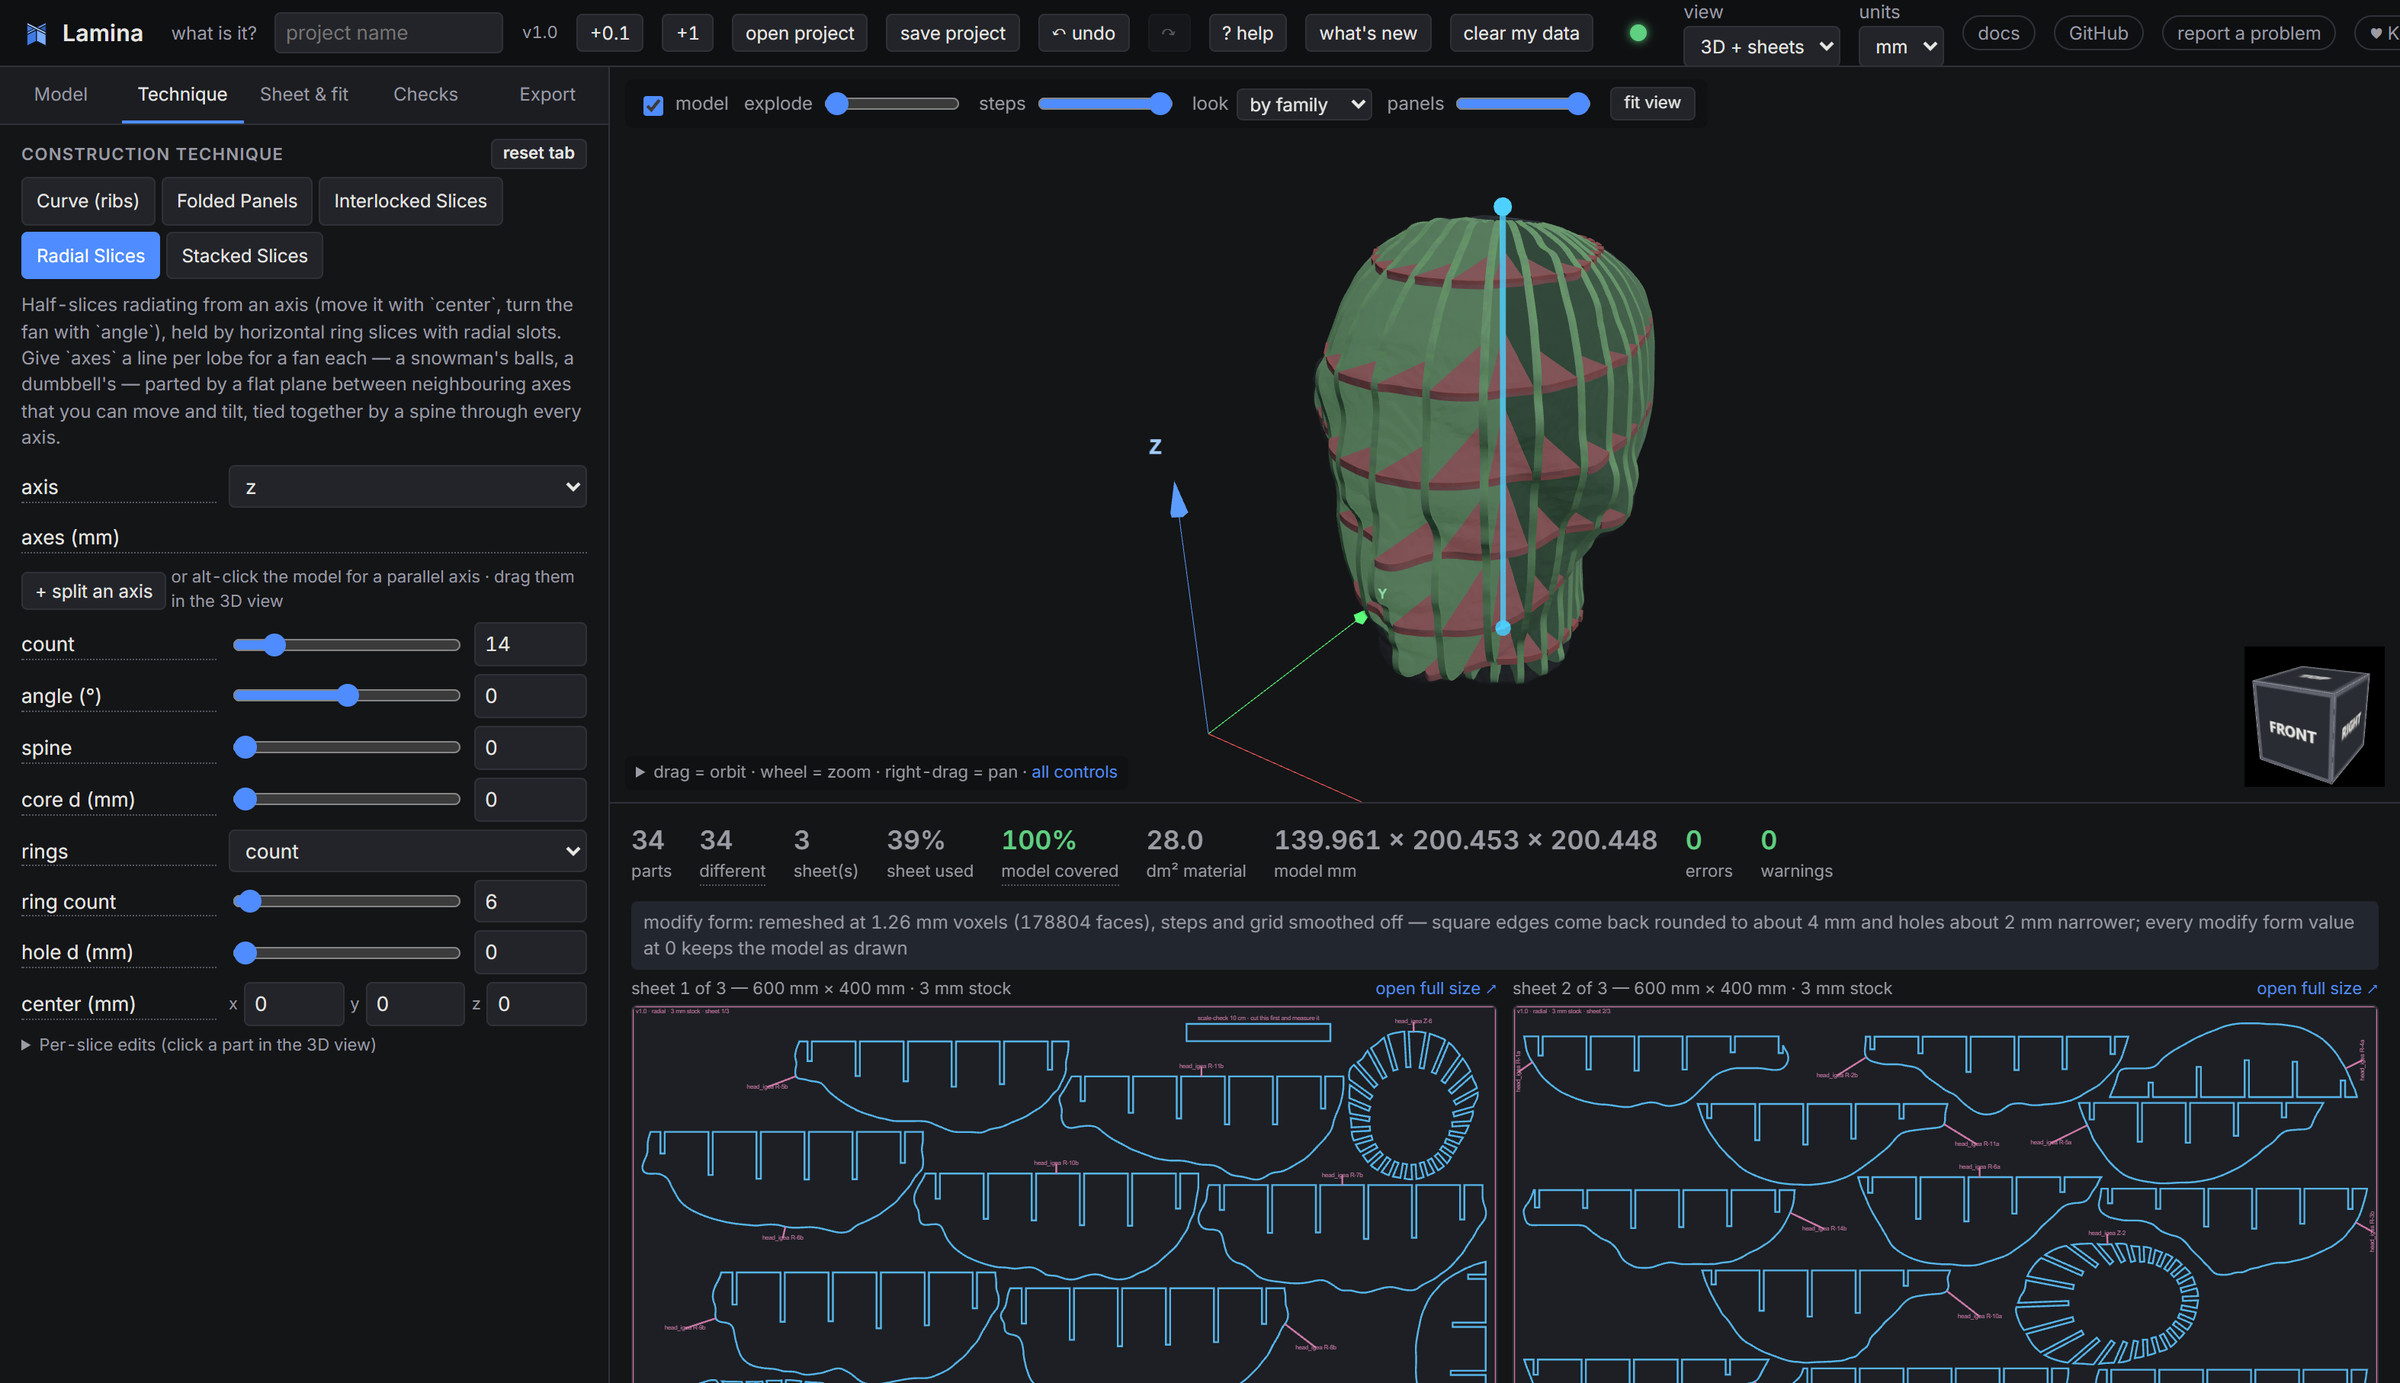
Landing page with screenshots and clips · parity with the original, option by option · how the unfolding works
The five ways to build a model
Each one is a clip on the landing page; the stills below are the same scenes.
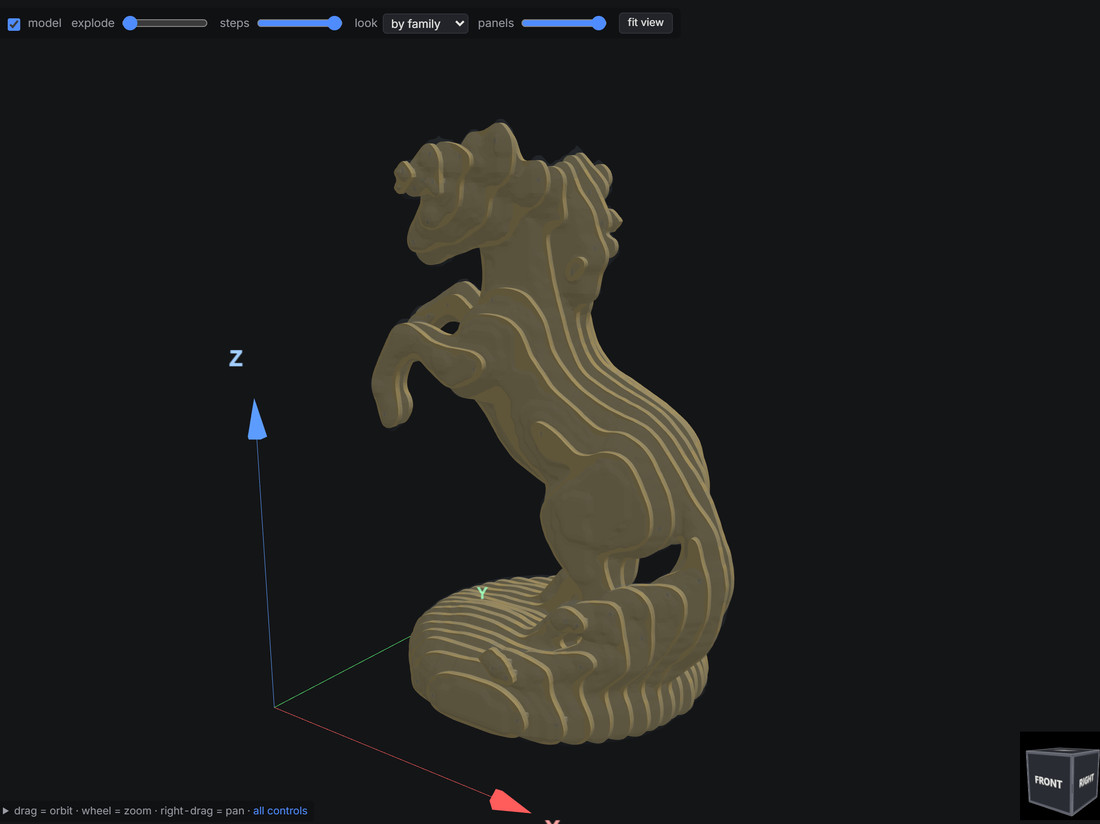 Stacked — parallel sections, touching or spaced, held by dowels, pegs or spacers |
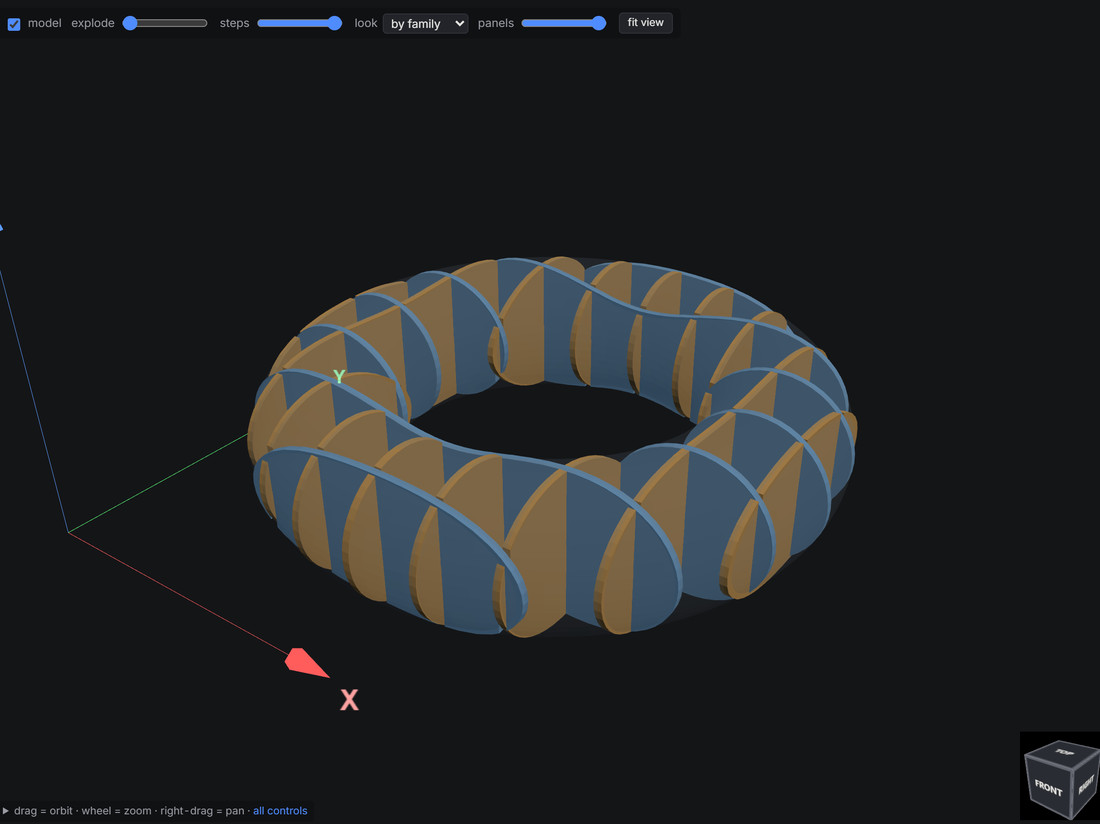 Interlocked — two slotted families, egg-crate |
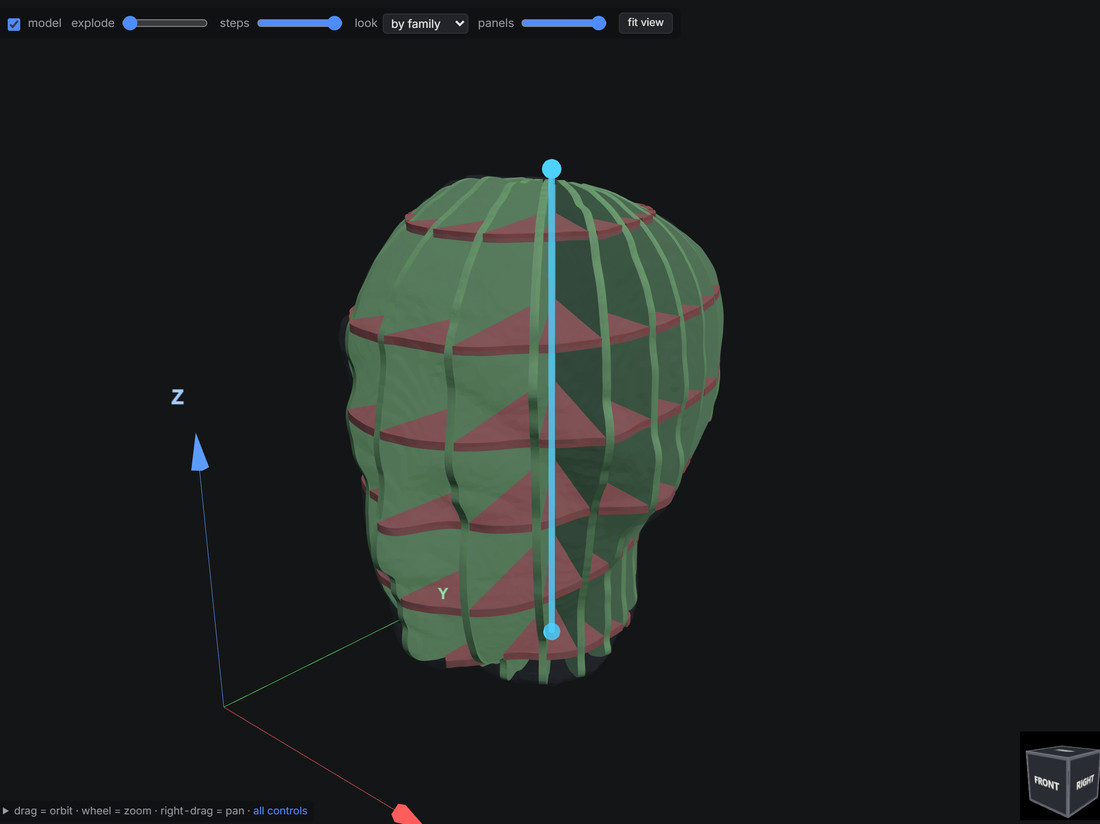 Radial — half-slices around an axis, locked by rings |
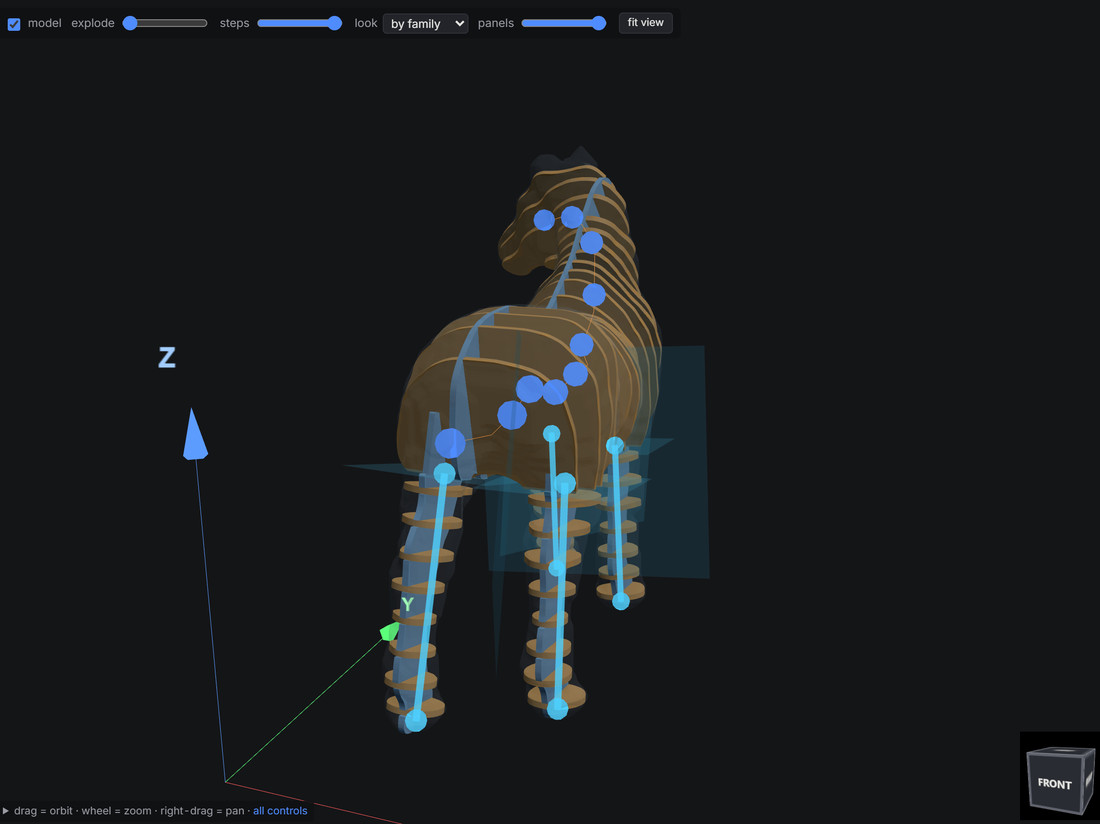 Curve — ribs that follow a bend, not the grid |
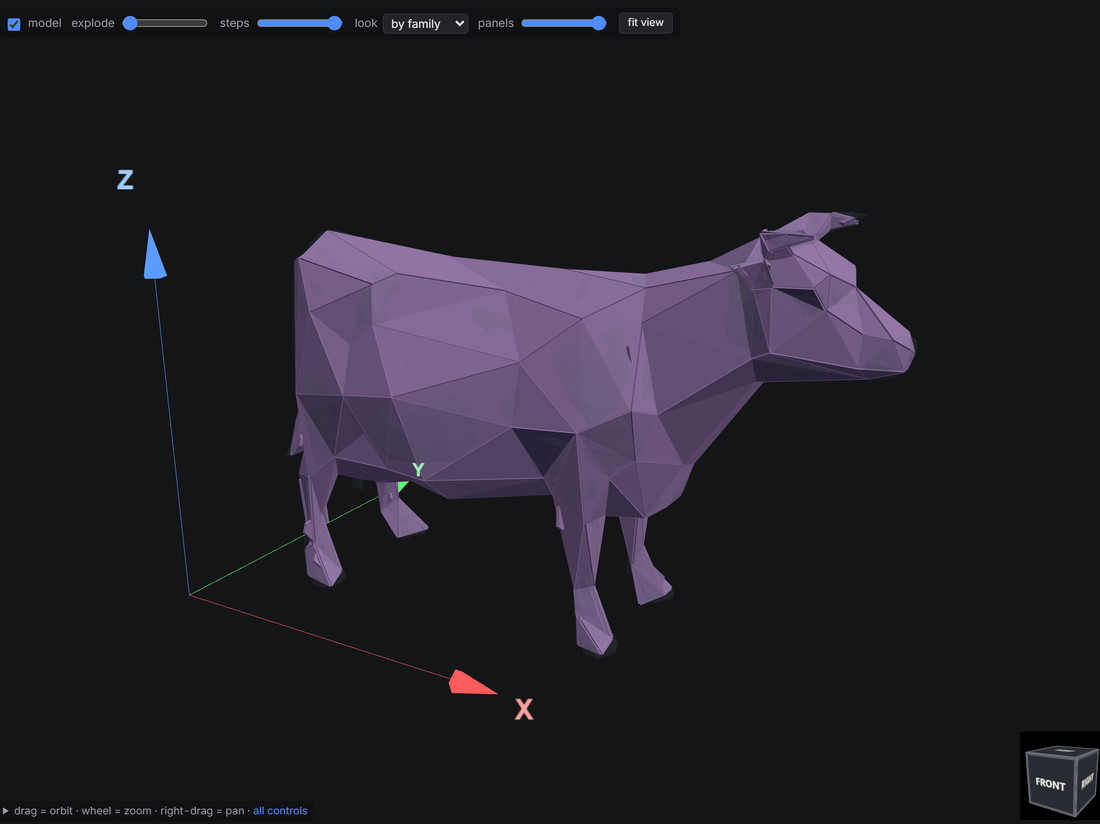 Folded — the surface unfolded flat, with 13 joint types |
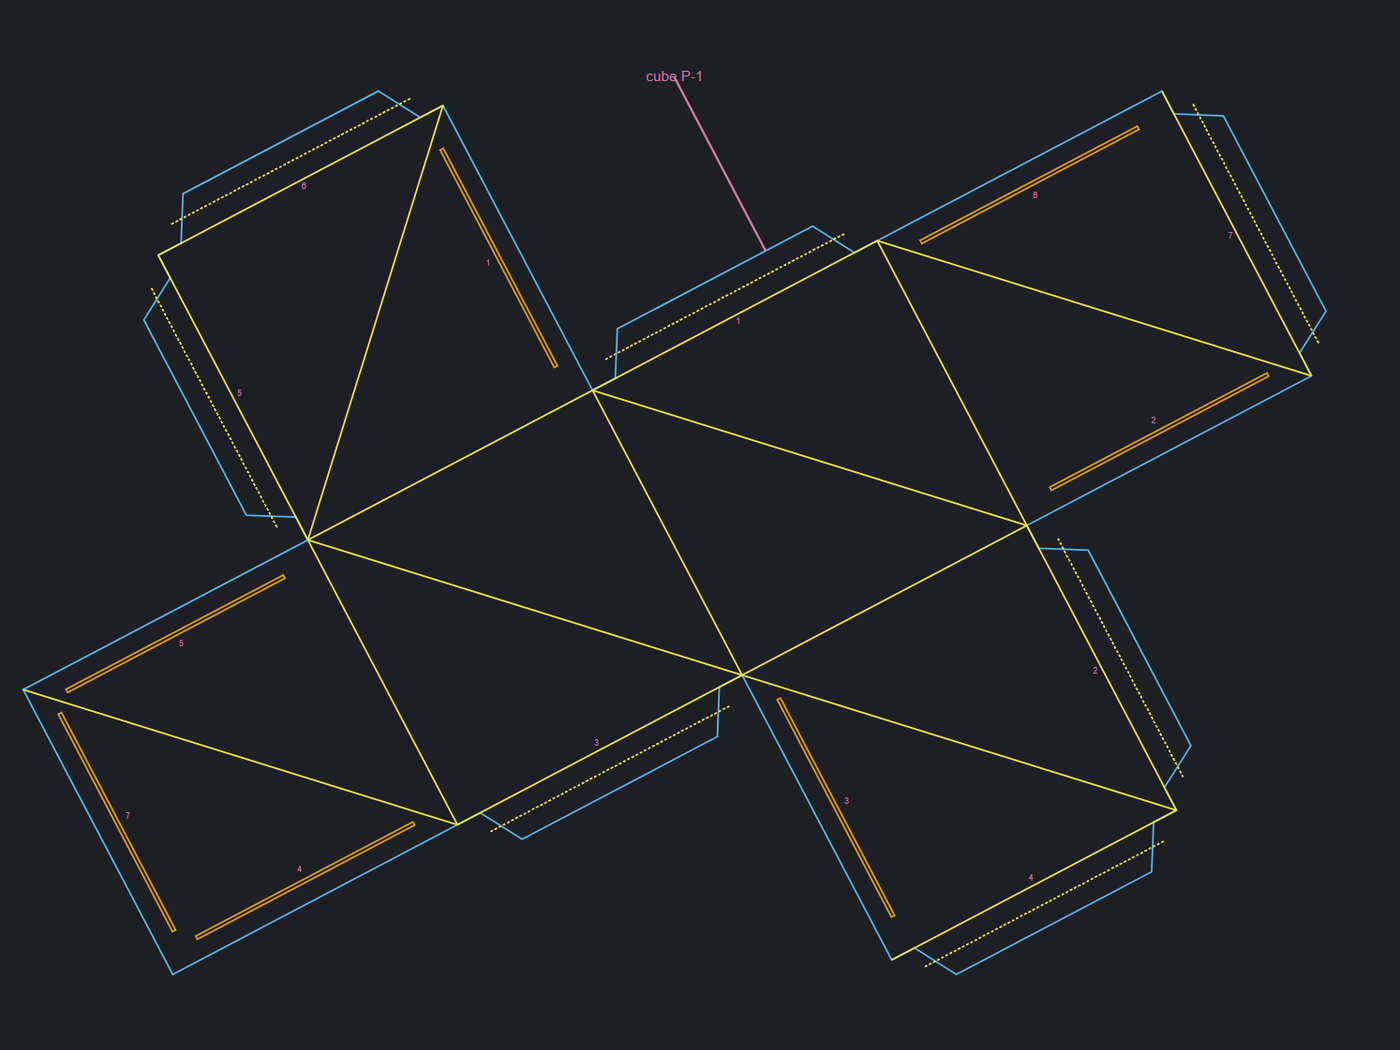 Thirteen joints — seam, tab, gear, tongue, puzzle, laced… |
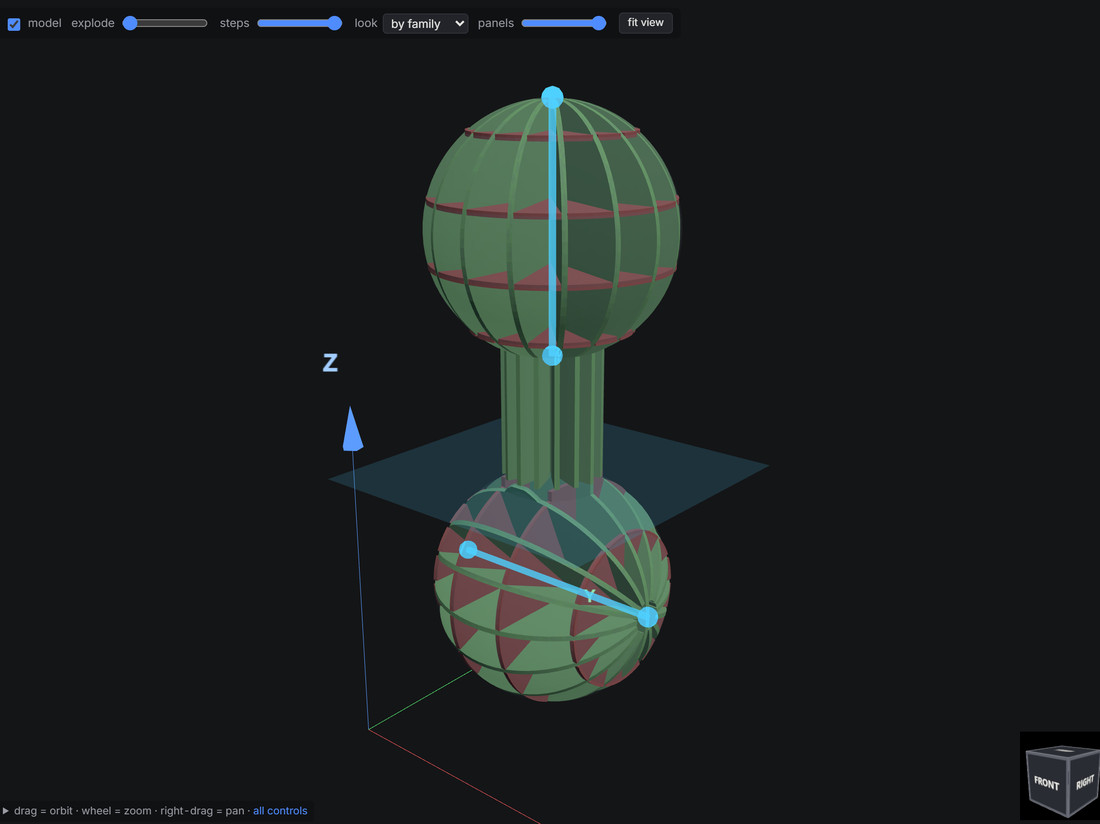 Radial, an axis per lobe — a fan per ball, one spine through all of them |
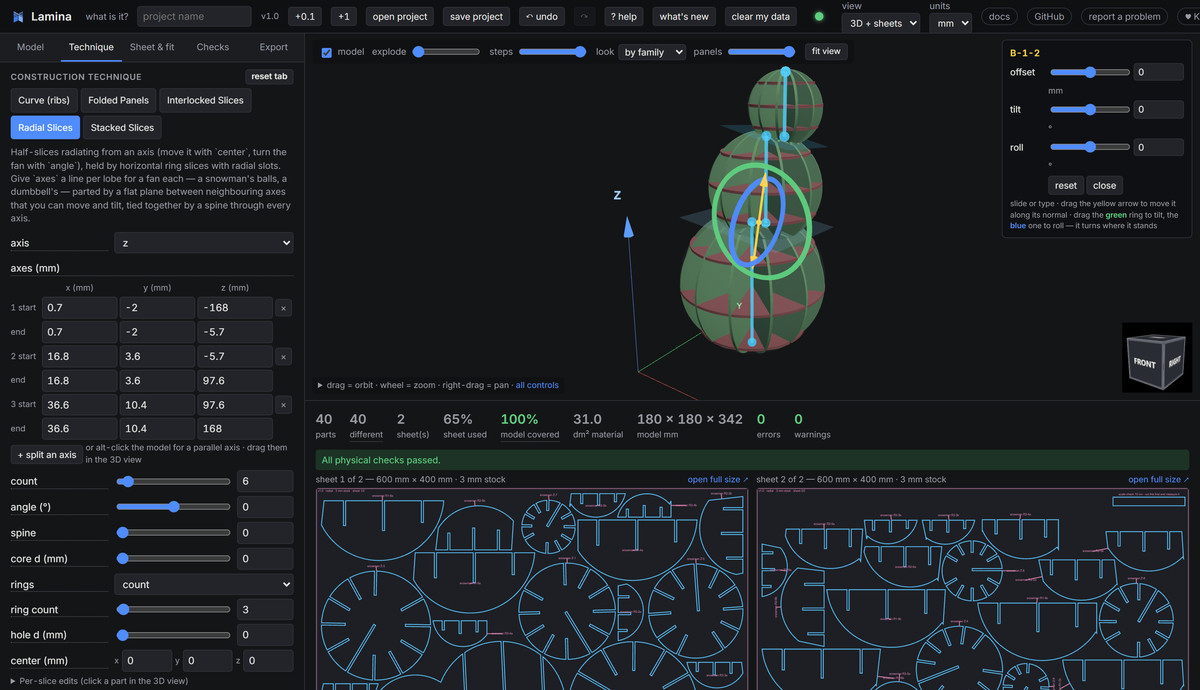 Where lobes meet — a plane you select, move and tilt like any slice |
What it checks, and what you get
 |
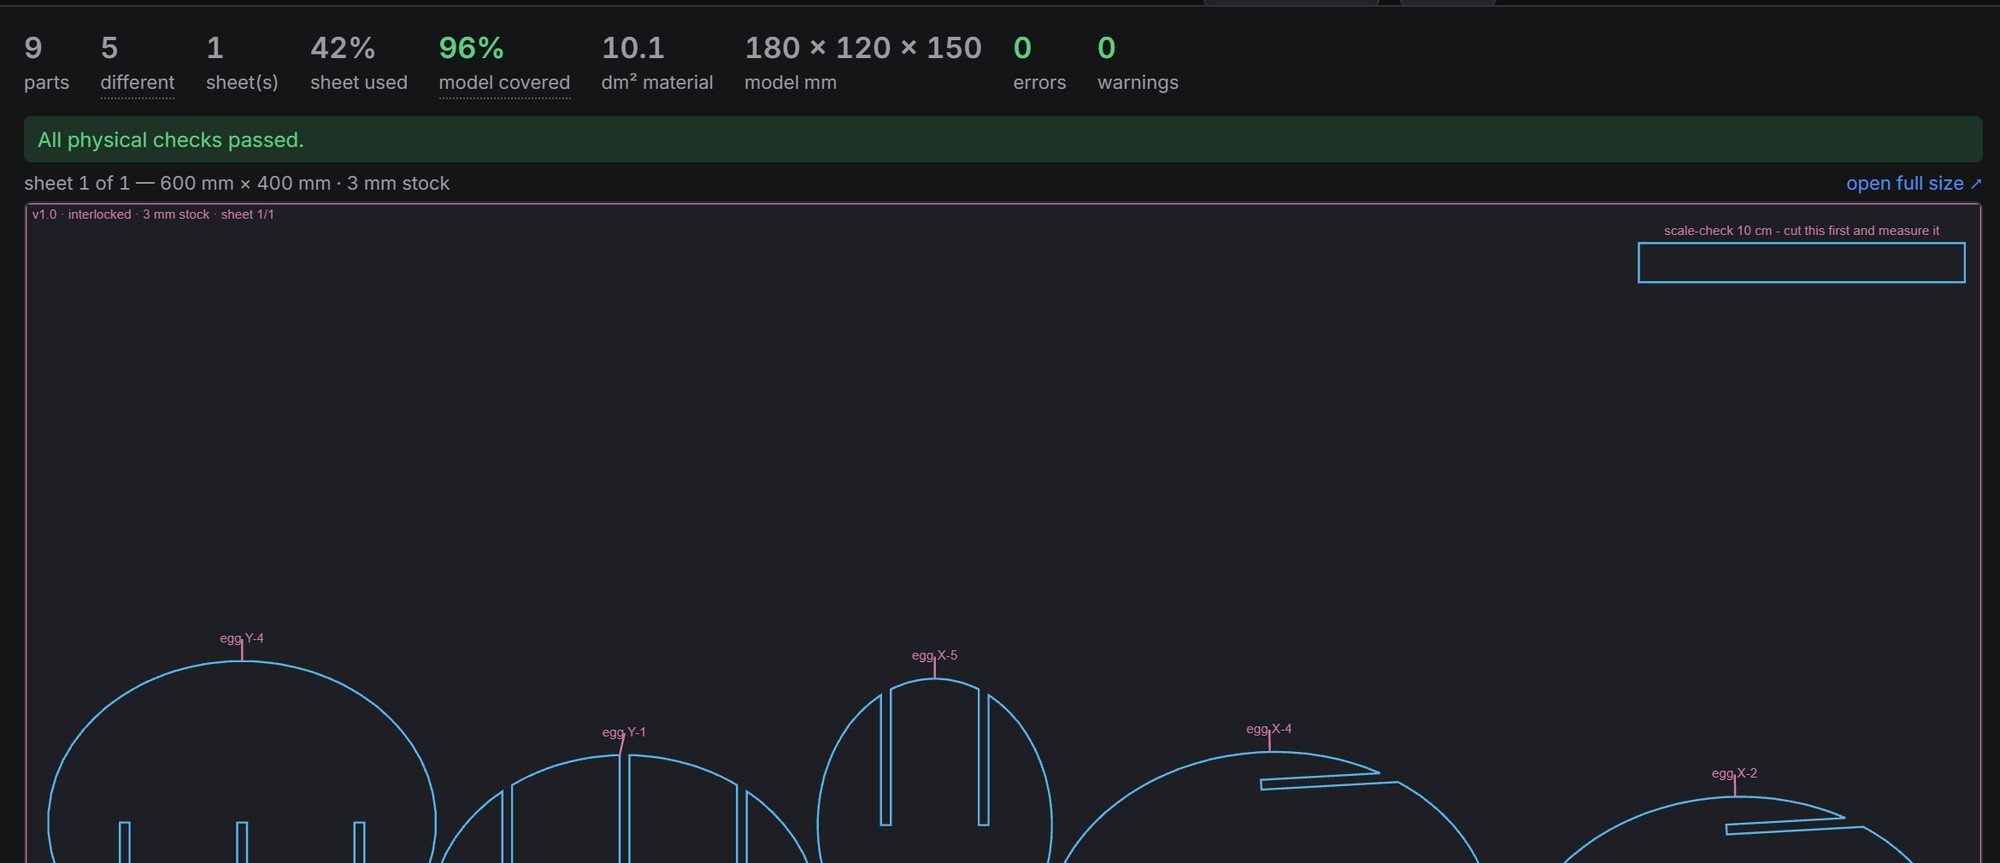 |
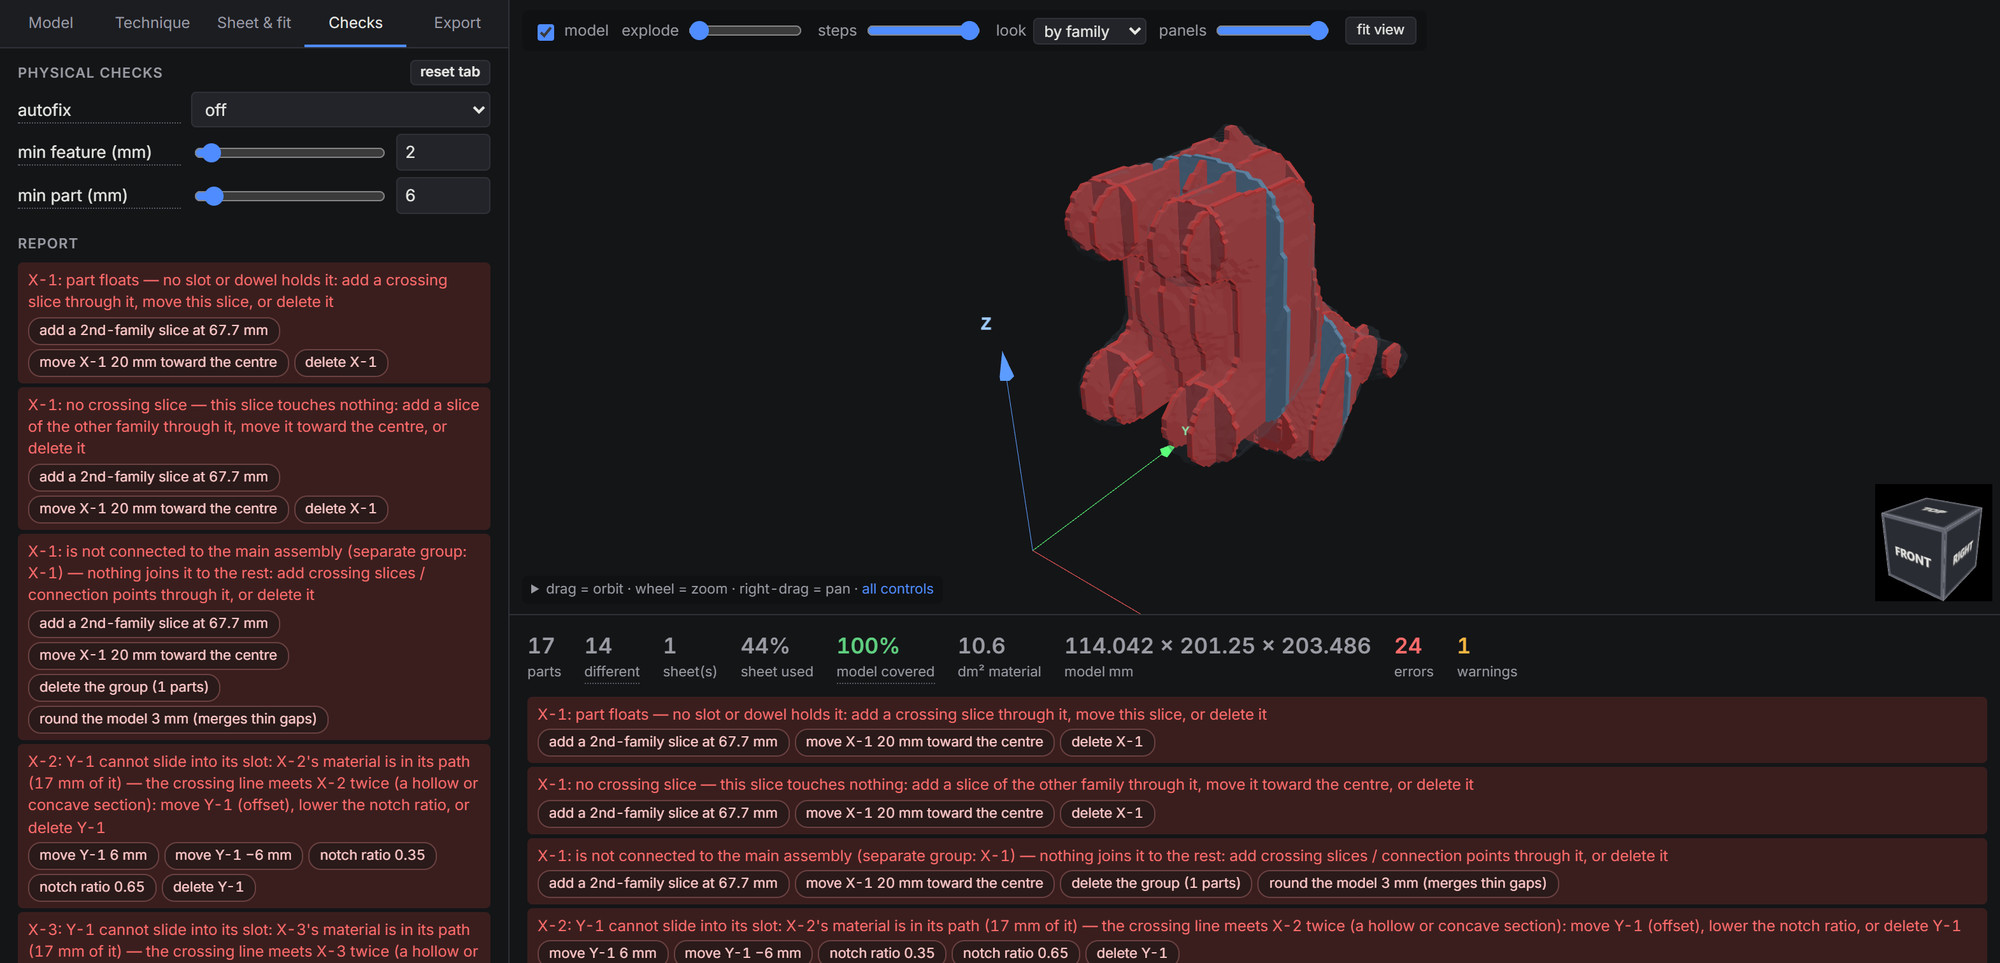
| Before you cut, every part is checked as a physical object: too thin, severed by a slot, held by nothing, larger than your sheet — most with a one-click fix. | Nesting and cut files: parts packed against each other's outlines, engraved labels, and SVG, DXF, PDF or EPS with the usual cut / score / engrave layers. |
(GitHub renders stills only. The moving versions of all of these are on the landing page.)
Why it exists
I built sculptures with Autodesk's Slicer for Fusion 360 for years. It is discontinued, it was hard to use, it is old, and it never had the parameters I actually needed — I kept wanting to do more than it allowed. I looked for something with the same possibilities and found nothing, and nothing open source that I could improve myself. So I started from the use cases I had, every project I had actually made or wanted to make with it, and built those. So far it has been a pleasure to use: projects that sat in my backlog for years are getting made because the part between the model and the cut files no longer fights back.
I hope it is useful to you too. If you make something with it, share it — show what you made on the Export tab or the landing page sends a photo by email (or the gallery issue form), and with your OK it goes in the gallery, credited as you like. Or post it on Instagram or X with #applamina.
About how it was made. A large part of this code was written with AI assistance, directed and reviewed by me. I am conscious of what that costs, in energy and in its wider effects on people and nature, and I try to use it deliberately. What it made possible is that a tool I had wanted for a long time exists, works well, is open source under the AGPL so nobody can close it, and can put a little more art, beauty and playfulness into the world. That trade felt worth making; you are welcome to disagree, and to make it better.
Status: early days — and this is where you come in
Lamina is very new. It is an alpha, written by one person, and it will do things you do not expect yet. Every construction technique of the original is in and the physical checks go further than it ever did, but there are certainly bugs in here that I have not met.
Please go and find them. If something breaks, comes out wrong, or simply annoys you, I would love to hear about it — every report makes the next person's cut come out better, and it is the quickest way this gets genuinely good. Nothing is too small to mention.
One habit worth keeping while it is this young: read the checks, and test-cut using the calibration bar on every sheet before you commit expensive material.
Found a bug? There are two ways to say so, and neither is better than the other.
- report a problem, in the app's header and on the landing page. Write a sentence and it fills in the rest:
the technique, every setting, what the checks said, and — unless you untick the box — the model itself, saved
ready to attach, which is what makes a report reproducible. It shows you exactly what it has gathered, then
opens either a prefilled email to
lamina.3d.app@gmail.comor the prefilled GitHub issue form, and you press send. Email needs no account anywhere; an issue is public, an email is not. - The issue form, filled in by hand. It asks for the model and the settings that reproduce the problem; the quickest way to give both is save project in the UI, which writes one file with the model embedded and every parameter in it — the same file the button attaches.
A machine or material that cuts well for you? Each has a share button beside it on the Sheet & fit tab that sends that one thing the same two ways (email, or the machine or material issue form): a machine's kerf, slot offset, corner relief, tool diameter and bed; a material's thickness and sheet sizes. Nothing else travels. A machine that is not on the list: set the numbers, press + beside the machine to keep it under its own name, then share it. They are added to the built-in lists by hand, so the next person with the same one starts from your numbers.
Quick start
Never used a terminal? You do not need one. Download the ZIP, unzip it, and double-click the starter for your computer in the folder that appears:
| your computer | double-click this |
|---|---|
| Windows | Start Lamina (Windows).bat — SmartScreen may ask: More info → Run anyway |
| macOS | Start Lamina (Mac).command — if it refuses: right-click → Open → Open |
| Linux | Start Lamina (Linux).sh — mark it executable and choose "Run in Terminal" |
It asks once whether it may install uv (a small tool that fetches Python and the
libraries into your own user folder), downloads them — a few minutes, once — and opens
http://localhost:8000. Leave the text window open while you work; closing it stops Lamina. Every start checks for
a new release and installs it (Updating). There is no signed
.dmg/.exe installer: Apple and Microsoft both charge yearly for the signature a free tool would need, so the
starters are the same convenience without it.
From a terminal — uv fetches Python and everything else; the starters run exactly this:
uv tool install lamina3d     # "lamina3d[cad]" adds STEP / BREP import
lamina3d                     # opens http://localhost:8000 (--port to change it)
If the shell says lamina3d is not found, uv's tool folder is not on your PATH yet: run uv tool update-shell and
open a new terminal, or start it with uv tool run lamina3d.
To work on Lamina itself, from a clone:
git clone https://github.com/marcelfarres/lamina.git
cd lamina
uv sync                                          # add --extra cad for STEP / BREP import
uv run uvicorn web.app:app --reload --port 8000  # then open http://localhost:8000
Or run it as a server
The image on GitHub Container Registry carries everything; the machine that runs it never needs the source.
docker run -d -p 8000:8000 -v lamina-jobs:/app/working-files ghcr.io/marcelfarres/lamina:latest
Updating
The browser version is always the newest. A local copy moves only to a tagged release, whose package is installed and made to slice before it is published:
| how you run it | how it updates |
|---|---|
| the double-click starter | by itself: every start runs uv tool install --upgrade lamina3d; offline it starts the version you have |
uv tool install |
uv tool upgrade lamina3d |
| Docker | docker pull ghcr.io/marcelfarres/lamina:latest, then start it again (docker compose pull && docker compose up -d) |
| a clone | git pull && uv sync |
The what's-new dialog opens by itself on the first start after an update. An older starter (one that says uv sync inside) never updates
— download the ZIP once more and use the new one; your jobs are in the old folder's working-files/.
No server at all: the same page runs its Python in a web worker (Pyodide) when nothing answers api/. That is
the public demo, at marcelfarres.github.io/lamina/app and on
Hugging Face. deploy/build_site.py
assembles that site — landing page, app, core + web zipped, the bundled models, the pure-Python packages pinned to
uv.lock — and the pages workflow publishes it to GitHub Pages, and to the Hugging Face static Space when the
HF_TOKEN secret is set, on every push to main; the deploy only goes out after
tests/test_e2e_site.py has loaded the built site in a real browser and sliced with every
technique. The first visit downloads about 60 MB of Python (cached afterwards, then it starts in a few seconds);
slicing runs at roughly native speed and your models never leave the browser. What differs from the local version:
STEP import is not available, folded panels are decimated by vertex clustering instead of quadric decimation (a
little more angular), and the 3D-print labels are cut through rather than engraved. Visit counting: none at all in
the copy you self-host or run from Docker — there is no script and no endpoint in it. The published site counts
visits with GoatCounter (no cookies, no IP stored, so no consent banner) when the COUNT_URL repository variable is
set: the landing page records the visit, the referrer, which link was clicked and which clips played, and the demo
records that it was opened. What someone does in the demo — technique, whether the model came from the examples or
their own computer, which formats they export — is sent while the box at the foot of its Model tab is ticked. It is
ticked by default and unticking it switches this off for good on that browser.
How long a slice takes
The browser version is the whole program, compiled to WebAssembly and running on your own CPU, so it is a little
slower than the local version rather than a lot. Neither one makes you wait in the dark: your model appears in the
3D view as soon as the build has finished with the mesh — seconds in, while the slices are still being cut — and
the overlay lists the stages of the slice with the one it is on, step 5 of 9 · sectioning · 12 of 34 · 46 %, so a
long wait has a shape. A second pass (auto-fix adding crossing slices) says so and keeps the bar moving forward
instead of dropping back to 20 %. After twenty seconds the browser version also says, in words, that the local one
is faster. Measured on the bundled examples at their presets (one core of a 2024 laptop, Chrome; the local column
is uv run, the Docker image is the same):
| example | technique | faces | parts | local | browser |
|---|---|---|---|---|---|
| head_igea (scan, remeshed and smoothed) | radial 14 × 6 | 281 k | 34 | 12 s | 24 s |
| bunny (scan) | stacked, random dowels | 187 k | 64 | 13 s | 31 s |
| cow_spot (scan) | stacked, dowels | 89 k | 67 | 7 s | 11 s |
| pear (scan) | radial 10 × 5 | 71 k | 25 | 4 s | 6 s |
| snowman | radial 10 × 6 | 14 k | 28 | 5 s | ~8 s |
| everything else (synthetic shapes) | any | ≤ 20 k | ≤ 36 | 0.1 – 4 s | 0.2 – 7 s |
What costs time: the face count of the model after Modify Form (a fine shrinkwrap pitch on a big model makes a
large mesh), the number of slices that cross each other (every crossing pair is a ray cast and an insertion check),
and smooth passes. Every slice logs its seconds per stage to the browser console (lamina timing), and the
local server also appends them to working-files/timing.log. If a slice takes minutes in the
browser, it is a model well beyond these: run the local version, or reduce the model first (a coarser
shrinkwrap, a decimated mesh).
docker-compose.yml is the same thing as a stack for Portainer / Dockge / Komodo: paste it,
and docker compose pull && docker compose up -d moves it to the newest build. Every push to main publishes
:latest, a v* tag publishes that version, and jobs live in the /app/working-files volume.
Several people can share one server: each browser tab holds a random id, everything it slices lives under that id,
and no other tab can name it. A tab nobody has touched for LAMINA_TTL_HOURS (24 by default, 0 = never) is deleted,
models and all, the next time anyone slices; the header's clear my data button deletes a tab's own at once.
Uploads are not capped by default — your own computer's memory is the only limit, and a cap that refused a 40 MB
mesh on a laptop with 32 GB was simply wrong. Set LAMINA_MAX_UPLOAD_MB when the server faces other people, where a
stranger's 2 GB scan is not yours to hold. WEB_CONCURRENCY is how many slices run at the same
time (one uvicorn worker each, about 300 MB). Lamina still has no login of its own, so put it behind your reverse
proxy's authentication if the server is reachable from the internet.
The Model tab opens on a bundled example; examples/ holds 24 of them, and each opens on the technique and parameters that suit it (examples/presets.json — the shape standing the right way up, sliced without an error; a test keeps that true). The same pipeline runs headless, so it can be scripted:
uv run python -m core.plan examples/egg.stl --mode interlocked --set nx=5 ny=4 thickness=3 --out out/egg
uv run python -m core.export out/egg.json --out out/egg_cut --fmt svg dxf pdf eps --labels
uv run python -m core.export out/egg.json --out out/egg_pieces --per-piece                  # one file per part
uv run python -m core.solid out/egg.json --out out/egg.stl                                  # assembled solid; --part X-3 for one part
uv run python -m core.solid out/egg.json --proto out/egg_proto --scale 0.5 --labels groove  # scaled 3D-print prototype set
uv run python -m core.plan examples/egg.stl --mode folded --list-params                     # every parameter with its help text
What it does
Five construction techniques
The original's six techniques as five modes: its 3D Slices is stacked with surface=outer.
| mode | what you get | parts |
|---|---|---|
stacked |
parallel sections, touching or with an empty space; outline mid / outer (Slicer's 3D Slices: sand down to shape) / inner; connected by dowels (6 hole shapes), flat pegs, or tabbed spacers that keep the space; points aligned, random per pair, or along your 3D lines |
Z-n, connectors P-n |
interlocked |
two slotted families, egg-crate; notch ratio / flare / relief; grid rotation; extra slices at chosen positions | X-n, Y-n |
radial |
half-slices around an axis (move it with center, turn the fan with angle) locked by horizontal ring slices with radial slots; ring count or spacing. Several axes: a fan per lobe — an axis through each of a dumbbell's balls, one per ball of a snowman, tilted to follow it. Neighbouring lobes are parted by a flat plane between their axes — a translucent part in the 3D view that you click and move or tilt like any slice — so the fans never run into each other, and a spine — one full plane through every axis, cut whole and slotted into every ring — ties the lobes together: automatic, found from how the axes lie (on one line, any number; on one plane, exactly one; on no plane, an error naming the fix). Every axis is drawn in the 3D view where it passes through the model: drag it whole or by either end (it stays on the plane the other axes share, so the spine survives the drag), alt-click the model for a parallel axis through that point, + to split one in two, alt-click an axis to remove it |
R-na/b (R2-na/b per axis), rings Z-n, spines SP-n |
curve |
ribs perpendicular to a curve through the model (its centre line by default, following the body across the plane too; drag the blue dots, alt-click to add or remove one, or type them in the curve table), so they follow a bend instead of staying parallel; locked together by spine slices. The turn between neighbouring ribs is limited so they do not meet inside the model. Branches: a straight line per leg, arm or tail, each with ribs square to it and a spine of its own that reaches back into the body and slots into the body's ribs, so a horse's legs are held instead of cut across by body ribs. Shift+alt-click a hoof to add one, drag its ends, alt-click it to remove it; a branch that starts past the body's ribs is an error, not a loose leg |
R-n, spines K-n; branch 2: ribs R2-n, spine K2, joint J-2 |
folded |
surface unfolded into flat panels with score lines (strategies flat / strip / area, or auto); thirteen joints: seam, tab, multitab, diamond, ticked, gear, tongue, puzzle, rivet, laced, loops, strip, rib, each sized to its triangle; separate mode cuts every triangle alone. The model need not be closed: panels are cut from the surface, so a clothing pattern, a mask or a shell with a neck hole is panelled as it is — its boundary edges stay open and carry no joints | P-n, strips S-n, ribs R-n |
Common to all: model rotate (three angles) and slicing center, per-slice offset / tilt / roll / thick /
skip (delete), size (a target size on any axis) with scale multiplying it, up_axis, Modify Form (shrinkwrap,
hollow, thicken, round, smooth), kerf, slot offset, and splitting of oversize parts with puzzle tabs.
Checks and fixes
Besides per-part checks (too small, too thin, severed by slots, holes near the outline, overlapping cuts), every plan
is checked as an assembly: each region of each slice must reach the main body through a slot, a connector or
glued contact; a head held only by slices that never touch the body is reported as a separate group. autofix=add
(the default) holds regions nothing holds the way the technique holds things — crossing slices placed where their own
section reaches the rest of the assembly, rings, spines — up to two rounds, and lists everything it did. It never
deletes a piece of the model: what still cannot be held stays on the plan with its error. (Left out, and said so: a
shaving a slot cuts off its own part and a speck where a slice only grazes the surface, both thinner than the minimum
wall everywhere — too small to cut or handle.) Every remaining error and most warnings carry one-click fixes: add a slice
through the region, move it, delete the group, round the model, change the notch ratio, split the part.
A coverage figure says how much of the model's surface the parts represent, so a leg or an ear that no slice reaches does not slip through. It carries the most signal for stacked and folded work; dense slicings score close to 100 %.
Cut sheets and export
- Nesting with no-fit polygons, after Deepnest: largest part first, each tried at its minimum-rectangle angle plus quarter turns and placed at the lowest, leftmost point where it clears every placed part, so a part slides into a placed part's cavity or hole (a disc into a ring, a small radial section into a big one). Above 150 parts a rectangle packer takes over; measured on jobs of that size it packs the same and runs far faster. Usage per sheet is shown.
- One thickness per sheet: a part whose thickness you changed is cut from another piece of material, so it is
nested on sheets of its own. Every sheet title says the stock it is cut from, the sheet header in the UI repeats
it, and as soon as a job mixes thicknesses the file names carry it (
sheet2 6mm.svg,Z-2 6mm x1.svg) — a sheet cut from the wrong stock fits nothing. Every file name also carries the material it is cut from (sheet1 plywood.svg). - One sheet ignores the sheet height: every part goes on one strip as wide as the sheet and as long as it needs, to be cut apart at the machine.
- Labels are engraved beside the part with a leader line wherever there is room; only a fully crowded sheet puts one on the part.
- An assembly key comes with the cut files (
assembly-key.txt): what this technique's labels mean —R-2ais the a half of the second radial plane,Z-3the third ring up — then every part with its centre, what it slots onto, in the order the 3D view builds them. The same legend is shown in the Export tab, so the scheme is clear before the cut rather than guessed after it. A tickbox leaves the file out of the zip. - Puzzle mode (
label_style=code) engraves a two-letter code instead of the position, and names the per-piece files after it, so nothing on the parts says where they go. The codes are seeded by the job, so re-slicing engraves the same ones; the app, the Parts table and the 3D view keep the real labels — they are the plans you consult when you give up — and the key is the only way back. Leave it out of the zip and the puzzle stays a puzzle. - An assembly video: the steps slider played and recorded off the 3D view as a
.webm, made in the page itself — nothing uploaded, nothing rendered twice. - Cut files: SVG and DXF in mm / cm / in, multi-page PDF, EPS per sheet, or one file per piece, each with or
without the red label layer (one switch for every file). Layers follow Slicer's Cut Layout: OUTER blue, INNER green
(slots, holes), SCORE yellow (folds: solid mountain, dashed valley, dotted perforate), LABEL red (labels, leaders,
seam numbers, sheet border). The zip is named
<project or model>_v<revision>_<technique>_…, and so is every file in it: they all start with the design,egg_v1.0 sheet1 plywood.svg, so the cut files of two designs unzipped into one folder never collide or mix. - Identical pieces once: in per-piece mode a shape that occurs several times is exported one time, with the
quantity last in the file name and on the label. A per-piece file is named design, part, material, thickness,
quantity, in that order and separated by spaces, and it always ends in its quantity,
x1included (egg_v1.0 Z-1 plywood x4.svg,egg_v1.0 Z-2 plywood x1.svg); acut-list.txtsays which parts each file covers and gives each part's width × height in your units. - The model's name on every part: each engraved label starts with it (
bunny Z-3), so parts of two models cut together are never mixed up. The project's name when it has one, else the model's file name; room for it is kept when the parts are nested, andlabel_modelturns it off. - Weight: the Export tab weighs the parts as cut (holes and slots taken out, each part at its own thickness, one line per stock when a job mixes them), the sheets they are nested on and the dowels, from the material's density. Every material on the list has a typical density you can correct, and a material of your own (+ beside the material) keeps the density you give it.
- Scale check: every export carries a calibration bar, 10 cm or 4 in following the units, to cut first and measure before committing to the whole set.
- Kerf compensation is off by default: many machines compensate their own kerf, and compensating twice ruins the fit. Turn it on under Machine & cut compensation when yours does not.
- Solids: STL of the assembled model or one part, and a prototyping set for test-printing a design: every part flat at a scale or target size, thickness raised to a printable minimum, label engraved as a groove or cut through, as one STL per part plus a 3MF that OrcaSlicer or PrusaSlicer opens as separate named objects. The label is bold, at least the letter height you ask for in printed millimetres (5 mm by default, whatever the scale), and sits where the part is widest, away from slots and edges; a part with no room for it gets none and README.txt in the zip names it.
- Fit tests before the model: five small assemblies with the job's joints (its thickness, connectors, and every radial half-slice, since that is what wedges) at slot offsets of ±1, ±2 steps around the current one, each part marked with its offset. Cut or print, assemble: the loosest that still holds is the offset to set. There are two, because a fit is a clearance in millimetres, not a ratio, and belongs to a process and a material: the cut-file fit test (Downloads) is at 1:1 for the real machine and predicts the model's fit; the print fit test (Prototyping) dials in the print's own print slot offset, in printed millimetres whatever the scale, which the prototype set uses in place of the job's.
- Every zip carries the project file (
….lamina.json) that the UI's open project reads back: technique, every parameter and the uploaded model itself, so a printed part or a cut file found later leads back to what made it.
The web UI
Dark, five tabs (Model · Technique · Sheet & fit · Checks · Export). Every change re-slices; the 3D view and the cut sheets are always the same plan. Hover a parameter name for its help.
- 3D view: drag to orbit, wheel to zoom, right-drag to pan. Click a part to select it: a yellow arrow slides it
along its normal, shift-drag tilts, ctrl-drag rolls, and the panel gets sliders for offset / tilt / roll /
thickness and a delete button. Only those move it: a plain drag on a selected part turns the view, and
Ctrl+Z or the ↶ undo button takes back the last 60 changes. The selected part is highlighted on the cut sheet,
clicking a part on the sheet selects it in 3D, and clicking a warning does the same. Alt-click adds or removes a
dowel (stacked), a curve control point (curve) or a radial axis; shift+alt-click a hoof, hand or tail tip adds a
curve branch out to it.
explodeandstepssliders animate the assembly;lookpreviews the material. - Dowels in a stack (
placement): aligned puts the same points straight through every layer, one rod each; alt-click a layer to add one there, alt-click it to remove it, or type exact x, y underdowels— that is how you move one. random picks new points for every pair of layers, spread as far apart as the pair allows; they cannot be placed by hand. lines are straight dowels you draw: a start and an end in the model's x, y, z (0, 0, 0 is its middle), every pair of layers the line passes through gets a hole.+ linedraws one up the middle, and alt-click draws one up through the point you click (again on it to remove it). Two lines hold a layer; one lets it turn. A layer nothing joins is never deleted — the Checks tab says what would hold it. - Model: quarter-turn buttons and three angles to re-orient it, scale or target size, and Modify Form: shrinkwrap, hollow, thicken, round (drops features thinner than a radius) and smooth (Taubin passes for pointy vertices).
- Material, machine, sheet: 21 materials — paper, card, cardboard, greyboard, plywood, MDF, basswood, balsa, acrylic, polypropylene, foam board, EVA foam, steel, stainless steel, aluminium, brass, copper, leather, fabric, and PLA and PETG to 3D-print the parts at full size (whole layers for thicknesses, print beds for sheets: picking one ticks 3D printed, the page counts plates and the Export tab offers one 3MF per plate instead of cut files). The material sets its stock thicknesses (sheet steel by Manufacturers' Standard Gauge and stainless by its own gauge table, copper by ounces per square foot, chipboard by points, plate, plywood, acrylic and model wood by fraction of an inch, each shown in mm and decimal inches), the sheet sizes it comes in (4 × 8 and 5 × 10 ft, A-series, balsa strips, foam board sheets, laser beds), its density and the 3D look; only machines that can cut it are offered. The machine (CO2 laser, fiber laser, plasma, CNC router, knife, by hand, 3D printer, or one listed by name) sets kerf, slot offset and corner relief. Saved manufacturing presets keep all of it.
- View cube: the cube in the corner of the 3D view turns with the camera; click a face for a flat top, front or side view.
- Session and projects: the session belongs to the browser tab, so a refresh resumes where you were; a second tab is a second session, and on a shared server nobody sees anyone else's models or cut files. Project save / open writes one file with the model embedded. Units mm / cm / in for every length field and for the DXF.
How it is built
web/app.py  (FastAPI)  ──▶  core/plan.py  ──▶  plan.json ──▶  core/export.py   SVG/DXF/PDF/EPS (OUTER, INNER, SCORE, LABEL)
web/static/index.html         │                            ──▶  core/solid.py    assembled / per-part STL, 3MF prototype set
(three.js, live)              ▼                            ──▶  browser          3D view from the facets in plan.json
                     core/modes/*.py   one file per technique (plug-in): Slice objects with a frame + cuts (+ facets)
                     core/unfold.py    mesh → flat panels (greedy flattest-edge spanning tree, overlap-checked)
                     core/notch.py     slots where families cross (ray casts, ratio, flare, relief)
                     core/checks.py    physical checks and auto-fix
                     core/split.py     split oversize parts with puzzle tabs      core/nest.py  outline nesting
                     core/geometry.py  frames, mesh sections → shapely polygons, dowel shapes
- All geometry is computed in Python (trimesh sections → shapely polygons). The browser only extrudes finished polygons; the STL export extrudes the same polygons with trimesh.
- A construction technique is one file in
core/modes/(seeinterlocked.py, about 50 lines): declareParams and returnSliceobjects (frame + thickness + optional clip + cuts, or a readyrawprofile for synthetic parts). Sections, per-slice edits, checks, splitting, nesting, export and the web form are shared and automatic. - Labels follow Slicer:
Axis-Slice(X-3,Z-6), split piecesAxis-Slice-Part(X-3-1).
Fit and cut compensation
| parameter | acts on | effect |
|---|---|---|
compensate, kerf |
every outline, at export | when on, outer edges grow by kerf/2 and slots and holes shrink by kerf/2, so the cut part comes out at nominal size; off by default because most machines compensate their own kerf |
slot_offset |
slot width | Slicer's "Slot Offset": nominal slot = crossing slice thickness; + looser, − press fit |
notch_ratio |
slot depth | where the two families meet along a crossing (0.5 = half and half) |
notch_factor, notch_angle |
slot mouth | Slicer's Notch Factor: flares the entrance so parts find the slot |
relief, tool_d |
slot corners | dog-bone / T-bone relief for router or plasma |
thick / offset / tilt / roll |
one slice | per-slice thickness, position along its normal, rotation about its in-plane axes |
Slot depth is exact per crossing: the line where two slices meet is cast against the mesh and every in-material segment gets its own slot (a torus crossing gets two).
Physical checks
Errors mean it will not work, warnings mean look at it. Part too small or too thin (minimum rotated rectangle) ·
thin bridge (erosion) · slots or holes sever the part · region floats (no slot, dowel or core holds it) · no crossing
slice · not connected to the main assembly (region-level connectivity through slots, connectors and glued contact) ·
plane misses material · does not fit the sheet (auto-split when split is on) · two slots overlap · hole too close
to the outline · folded: joint shrunk or skipped for its triangle, listed by seam number · folded: the material does
not fold at that thickness (plywood, MDF, acrylic, balsa, foam board, printed plastic, or card and metal past their
limit), with a one-click switch to faces joined by ribs · slot opens away from the insertion direction · a boxy model
a few degrees off square (the Model tab offers square it up). Every message says what to do about it.
Tests
The test workflow runs the suite on every push and pull request; docker and pages publish from main only,
and pages deploys nothing until the built site has sliced with every technique in a real browser.
Two of them drive a real browser, because that is where the bugs people report actually live:
tests/test_ui.py runs the app against a real server and does what a person does — fills every
box of every technique and checks each value reached the plan, walks the undo history end to end and back, uploads
a broken model, saves and reopens a project, downloads the cut files — and fails on any uncaught JavaScript error
or a status line that never settles. tests/test_e2e_site.py does the same for the
published browser build. Both need LAMINA_UI=1 / LAMINA_E2E=1 and Playwright's Chromium, so they stay out of
the quick run.
uv run ruff check                       # lint (pyflakes, bugbear, bandit, pyupgrade); the test workflow runs it first
uv run pytest tests -n auto             # pipeline, nesting, checks, export, the web API, the browser build's code path,
                                        # and every slider end / choice / toggle of every technique (tests/test_params.py);
                                        # -n auto spreads it over every core: about 4 min on 12, 32 in one process
uv run --with pytest-cov pytest --cov=core --cov=web --cov-report=term-missing   # coverage: 88 % of core + web
uv run python tests/browser_env.py working-files/jobs   # the whole matrix without the compiled extras Pyodide lacks
uv run --with playwright playwright install chromium
LAMINA_UI=1 uv run --with playwright pytest tests/test_ui.py   # the app itself, driven like a person: every parameter, undo, no number cut off (20 min)
python deploy/build_site.py
LAMINA_E2E=1 uv run --with playwright pytest tests/test_e2e_site.py   # the built site, end to end, in Chromium
uv run python tests/test_unfold.py      # folded-panel correctness: refold, area, seams, joints (a few minutes)
uv run python tests/run_matrix.py       # regression matrix of model × mode × feature → working-files/matrix/contact.png
uv run python -m core.testmodels examples/   # regenerate the synthetic example shapes
uv run --with playwright python scripts/media/record.py [scene …]   # re-record the landing-page stills and clips (needs node + ffmpeg)
The landing-page media are re-recorded on every release tag by .github/workflows/media.yml (or by hand from the
Actions tab), and committed back to main, so they always show the version people download.
Folder layout
core/        planner, modes, unfold, notch, checks, nest, split, export, solid
web/         FastAPI app + single-page UI (vendored three.js)
examples/    24 test models: 18 synthetic + a scanned head, a porcelain horse statue, three animals and the bunny (terms in examples/README.md)
docs/        index.html + media/ (the GitHub Pages site), roadmap.md, folded-panels.md, original-slicer-reference.md
tests/       pytest suite, test_ui.py (the app in a browser), test_unfold.py, run_matrix.py
Serving the docs
The landing page is docs/, served by GitHub Pages from main — plain
HTML with no build step, so any static server shows exactly what Pages will:
uv run python -m http.server 8080 --directory docs # then open http://localhost:8080
The .md files next to it (roadmap.md, folded-panels.md) are read on GitHub rather than through the page.
deploy/build_site.py assembles what actually gets published — the landing page plus the app running its Python
in the browser. Its one optional repository variable, set in the pages workflow, is COUNT_URL, the GoatCounter
endpoint; unset means nothing is counted anywhere.
report a problem needs no configuration at all: web/static/feedback.js gathers the report and opens a
prefilled email or the GitHub issue form, so it behaves identically published, in Docker and offline. The address
it writes to is one constant at the top of that file; a fork changes that line.
Contributing
Issues and pull requests are welcome. A new construction technique is one file in core/modes/; checks, nesting
and export come for free. Run the tests above before opening a pull request, and say which example and settings
you checked the change on.
Support
Lamina is free and always will be, and none of that depends on anyone giving me anything. If you like it or any of my other projects and you want to support the work, there is Ko-fi — only if you can comfortably afford it, and with no pressure at all.
Other ways that help just as much: tell someone who cuts sheet material that this exists, show me what you made, or open an issue when something goes wrong. A good bug report is worth more to me than a coffee.
Licence
Lamina is free software under the GNU Affero General Public License v3.0. You can use it, change it and share it. Anyone who distributes a modified version, or offers it to others as a service, must publish their source under the same licence.
What you make with it is yours. The cut files, parts and objects you produce are not covered by the licence; sell them, give them away, do as you like. Only the program itself is copyleft. The bundled example models have their own terms, listed in examples/README.md.
1 maintainer

Metadata
1 maintainer
Release files for lamina3d 0.2.2
For a detailed explanation of source distributions (sdists) and built distributions (wheels), please see the package formats documentation.
Source distribution (sdist)
| File | Size | Uploaded | |
|---|---|---|---|
| lamina3d-0.2.2.tar.gz | 6.7 MB | Details |
Built distribution (wheel)
| File | Interpreter | ABI | Platform | Reset |
|---|---|---|---|---|
| lamina3d-0.2.2-py3-none-any.whl | Python 3 | none | any | Details |
Total release size: 13.5 MB
Release files / lamina3d-0.2.2.tar.gz
| Download URL | lamina3d-0.2.2.tar.gz |
|---|---|
| Size | 6.7 MB |
| Tags | Source |
|
SHA-256 checksum How to use checksums |
300b779de81ca65a7d8d4c387cd425ece20d30cf821ece4d214488b83c742553
|
|
BLAKE2b-256 checksum How to use checksums |
65d4a7d8b0669a6372987344be4968334fb3745824b4460a05ad0f1f8c0d5397
|
| Upload date | |
|
Uploaded using Trusted Publishing? What is trusted publishing? |
Yes |
| Uploaded via |
uv/0.12.23 {"installer":{"name":"uv","version":"0.12.23","subcommand":["publish"]},"python":null,"implementation":{"name":null,"version":null},"distro":{"name":"Ubuntu","version":"24.04","id":"noble","libc":null},"system":{"name":null,"release":null},"cpu":null,"openssl_version":null,"setuptools_version":null,"rustc_version":null,"ci":true}
|
Release files / lamina3d-0.2.2-py3-none-any.whl
| Download URL | lamina3d-0.2.2-py3-none-any.whl |
|---|---|
| Size | 6.7 MB |
| Tags | Python 3 |
|
SHA-256 checksum How to use checksums |
9507b6a084ebb7dd9c82094ee82e320b8cf605521073d8ade0edb0136ae2815e
|
|
BLAKE2b-256 checksum How to use checksums |
7352d5812760b9db5c2cd282fc2444001a0c7faae98d2940ed3a728fa1c9111b
|
| Upload date | |
|
Uploaded using Trusted Publishing? What is trusted publishing? |
Yes |
| Uploaded via |
uv/0.12.23 {"installer":{"name":"uv","version":"0.12.23","subcommand":["publish"]},"python":null,"implementation":{"name":null,"version":null},"distro":{"name":"Ubuntu","version":"24.04","id":"noble","libc":null},"system":{"name":null,"release":null},"cpu":null,"openssl_version":null,"setuptools_version":null,"rustc_version":null,"ci":true}
|














