
langgraph2slack



Simple, minimal package to connect LangGraph applications to Slack with just a few lines of code.
Why langgraph2slack?
You've built a LangGraph agent. Now your team wants to use it, but they live in Slack, not in a Python terminal or a custom web UI.
Wiring a LangGraph agent to Slack from scratch means learning Slack's Bolt framework, handling event routing, managing streaming APIs, and keeping Slack threads in sync with LangGraph conversation threads. That's a lot of plumbing before your agent is actually useful to anyone.
langgraph2slack handles all of that for you. Point it at your existing LangGraph agent and your Slack bot is ready, with real-time streaming, thread memory, and optional LangSmith feedback tracking out of the box. Chat with it directly via DM, or @mention it in any channel!
When to use it:
- You have a LangGraph agent and want to make it accessible to teammates or users via Slack
- You're building an internal AI assistant (a data analyst bot, a support bot, a knowledge base Q&A bot) and Slack is where your users already are
- You want production-ready features like streaming, memory, and feedback collection without writing the integration layer yourself
Installation
pip install langgraph2slack
Quick Start
1. Create a LangGraph App
First, create a simple LangGraph chatbot that will power your Slack bot:
# agent.py
from langchain_anthropic import ChatAnthropic
from langgraph.graph import MessagesState, StateGraph, START, END
from langgraph.checkpoint.memory import MemorySaver

# Define the chatbot function
def chatbot(state: MessagesState):
    model = ChatAnthropic(model="claude-3-5-sonnet-20241022")
    return {"messages": [model.invoke(state["messages"])]}

# Build the graph
graph = StateGraph(MessagesState)
graph.add_node("chatbot", chatbot)
graph.add_edge(START, "chatbot")
graph.add_edge("chatbot", END)

# Compile with memory to maintain conversation history
app = graph.compile(checkpointer=MemorySaver())
This creates a simple chatbot that maintains conversation history across messages.
2. Create Your Slack Bot Server
This is where the magic happens.
Create a slack/server.py file in your project directory:
# slack/server.py
from langgraph2slack import SlackBot

bot = SlackBot()

# Export the app for langgraph.json
app = bot.app
That's it! Just 3 lines of code.
3. Configure Environment Variables
Create a .env file with your credentials:
# Slack credentials (from https://api.slack.com/apps -> Your App)
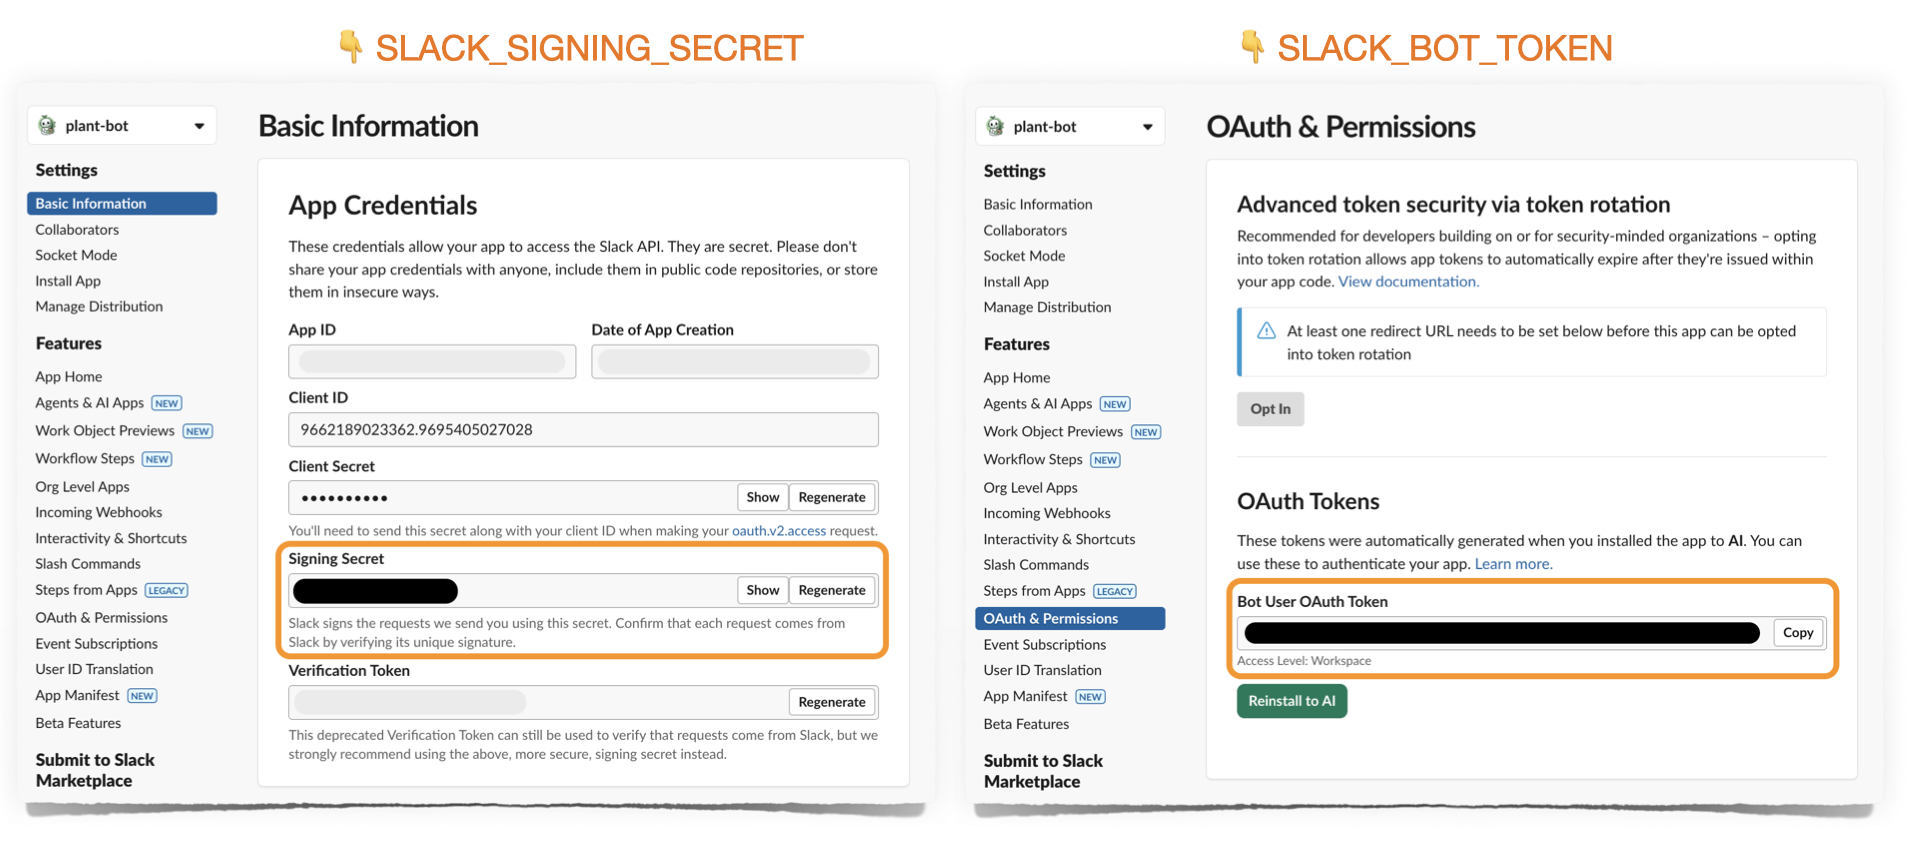
SLACK_BOT_TOKEN=xoxb-your-bot-token
SLACK_SIGNING_SECRET=your-signing-secret

# LangGraph agent name
# This is the key you will set in langgraph.json
ASSISTANT_ID=my-assistant
You can find SLACK_SIGNING_SECRET and SLACK_BOT_TOKEN in the following pages on https://api.slack.com/apps:
4. Configure LangGraph Deployment
Add your agent and Slack server paths to langgraph.json:
{
  "dependencies": ["langgraph2slack", "."],
  "graphs": {
    "my-assistant": "./agent.py:app"
  },
  "env": ".env",
  "http": {
    "/events/slack": "slack/server:app"
  }
}
Local Testing

Before deploying to production, test your bot locally using ngrok.
Important: You'll need separate Slack apps for local development and production deployment, since each environment has its own request URL where Slack sends events.
1. Create a Slack App for Local Development
- Go to https://api.slack.com/apps
- Click "Create New App" → "From a manifest"
- Copy the contents of
slack_manifest.yamlfrom this repo - Replace placeholder values:
your-app-name→ Your app name (e.g., "My Bot - Local")your-deployment-url→ This is your ngrok or Langgraph deployment URL. Leave as placeholder for now
- Install the app to your workspace
- Copy the Bot Token and Signing Secret to your
.envfile
2. Start LangGraph Dev Server
langgraph dev
# Runs on http://localhost:2024 and automatically mounts your FastAPI app
Note: You don't need to run a separate server! LangGraph dev automatically imports and serves the FastAPI app from your langgraph.json.
3. Expose with ngrok
Install ngrok if you haven't already:
# macOS
brew install ngrok

# Or download from https://ngrok.com/download
Start ngrok to expose your local server:
ngrok http 2024
This will output something like:
Forwarding https://abc123.ngrok.io -> http://localhost:2024
Tip: View all requests in ngrok's web interface at http://localhost:4040
4. Update Slack App Event URL
Go to your Slack app settings → Event Subscriptions:
- Request URL:
https://abc123.ngrok.io/events/slack(use YOUR ngrok URL) - Slack will verify the URL - you should see a green checkmark
5. Test Your Bot
Send a DM to your bot or @mention it in a channel! You'll see requests in both:
- LangGraph dev console
- ngrok web interface (http://localhost:4040)
Production Deployment
Once local testing looks good, deploy to LangGraph Platform.
1. Create a Production Slack App
Create a new Slack app for production (separate from your local dev app):
- Go to https://api.slack.com/apps
- Click "Create New App" → "From a manifest"
- Use the same manifest, but name it differently (e.g., "My Bot - Production")
- After deployment, you'll update the request URL to your LangGraph Platform URL
2. Update Environment Variables
Update your .env file with the production Slack app credentials:
# Production Slack credentials
SLACK_BOT_TOKEN=xoxb-your-production-bot-token
SLACK_SIGNING_SECRET=your-production-signing-secret

# LangGraph configuration
ASSISTANT_ID=my-assistant
3. Deploy to LangGraph Platform
langgraph deploy
After deployment, you'll receive a URL like: https://your-deployment.langraph.app
4. Update Production Slack App URL
Go to your production Slack app settings → Event Subscriptions:
- Request URL:
https://your-deployment.langraph.app/events/slack
Your bot is now live! Chat with it by:
- Sending a DM to the bot
- @mentioning the bot in a channel
Advanced Usage
Configuration Options

The SlackBot class accepts many parameters to customize behavior:
bot = SlackBot(
    # LangGraph settings
    assistant_id="my-assistant",        # Or from env: ASSISTANT_ID
    langgraph_url=None,                 # Or from env: LANGGRAPH_URL (None = loopback)

    # Response settings
    streaming=True,                     # Stream responses token-by-token (default: True)
    reply_in_thread=True,               # Always reply in threads (default: True)

    # Slack credentials (or from env)
    slack_bot_token=None,               # From env: SLACK_BOT_TOKEN
    slack_signing_secret=None,          # From env: SLACK_SIGNING_SECRET

    # Feedback integration
    show_feedback_buttons=False,        # Show thumbs up/down buttons (default: False)
    enable_feedback_comments=False,     # Allow text feedback on negative reactions (default: False)
    show_thread_id=False,               # Show LangGraph thread_id in footer (default: False)

    # Image handling
    extract_images=True,                # Convert markdown images to Slack blocks (default: True)
    max_image_blocks=5,                 # Max images per message (default: 5)

    # Metadata tracking
    include_metadata=True,              # Pass Slack context to LangSmith (default: True)

    # Visual feedback
    processing_reaction="eyes",         # Show emoji while processing (default: None)
                                        # Examples: "eyes", "hourglass", "robot_face"

    # Message filtering (streaming only)
    message_types=["AIMessageChunk"],   # Which message types to stream (default: ["AIMessageChunk"])
                                        # Options: "AIMessageChunk", "ai", "tool", "human", "system"
)
Input/Output Transformers
Customize message processing with transformers:
from langgraph2slack import SlackBot

bot = SlackBot()

# Transform user input before sending to LangGraph
@bot.transform_input
async def add_context(message: str, context) -> str:
    return f"User {context.user_id} asks: {message}"

# Transform AI output before sending to Slack
@bot.transform_output
async def add_footer(response: str, context) -> str:
    return f"{response}\n\n_Powered by LangGraph_"

app = bot.app
Multiple transformers are applied in registration order:
@bot.transform_input
async def first_transform(message: str, context) -> str:
    return f"[1] {message}"

@bot.transform_input
async def second_transform(message: str, context) -> str:
    return f"[2] {message}"

# Input "hello" becomes: "[2] [1] hello"
Metadata Transformers
Customize what Slack context gets passed to LangSmith:
bot = SlackBot(include_metadata=True)

@bot.transform_metadata
async def custom_metadata(context) -> dict:
    """Customize metadata sent to LangSmith."""
    return {
        "channel_id": context.channel_id,
        "is_dm": context.is_dm,
        "user_id_hash": hash(context.user_id),  # Hash PII for privacy
    }
By default, the following fields are passed:
slack_user_idslack_channel_idslack_message_tsslack_thread_tsslack_channel_typeslack_is_dmslack_is_thread
Streaming Mode Control
Control which message types to stream to users:
# Stream only AI responses (default)
bot = SlackBot(message_types=["AIMessageChunk"])

# Stream AI responses AND tool calls
bot = SlackBot(message_types=["AIMessageChunk", "tool"])

# Stream everything (highly verbose!)
bot = SlackBot(message_types=["AIMessageChunk", "ai", "tool", "system"])
Processing Reaction
Show a visual indicator while the bot is thinking:
# Show hourglass emoji while processing
bot = SlackBot(processing_reaction="hourglass")

# Other options: "eyes", "robot_face", "thinking_face", etc.
# Must be emoji NAME, not the emoji character itself
The reaction is automatically removed when the response is ready.
Image Support
The bot automatically extracts markdown images and renders them as Slack image blocks:
# Enable image extraction (default)
bot = SlackBot(extract_images=True, max_image_blocks=5)

# Disable image extraction
bot = SlackBot(extract_images=False)
When enabled, markdown like  in AI responses will:
- Appear as text in the message
- Render as a native Slack image block below the text
Feedback Integration
Collect user feedback and send it to LangSmith:
bot = SlackBot(
    show_thread_id=True,                # Show thread ID for debugging
    show_feedback_buttons=True,         # Show thumbs up/down
    enable_feedback_comments=True,      # Allow text feedback for negative reactions

)
How It Works
Architecture
Slack [user] → langgraph2slack → [INPUT TRANSFORMERS] → LangGraph [HumanMessage]
                                                     ↓
Slack [bot]  ← langgraph2slack ← [OUTPUT TRANSFORMERS] ← LangGraph [AIMessage]
Message Flow
- User sends message in Slack (DM or @mention)
- Input transformers process the message
- Slack sends event to
/events/slackendpoint - Message passed to LangGraph as HumanMessage with thread_id
- LangGraph processes and generates response as AIMessage
- Streaming mode: Each token immediately forwarded to Slack
- Output transformers process the complete response
- Final message displayed in Slack with optional feedback buttons
- Feedback and Metadata optionally stored in LangSmith if enabled in
.env
Streaming vs Non-Streaming
langgraph2slack assumes you are generating streaming responses from LangGraph, but you have the option to show them on Slack in streaming on non-streaming modes.
Streaming mode (default):
- Low-latency streaming
- Each token forwarded immediately to Slack
- Uses Slack's
chat_startStream,chat_appendStream,chat_stopStreamAPIs - If images are extracted, the text will be replaced with a markdown block.
Non-streaming mode:
bot = SlackBot(streaming=False)
- Waits for complete response
- Sends entire message at once
- Useful for debugging or if streaming causes issues
Examples
Check out the examples/plant_bot directory for a complete working example:
- plant_agent.py - LangGraph agent with conditional image search
- slack_server.py - SlackBot setup with transformers
- langgraph.json - Simple deployment configuration
Requirements
- Python 3.10+
- LangGraph deployment with
messagesstate key - Slack workspace with bot permissions
License
MIT
Contributing
Contributions welcome! Please open an issue or PR.
1 maintainer

Metadata
1 maintainer
Release files for langgraph2slack 0.7.0
For a detailed explanation of source distributions (sdists) and built distributions (wheels), please see the package formats documentation.
Source distribution (sdist)
| File | Size | Uploaded | |
|---|---|---|---|
| langgraph2slack-0.7.0.tar.gz | 94.6 kB | Details |
Built distribution (wheel)
| File | Interpreter | ABI | Platform | Reset |
|---|---|---|---|---|
| langgraph2slack-0.7.0-py3-none-any.whl | Python 3 | none | any | Details |
Total release size: 158.8 kB
Release files / langgraph2slack-0.7.0.tar.gz
| Download URL | langgraph2slack-0.7.0.tar.gz |
|---|---|
| Size | 94.6 kB |
| Tags | Source |
|
SHA-256 checksum How to use checksums |
f6de1a75caf9ea9d0f983aac8c59fb06ce09520dd26760d15f1fa6cd86d47c96
|
|
BLAKE2b-256 checksum How to use checksums |
dc3fb9cc2ae851d4a0b7fab52109fe84a2c28a8b80bfa26e120f39a625f9ac8b
|
| Upload date | |
|
Uploaded using Trusted Publishing? What is trusted publishing? |
No |
| Uploaded via |
uv/0.11.28 {"installer":{"name":"uv","version":"0.11.28","subcommand":["publish"]},"python":null,"implementation":{"name":null,"version":null},"distro":{"name":"Ubuntu","version":"24.04","id":"noble","libc":null},"system":{"name":null,"release":null},"cpu":null,"openssl_version":null,"setuptools_version":null,"rustc_version":null,"ci":true}
|
Release files / langgraph2slack-0.7.0-py3-none-any.whl
| Download URL | langgraph2slack-0.7.0-py3-none-any.whl |
|---|---|
| Size | 64.3 kB |
| Tags | Python 3 |
|
SHA-256 checksum How to use checksums |
c7ecdbdd8b9f5e3c989688354d429302d033a4155d146ab8fb4759353899f0b3
|
|
BLAKE2b-256 checksum How to use checksums |
cd7117a36dabcc480f22e69b55a197cc851812ff0a70a5f3b90e5f370f2ec3ba
|
| Upload date | |
|
Uploaded using Trusted Publishing? What is trusted publishing? |
No |
| Uploaded via |
uv/0.11.28 {"installer":{"name":"uv","version":"0.11.28","subcommand":["publish"]},"python":null,"implementation":{"name":null,"version":null},"distro":{"name":"Ubuntu","version":"24.04","id":"noble","libc":null},"system":{"name":null,"release":null},"cpu":null,"openssl_version":null,"setuptools_version":null,"rustc_version":null,"ci":true}
|














