

Layer Rescue


A failed print doesn't always have to go in the bin. Layer Rescue lets your printer pick up a print where it stopped, even after a power cut, and it can put a broken or loose part back on the plate and print the missing part on top of it.
It runs inside Bambu Studio as a post-processing script. You slice as usual, answer a few questions in a small window, and Layer Rescue rewrites the G-code. Before anything reaches the printer, you see the result in Bambu Studio's preview.
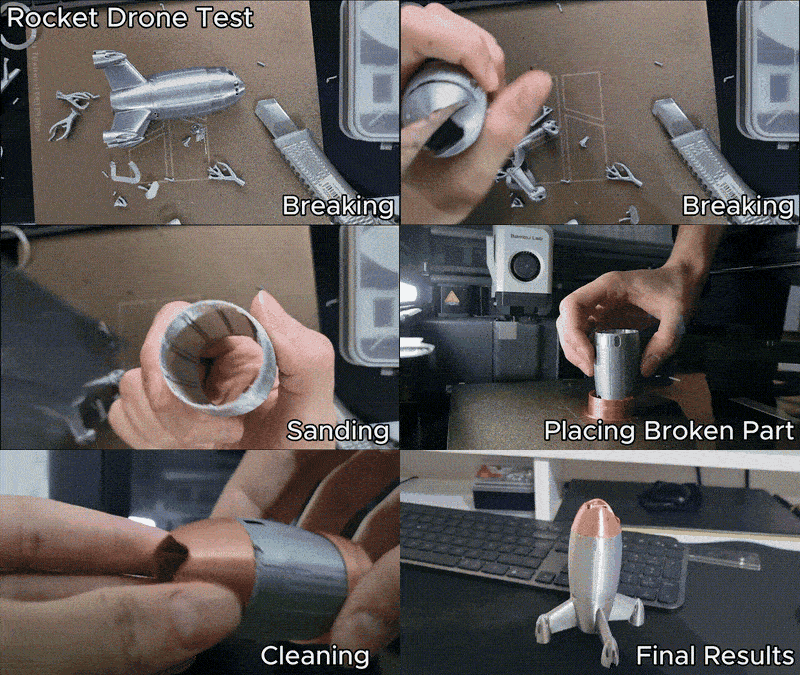
A rocket drone body, broken on purpose, put back on the plate and reprinted with its supports. Full test
What it can do
- Continue a print that stopped. Filament ran out, the nozzle clogged, you hit stop: tell Layer Rescue the last layer that printed properly, and the job continues from the next one, right on top of the part that is still on the plate. (Test 1)
- Even after a power cut. After a restart the printer no longer knows where Z is, and homing Z would drive the part into the nozzle. Instead, you lower the nozzle onto the part by hand and Layer Rescue makes every Z move relative to that point. Z is never homed. (Test 2)
- Put a loose or broken part back and print the rest on it. For a part that came off the plate, broke later or needs an addition. The printer prints a low wall shaped from the part's own outline, pauses so you can put the part in, then prints the missing top onto it. (Test 3, Test 4)
- Rebuild the supports the new part needs. If the missing top was printed on supports, Layer Rescue prints them again from the bed, even inside a hollow part, and leaves out everything that would get in the part's way. (Test 4)
- Save what's left of a full plate. If a few parts on a crowded plate came loose, delete them in Bambu Studio and finish the rest. (Test 5)
- No G-code editing by hand. Bambu Studio keeps its filament mapping and
.gcode.3mfdata, and the preview shows exactly what will be printed. - Careful by default. It never homes Z or levels the bed over a part, checks its own output before saving it, refuses files it can't handle safely instead of guessing, and keeps a backup of the original G-code. The window asks you to confirm what it can't see for itself.
- English and Turkish, switchable in the window at any time.
Real-world tests
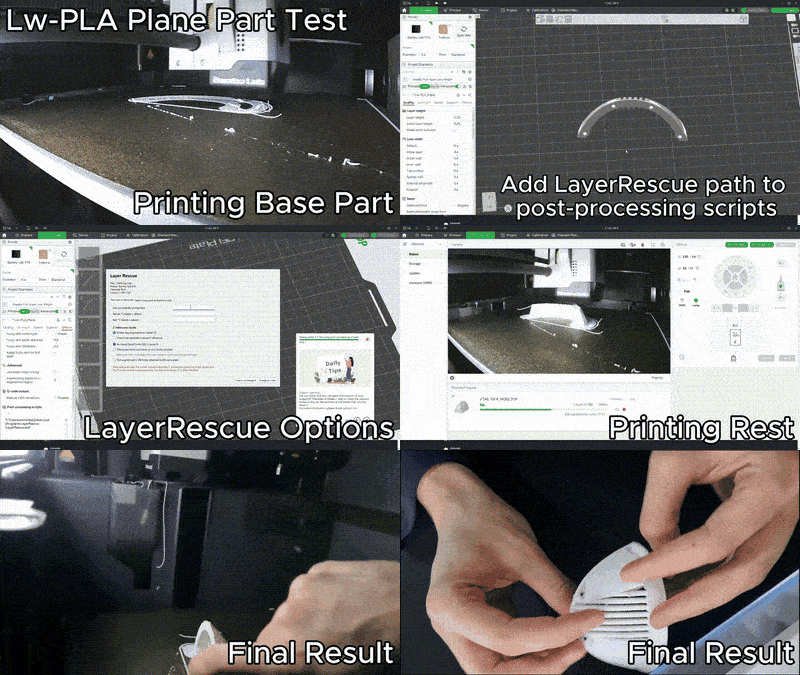
I tested every feature on my own P1S with real prints and wrote down each one step by step, with videos, settings and what I learned. All five worked; two of them taught me something worth knowing before you try it yourself.
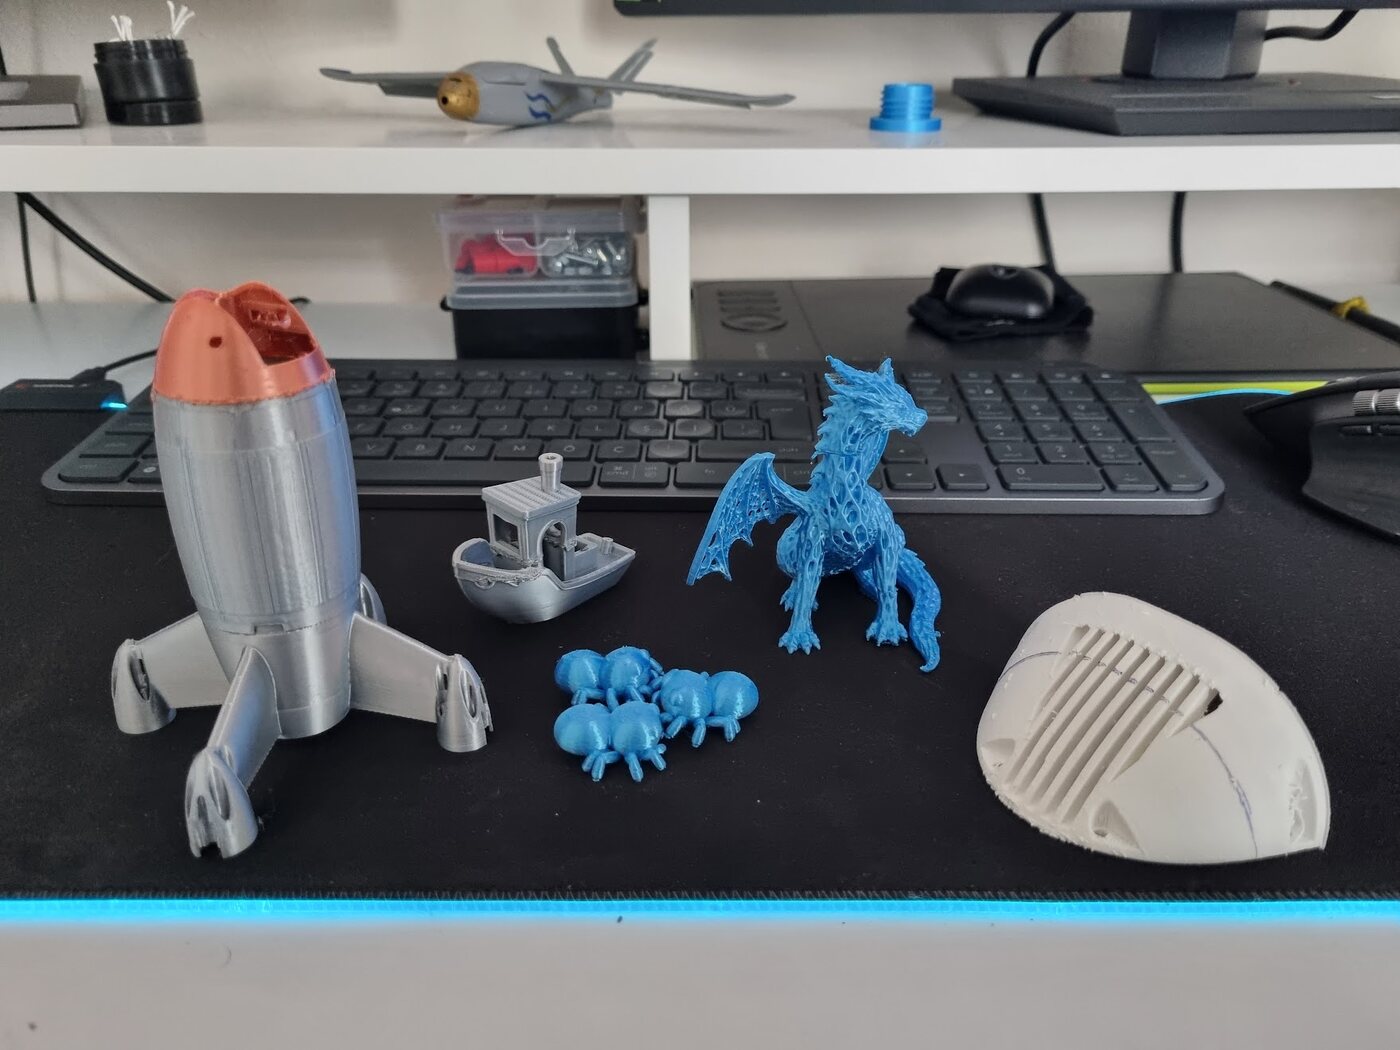
All five rescued prints. From left: the rocket drone body, the Benchy, the three spiders, the dragon and the plane's nose cover.
| Test | Situation | What it shows |
|---|---|---|
| 1. LW-PLA plane part | filament jam, printer stayed on | the basic resume |
| 2. Dragon | power cut | resuming after a restart, and what happens when you pick the wrong layer |
| 3. Benchy | print came off the plate | insert mode, and why parts that get wider towards the top need a bit of hot glue |
| 4. Rocket drone | finished part broke | insert mode with supports rebuilt from the bed inside a hollow part |
| 5. Spiders | 2 of 5 parts came off | finishing only the parts that are left, with a seam you can't see |
Tested on
- Bambu Lab P1S, single filament
- Windows and macOS (Linux from source)
- Bambu Studio G-code, by-layer printing, relative extrusion
- The part is still firmly attached to the same plate (resume mode), or it came off / is finished and fits back into a wall printed around it (insert mode, beta)
Not tested yet: other printer models and AMS/multi-filament jobs. When a job falls outside what's been tested, Layer Rescue tells you why and asks you to accept the risks before it continues (CLI: --allow-untested). With several filaments it loads the filament that was active at the layer you continue from. If you try one of these, please share your results.
By-object printing and spiral vase don't fit the way Layer Rescue works yet, so those jobs are still turned down.
Install
Downloads are on the Releases page.
Windows: run LayerRescue-Setup-<version>-win-x64.exe. The last page of the installer shows the command to paste into Bambu Studio.
macOS (Apple Silicon): unzip LayerRescue-<version>-macos-arm64.zip and move LayerRescue.app to Applications. The app is not signed with an Apple Developer ID yet, so macOS blocks it the first time:
- Double-click
LayerRescue.app. macOS says it cannot be opened; click Done. - Open System Settings → Privacy & Security, scroll down and click Open Anyway next to Layer Rescue.
- The app opens and shows the command to paste into Bambu Studio.
Do this once before using it from Bambu Studio, otherwise Studio cannot start it. Alternatively run xattr -dr com.apple.quarantine /Applications/LayerRescue.app.
Intel Macs, Linux and everything else: install the PyPI package with Python 3.10+ (the window needs Tkinter; with Homebrew Python also run brew install python-tk):
pipx install layer-rescue
Set up Bambu Studio
-
Switch Bambu Studio to Advanced mode.
-
In the process settings, open Others and find Post-processing Scripts.
-
Enter the full path to Layer Rescue, in quotes:
Install Command Windows installer "C:\Users\<you>\AppData\Local\Programs\LayerRescue\LayerRescue.exe"macOS app "/Applications/LayerRescue.app/Contents/MacOS/LayerRescue"pipx the output of which layer-rescue, e.g."/Users/<you>/.local/bin/layer-rescue"Opening the app directly (without Bambu Studio) shows the exact command for your install.
Studio may show a warning because post-processing scripts are executables. Only approve tools you installed from a source you trust.
Tip: save the process preset with the script in it, so it's there the next time something goes wrong.
The window
After slicing, Layer Rescue opens a small window. At the top it shows the file it got (printer, filament, layer count), and below that there's a tab for each situation:
- Part is still on the plate: resume an interrupted print (below).
- Part came off / print on a finished part: insert mode (further below).
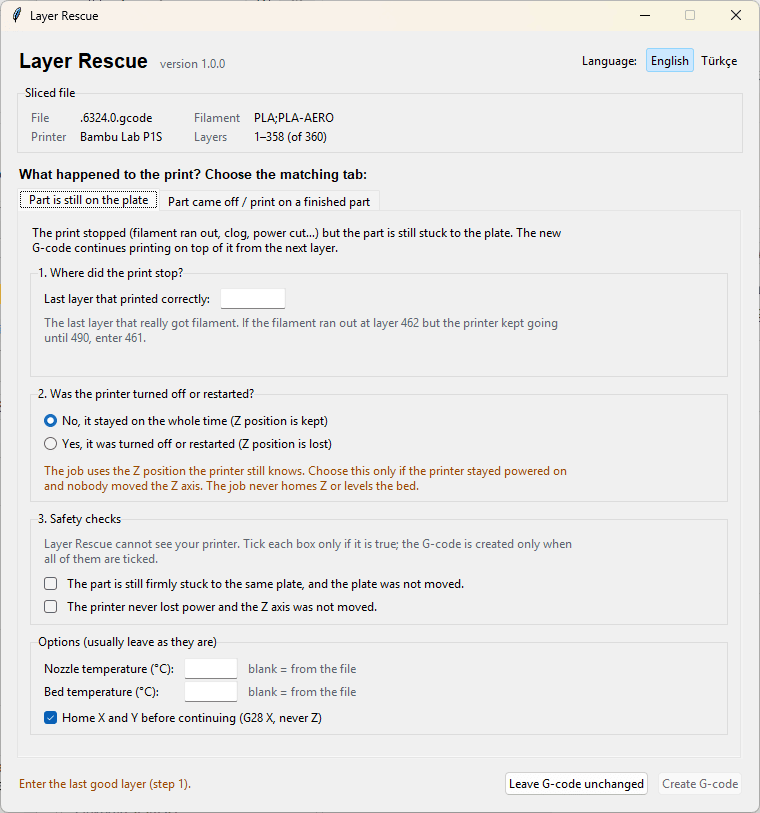
Each tab is a short list of numbered steps. On the resume tab you enter where the print stopped, say whether the printer was turned off, and confirm a few things Layer Rescue can't see for itself under Safety checks. Create G-code stays disabled until everything required is filled in, and the line at the bottom left says what is still missing. Leave G-code unchanged closes the window without touching the file; use it for normal prints.
If the job is for a printer or filament setup that hasn't been tested yet, an extra Untested setup box appears above the tabs. It explains why and asks you to accept the risks before you can continue.
Language: use the English / Türkçe buttons at the top right. The change applies immediately and is remembered for next time. On first start the language follows your system language. (Command-line output stays in English.)
Resume a print
-
Find the last layer that actually got filament (see Picking the layer below).
-
Slice the original project again, without changing anything. The Layer Rescue window opens on Part is still on the plate.
-
Step 1 – Where did the print stop? Enter the last good layer. The window shows the layer and Z height that printing restarts at.
-
Step 2 – Was the printer turned off or restarted?
- No, it stayed on the whole time (
retained): the printer kept its Z position. Nothing else to do. - Yes, it was turned off or restarted (
manual): after a power cycle Z is not homed. Heat the bed back up, clean the nozzle, move it over a flat printed area of the last good layer and lower it until it just touches the surface. If the printer offers to home Z, don't accept. Do not move the part or the plate. (Test 2 shows this step by step.)
- No, it stayed on the whole time (
-
Step 3 – Safety checks. Layer Rescue cannot see the printer, so you confirm what it has to assume. Tick each box only if it is true:
- the part is still firmly stuck to the same plate and the plate was not moved;
- with No, it stayed on: the printer never lost power and the Z axis was not moved;
- with Yes, it was restarted: you will lower the clean nozzle onto the last good layer before starting the job.
Only the check for the selected answer in step 2 is shown.
-
Options can usually stay as they are: nozzle and bed temperature (blank = taken from the file) and homing X/Y before continuing (always on after a restart; Z is never homed).
-
Click Create G-code, check the preview in Bambu Studio and send the job.
Picking the layer
This is the one decision Layer Rescue can't make for you, and it matters more than anything else. When a print fails, the last few layers are often thin or missing even though the printer counts them as done, so go by the part, not by the counter. If filament ran out at layer 462 but the printer kept going until 490, enter 461. A recording or timelapse helps a lot.
Being off by only 2–3 layers already shows:
- Printer stayed on: too high leaves a gap, so the seam is weak and very visible; too low drives the nozzle into the part and can knock it off the plate. (Test 1)
- After a restart: Z comes from where you put the nozzle, so nothing crashes, but the wrong layers get printed there. Too low prints a few layers twice, too high skips them, and the details stop lining up at the seam. (Test 2 is exactly this mistake.)
If you can choose when to stop the print, stop it right after a layer has finished. In Test 5 that gave a seam you can't see at all.
Several objects on the plate
If some parts on a crowded plate came loose, take them off, delete them in Bambu Studio and slice again. Layer Rescue continues everything that is in the G-code, so anything you leave in the project gets printed, in the air if it's no longer on the plate. Don't move, rotate or Arrange the remaining parts; they have to stay exactly where they were printed. (Test 5)
Seat a loose part and print on top (insert mode, beta)
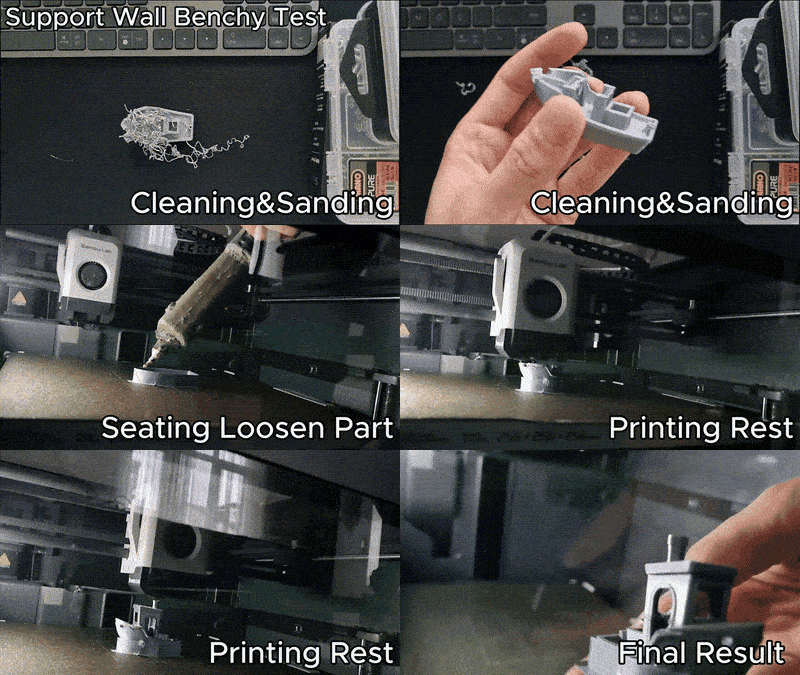
For a part that came off the plate halfway, a finished part that broke, or a finished part that gets an addition. You slice the complete model (the old part plus what goes on top, one object). Layer Rescue replaces the layers below the part's top with a holding wall that follows the part's outline, pauses, and prints the rest on top of the part you put into the wall.
- Prepare the part: remove brim and strings. A broken part must be cut or sanded flat first. Measure its height with calipers.
- Slice the complete model. In the Layer Rescue window open Part came off / print on a finished part.
- Enter the part height (or the last layer the part contains) and optionally the wall height (blank = recommended: half the part, 3–15 mm, always at least 1 mm below the top). Press Preview to see the wall from above and, under Result, where printing continues and any warnings.
- Tick the Safety check (you will stay at the printer, seat the part when it pauses and watch the first layers), click Create G-code and send the job. The printer levels the empty bed, prints the wall, lifts to 15 mm above the part height, parks at the back and pauses (
M400 U1). - Without removing or shifting the plate, press the part into the wall the same way round as in Bambu Studio (front of the model to the front of the plate), then press Resume.
- The printer reheats, purges, travels above the part and prints the rest. The first 2 layers on the part are 10 °C hotter, half speed and without part cooling for adhesion.
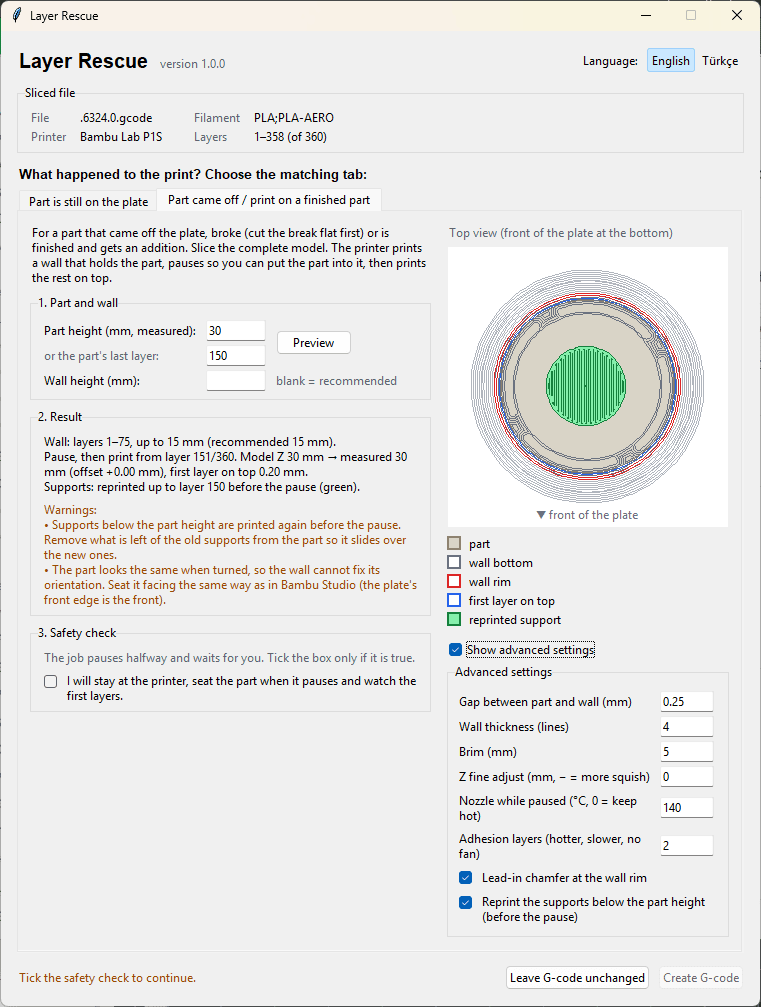
After Preview, the right side shows the plate from above: the part (beige), the bottom and the rim of the wall (grey and red), the first layer that will be printed on the part (blue) and the supports that will be reprinted (green). Result on the left says which layers become the wall, where printing continues after the pause and how thick the first layer on the part will be, followed by any warnings. The advanced settings open under the preview.
How the wall is made: the part's own outline is read from the sliced layers below the wall height. The opening at every height lets all sections below it pass (the part is lowered from above), with 0.25 mm clearance, a 4-line wall, a 5 mm brim and a small lead-in chamfer at the rim. All of these can be changed after ticking Show advanced settings (next to the preview).
Supports. If the model has supports that reach above the part height (for example tree supports inside a hollow part, or next to it), their lower part is printed again before the pause, wherever the part will not hit them when it is lowered in. Remove the old supports from the part before seating it. Supports that only held the part's own overhangs are left out. Turn this off with Reprint the supports below the part height in the advanced settings (CLI --no-reprint-supports). Test 4 shows this on a hollow rocket body.
Getting a good fit:
- If the part sits loose in the wall, lower the clearance. On a round part, the default 0.25 mm was clearly too loose and 0.12 mm gave a much tighter fit.
- Parts that widen upwards (like a boat hull) touch the wall only on sloped surfaces, so the nozzle can drag them up and out. Fix such a part with a few dots of hot glue over the seam, squeezed onto the wall rather than the part: it comes off the part cleanly afterwards. (Test 3)
- Seat the part level all around. Even 0.2 mm higher on one side shows up as layer lines on the other.
Limits: one object on the plate, no prime tower, part at least 3 mm tall and 5 mm wide. The Z of everything printed on top is shifted by the difference between the measured height and the nearest model layer, so the first layer sits on the real part. If the top surface is a cut (infill exposed), add a height range modifier in Bambu Studio from the part height to about 0.6 mm above it with 100 % sparse infill density, so the first layers are solid.
What the generated job does
It keeps the original header and settings, drops the start sequence and the finished layers, restores temperatures, fans and motion limits, lifts the nozzle, homes X/Y only (G28 X), purges at the rear chute, moves above the first point of the layer, lowers onto it and continues with the original G-code to the end.
It never homes Z and never runs bed leveling. In manual mode every Z move is relative to the position you aligned, so the job does not depend on the Z the printer thinks it is at after a restart.
The file is rewritten in place and a .layer-rescue.bak copy of the original is kept next to it.
Limitations and what's next
Layer Rescue saves prints, but it can't make the repair invisible or do everything yet. Here's what to expect:
- The seam usually shows. In most tests there was a visible layer line where the print restarted, even with the exact right layer. With the right layer, the seams I've handled didn't tear, crack or crush, but I haven't done proper strength tests yet, and the result depends on the model and the filament. For functional parts, a few drops of superglue on the seam don't hurt.
- You pick the layer, and mistakes show. There's no automatic detection of where the print really stopped. See Picking the layer.
- After a restart, the result depends on your hands. The nozzle is placed on the part by eye.
- Insert mode is still beta. How well a part fits the wall depends a lot on its shape: some drop in and sit snugly, some can shift, some need glue, and some may not fit at all. Round parts can't be oriented by the wall, so you have to seat them facing the right way. It handles one object on the plate and no prime tower.
- Tested on one printer so far. Everything above was tested on a Bambu Lab P1S with a single filament. You can try other printers and multi-filament jobs by accepting the risks in the window, but the parking, purging and homing moves were made for the P1S, so watch the start closely.
I'm working on these, with insert mode fitting first in line.
Share your results
Layer Rescue gets better with every real print it sees. If something didn't work, or the result looked odd, please open an issue with the G-code, your printer and firmware version, the settings you used and a few photos. And if it saved a print for you, especially on a printer or with a filament I haven't tried, I'd love to hear about that too: successful prints on new setups are exactly what's needed before they can be enabled.
Command line
layer-rescue --analyze print.gcode
layer-rescue --last-layer 461 --z-mode retained print.gcode
layer-rescue --last-layer 461 --z-mode manual --confirm-manual-z-aligned print.gcode
Insert mode:
layer-rescue --part-height 23.4 --wall-height 10 --confirm-attended print.gcode
layer-rescue --part-layer 117 --confirm-attended --preview-svg wall.svg print.gcode
Insert options: --clearance, --wall-lines, --brim, --no-chamfer, --z-fine, --standby-temp, --adhesion-layers, --no-reprint-supports.
--allow-untested accepts the risks of an untested printer or multi-filament job. --nozzle-temp and --bed-temp override the detected temperatures. Run layer-rescue --help for all options.
Credits
The idea of resuming a print from a chosen layer comes from CNC Kitchen's guide to resuming a failed 3D print. When I started this project, I mostly wanted to automate the manual steps from that guide for Bambu Studio, so thanks to CNC Kitchen for explaining it so clearly. Everything else (insert mode with its holding wall, support reprinting, the safety checks and output validation) was designed from scratch for Layer Rescue.
Thanks also to the designers of the models I used in the tests:
- Plane part: Talon 1400 by Flightory
- Dragon: Mystic Dragon by DElex3D on MakerWorld
- Boat: the classic 3DBenchy
- Rocket drone: Sub-250g SpeedDrone by luisengineering on MakerWorld
- Spiders: The World's Smallest Spider by formastampa on MakerWorld
Contributing
Bug reports with the printer model, firmware version and G-code are the most useful contribution. See CONTRIBUTING.md.
License
MIT. Not affiliated with or endorsed by Bambu Lab.
1 maintainer

Metadata
1 maintainer
Release files for layer-rescue 1.0.1
For a detailed explanation of source distributions (sdists) and built distributions (wheels), please see the package formats documentation.
Source distribution (sdist)
| File | Size | Uploaded | |
|---|---|---|---|
| layer_rescue-1.0.1.tar.gz | 124.5 kB | Details |
Built distribution (wheel)
| File | Interpreter | ABI | Platform | Reset |
|---|---|---|---|---|
| layer_rescue-1.0.1-py3-none-any.whl | Python 3 | none | any | Details |
Total release size: 238.0 kB
Release files / layer_rescue-1.0.1.tar.gz
| Download URL | layer_rescue-1.0.1.tar.gz |
|---|---|
| Size | 124.5 kB |
| Tags | Source |
|
SHA-256 checksum How to use checksums |
baf866b039892b1c4b47239dc6d3a32444b6984f0d9fd42645692c08b30ed5df
|
|
BLAKE2b-256 checksum How to use checksums |
474c21e0e47b72e08fca6682ad8abb045ee2f394c10cb99ea12ef5d00bed49f9
|
| Upload date | |
|
Uploaded using Trusted Publishing? What is trusted publishing? |
Yes |
| Uploaded via |
twine/7.0.0 CPython/3.13.14
|
Provenance
Provenance describes where a file came from. On PyPI, provenance is shared via attestations, which provide a verifiable record of the build or publishing details. View details, limitations and caveats.


PyPI Publish Attestation
PyPI verified that this artifact, at this checksum, originated from the publisher listed below.
Signed by GitHub Actions, verified by PyPI on Oct 1, 2026.
Transparency logRelease files / layer_rescue-1.0.1-py3-none-any.whl
| Download URL | layer_rescue-1.0.1-py3-none-any.whl |
|---|---|
| Size | 113.5 kB |
| Tags | Python 3 |
|
SHA-256 checksum How to use checksums |
16634ee18ed03b0ae3ef3d6ae027c7caaf8f9fc5fe6fba94fd2f53518b615784
|
|
BLAKE2b-256 checksum How to use checksums |
3903e4afbc355d130fddb93c01cb40e60d8528abc2571180a1c22e974294dbc5
|
| Upload date | |
|
Uploaded using Trusted Publishing? What is trusted publishing? |
Yes |
| Uploaded via |
twine/7.0.0 CPython/3.13.14
|
Provenance
Provenance describes where a file came from. On PyPI, provenance is shared via attestations, which provide a verifiable record of the build or publishing details. View details, limitations and caveats.
PyPI Publish Attestation
PyPI verified that this artifact, at this checksum, originated from the publisher listed below.
Signed by GitHub Actions, verified by PyPI on Oct 1, 2026.
Transparency log












