A Looker Deployment Tool


Project description
Looker Deployer

Intro
Looker Deployer (aka 'ldeploy') is a command line tool to help move Looker objects across instances. This includes Content (Looks, Dashboards, entire Spaces, etc.), Boards and Connections.
Status and Support
As of 2023, Looker Deployer is supported, but not warrantied by Google. Issues and feature requests can be reported via https://github.com/llooker/looker_deployer/issues, which will be regularly monitored and prioritized.
Requirements
In order for these commands to correctly work a few assumptions/requirements are needed for your environment:
- Python Looker Deployer requires Python 3.6-3.9
- Gazer The content deployment command makes use of gzr to automate content deployment, so you will need to have that installed and configured properly. Gazer requires an up-to-date version of ruby.
Authentication and Configuration
Looker Deployer makes use of the Looker SDK to
communicate with your Looker instances. A looker.ini file is required to provide authentication. By default the tool
looks for this file in your working directory but if it is named differently or in a different location you can make use
of the --ini argument to specify its location. Here's an example ini file:
[dev]
base_url=https://looker-dev.company.com:19999
client_id=abc
client_secret=xyz
verify_ssl=True

[prod]
base_url=https://looker-prod.company.com:19999
client_id=abc
client_secret=xyz
verify_ssl=True
Installation
Looker Deployer is on PyPi! - You can install it with pip install looker-deployer.
Dockerfile
A looker.ini file is required for API authentication. You will have to either volume-map the ini file
when you run the container, or (recommended) build an image from this one that "burns" a relevant ini file into the
container.
To do this, create a directory with an looker.ini file and a Dockerfile with the following content:
FROM python:3.9-slim

RUN apt update
RUN apt -y install ruby ruby-dev
RUN gem install gazer

RUN apt -y install git
RUN git clone https://github.com/looker-open-source/looker_deployer.git

WORKDIR /looker_deployer

COPY looker.ini .
RUN pip install .

ENTRYPOINT ["ldeploy"]
Then simply:
docker build -t ldeploy .
You can get use: docker run ldeploy <command> <parameters> ...
Keep in mind that in order to get the output you will need to map local directories to directories in docker, so a real life usage might look like:
docker run \
  -v /local/path/to/ldeploy/settings:/ldeploy_settings \
  -v /local/path/to/ldeploy/output:/ldeploy_output \
  ldeploy content export \
    --ini /ldeploy_settings/looker.ini \
    --local-target /ldeploy_output \
    <additional parameters>
You would put your looker.ini file in /local/path/to/ldeploy/settings and the output generated by the commands would
be found in /local/path/to/ldeploy/output.
Local Installation
It is recommended to set up a python virtual environment if you intend to use looker-deployer on your local machine rather than using the docker image. This will prevent other modules from creating conflicts with the looker-deployer install.
pyenv offers easy management of python versions and virtual environments.
Once pyenv is installed, install the desired version of Python and create the virtual environment named ldeploy:
pyenv install 3.8.3
pyenv virtualenv 3.8.3 ldeploy
Activate the virtual environment and install looker-deployer:
pyenv activate ldeploy
pip install looker-deployer
looker-deployer is now ready for use! Once you are finished, deactivate the virtual environment:
source deactivate
Usage
The tool is invoked with the ldeploy command, followed by the relevant sub-command. The available sub-commands
are: boards, code, connections, and content.
Each sub-command can be configured with its relevant arguments, which can be reviewed with the -h or --help
argument. For example:
ldeploy content -h
Content Deployment
This command makes use of gazer to either pull content from your dev Looker instance to a directory structure on your
local machine or deploy content from said directory structure to a specified Looker instance. The command can work for
specific sets of Looks or Dashboards or can work on entire folders - and will correctly create any folder it doesn't find
in the target instance.
The content command is further divided into two subcommands: export and import
Content Export
All content deployment tasks begin by exporting a representation of your development environment's content folder tree
to local disk. This is done with the export command. This directory tree is then used in subsequent import commands to import
dashboards, looks, or the entire tree to another instance.
The command accepts the following arguments:
usage: ldeploy content export [-h] --env ENV [--ini INI] [--debug] --folders
                              FOLDERS [FOLDERS ...] --local-target
                              LOCAL_TARGET

optional arguments:
  -h, --help            show this help message and exit
  --env ENV             What environment to deploy from
  --ini INI             ini file to parse for credentials
  --debug               set logger to debug for more verbosity
  --folders FOLDERS [FOLDERS ...]
                        What folders to export content from
  --local-target LOCAL_TARGET
                        Local directory to store content
Content Import
Once you have exported your content from your development environment you can use the import command to bring it into
your production environment.
usage: ldeploy content import [-h] --env ENV [--ini INI] [--debug]
                              [--recursive] [--target-folder TARGET_FOLDER]
                              (--folders FOLDERS [FOLDERS ...] | --dashboards DASHBOARDS [DASHBOARDS ...] | --looks LOOKS [LOOKS ...])

optional arguments:
  -h, --help            show this help message and exit
  --env ENV             What environment to deploy to
  --ini INI             ini file to parse for credentials
  --debug               set logger to debug for more verbosity
  --recursive           Should folders deploy recursively
  --target-folder TARGET_FOLDER
                        override the default target folder with a custom path
  --folders FOLDERS [FOLDERS ...]
                        Folders to fully deploy
  --dashboards DASHBOARDS [DASHBOARDS ...]
                        Dashboards to deploy
  --looks LOOKS [LOOKS ...]
                        Looks to deploy
Import base folder Support has been added for importing contenting to base folders other than Shared. There are a few important notes to go along with that:
- Users, Embed Users, and Embed Groups folders must exist before running the import, ldeploy cannot create them.
- Users, Embed Users, and Embed Groups folders must be uniquely named.
- "Shared" is the default base folder if no other is specified using "--target-folder"
Examples:
ldeploy content export --env dev --folders 1 --local-target ./foo/bar/<- exports the Shared folder (id 1) and all sub-folders to the directory location./foo/bar/ldeploy content export --env dev --folders 5 8 --local-target ./foo/bar/<- exports folders 5 and 8 (and all of their sub-folders) to the directory location./foo/bar/ldeploy content import --env prod --folders ./foo/bar/Shared/Public<- deploys every piece of content inShared/Publicto the prod instanceldeploy content import --env prod --folders ./foo/bar/Shared/Public --recursive --target-folder Shared/FromDev/Public<- deploys every piece of content inShared/Publicand all sub-folders to the prod instance in theShared/FromDev/Publicfolder.ldeploy content import --env prod --dashboards ./foo/bar/Shared/Public/Dashboard_1.json ./foo/bar/Shared/Restricted/Dashboard_2.json<- deploysDashboard1andDashboard2to their respective folders in the prod instanceldeploy content import --env prod --folders ./dev/Users --recursive --target-folder Users<- deploys every piece of content indev/Usersand all sub-folders to the prod instance in theUsersfolderldeploy content import --env prod --folders "./dev/Embed Users" --recursive --target-folder "Embed Users"<- deploys every piece of content indev/Embed Usersand all sub-folders to the prod instance in theEmbed Groupsfolderldeploy content import --env prod --folders "./dev/Embed Groups" --recursive --target-folder "Embed Groups"<- deploys every piece of content indev/Embed Groupsand all sub-folders to the prod instance in theEmbed Groupsfolder
Board Deployment
This command allows for the deployment of boards/homepages across instances. It attempts to resolve differences in
dashboard/look ids across instances and confirms that the content is present before building the new board. Boards are
matched by title - updating an existing board will result in the rebuilding of the relevant sections and items to
prevent issues with attempting to match via title. If needing to update a board title, make use of the title-change
parameter to allow the command to find the old title. The command accepts the following arguments:
usage: ldeploy boards [-h] --source SOURCE --target TARGET [TARGET ...]
                      --board BOARD [--ini INI] [--allow-partial]
                      [--title-change TITLE_CHANGE] [--debug]

optional arguments:
  -h, --help            show this help message and exit
  --source SOURCE       which environment to source the board from
  --target TARGET [TARGET ...]
                        which target environment(s) to deploy to
  --board BOARD         which board to deploy
  --ini INI             ini file to parse for credentials
  --allow-partial       allow partial deployment of board content if not all
                        content is present on target instance?
  --title-change TITLE_CHANGE
                        if updating title, the old title to replace in target
                        environments
  --debug               set logger to debug for more verbosity
Examples:
ldeploy boards --source dev --target prod --board 'My Cool Board'<- deploys the board 'My Cool Board' from dev to prodldeploy boards --source dev --target prod_1 prod_2 --allow-partial --board 'My Updated Title Board' --title-change 'My Cool Board'<- This deploys a board whose title has been changed from 'My Cool Board' to 'My Updated Title Board' from dev to two instances: prod_1 and prod_2. Any content not present in either prod instance will be skipped without raising any errors.
Connections Deployment
This command allows for the migration of database connections across instances. For security purposes, Looker's API does
not transmit password credentials, so this command allows for the injection of these credentials from the .ini file.
The command accepts the following arguments:
usage: ldeploy connections [-h] --source SOURCE [--ini INI] --target TARGET
                           [TARGET ...] [--pattern PATTERN]
                           [--include-password] [--debug]

optional arguments:
  -h, --help            show this help message and exit
  --source SOURCE       which environment to source the board from
  --ini INI             ini file to parse for credentials
  --target TARGET [TARGET ...]
                        which target environment(s) to deploy to
  --pattern PATTERN     regex pattern to filter which connections are deployed
  --include-password    should passwords be set from the ini file?
  --debug               set logger to debug for more verbosity
Examples:
ldeploy connections --source dev --target prod<- This will deploy all connections in the dev instance to the prod instance. No credentials will be included and would need to be manually added from the Looker UI.ldeploy connections --source dev --target prod --pattern ^bigquery --include-password<- This will deploy all connections that begin withbigqueryfrom dev to prod and attempt to inject passwords included in the.inifile.
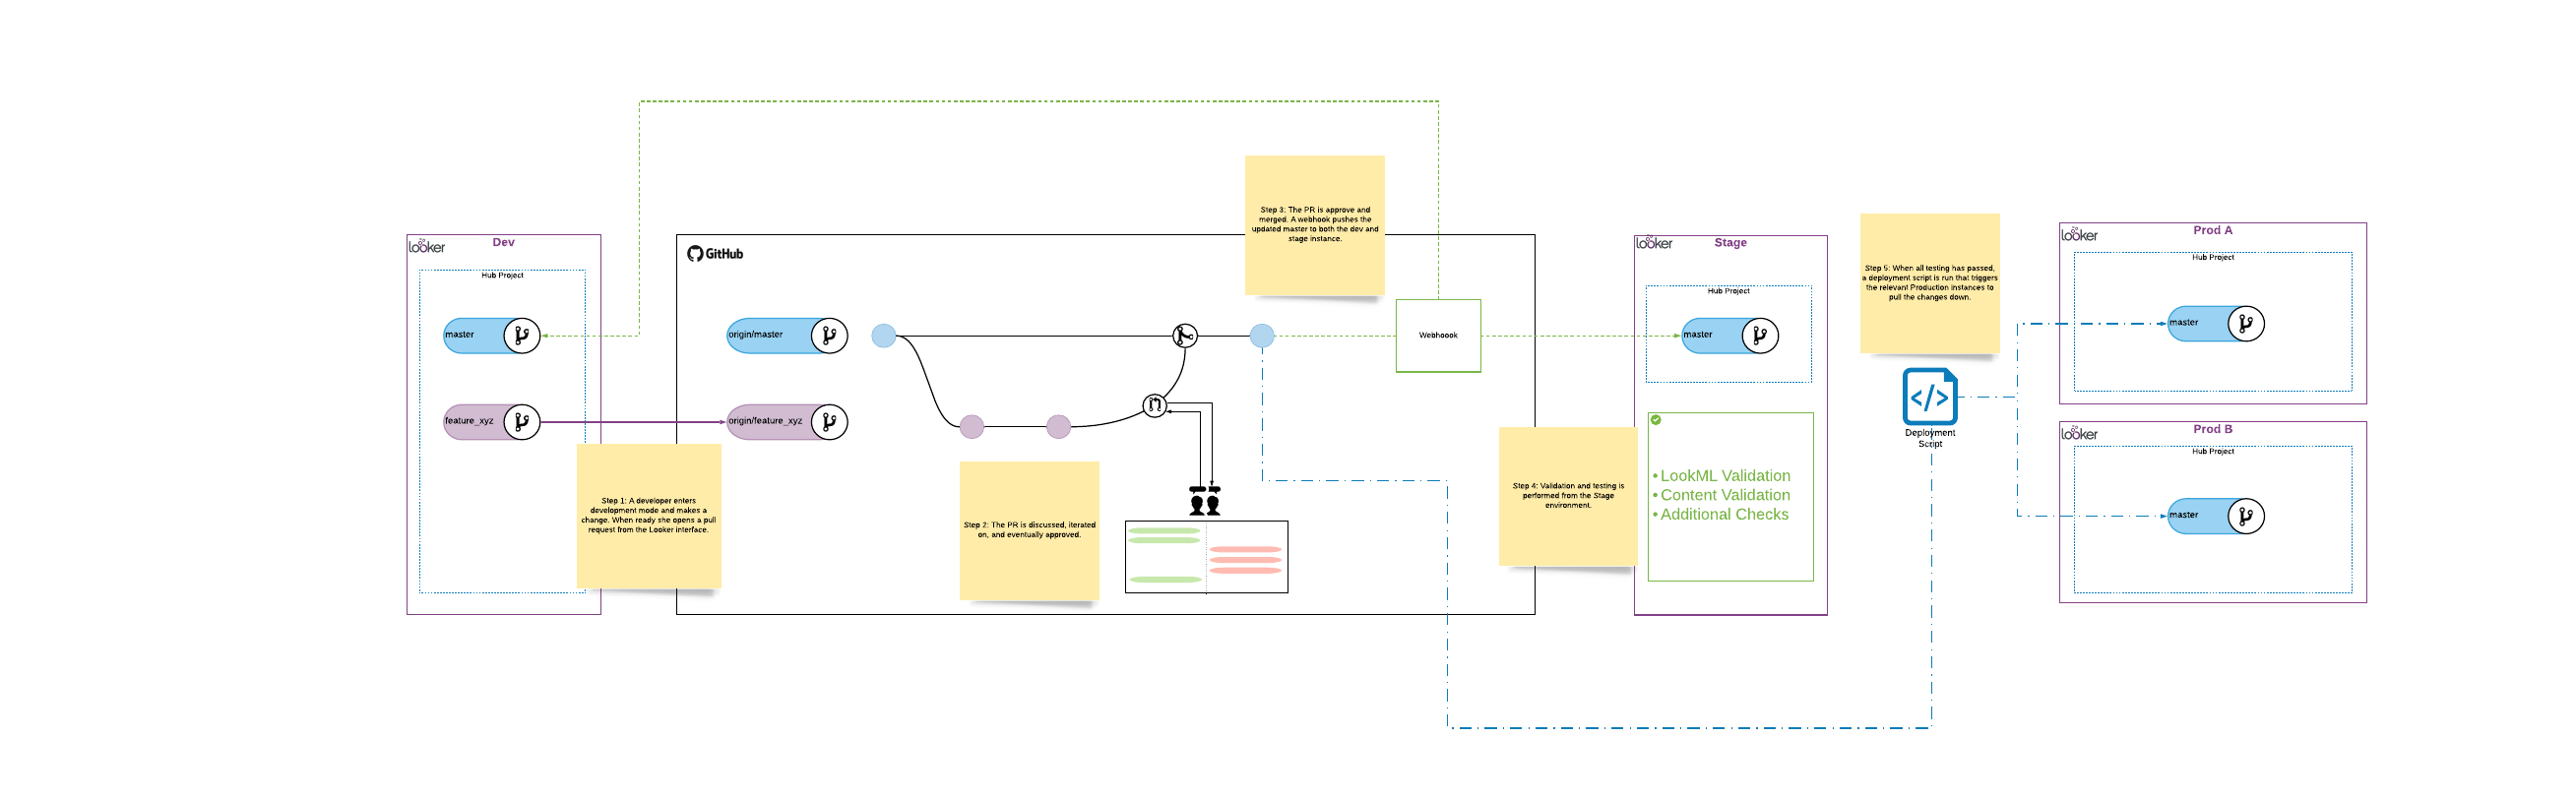
Code Deployment
This command will manage deployments of hub/spoke LookML code from the current Github master branch to the relevant production instance(s). This
is accomplished by sending a GET request to each instances deploy endpoint and authenticating it with the webhook
secret.
An overview of the relevant architecture (click to embiggen):
In order to use the code deployment tool, a code_config.yaml file is required. This file requires a list of instances - one
for each client production instance. This list must include the name (used to refer to that instance in the commands),
the endpoint, and the name of that instances spoke project. In addition, the config file requires an entry for the
common hub project and can optionally include a list of names to instance names to exclude from hub deployments. Here's
an example config:
instances:
  - name: calvin
    endpoint: https://looker-dev.company.com
    spoke_project: powered_by_spoke_ck
  - name: levis
    endpoint: https://looker-dev.company.com
    spoke_project: powered_by_spoke_lv

hub_project: powered_by_hub
The command accepts the following arguments:
usage: ldeploy code [-h] [--hub] [--spoke SPOKE [SPOKE ...]]
                    [--hub-exclude HUB_EXCLUDE [HUB_EXCLUDE ...]] [--debug]

optional arguments:
  -h, --help            show this help message and exit
  --hub                 flag to deploy hub project
  --spoke SPOKE [SPOKE ...]
                        which spoke(s) to deploy
  --hub-exclude HUB_EXCLUDE [HUB_EXCLUDE ...]
                        which projects should be ignored from hub deployment
  --debug               set logger to debug for more verbosity
Examples:
ldeploy code --hub<- This will deploy the hub project to all production instancesldeploy code --spoke foo<- This will deploy the spoke project named "foo" to the relevant instanceldeploy code --hub --spoke foo bar --hub-exclude bar --debug<- This will deploy the hub project to all instances exceptbarand then deploy the spoke projectsfooandbarto their respective instances
Role Admin Settings
Due to the related nature of role settings in Looker, it is recommended to run these commands in the following order to ensure the prior information is available:
- Model Sets
- Permission Sets
- Roles
- Groups
- Group in Group
- Role to Group
- User Attributes
Special Considerations:
If you have externally manged groups, you will need to ensure you update for SAML/LDAP is done prior to Group in Group. These special groups are not migrated by the code referenced above.
Model Sets Deployment
This command allows for the migration of model sets across instances.
Matching for create/update/delete will be based on the name of the setting, since IDs are auto-incremented.
The command accepts the following arguments:
usage: ldeploy model_sets [-h] --source SOURCE [--ini INI] --target TARGE [TARGET ...] [--pattern PATTERN] [--delete] [--debug]

optional arguments:
  -h, --help            show this help message and exit
  --source SOURCE       which environment to source the model sets from
  --ini INI             ini file to parse for credentials
  --target TARGET [TARGET ...]
                        which target environment(s) to deploy to
  --pattern PATTERN     regex pattern to filter
  --delete              allows for deletion from target based on name
  --debug               set logger to debug for more verbosity
Examples:
ldeploy model_sets --source dev --target prod<- This will deploy all model sets in the dev instance to the prod instance.ldeploy model_sets --source dev --target prod --pattern ^test<- This will deploy all model sets that starts with test.
Permission Sets Deployment
This command allows for the migration of permission sets across instances.
Matching for create/update/delete will be based on the name of the setting, since IDs are auto-incremented.
The command accepts the following arguments:
usage: ldeploy permission_sets [-h] --source SOURCE [--ini INI] --target TARGE [TARGET ...] [--pattern PATTERN] [--delete] [--debug]

optional arguments:
  -h, --help            show this help message and exit
  --source SOURCE       which environment to source the permission sets from
  --ini INI             ini file to parse for credentials
  --target TARGET [TARGET ...]
                        which target environment(s) to deploy to
  --pattern PATTERN     regex pattern to filter
  --delete              allows for deletion from target based on name
  --debug               set logger to debug for more verbosity
Examples:
ldeploy permission_sets --source dev --target prod<- This will deploy all permission sets in the dev instance to the prod instance.ldeploy permission_sets --source dev --target prod --pattern ^test<- This will deploy all permission sets that starts with test.
Roles Deployment
This command allows for the migration of roles across instances.
Matching for create/update/delete will be based on the name of the setting, since IDs are auto-incremented.
The command accepts the following arguments:
usage: ldeploy roles [-h] --source SOURCE [--ini INI] --target TARGE [TARGET ...] [--pattern PATTERN] [--delete] [--debug]

optional arguments:
  -h, --help            show this help message and exit
  --source SOURCE       which environment to source the roles from
  --ini INI             ini file to parse for credentials
  --target TARGET [TARGET ...]
                        which target environment(s) to deploy to
  --pattern PATTERN     regex pattern to filter
  --delete              allows for deletion from target based on name
  --debug               set logger to debug for more verbosity
Examples:
ldeploy roles --source dev --target prod<- This will deploy all roles in the dev instance to the prod instance.ldeploy roles --source dev --target prod --pattern ^test<- This will deploy all roles that starts with test.
Groups Deployment
This command allows for the migration of non-externally managed groups across instances.
Matching for create/update/delete will be based on the name of the setting, since IDs are auto-incremented.
The command accepts the following arguments:
usage: ldeploy groups [-h] --source SOURCE [--ini INI] --target TARGE [TARGET ...] [--pattern PATTERN] [--delete] [--debug]

optional arguments:
  -h, --help            show this help message and exit
  --source SOURCE       which environment to source the groups from
  --ini INI             ini file to parse for credentials
  --target TARGET [TARGET ...]
                        which target environment(s) to deploy to
  --pattern PATTERN     regex pattern to filter
  --delete              allows for deletion from target based on name
  --debug               set logger to debug for more verbosity
Examples:
ldeploy groups --source dev --target prod<- This will deploy all groups in the dev instance to the prod instance.ldeploy groups --source dev --target prod --pattern ^test<- This will deploy all groups that starts with test.
Group in Group (i.e. Groups Hierarchy) Deployment
This command allows for the migration of groups belonging to other groups across instances.
Matching for create or delete will be based on the name of the setting, since IDs are auto-incremented.
The command accepts the following arguments:
usage: ldeploy group_in_group [-h] --source SOURCE [--ini INI] --target TARGE [TARGET ...] [--pattern PATTERN] [--debug]

optional arguments:
  -h, --help            show this help message and exit
  --source SOURCE       which environment to source the group hierarchy from
  --ini INI             ini file to parse for credentials
  --target TARGET [TARGET ...]
                        which target environment(s) to deploy to
  --pattern PATTERN     regex pattern to filter
  --debug               set logger to debug for more verbosity
Examples:
ldeploy group_in_group --source dev --target prod<- This will deploy all group in groups in the dev instance to the prod instance.ldeploy group_in_group --source dev --target prod --pattern ^test<- This will deploy all group in groups that starts with test.
Role to Group Deployment
This command allows for the migration of roles associated to groups across instances.
Matching for create or update will be based on the name of the setting, since IDs are auto-incremented.
The command accepts the following arguments:
usage: ldeploy role_to_group [-h] --source SOURCE [--ini INI] --target TARGE [TARGET ...] [--pattern PATTERN] [--debug]

optional arguments:
  -h, --help            show this help message and exit
  --source SOURCE       which environment to source the role to group from
  --ini INI             ini file to parse for credentials
  --target TARGET [TARGET ...]
                        which target environment(s) to deploy to
  --pattern PATTERN     regex pattern to filter
  --debug               set logger to debug for more verbosity
Examples:
ldeploy role_to_group --source dev --target prod<- This will deploy all roles to group in the dev instance to the prod instance.ldeploy role_to_group --source dev --target prod --pattern ^test<- This will deploy all roles to groups that starts with test.
User Attributes Deployment
This command allows for the migration of non-system managed user attributes across instances (i.e. id, first_name, last_name, email).
Matching for create/update/delete will be based on the name of the setting, since IDs are auto-incremented. This includes assignments made for user attributes made by group names.
The command accepts the following arguments:
usage: ldeploy user_attributes [-h] --source SOURCE [--ini INI] --target TARGE [TARGET ...] [--pattern PATTERN] [--delete] [--debug]

optional arguments:
  -h, --help            show this help message and exit
  --source SOURCE       which environment to source the user attributes from
  --ini INI             ini file to parse for credentials
  --target TARGET [TARGET ...]
                        which target environment(s) to deploy to
  --pattern PATTERN     regex pattern to filter
  --delete              allows for deletion from target based on name
  --debug               set logger to debug for more verbosity
Examples:
ldeploy user_attributes --source dev --target prod<- This will deploy all user attributes in the dev instance to the prod instance.ldeploy user_attributes --source dev --target prod --pattern ^test<- This will deploy all user attributes that starts with test.
Development
This project makes use of pipenv to manage dependencies. Follow the installation
instructions. It is recommended to use pyenv to manage installing python versions.
Once pipenv has been installed, clone this repo, cd into it, and invoke pipenv install --ignore-pipfile
Release history Release notifications | RSS feed


Download files
Download the file for your platform. If you're not sure which to choose, learn more about installing packages.
Source Distribution
Built Distribution
Filter files by name, interpreter, ABI, and platform.
If you're not sure about the file name format, learn more about wheel file names.
Copy a direct link to the current filters
File details
Details for the file looker_deployer-0.3.12.tar.gz.
File metadata
- Download URL: looker_deployer-0.3.12.tar.gz
- Upload date:
- Size: 31.5 kB
- Tags: Source
- Uploaded using Trusted Publishing? No
- Uploaded via: twine/6.0.1 CPython/3.8.20
File hashes
| Algorithm | Hash digest | |
|---|---|---|
| SHA256 |
9b33a1d2e7ea5815866728eb14175b1fd681819a28aadaf8f1ae71f2d6c6a9b1
|
|
| MD5 |
53c2a734409d4cf001801c570709e495
|
|
| BLAKE2b-256 |
344aec1a74132fea89d9fd577da313df928bced2427e654eac93c965f2d0a218
|
File details
Details for the file looker_deployer-0.3.12-py3-none-any.whl.
File metadata
- Download URL: looker_deployer-0.3.12-py3-none-any.whl
- Upload date:
- Size: 38.6 kB
- Tags: Python 3
- Uploaded using Trusted Publishing? No
- Uploaded via: twine/6.0.1 CPython/3.8.20
File hashes
| Algorithm | Hash digest | |
|---|---|---|
| SHA256 |
32dc02855d3cdcd3380dd60f6651c178ae6e294daf81216381f71445d3ba085b
|
|
| MD5 |
15cb619e4060bc0f351baa813f793f48
|
|
| BLAKE2b-256 |
2a0cb47c098c7fd39ff399c9bf5922d5cf34356537a0a7f26697a7a3699774fe
|


