
Lythos
2D finite element analysis for geotechnical engineering: slopes, embankments and deep excavations, with factors of safety by strength reduction and internal forces in walls, piles and anchors.
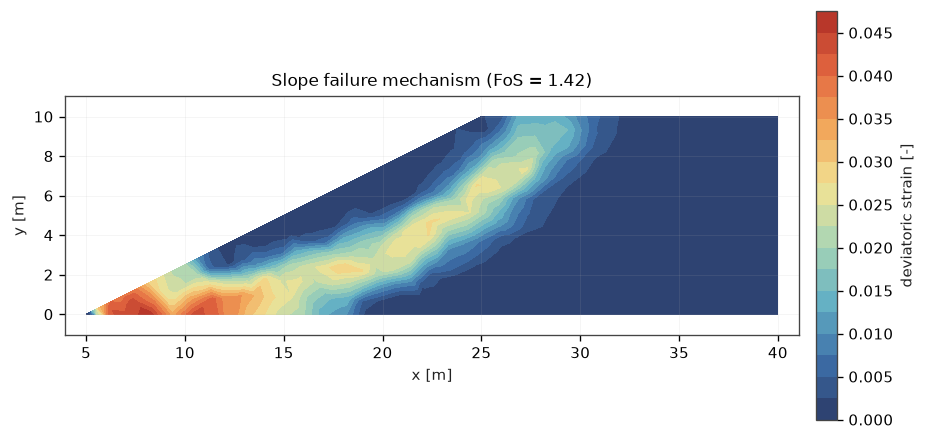
Lythos covers the analyses a geotechnical engineer runs in practice:
- Slope stability — factor of safety by shear strength reduction, with the critical slip surface falling out of the deviatoric strain field rather than being assumed circular.
- Staged construction — embankments raised in lifts, excavations dug in stages, structures and anchors installed when they are built.
- Retaining structures — bored pile rows, diaphragm walls, sheet piles and linings, specified by diameter, spacing and concrete grade, reporting axial force, shear and bending moment along the member.
- Soil-structure interaction — Mohr-Coulomb interfaces with wall friction, pre-stressed ground anchors, struts and surcharge loads.
- Groundwater — hydrostatic pore pressure below a phreatic surface, with the horizontal pressure gradient carried as a seepage force.
- DXF import — read the section, and its construction sequence, straight out of the CAD drawing instead of retyping coordinates.
Everything runs from an interactive interface in the browser, from the command line, or as a Python script.
Installing
pip install lythosfea
The distribution is lythosfea; what you import and run is lythos:
import lythos
lythos gui                       # the interface
lythos import --sample -o m.json # try the drawing that ships with it
Add pip install lythosfea[dxf] if you need binary DXF, splines or block
references; plain ASCII DXF needs nothing extra.
Running it from a clone
Nothing needs installing. From a fresh clone:
python main.py
That opens the interface in your browser. main.py also takes the commands
below, so python main.py run models/slope.json -o out works the same as the
installed lythos run ....
Python 3.10 or later, with NumPy, SciPy and Matplotlib. If any of those are
missing main.py says so and gives the command for your system rather than
failing with an import error.
For working on the code, install it in place:
python -m venv .venv
source .venv/bin/activate        # fish: source .venv/bin/activate.fish
pip install -e ".[dev]"
A virtual environment is not a formality on Arch, Debian or Fedora: those
distributions refuse a system-wide pip install outright (PEP 668). If you
would rather use the system packages, python -m venv --system-site-packages .venv lets the environment see a pacman- or apt-installed NumPy instead of
downloading its own.
The interface
python main.py # or: lythos gui
This starts a local server and opens the interface in your browser. Draw the soil layers, drop in a wall, set the construction stages, and press Run analysis.
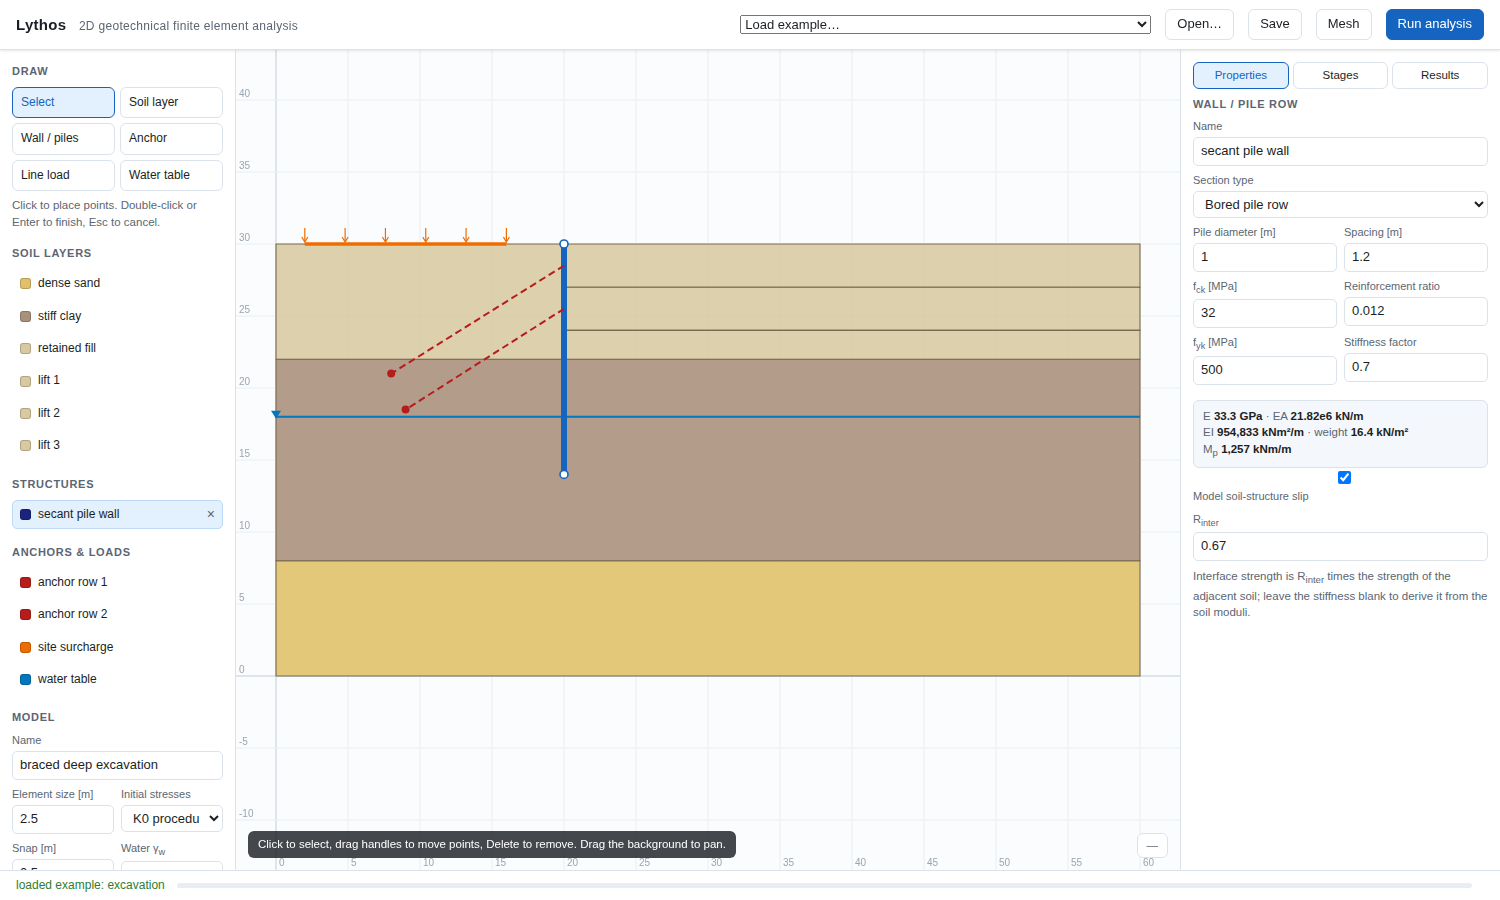
Nothing leaves your machine: the server listens on the loopback address only. The interface runs in a browser rather than a desktop toolkit so that it works the same over a remote session, in a container, or on a machine with no display.
Starting from a CAD drawing
python main.py import section.dxf -o section.json --plot section.png
Or press Import DXF… in the interface.
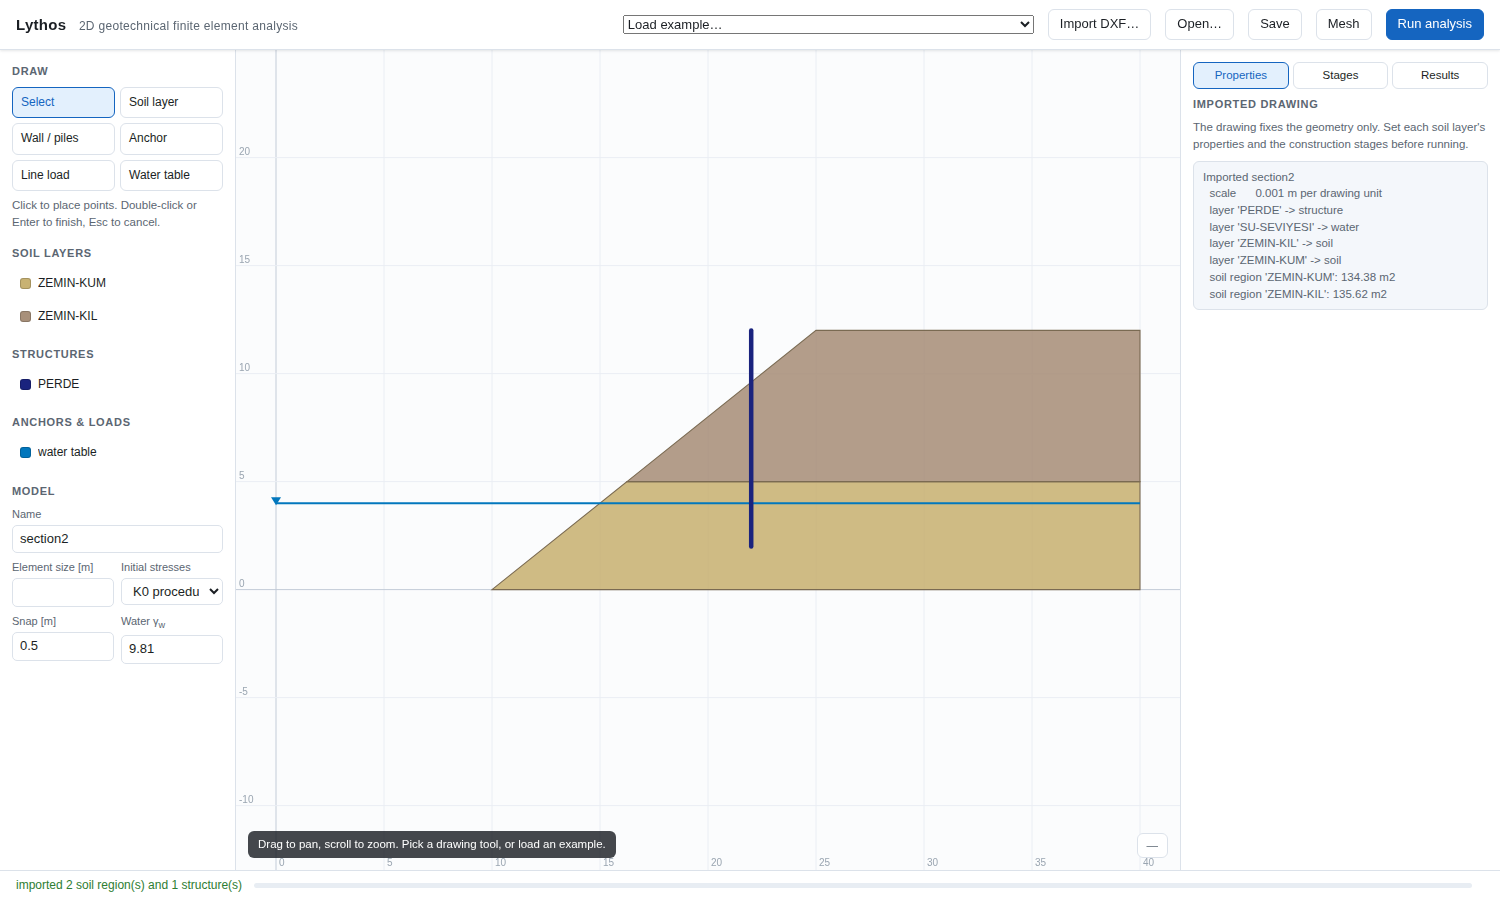
Which drawing layer becomes what is decided by its name, matched
case-insensitively and ignoring hyphens, underscores and spaces, so
SU-SEVIYESI and su seviyesi both read as the water table:
| Drawing layer contains | becomes |
|---|---|
soil, clay, sand, rock, fill, zemin, kil, kum, tabaka, … |
a soil layer |
wall, pile, sheet, diaphragm, perde, kazık, … |
a wall or pile row |
water, phreatic, gwl, su seviyesi, … |
the water table |
load, surcharge, yük, … |
a line load |
anchor, strut, prop, ankraj, … |
an anchor |
text, dim, hatch, grid, defpoints, ölçü, … |
ignored |
| anything else | soil if the outline is closed, a structure if not |
Soil regions are recovered as the faces of the planar arrangement the lines make, so both usual CAD conventions work: each stratum drawn as its own closed polyline, or one outer boundary plus the lines dividing it. Drawn the first way each region keeps its own layer name; drawn the second way names are guessed from whichever layer drew most of each boundary, and the import says so.
The construction sequence
A number at the end of a layer name is the step at which that thing happens. That is the whole convention:
| Layer | Meaning |
|---|---|
WALL-1 |
the wall is built at step 1 |
EXC-2, KAZI-2 |
this region is dug out at step 2 |
ANCHOR-3 |
the anchor is stressed to its lock-off load at step 3 |
SURCHARGE-1 |
the load is applied at step 1 |
SOIL-CLAY |
no number: present from the start, never removed |
Excavation regions can be drawn either way too: as closed outlines of each lift, or as the dig levels drawn from the wall outwards, in which case the region each level cuts off from below is what comes out at that step. Walls take part in bounding those regions, which is what lets a level line drawn only across the excavation enclose anything.
Try it on the drawing in the repository:
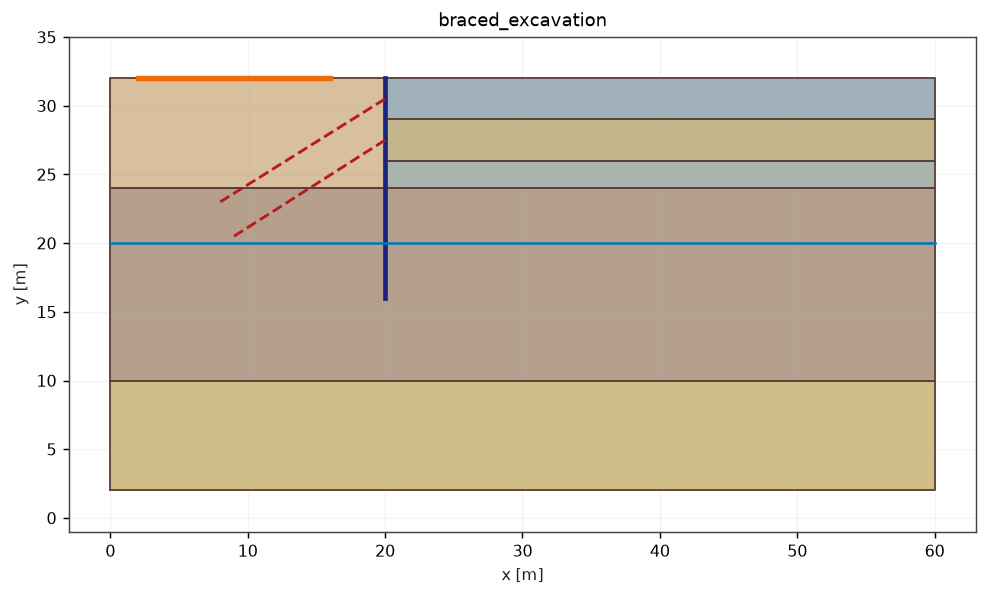
lythos import --sample -o excavation.json
# from a clone, without installing:
python main.py import --sample -o excavation.json
step 1: build WALL-1; apply SURCHARGE-1
step 2: excavate EXC-2
step 3: stress ANCHOR-3
step 4: excavate EXC-4
step 5: stress ANCHOR-5
step 6: excavate EXC-6
which becomes an eight-stage model: initial stresses, those six steps, and a factor of safety. Excavated regions are meshed like any other soil — they have to exist before they can be taken away — and each one leaves at its step and stays gone.
Pass --keep-coordinates to leave survey coordinates alone, and see
ImportRules for turning the step reading or the closing safety stage off.
Drawing units are read from $INSUNITS, so a section drawn in millimetres
arrives in metres. Survey coordinates are moved to the origin, because the
mesher's geometric tests lose precision out in the hundreds of thousands; the
shift is reported so you can map results back.
The drawing fixes the geometry and nothing else. Soil properties, section sizes, loads and construction stages are still yours to set afterwards.
ASCII DXF is read directly, with no extra package. Install ezdxf if you also
need binary DXF, splines or block references — it is used automatically when
present.
From a script
from lythos.core.materials import MohrCoulomb
from lythos.core.model import Model, SoilLayer, Stage
from lythos.report import run_and_report

clay = MohrCoulomb(name="silty clay", E=1e5, nu=0.3, c=10.0, phi=20.0, gamma=20.0)
slope = [(0, 0), (40, 0), (40, 10), (25, 10), (5, 0)]

model = Model(
    name="cut slope",
    layers=[SoilLayer("silty clay", slope, clay, mesh_size=2.0)],
    stages=[
        Stage("1 - self weight", kind="initial"),
        Stage("2 - factor of safety", kind="ssr"),
    ],
    initial_stress="gravity",
)

summary = run_and_report(model, out_dir="out/slope")
print(summary["stages"][-1]["factor_of_safety"])      # 1.42 at this mesh size
run_and_report writes a self-contained HTML report with every figure
embedded, plus the numbers as JSON.
Two ready-made scripts in examples/ are written for an editor such as
Thonny, IDLE or VS Code - open one and press Run:
| script | what it does |
|---|---|
examples/thonny_analysis.py |
the whole analysis as plain Python: soil, geometry, stages, figures, report |
examples/thonny_gui.py |
starts the interface and opens it in a browser |
From the command line
python main.py examples -o models      # write the worked examples as model files
python main.py mesh models/slope.json  # mesh statistics, without analysing
python main.py run models/slope.json -o out/slope
With the package installed, lythos replaces python main.py in each of
these.
Specifying a pile wall
Piles are given the way they are designed, and the equivalent plate rigidities follow:
from lythos.core.pile import PileSection

piles = PileSection(diameter=1.0, spacing=1.2, fck=32.0,
                    rho_s=0.012, stiffness_factor=0.7)   # 0.7 for cracked bending
print(piles.describe())
# EA 21.8e6 kN/m, EI 954,800 kNm2/m, Mp 1257 kNm/m, weight 16.4 kN/m2
The concrete modulus comes from EN 1992-1-1 (Ecm = 22000 (fcm/10)^0.3 MPa).
All structural output is per metre run of wall; divide by the spacing for the
force in one pile.
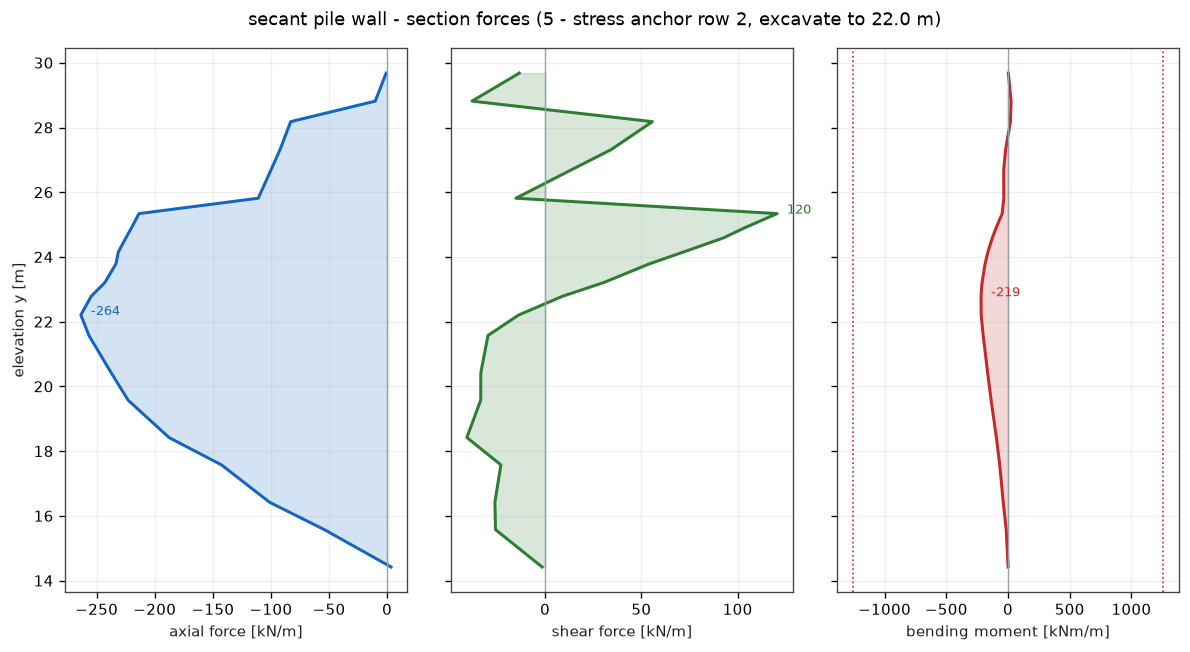
The steps in the shear diagram are at the anchor levels, where a point load enters the wall.
What is inside
| Part | What it does |
|---|---|
lythos.core.mesher |
Delaunay refinement mesher; planarises the drawing, honours every layer and structural line, grades element size per region |
lythos.core.materials |
Mohr-Coulomb with non-associated flow and a tension cut-off, linear elastic, concrete; exact return mapping in principal stress space |
lythos.core.elements |
6-node triangles, Timoshenko beams, zero-thickness interfaces, anchors |
lythos.core.solver |
Staged construction, adaptive sub-stepping, strength reduction |
lythos.core.pile |
Pile and wall sections from diameter, spacing and concrete grade |
lythos.viz.plots |
Contours, deformed meshes, plastic points, section force diagrams |
lythos.gui |
The browser interface |
See docs/theory.md for the formulation and docs/validation.md for what has been checked against what.
Verification
Every claim below is a test in tests/:
| Check | Reference | Lythos |
|---|---|---|
| Mohr-Coulomb failure deviator, plane strain | σ1 = σ3 Kp + 2c√Kp |
within 0.5% |
| Active earth pressure, zero lateral strain | Ka σv + 2c√Ka |
exact |
| Geostatic stress and settlement under self weight | γz, γH²/2E |
exact |
| Patch test, linear displacement field | constant stress | exact to 1e-12 |
| Cantilever tip deflection | PL³/3EI + PL/GA |
within 0.2% |
| Slender beam, h/L = 1/1000 | no shear locking | within 2% |
| 2:1 slope factor of safety | 1.377, independent Bishop search | 1.381 on a 471-element mesh |
| Algorithmic tangent | numerical derivative | within 4e-4 of E, everywhere |
pytest                    # the quick suite
pytest -m slow            # the full analyses as well
Limitations
Worth knowing before trusting a number to a design:
- Drained or total-stress (undrained) analysis only; there is no consolidation,
no transient flow and no coupled pore pressure. Undrained behaviour is
modelled by giving a layer
phi = 0andc = su. - Pore pressure is hydrostatic below the phreatic surface. There is no seepage analysis, though the horizontal gradient of an inclined phreatic surface is carried as a seepage body force.
- Small strain throughout; no updated-mesh or large-displacement option.
- Elastic-perfectly plastic soil. There is no hardening model, so settlement predictions under working loads are only as good as the single stiffness chosen for the stress range that matters.
- A row of piles is smeared into an equivalent plate, which is the usual plane-strain idealisation; it says nothing about arching between the piles.
- Quadratic triangles are much better than linear ones under constant-volume
plastic flow, but they are not immune to volumetric locking. Undrained
(
phi = 0) collapse loads are therefore slightly on the high side and get slower to converge as the plastic zone spreads. Refine, and treat an undrained factor of safety from a coarse mesh with particular suspicion. - Strength reduction reports the factor at which equilibrium is lost. Like any such analysis it is sensitive to how the failure criterion is judged, so the displacement-versus-factor curve is reported alongside it and should be looked at.
Licence
MIT.
1 maintainer

Release files for lythosfea 0.1.0
For a detailed explanation of source distributions (sdists) and built distributions (wheels), please see the package formats documentation.
Source distribution (sdist)
| File | Size | Uploaded | |
|---|---|---|---|
| lythosfea-0.1.0.tar.gz | 121.9 kB | Details |
Built distribution (wheel)
| File | Interpreter | ABI | Platform | Reset |
|---|---|---|---|---|
| lythosfea-0.1.0-py3-none-any.whl | Python 3 | none | any | Details |
Total release size: 232.7 kB
Release files / lythosfea-0.1.0.tar.gz
| Download URL | lythosfea-0.1.0.tar.gz |
|---|---|
| Size | 121.9 kB |
| Tags | Source |
|
SHA-256 checksum How to use checksums |
972310745900b74d1b07973c7d8adf3b38b47fd8de6e626c4b425d9f8ff48657
|
|
BLAKE2b-256 checksum How to use checksums |
9f983b2dd7d07bacc9e9e7ac2214f0d919b6d33af8409d104e0db7a3931c05f1
|
| Upload date | |
|
Uploaded using Trusted Publishing? What is trusted publishing? |
No |
| Uploaded via |
twine/7.0.0 CPython/3.14.4
|
Release files / lythosfea-0.1.0-py3-none-any.whl
| Download URL | lythosfea-0.1.0-py3-none-any.whl |
|---|---|
| Size | 110.7 kB |
| Tags | Python 3 |
|
SHA-256 checksum How to use checksums |
0a54ef8bebb51ce65b8149b331202d541c7a4946f953898f1466a62b840ba926
|
|
BLAKE2b-256 checksum How to use checksums |
9524b10efd2dda0a4e7590027d383a53cd22079b88582355697c0fc3ad1e3508
|
| Upload date | |
|
Uploaded using Trusted Publishing? What is trusted publishing? |
No |
| Uploaded via |
twine/7.0.0 CPython/3.14.4
|













