
MacUtility
A lightweight macOS desktop utility built with Python and PySide6 for monitoring system resources and managing running processes.
MacUtility is designed as a practical developer-oriented utility for macOS, with a focus on quickly identifying high CPU or memory usage and safely managing processes from a graphical interface.
🚧 Project Status: Early Development / Pre-release
Quick Start
MacUtility is available on PyPI and can be installed directly without cloning the repository.
The recommended installation method for end users is pipx.
Install
brew install pipx
pipx ensurepath
Restart your Terminal if necessary, then:
pipx install macutility
Run MacUtility:
macutility
MacUtility should launch as a desktop application.
Features
Process Manager
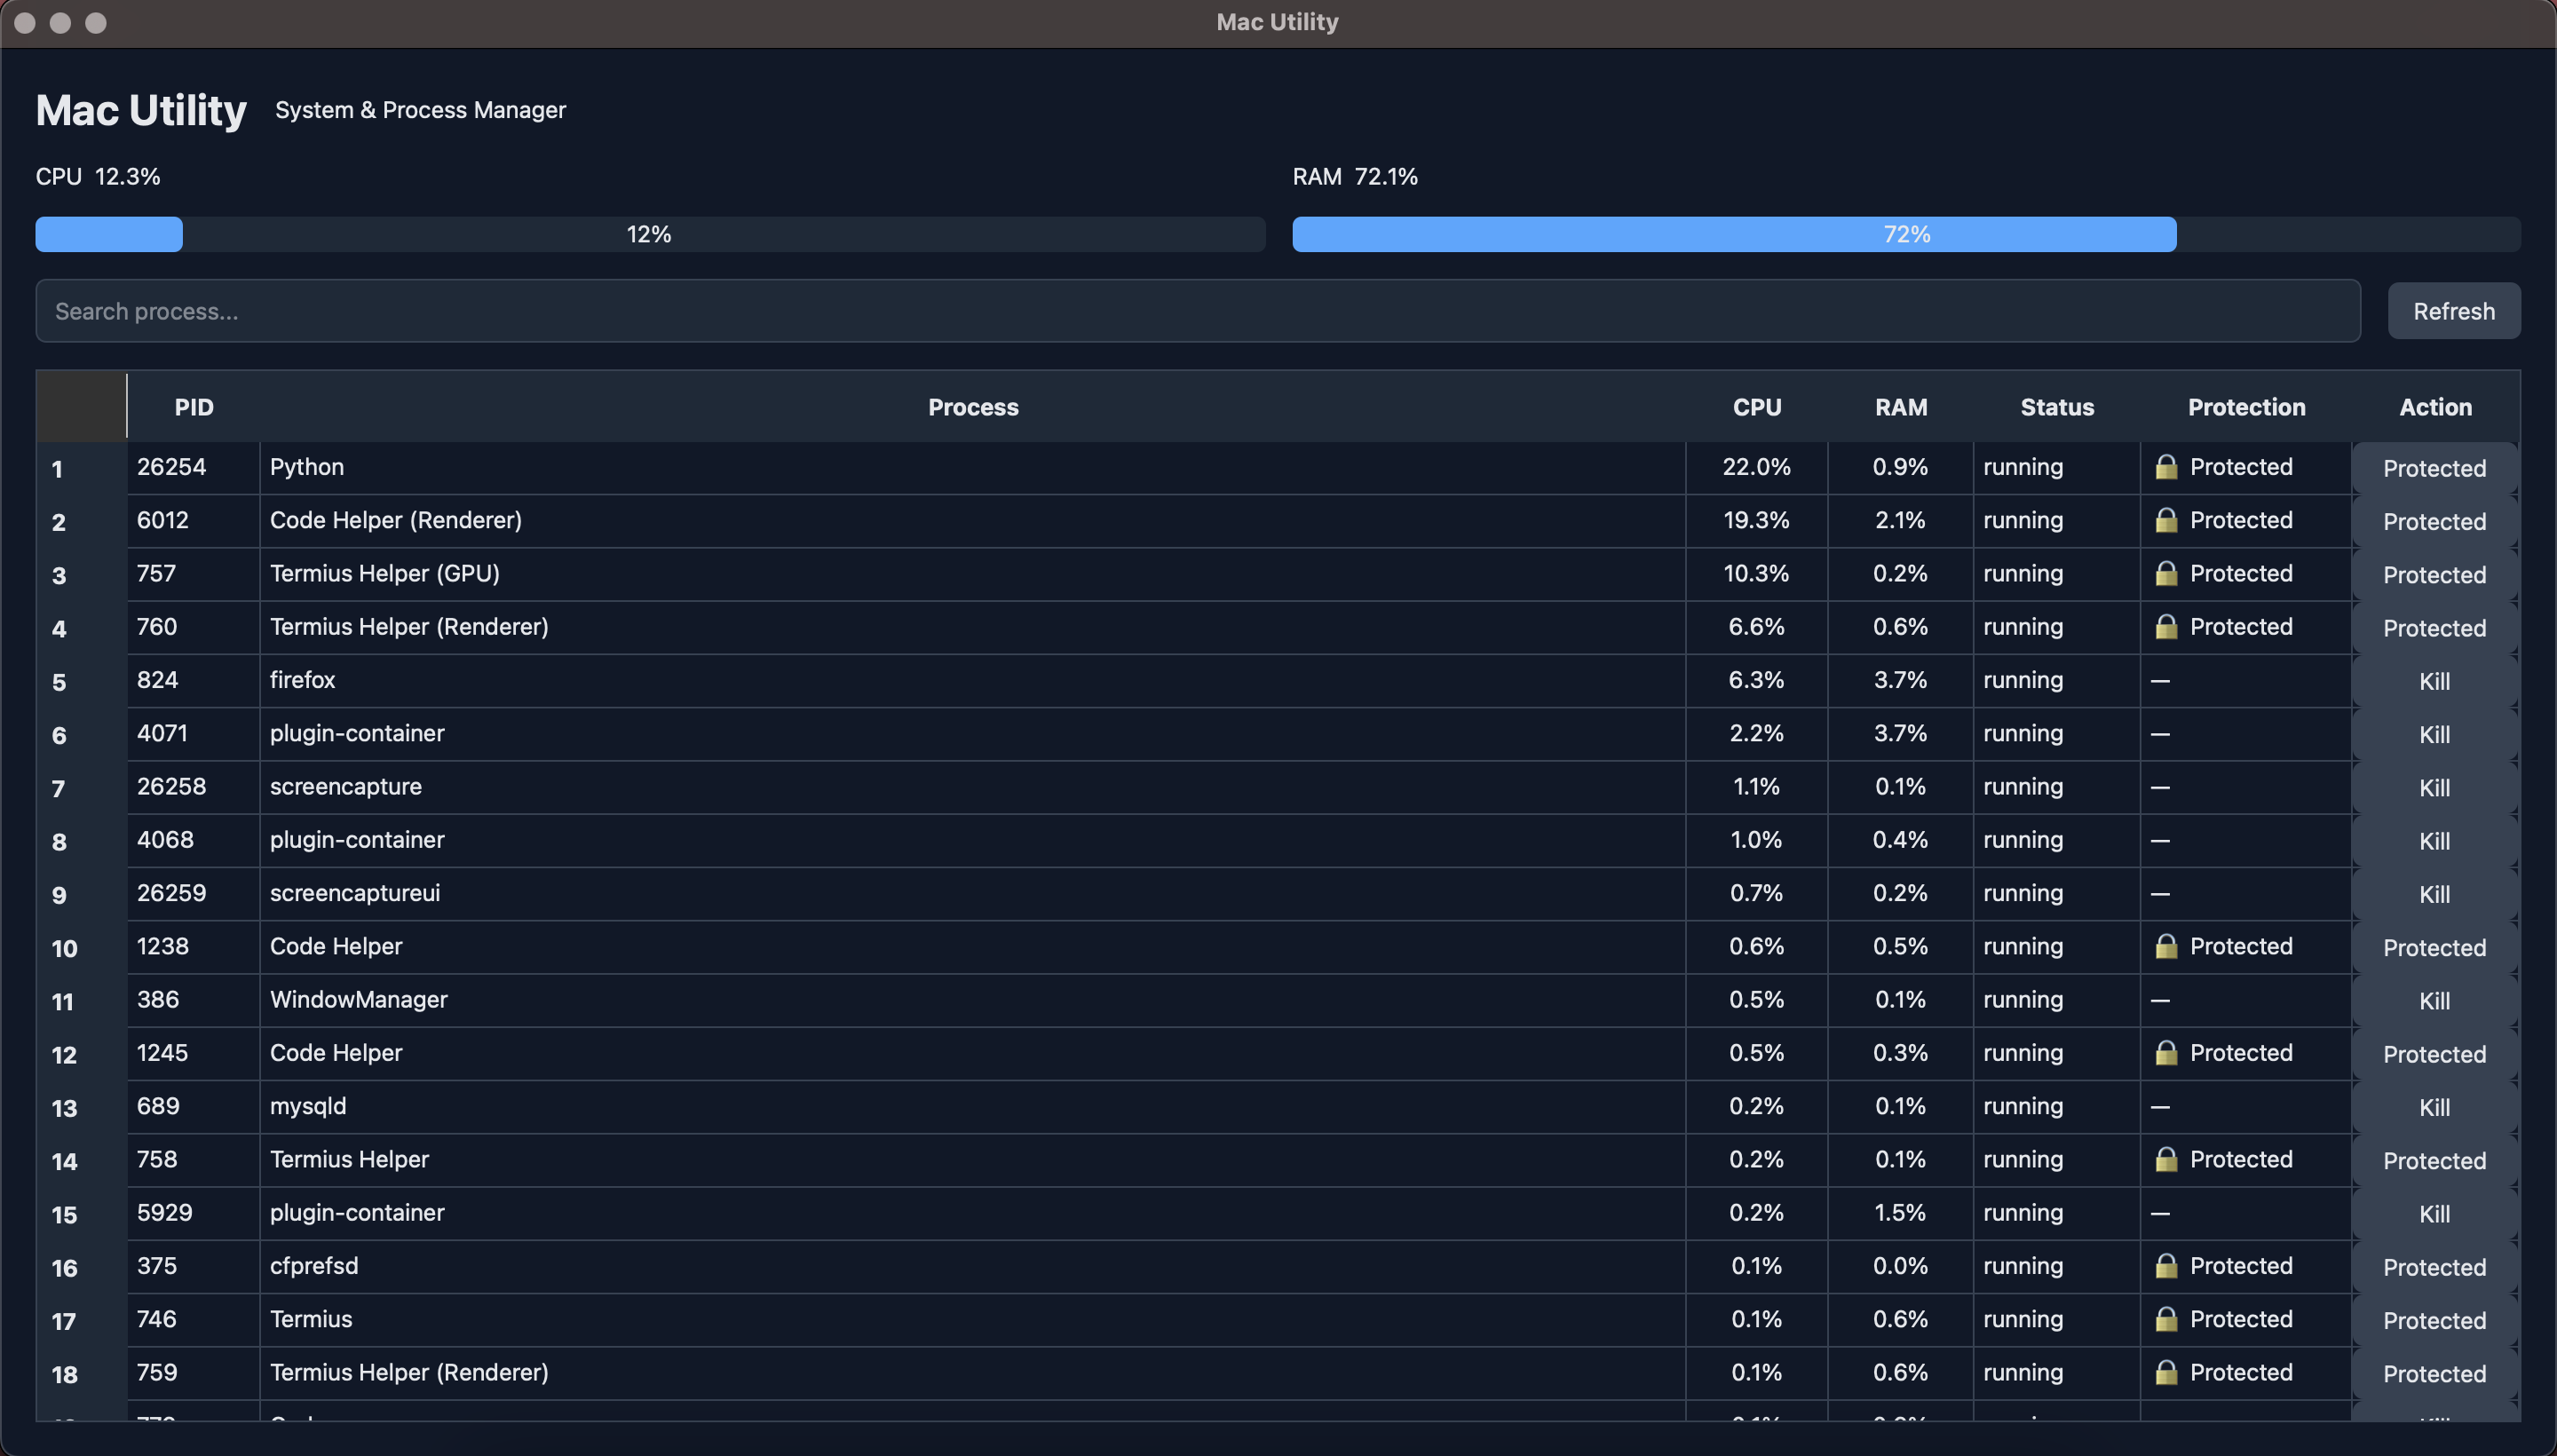
Monitor running processes directly from a desktop interface.
- View running processes
- Display PID
- Display process name
- Monitor CPU usage
- Monitor memory usage
- View process status
- Search processes by name or PID
- Sort processes by CPU usage
- Terminate processes
- Force kill processes
- Protected system processes
System Monitor
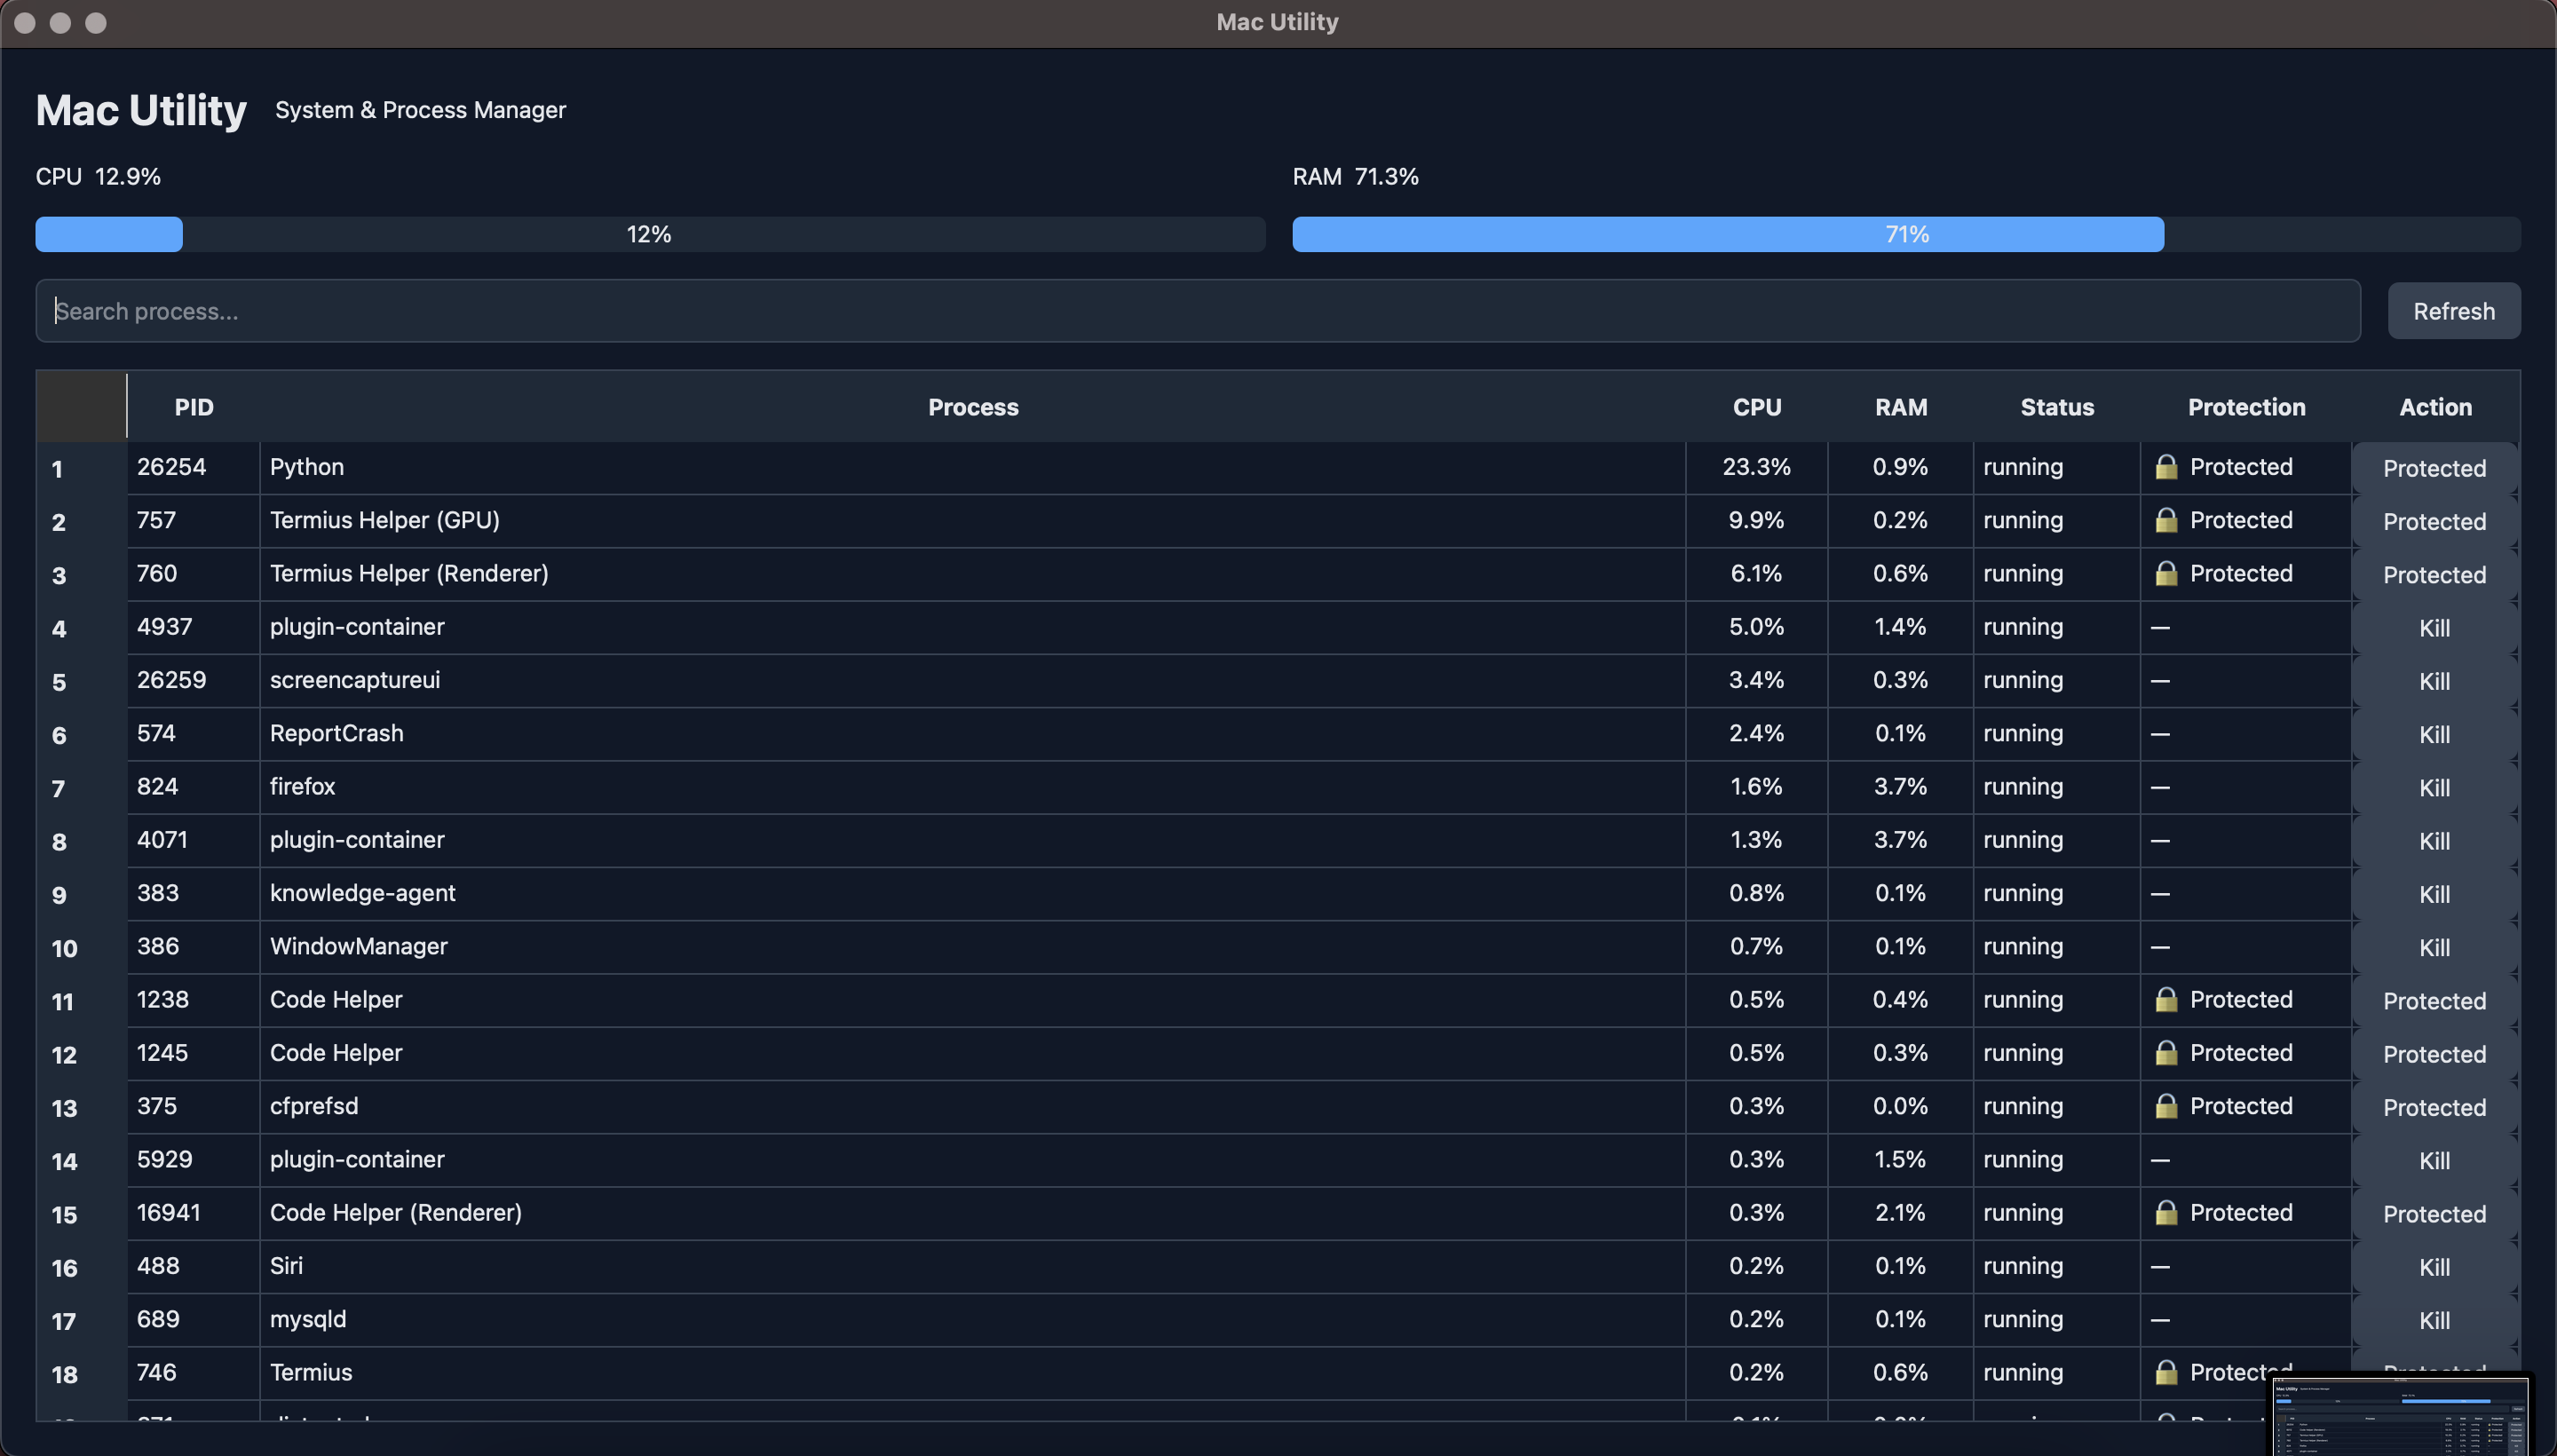
Monitor basic system resources in real time.
- CPU usage
- Memory usage
- Automatic refresh
- Lightweight monitoring
Protected Processes
MacUtility includes a protection layer to prevent accidental termination of important macOS processes.
Protected processes include system components such as:
kernel_tasklaunchdWindowServerloginwindowsystemuiserverFinderDockSystemUIServercoreaudiodcoreduetdmdsmds_storesmdworkermdworker_sharedcfprefsdopendirectoryddistnotednotifyd
The application also protects selected applications that should remain available during development, including:
- Termius
- Visual Studio Code
- Code Helper
The protection system is intentionally conservative and may be expanded as the project evolves.
Screenshots
Process Manager
The Process Manager provides an overview of currently running processes, including CPU usage, memory usage, process status, protection status, and available actions.
System Monitor
The system monitor displays current CPU and memory utilization and provides a lightweight overview of system resource usage.
Installation
MacUtility can be installed directly from PyPI.
Recommended: Install with pipx
For normal users, pipx is recommended because it installs MacUtility in an isolated Python environment while making the macutility command available globally.
Requirements
- macOS
- Python 3.10+
- Homebrew
- pipx
1. Install pipx
If pipx is not already installed:
brew install pipx
2. Configure pipx
pipx ensurepath
Restart your Terminal after running this command if necessary.
You can verify that pipx is available with:
pipx --version
3. Install MacUtility
pipx install macutility
pipx will automatically create an isolated environment and install MacUtility together with its required dependencies.
The main dependencies are:
- PySide6
- psutil
4. Run MacUtility
macutility
MacUtility should open as a desktop application.
Upgrade MacUtility
When a new version is released on PyPI, upgrade the installed application with:
pipx upgrade macutility
You can check the installed version with:
pipx list
Uninstall MacUtility
To remove MacUtility:
pipx uninstall macutility
Development Installation
If you want to contribute to MacUtility or run the project directly from source code, clone the repository and create a development environment.
1. Clone the repository
git clone https://github.com/codesyariah122/MacUtility.git
cd MacUtility
2. Create a virtual environment
python3 -m venv .venv
3. Activate the virtual environment
source .venv/bin/activate
4. Install dependencies
pip install -r requirements.txt
5. Run the application
python -m app.main
MacUtility should open as a desktop application.
Running the Application
Installed from PyPI
If MacUtility was installed with pipx:
macutility
Running from source
If you are working from the Git repository:
python -m app.main
Tech Stack
MacUtility is built with:
- Python 3 — application programming language
- PySide6 — desktop GUI framework
- psutil — system and process monitoring
Architecture
The project separates UI, process management, and utility logic:
MacUtility/
├── app/
│   ├── __init__.py
│   ├── main.py
│   │
│   ├── services/
│   │   ├── __init__.py
│   │   └── process_service.py
│   │
│   ├── ui/
│   │   ├── __init__.py
│   │   └── main_window.py
│   │
│   └── utils/
│       ├── __init__.py
│       └── protected_processes.py
│
├── .gitignore
├── LICENSE
├── pyproject.toml
├── requirements.txt
└── README.md
PyPI Package
MacUtility is published as the Python package:
macutility
Current release:
0.1.0
Install the latest published version with:
pipx install macutility
The package provides the following executable:
macutility
The PyPI package is intended to make installation simple for end users without requiring them to clone the source repository or manually configure a virtual environment.
Development
MacUtility is currently being developed incrementally.
The current development milestone is:
V0.1.0
- Process monitoring
- CPU monitoring
- Memory monitoring
- Process search
- Process sorting
- Process termination
- Force kill
- Protected processes
- Protected applications
Future releases will expand the application into a broader macOS developer utility.
Roadmap
V0.1.x — Process Manager
- CPU monitoring
- Memory monitoring
- Process list
- Process search
- Process sorting
- Process termination
- Force kill
- Protected processes
- Protected Termius
- Protected Visual Studio Code
V0.2.x — Dashboard
- Improved system dashboard
- Top CPU processes
- Top memory processes
- CPU usage indicators
- Memory usage indicators
- Process details
- Background monitoring worker
V0.3.x — Disk Utilities
- Disk usage monitoring
- Large file finder
- Cache inspection
- Developer cache utilities
- Storage overview
V0.4.x — Network Utilities
- Network status
- Network interface information
- IP information
- DNS utilities
- Ping utility
- Network diagnostics
V0.5.x — Port Manager
- List listening ports
- Identify processes using ports
- Search ports
- Terminate process by port
- Port diagnostics
Example:
Port 8000

PID       Process
1234      php

[ Kill Process ]
V0.6.x — Developer Utilities
Planned utilities for common development environments:
- PHP process management
- Node.js process management
- Laravel utilities
- Composer utilities
- npm utilities
- Yarn utilities
- Flutter utilities
- Android SDK utilities
- Git utilities
- SSH utilities
V0.7.x — Docker Utilities
- Docker container overview
- Container CPU usage
- Container memory usage
- Start/stop containers
- Docker cleanup utilities
- Docker resource overview
V0.8.x — macOS Integration
- Menu bar application
- macOS notifications
- Launch at login
- Native macOS application icon
- Improved macOS permissions handling
V1.0.0 — Stable Release
The goal for 1.0.0 is a stable, polished macOS developer utility with reliable system monitoring and a collection of useful developer-oriented tools.
Safety
MacUtility interacts directly with running processes.
Process termination can cause:
- Unsaved data loss
- Application crashes
- Interrupted development processes
- Unexpected system behavior
For this reason, MacUtility includes protected processes and confirmation dialogs before terminating processes.
Use Force Kill only when a process is unresponsive and normal termination does not work.
Protected processes cannot be terminated through the application.
Why MacUtility?
macOS already provides tools such as Activity Monitor and Terminal for process management.
MacUtility aims to provide a simpler workflow for developers who frequently need to:
- Identify a process consuming excessive CPU or memory.
- Find its PID.
- Determine whether the process is safe to terminate.
- Stop it without opening Terminal.
- Access additional developer-oriented utilities from one application.
For example:
🔥 Firefox plugin-container

CPU: 88%

[ Kill ]
Instead of manually running:
ps -Ao pid,pcpu,pmem,comm | sort -k2 -nr
and then:
kill -9 <PID>
MacUtility aims to provide these workflows through a graphical interface.
Project Goals
MacUtility aims to become a practical toolbox for macOS developers.
The long-term goal is to bring frequently used commands, diagnostics, and developer utilities into one lightweight desktop application.
Instead of remembering multiple Terminal commands, developers should be able to perform common tasks through a single interface.
The project is intentionally being developed incrementally, with the Process Manager and System Monitor forming the foundation for future utilities.
Contributing
Contributions, suggestions, bug reports, and feature requests are welcome.
Before submitting a pull request:
- Fork the repository.
- Create a feature branch.
- Make your changes.
- Test the application on macOS.
- Commit your changes.
- Open a pull request.
Example:
git checkout -b feature/my-feature
For bug reports or feature requests, please provide as much relevant information as possible, including:
- macOS version
- Python version
- MacUtility version
- Steps to reproduce the issue
- Expected behavior
- Actual behavior
- Relevant error messages
Building the Package
MacUtility uses pyproject.toml and Hatchling as its build backend.
Install the build and publishing tools:
python -m pip install --upgrade build twine
Build the package:
python -m build
The generated distributions will be placed in:
dist/
├── macutility-0.1.0-py3-none-any.whl
└── macutility-0.1.0.tar.gz
Validate the distributions:
python -m twine check dist/*
Both the wheel and source distribution should pass the package validation check before publishing.
Publishing a New Release
Before publishing a new release:
- Update the version in
pyproject.toml. - Update the documentation if necessary.
- Test the application.
- Build the package.
- Validate the distributions.
- Publish the package.
- Commit and push the release changes to GitHub.
Example version update:
[project]
name = "macutility"
version = "0.1.1"
Clean previous build artifacts:
rm -rf dist build
rm -rf ./*.egg-info
Build the new package:
python -m build
Validate:
python -m twine check dist/*
Publish:
python -m twine upload dist/*
Important: A version that has already been uploaded to PyPI cannot be uploaded again. Always increment the package version before publishing a new release.
License
MacUtility is released under the MIT License.
See the LICENSE file for the full license text.
Author
Puji Ermanto
MacUtility is developed as an open-source macOS developer utility project.
Repository
MacUtility source code is maintained in the GitHub repository:
codesyariah122/MacUtility
Status
MacUtility is currently an active development project.
The current version focuses on the foundation of the process manager and system monitoring functionality. APIs, architecture, UI, and features may change before the 1.0.0 stable release.
1 maintainer

Download files
Download the file for your platform. If you're not sure which to choose, learn more about installing packages.
Source Distribution
Built Distribution
Filter files by name, interpreter, ABI, and platform.
If you're not sure about the file name format, learn more about wheel file names.
Copy a direct link to the current filters
File details
Details for the file macutility-0.1.1.tar.gz.
File metadata
- Download URL: macutility-0.1.1.tar.gz
- Upload date:
- Size: 11.7 kB
- Tags: Source
- Uploaded using Trusted Publishing? No
- Uploaded via:
twine/7.0.0 CPython/3.14.7
File hashes
| Algorithm | Hash digest | |
|---|---|---|
| SHA256 |
e8534cafe5a0d718464ce0d47e777f12e5185b8d2affefe7446bff2710149ad8
|
|
| MD5 |
03f2f8febf866b2b6e52cf868abfdafb
|
|
| BLAKE2b-256 |
4ebb9930b36bca7aacfb1fa93b04ce2555c9dc682881912d4df813548b3c21bb
|
File details
Details for the file macutility-0.1.1-py3-none-any.whl.
File metadata
- Download URL: macutility-0.1.1-py3-none-any.whl
- Upload date:
- Size: 12.8 kB
- Tags: Python 3
- Uploaded using Trusted Publishing? No
- Uploaded via:
twine/7.0.0 CPython/3.14.7
File hashes
| Algorithm | Hash digest | |
|---|---|---|
| SHA256 |
2df01089c85187e987f715a20e77ab596eb89d09d45e9b9d24c97ce3d3865614
|
|
| MD5 |
ed7b621c8df24978151992c34e591563
|
|
| BLAKE2b-256 |
b1f10e86f6af32a204db2b6dbf4cabcb871a9113bdfbbfdb98f0f99982339132
|














