
Convert matplotlib figures into TikZ/PGFPlots

Project description
makintikz
The artist formerly known as tikzplotlib & matplot2tikz.







This is makintikz, a Python tool for converting matplotlib figures into PGFPlots (PGF/TikZ) figures like
for native inclusion into LaTeX or ConTeXt documents.
The output of makintikz is in PGFPlots, a TeX library that sits on top of PGF/TikZ and describes graphs in terms of axes, data etc. Consequently, the output of makintikz
- retains more information,
- can be more easily understood, and
- is more easily editable
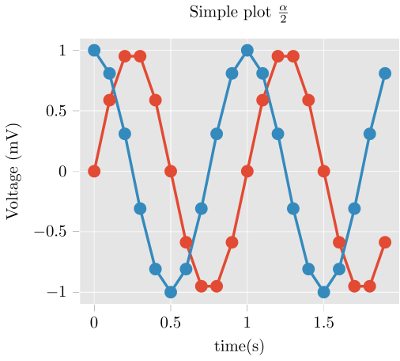
than raw TikZ output. For example, the matplotlib figure
import matplotlib.pyplot as plt
import numpy as np

plt.style.use("ggplot")

t = np.arange(0.0, 2.0, 0.1)
s = np.sin(2 * np.pi * t)
s2 = np.cos(2 * np.pi * t)
plt.plot(t, s, "o-", lw=4.1)
plt.plot(t, s2, "o-", lw=4.1)
plt.xlabel("time (s)")
plt.ylabel("Voltage (mV)")
plt.title("Simple plot $\\frac{\\alpha}{2}$")
plt.grid(True)

import makintikz

makintikz.save("test.tex")
--> (see above) gives
\begin{tikzpicture}

\definecolor{chocolate2267451}{RGB}{226,74,51}
\definecolor{dimgray85}{RGB}{85,85,85}
\definecolor{gainsboro229}{RGB}{229,229,229}
\definecolor{steelblue52138189}{RGB}{52,138,189}
\begin{axis}[
axis background/.style={fill=gainsboro229},
axis line style={white},
tick align=outside,
tick pos=left,
title={Simple plot \(\displaystyle \frac{\alpha}{2}\)},
x grid style={white},
xlabel=\textcolor{dimgray85}{time (s)},
xmajorgrids,
xmin=-0.095, xmax=1.995,
xtick style={color=dimgray85},
y grid style={white},
ylabel=\textcolor{dimgray85}{Voltage (mV)},
ymajorgrids,
ymin=-1.1, ymax=1.1,
ytick style={color=dimgray85}
]
\addplot [line width=1.64pt, chocolate2267451, mark=*, mark size=3, mark options={solid}]
table {%
0 0
% [...]
1.9 -0.587785252292473
};
\addplot [line width=1.64pt, steelblue52138189, mark=*, mark size=3, mark options={solid}]
table {%
0 1
% [...]
1.9 0.809016994374947
};
\end{axis}

\end{tikzpicture}
(Use get_tikz_code() instead of save() if you want the code as a string.)
Tweaking the plot is straightforward and can be done as part of your TeX work flow. The fantastic PGFPlots manual contains great examples of how to make your plot look even better.
Of course, not all figures produced by matplotlib can be converted without error. Notably, 3D plots don't work.
Installation
makintikz is available from the Python Package Index, so simply do
pip install makintikz
to install.
Usage
-
Generate your matplotlib plot as usual.
-
Instead of
pyplot.show(), invoke makintikz byimport makintikz makintikz.save("mytikz.tex") # or makintikz.save("mytikz.tex", flavor="context")
to store the TikZ file as
mytikz.tex. -
Add the contents of
mytikz.texinto your TeX source code. A convenient way of doing so is via\input{/path/to/mytikz}
Also make sure that the packages for PGFPlots and proper Unicode support and are included in the header of your document:
\usepackage[utf8]{inputenc}
\usepackage{pgfplots}
\DeclareUnicodeCharacter{2212}{−}
\usepgfplotslibrary{groupplots,dateplot}
\usetikzlibrary{patterns,shapes.arrows}
\pgfplotsset{compat=newest}
or:
\setupcolors[state=start]
\usemodule[tikz]
\usemodule[pgfplots]
\usepgfplotslibrary[groupplots,dateplot]
\usetikzlibrary[patterns,shapes.arrows]
\pgfplotsset{compat=newest}
\unexpanded\def\startgroupplot{\groupplot}
\unexpanded\def\stopgroupplot{\endgroupplot}
You can also get the code via:
import makintikz

makintikz.Flavors.latex.preamble()
# or
makintikz.Flavors.context.preamble()
-
[Optional] Clean up the figure before exporting to tikz using the
clean_figurecommand.import matplotlib.pyplot as plt import numpy as np # ... do your plotting import makintikz makintikz.clean_figure() makintikz.save("test.tex")
The command will remove points that are outside the axes limits, simplify curves and reduce point density for the specified target resolution.
makintikz vs. matplot2tikz vs. tikzplotlib
The matplot2tikz library and makintikz originated from the tikzplotlib project. The reason a new library has been created is because tikzplotlib is no longer maintained and maintainance could only be done by the single owner of the tikzplotlib library. If you need to use third-party code that already depends on tikzplotlib, it is suggested to change the tikzplotlib dependency to makintikz. If this is not possible, a workaround is to put the following code before importing the third-party code:
import sys
import makintikz
sys.modules["tikzplotlib"] = makintikz
# Do other imports, e.g., using `import my_third_party_library`
# If tikzplotlib is used in this library, it will automatically use makintikz instead.
If you are updating your own scripts from tikzplotlib, you can simply use an import alias:
import makintikz as tikzplotlib
Contributing
If you experience bugs, would like to contribute, have nice examples of what makintikz can do, or if you are just looking for more information, then please visit makintikz's GitHub page.
For contributing, follow these steps:
-
Download the git repository, e.g., using
git clone git@github.com:AlexChrzanowski/makintikz.git. -
Create a virtual environment, e.g., using
python -m venv venv. -
Activate the virtual environment (e.g., on Windows,
venv\Scripts\activate). -
Install
uvusingpip install uvand thentox-uvusinguv pip install tox-uv. -
The main branch is protected, meaning that you cannot directly push changes to this branch. Therefore, if you want to make changes, do so in a seperate branch. For example, you can create a new branch using
git checkout -b feature/my_awesome_new_feature. -
Before pushing changes, ensure that the code adheres to the linting rules and that the tests are successful. Run
tox. This does a linting check and runs all test scripts. To manually perform these steps, use the following commands:- Run
tox -e lint. You can do the linting commands manually using:- (One time)
uv pip install -r requirements-lint.txt ruff format . --check(remove the--checkflag to letruffdo the formatting)ruff check .mypy .
- (One time)
- Run
tox -e py310. - Run
tox -e py311. - Run
tox -e py312. - Run
tox -e py313. - Run
tox -e py314. - Run
tox -e combine-test-reports
- Run
-
Check if the tests covered everything using the coverage report in
/reports/coverage_html/index.html.NOTE: Currently, now all code is covered. Ideally, all code is covered, but for now, ensure that all new code is covered by the testing.
-
Push changes to GitHub. If everything is OK and you want to merge your changes to the
mainbranch, create a pull request. Ideally, there is at least one reviewer who reviews the pull request before the merge.
Note that currently only "Code owners" can merge pull requests onto the main branch. This is to
ensure that not everyone can break the main code (even unintentially). If you want to be a "Code
owner", let us know!
License
makintikz is published under the MIT license.
Release history Release notifications | RSS feed


Download files
Download the file for your platform. If you're not sure which to choose, learn more about installing packages.
Source Distribution
Built Distribution
Filter files by name, interpreter, ABI, and platform.
If you're not sure about the file name format, learn more about wheel file names.
Copy a direct link to the current filters
File details
Details for the file makintikz-1.0.1.tar.gz.
File metadata
- Download URL: makintikz-1.0.1.tar.gz
- Upload date:
- Size: 179.5 kB
- Tags: Source
- Uploaded using Trusted Publishing? Yes
- Uploaded via: twine/6.1.0 CPython/3.13.12
File hashes
| Algorithm | Hash digest | |
|---|---|---|
| SHA256 |
8aa064c2638e3874eed349501158237f02d8b65f17a127cf9141182e6aa7ce5d
|
|
| MD5 |
7cfeed4a2f6badc9e6b234860f12a986
|
|
| BLAKE2b-256 |
03d61a3515063c5b02b025cad55a7d5b19bf4ba36a08a8a1e7aa1d087860becb
|
Provenance
The following attestation bundles were made for makintikz-1.0.1.tar.gz:
Publisher:
publish-to-pypi.yaml on AlexChrzanowski/MakinTikZ
-
Statement:
-
Statement type:
https://in-toto.io/Statement/v1 -
Predicate type:
https://docs.pypi.org/attestations/publish/v1 -
Subject name:
makintikz-1.0.1.tar.gz -
Subject digest:
8aa064c2638e3874eed349501158237f02d8b65f17a127cf9141182e6aa7ce5d - Sigstore transparency entry: 1429937506
- Sigstore integration time:
-
Permalink:
AlexChrzanowski/MakinTikZ@9cd1393ed047198e95c26846897bf3bd985d4973 -
Branch / Tag:
refs/tags/v1.0.1 - Owner: https://github.com/AlexChrzanowski
-
Access:
public
-
Token Issuer:
https://token.actions.githubusercontent.com -
Runner Environment:
github-hosted -
Publication workflow:
publish-to-pypi.yaml@9cd1393ed047198e95c26846897bf3bd985d4973 -
Trigger Event:
release
-
Statement type:
File details
Details for the file makintikz-1.0.1-py3-none-any.whl.
File metadata
- Download URL: makintikz-1.0.1-py3-none-any.whl
- Upload date:
- Size: 69.8 kB
- Tags: Python 3
- Uploaded using Trusted Publishing? Yes
- Uploaded via: twine/6.1.0 CPython/3.13.12
File hashes
| Algorithm | Hash digest | |
|---|---|---|
| SHA256 |
95ed65cdc097b9aba9e8c32cab0fa96ef88396259faa39f2c9a1014c6b2d920a
|
|
| MD5 |
bc035a3270ad7948d40dd458b4384a55
|
|
| BLAKE2b-256 |
e2f9cb17fa94c4e6a5c193bbafbf62c9a87fb87815c0261e891ed606e929b506
|
Provenance
The following attestation bundles were made for makintikz-1.0.1-py3-none-any.whl:
Publisher:
publish-to-pypi.yaml on AlexChrzanowski/MakinTikZ
-
Statement:
-
Statement type:
https://in-toto.io/Statement/v1 -
Predicate type:
https://docs.pypi.org/attestations/publish/v1 -
Subject name:
makintikz-1.0.1-py3-none-any.whl -
Subject digest:
95ed65cdc097b9aba9e8c32cab0fa96ef88396259faa39f2c9a1014c6b2d920a - Sigstore transparency entry: 1429937511
- Sigstore integration time:
-
Permalink:
AlexChrzanowski/MakinTikZ@9cd1393ed047198e95c26846897bf3bd985d4973 -
Branch / Tag:
refs/tags/v1.0.1 - Owner: https://github.com/AlexChrzanowski
-
Access:
public
-
Token Issuer:
https://token.actions.githubusercontent.com -
Runner Environment:
github-hosted -
Publication workflow:
publish-to-pypi.yaml@9cd1393ed047198e95c26846897bf3bd985d4973 -
Trigger Event:
release
-
Statement type:






