A MCP server to search for accurate academic articles.

Project description

mcp-scholarly MCP server

A MCP server to search for accurate academic articles. More scholarly vendors will be added soon.


Components
Tools
The server implements one tool:
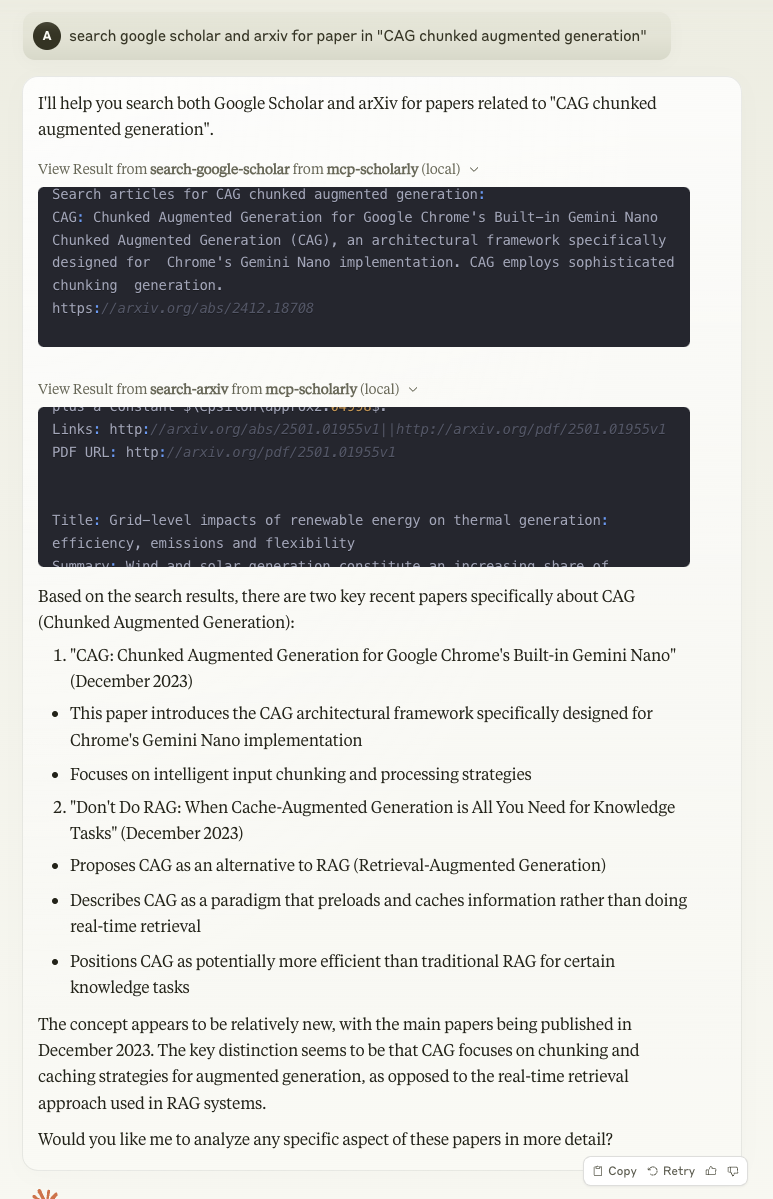
- search-arxiv: Search arxiv for articles related to the given keyword.
- Takes "keyword" as required string arguments
Quickstart
Install
Claude Desktop
On MacOS: ~/Library/Application\ Support/Claude/claude_desktop_config.json
On Windows: %APPDATA%/Claude/claude_desktop_config.json
Development/Unpublished Servers Configuration
``` "mcpServers": { "mcp-scholarly": { "command": "uv", "args": [ "--directory", "/Users/adityakarnam/PycharmProjects/mcp-scholarly/mcp-scholarly", "run", "mcp-scholarly" ] } } ```Published Servers Configuration
``` "mcpServers": { "mcp-scholarly": { "command": "uvx", "args": [ "mcp-scholarly" ] } } ```or if you are using Docker
Published Docker Servers Configuration
``` "mcpServers": { "mcp-scholarly": { "command": "docker", "args": [ "run", "--rm", "-i", "mcp/scholarly" ] } } ```Installing via Smithery
To install mcp-scholarly for Claude Desktop automatically via Smithery:
npx -y @smithery/cli install mcp-scholarly --client claude
Development
Building and Publishing
To prepare the package for distribution:
- Sync dependencies and update lockfile:
uv sync
- Build package distributions:
uv build
This will create source and wheel distributions in the dist/ directory.
- Publish to PyPI:
uv publish
Note: You'll need to set PyPI credentials via environment variables or command flags:
- Token:
--tokenorUV_PUBLISH_TOKEN - Or username/password:
--username/UV_PUBLISH_USERNAMEand--password/UV_PUBLISH_PASSWORD
Debugging
Since MCP servers run over stdio, debugging can be challenging. For the best debugging experience, we strongly recommend using the MCP Inspector.
You can launch the MCP Inspector via npm with this command:
npx @modelcontextprotocol/inspector uv --directory /Users/adityakarnam/PycharmProjects/mcp-scholarly/mcp-scholarly run mcp-scholarly
Upon launching, the Inspector will display a URL that you can access in your browser to begin debugging.


Download files
Download the file for your platform. If you're not sure which to choose, learn more about installing packages.
Source Distribution
Built Distribution
Filter files by name, interpreter, ABI, and platform.
If you're not sure about the file name format, learn more about wheel file names.
Copy a direct link to the current filters
File details
Details for the file mcp_scholarly_enhanced-0.1.1.tar.gz.
File metadata
- Download URL: mcp_scholarly_enhanced-0.1.1.tar.gz
- Upload date:
- Size: 286.9 kB
- Tags: Source
- Uploaded using Trusted Publishing? No
- Uploaded via: uv/0.8.12
File hashes
| Algorithm | Hash digest | |
|---|---|---|
| SHA256 |
b656b95e50a07c2732cf1157f96b78d212371695f8cf92a915bf612d7de8cc02
|
|
| MD5 |
d975e12550be4a715768b136703457b2
|
|
| BLAKE2b-256 |
6bfb66290c5a40f616bed83ce5a860a3eacd93a033cad6ff7046b78c41a100f8
|
File details
Details for the file mcp_scholarly_enhanced-0.1.1-py3-none-any.whl.
File metadata
- Download URL: mcp_scholarly_enhanced-0.1.1-py3-none-any.whl
- Upload date:
- Size: 6.6 kB
- Tags: Python 3
- Uploaded using Trusted Publishing? No
- Uploaded via: uv/0.8.12
File hashes
| Algorithm | Hash digest | |
|---|---|---|
| SHA256 |
498ed1fcf194b3f19ae1c9a92207ab63601799ed433127b5e1bfc2a8e3ea46ba
|
|
| MD5 |
b6ae9538cee6f0c75dec9ca7a33a05b3
|
|
| BLAKE2b-256 |
ec43a5a502426a159f774a0312aea7754de4b64bd911a56a3e3a36d6f261966f
|


