McQuic, a.k.a. Multi-codebook Quantizers for neural image compression

Project description


a.k.a. Multi-codebook Quantizers for neural image compression


🥳Our paper will be presented at CVPR 2022!🥳


CVF Open Access | arXiv | BibTex | Demo
McQuic is a deep image compressor.
Features:
- Solid performance and super-fast coding speed (See Reference Models).
- Cross-platform support (Linux-64, Windows-64 and macOS-64, macOS-arm64).
- You could try the interactive demo in the HuggingFace Space!
Techs:
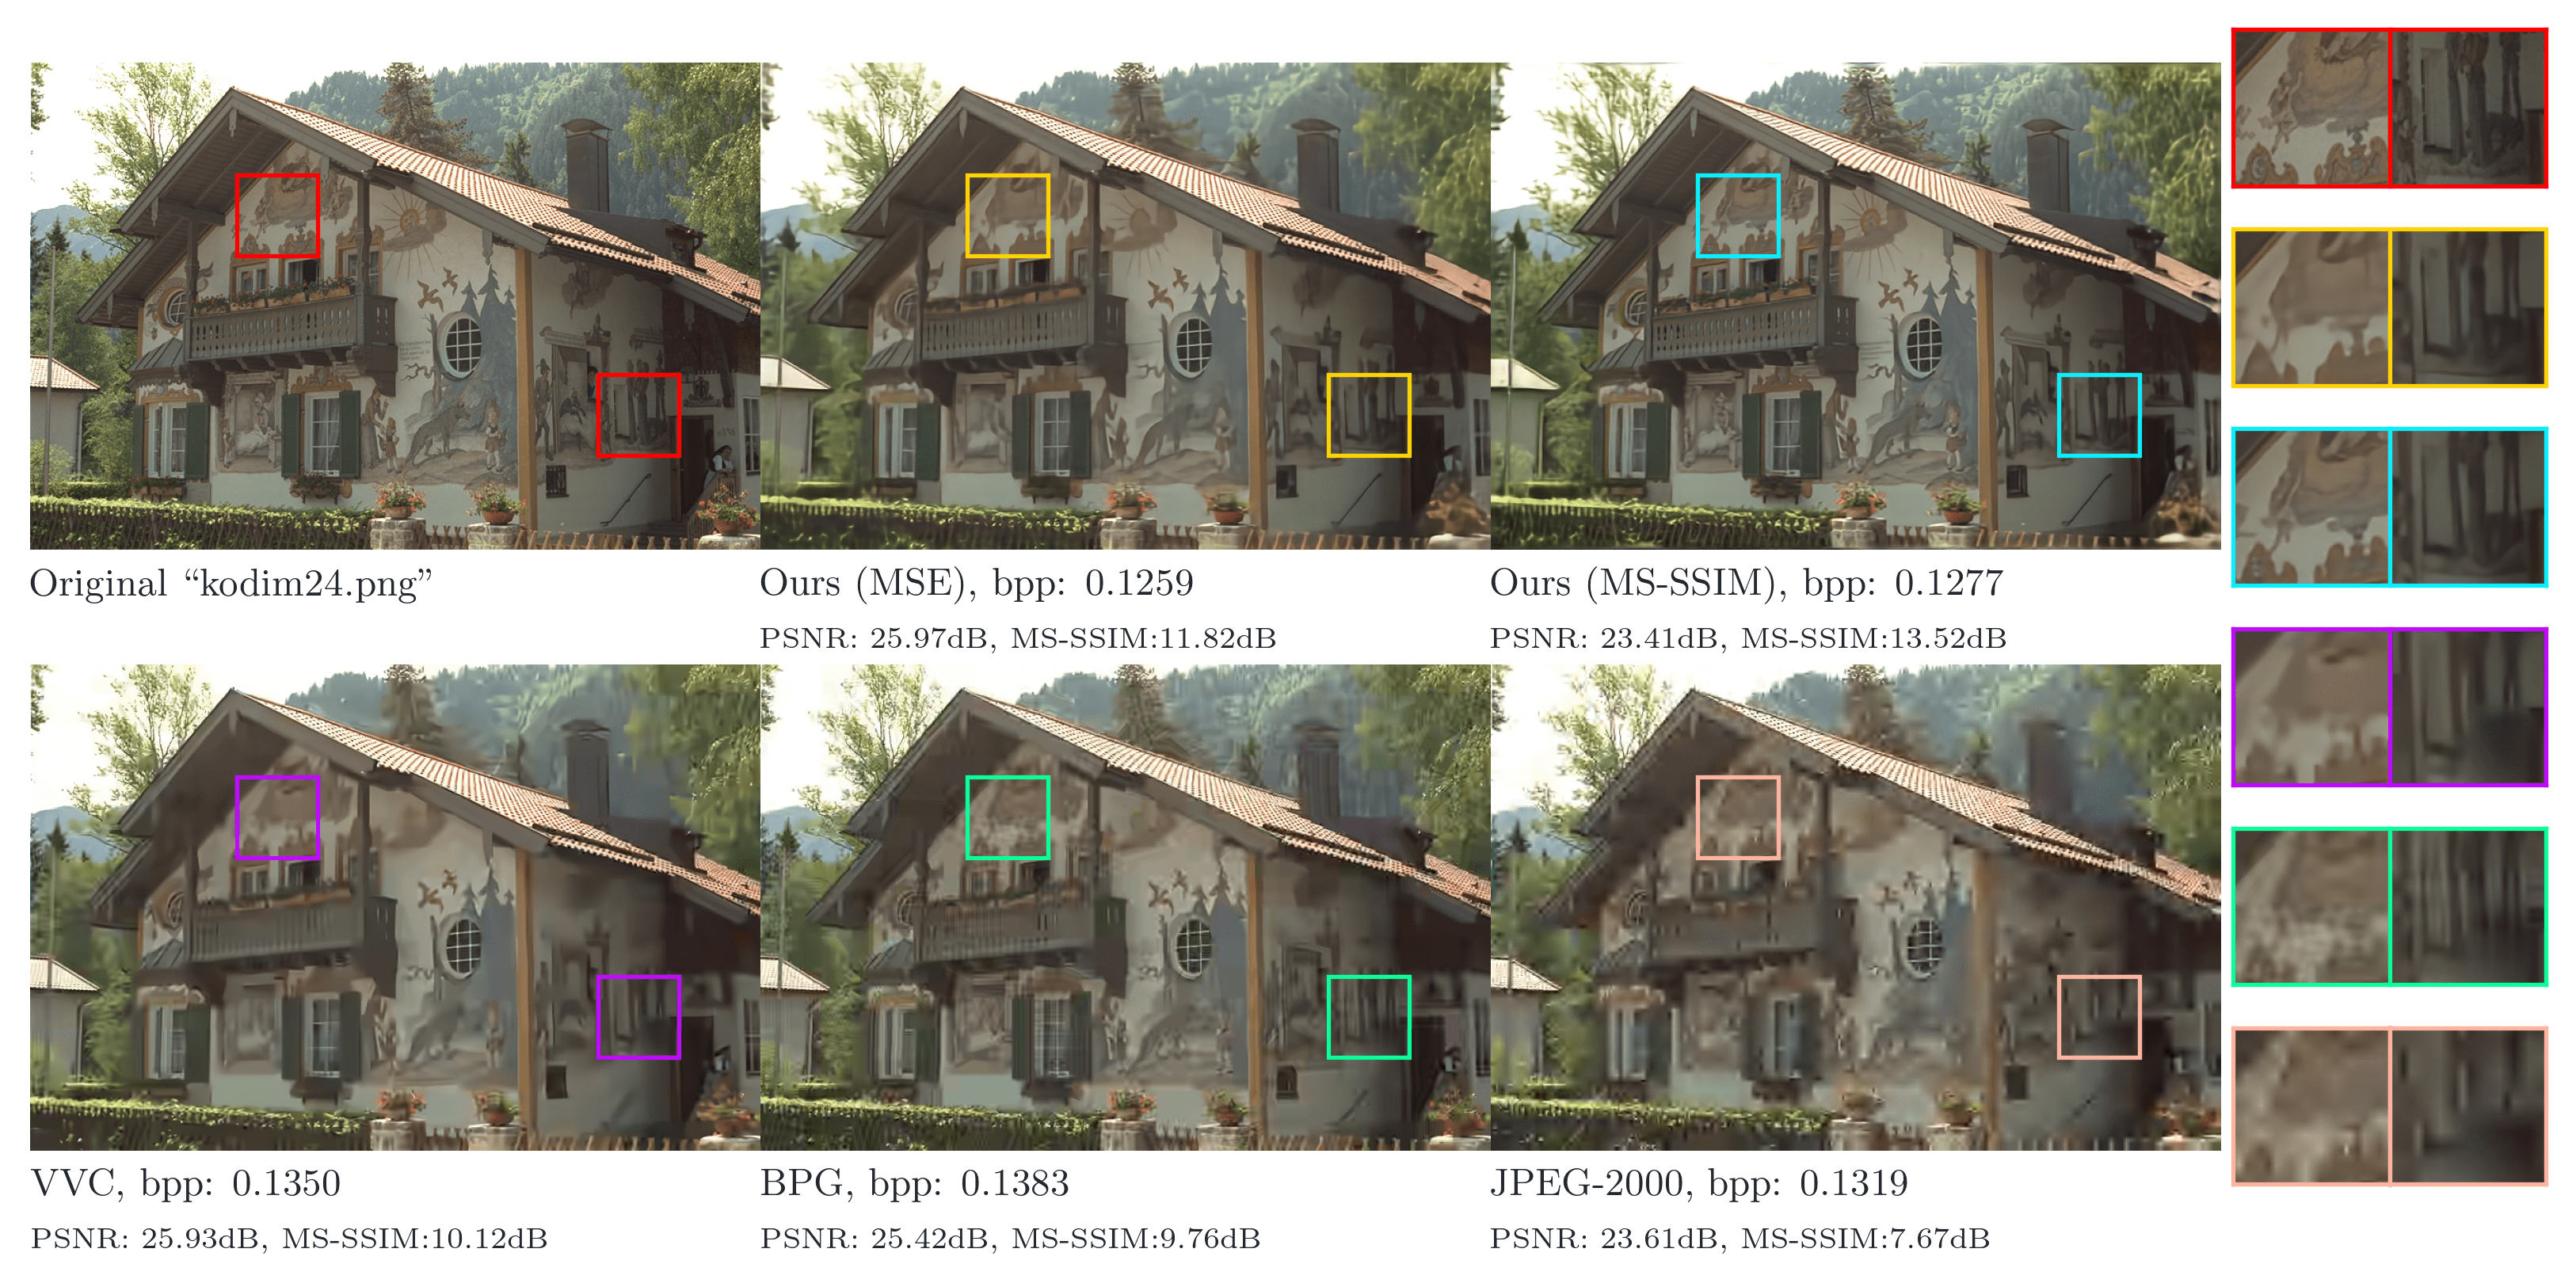
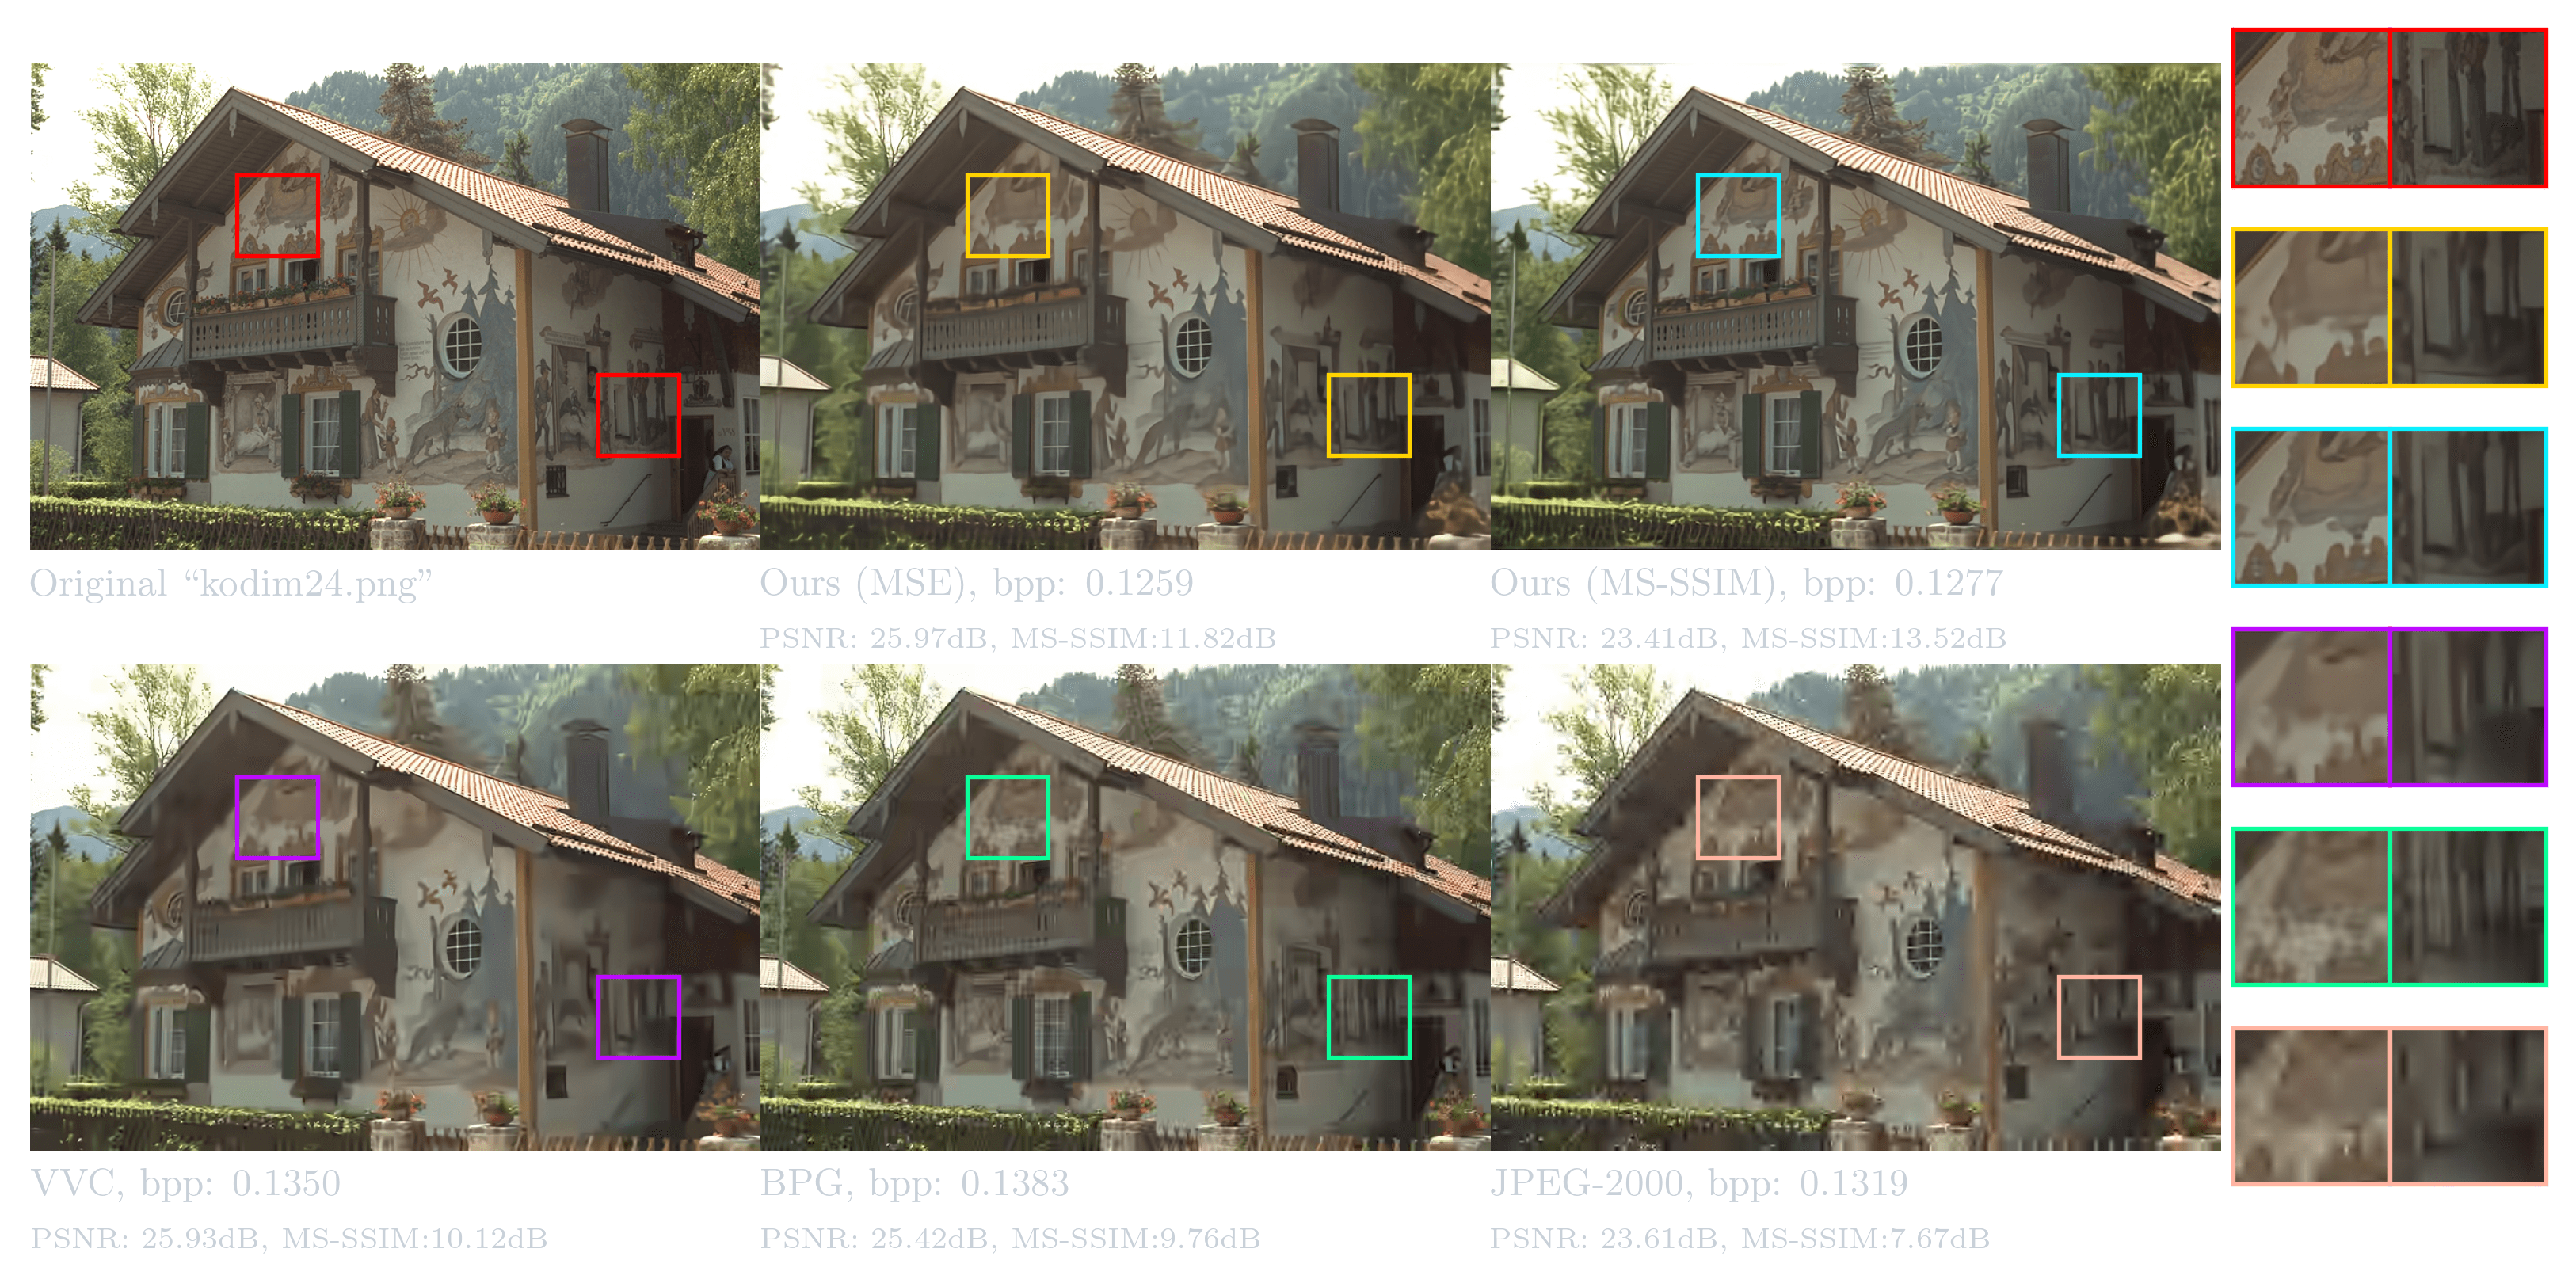
The McQuic hold rich multi-codebooks to quantize visual features and restore images by these quantized features. Similar ideas are presented in SHA [1], VQ-VAE [2], VQ-GAN [3], etc. We summarize these as vectorized priors, and our method extends these ideas to a unified multivariate Gaussian mixture, to perform high-quality, low-latency image compression.


- Quick Start
- Reference Models
- Train a New Model
- Implement MCQ by yourself
- Contribute to this Repository
- To-do List
- Detailed framework
- References and License
Quick Start
It is easy (with a GPU, or CPU if you like) to try our model. I would give a quick guide to help you compress an image and restore it.
Requirements
To run the model, your device needs to meet following requirements.
- Hardware
- a CUDA-enabled GPU (
≥ 8GiB VRAM, Driver version≥ 450.80.02) - If you don't have GPU, running models on CPU may be slower.
≥ 8GiB RAM
- a CUDA-enabled GPU (
- OS
- I've tested all features on
Ubuntu, other platforms should also work. If not, please file bugs.
- I've tested all features on
Conda (Recommended)
Install this package is very easy with a conda environment installed, e.g. Miniconda. I recommend you to install it to a new virtual environment directly by:
# Install a clean pytorch with CUDA support
conda create -n [ENV_NAME] python=3.9 "pytorch>=1.11,<2" "torchvision>=0.12,<1" cudatoolkit -c pytorch
# Install mcquic and other dependencies
conda install -n [ENV_NAME] mcquic -c xiaosu-zhu -c conda-forge
conda activate [ENV_NAME]

Above command install packages with
CUDAsupport. If you just want to run it on CPU, please usecpuonlyother thancudatoolkitin the first command.
Since there is no proper version of torchvision now for Apple M1, you need to change channel from
pytorchtoconda-forgein the first command.
- Compress images
mcquic
Usage: mcquic [OPTIONS] COMMAND [ARGS]...

Options:
  -v, --version  Print version info.
  -h, --help     Show this message and exit.

Commands:
  -*        Compress/restore a file.
  dataset   Create training set from `images` dir to `output` dir.
  train     Train a model.
  validate  Validate a trained model from `path` by images from `images`...
mcquic --help
Usage: mcquic - [OPTIONS] INPUT [OUTPUT]

  Compress/restore a file.

  Args:

      input (str): Input file path. If input is an image, compress it. If
      input is a `.mcq` file, restore it.

      output (optional, str): Output file path or dir. If not provided, this
      program will only print compressor information of input file.

Options:
  -D, --debug        Set logging level to DEBUG to print verbose messages.
  -q, --quiet        Silence all messages, this option has higher priority to
                     `-D/--debug`.
  -qp INTEGER RANGE  Quantization parameter. Higher means better image quality
                     and larger size.  [default: 2; 1<=x<=13]
  --local FILE       Use a local model path instead of download by `qp`.
  --disable-gpu      Use pure CPU to perform compression. This will be slow.
  --mse              Use model optimized for PSNR other than MsSSIM.
  --crop             Crop the image to align feature patches. Edges of image
                     are cutted though, compressed binary will be smaller.
  -h, --help         Show this message and exit.
mcquic -qp 2 path/to/an/image path/to/output.mcq
- Decompress images
# `-qp` is not necessary. Since this arg is written to `output.mcq`.
mcquic path/to/output.mcq path/to/restored.png
Docker
I also build docker images for you to get away from environment issues.
Try with the latest docker image:
docker pull ghcr.io/xiaosu-zhu/mcquic:latest
# or nightly build
# docker pull ghcr.io/xiaosu-zhu/mcquic:nightly
The entrypoint of this container is set to mcquic itself. So, you can directly use it as mcquic main program to execute.
docker run ghcr.io/xiaosu-zhu/mcquic:latest --help
To compress/restore images, you need to mount native files into the container. Therefore, a working example forms as follows:
# `someimage.png` is located in `path/to/some/folder`. And this folder will be mounted at `/workspace/workdir`.
docker run -v path/to/some/folder:/workspace/workdir ghcr.io/xiaosu-zhu/mcquic:latest /workspace/workdir/someimage.png /workspace/workdir/output.mcq
docker run -v path/to/some/folder:/workspace/workdir ghcr.io/xiaosu-zhu/mcquic:latest /workspace/workdir/output.mcq /workspace/workdir/restored.png
Install Manually (for dev)
This way enables your full access to this repo for modifying. Also, if you want to go on, a conda environment is needed, e.g. Miniconda.
- Clone this repository
git clone https://github.com/xiaosu-zhu/McQuic.git && cd McQuic
- Create a virtual env
mcquicand install all packages by
./install.sh  # for POSIX with bash
.\install.ps1 # for Windows with Anaconda PowerShell
Now you should in the mcquic virtual environment. If not, please activate it by conda activate mcquic.
- Compress images
mcquic --help
mcquic -qp 2 assets/sample.png assets/compressed.mcq
- Decompress images
# `-qp` is not necessary. Since this arg is written to `output.mcq`.
mcquic assets/compressed.mcq assets/restored.png
And check outputs: assets/compressed.mcq and assets/restored.png.
(Optional) Install NVIDIA/Apex
NVIDIA/Apex is an additional package required for training. If you want to develop, contribute, or train a new model, please ensure you've installed NVIDIA/Apex by following snippets.
git clone https://github.com/NVIDIA/apex && cd apex
pip install -v --disable-pip-version-check --no-cache-dir --global-option="--cpp_ext" --global-option="--cuda_ext" ./
If you are using Docker images, this step is not necessary.
Please make sure you've installed it in the correct virtual environment.
For more information such as building toolchains, please refer to their repository.
Reference Models
I've released one pretrained model (Sorry, currently I don't have much free GPUs to train models). You could fetch them by specifying -qp [Model_NO]. Following is the pretrained model list (Others TBA):
| Model No. | Channel | M | K | Throughput (Encode/Decode) | Avg.BPP |
|---|---|---|---|---|---|
| - | - | - | - | - | - |
| 2 | 128 | 2 | [8192,2048,512] | 25.45 Mpps / 22.03 Mpps | 0.1277 |
| - | - | - | - | - | - |
| 12 | 192 | 12 | [8192,2048,512] | 11.07 Mpps / 10.21 Mpps | - |
The coding throughput is tested on a NVIDIA RTX 3090. Image file I/O, model loading, etc. are not included in the test. Throughput will be further increased by 5%~15% if you convert models to TorchScript. However, it is not trivial since conversion involves entropy coder, which is a cpp extension. So, I'm not going to implement it.
The main slow-down from small models to large models is caused by channel 128 -> 192.
Mpps = Mega-pixels per secondBPP = Bits per pixel
Train a New Model
Please ensure you've installed NVIDIA/Apex. To train models, here are minimal and recommended system requirements.
Requirements
- Minimal
RAM ≥ 64GiBVRAM ≥ 12GiB
- Recommended
VRAM ≥ 24GiB- Better if you have
≥4-wayNVIDIA RTX 3090s or faster GPUs.
Configs
The folder configs provides example config example.yaml to train models. Please refer to configs/README.md for more info.
Prepare a Dataset
Before training models, you need to prepare an image dataset. It is free to pick any images to form dataset, as long as the image-size is ≥512x512.
- To build a training dataset, please put all images in a folder (allow for sub-folders), then run
mcquic dataset --help
Usage: mcquic dataset [OPTIONS] IMAGES OUTPUT

  Create training set from `images` dir to `output` dir.

  Args:

      images (str): All training images folder, allow sub-folders.

      output (str): Output dir to create training set.

Options:
  -D, --debug  Set logging level to DEBUG to print verbose messages.
  -q, --quiet  Silence all messages, this option has higher priority to
               `-D/--debug`.
  -h, --help   Show this message and exit.
mcquic dataset train_images mcquic_dataset
to build a lmdb dataset for mcquic to read.
- Then, you could prepare a training config e.g.
configs/train.yaml, and don't forget to speify dataset path.
# `configs/train.yaml`
...
trainSet: mcquic_dataset # path to the training dataset.
valSet: val_images # path to a folder of validation images.
savePath: saved # path to a folder to save checkpoints.
...
where trainSet and valSet can be any relative or absolute paths, and savePath is a folder for saving checkpoints and logs.
In this example, the final folder structure is shown below:
. # A nice folder
├─ 📂configs
│   ...
│   └── 📄train.yaml
├── 📄README.md # this readme
├── 📂saved # saved models apprear here
├── 📂train_images # a lot of training images
│   ├── 📂ImageNet
│   |   ├── 📂folder1 # a lot of images
│   |   ├── 🖼️image1.png
│   |   ...
│   ├── 📂COCO
│   |   ├── 🖼️image1.png
│   |   ├── 🖼️image2.png
│   |   ...
|   ...
├── 📂mcquic_dataset # generated training dataset
|   ├── 📀data.mdb
|   ├── 📀lock.mdb
|   └── 📄metadata.json
└── 📂val_images # a lot of validation images
    ├── 🖼️image1.png
    ├── 🖼️image2.png
    ...
Training
- To train a new model, run
mcquic train --help
Usage: mcquic train [OPTIONS] [CONFIG]

  Train a model.

  Args:

      config (str): Config file (yaml) path. If `-r/--resume` is present but
      config is still given, then this config will be used to update the
      resumed training.

Options:
  -D, --debug        Set logging level to DEBUG to print verbose messages.
  -q, --quiet        Silence all messages, this option has higher priority to
                     `-D/--debug`.
  -r, --resume FILE  `.ckpt` file path to resume training.
  -h, --help         Show this message and exit.
mcquic train configs/train.yaml
and saved model is located in saved/mcquic_dataset/latest.
- To resume an interuptted training, run
mcquic train -r
, or
mcquic train -r configs/train.yaml
if you want to use an updated config (e.g. tuned learning rate, modified hyper-parameters) to resume training.
Test
You could use any save checkpoints (usually located in above savePath) to validate the performance. For example
mcquic validate --help
Usage: python -m mcquic.validate [OPTIONS] PATH IMAGES [OUTPUT]

  Validate a trained model from `path` by images from `images` dir, and
  publish a final state_dict to `output` path.

  Args:

      path (str): Saved checkpoint path.

      images (str): Validation images folder.

      output (str): Dir to save all restored images.

Options:
  -D, --debug        Set logging level to DEBUG to print verbose messages.
  -q, --quiet        Silence all messages, this option has higher priority to
                     `-D/--debug`.
  -e, --export PATH  Path to export the final model that is compatible with
                     main program.
  -h, --help         Show this message and exit.
mcquic validate -e path/to/final/model path/to/a/checkpoint path/to/images/folder path/to/output/folder
And the output "final/model" is compatible with the main program mcquic, you could directly use this local model to perform compression. Try:
mcquic --local path/to/final/model assets/sample.png assets/compressed.mcq
# `--local` is not necessary. Since this arg is written to `output.mcq`.
mcquic assets/compressed.mcq assets/restored.png
If you think your model is awesome, please don't hasitate to Contribute to this Repository!
Implement MCQ by yourself
A minimal implementation of the multi-codebook quantizer comes up with (please refer to quantizer.py for notes):
class Quantizer(nn.Module):
    """
    Quantizer with `m` sub-codebooks,
        `k` codewords for each, and
        `n` total channels.
    Args:
        m (int): Number of sub-codebooks.
        k (int): Number of codewords for each sub-codebook.
        n (int): Number of channels of latent variables.
    """
    def __init__(self, m: int, k: int, n: int):
        super().__init__()
        # A codebook, feature dim `d = n // m`.
        self._codebook = nn.Parameter(torch.empty(m, k, n // m))
        self._initParameters()

    def _initParameters(self):
        nn.init.normal_(self._codebook, std=math.sqrt(2 / (5 * n / m)))

    def forward(self, x: Tensor, t: float = 1.0) -> (Tensor, Tensor):
        """
        Module forward.
        Args:
            x (Tensor): Latent variable with shape [b, n, h, w].
            t (float, 1.0): Temperature for Gumbel softmax.
        Return:
            Tensor: Quantized latent with shape [b, n, h, w].
            Tensor: Binary codes with shape [b, m, h, w].
        """
        b, _, h, w = x.shape
        # [b, m, d, h, w]
        x = x.reshape(b, len(self._codebook), -1, h, w)
        # [b, m, 1, h, w], square of x
        x2 = (x ** 2).sum(2, keepdim=True)
        # [m, k, 1, 1], square of codebook
        c2 = (self._codebook ** 2).sum(-1, keepdim=True)[..., None]
        # [b, m, d, h, w] * [m, k, d] -sum-> [b, m, k, h, w], dot product between x and codebook
        inter = torch.einsum("bmdhw,mkd->bmkhw", x, self._codebook)
        # [b, m, k, h, w], pairwise L2-distance
        distance = x2 + c2 - 2 * inter
        # [b, m, k, h, w], distance as logits to sample
        sample = F.gumbel_softmax(-distance, t, hard=True, dim=2)
        # [b, m, d, h, w], use sample to find codewords
        quantized = torch.einsum("bmkhw,mkd->bmdhw", sample, self._codebook)
        # back to [b, n, h, w]
        quantized = quantized.reshape(b, -1, h, w)
        # [b, n, h, w], [b, m, h, w], quantizeds and binaries
        return quantized, sample.argmax(2)
Contribute to this Repository
It will be very nice if you want to check your new ideas or add new functions 😊. You will need to install mcquic by Docker or manually (with optional step). Just like other git repos, before raising issues or pull requests, please take a thorough look at issue templates.
To-do List
mcquic service- More pretrained model
Detailed framework
Thanks for your attention!❤️ Here are details in the paper.
Following previous works, we build the compression model as an AutoEncoder. Bottleneck of encoder (analysis transform) outputs a small feature map and is quantized by multi-codebook vector-quantization other than scalar-quantization. Quantizers are cascaded to effectively estimate latent distribution.


Right part of above figure shows detailed structure of our proposed quantizer.
References and License
References
[1] Agustsson, Eirikur, et al. "Soft-to-hard vector quantization for end-to-end learning compressible representations." NeurIPS 2017.
[2] Van Den Oord, Aaron, and Oriol Vinyals. "Neural discrete representation learning." NeurIPS 2017.
[3] Esser, Patrick, Robin Rombach, and Bjorn Ommer. "Taming transformers for high-resolution image synthesis." CVPR 2021.
Citation
To cite our paper, please use following BibTex:
@inproceedings{McQuic,
  author    = {Xiaosu Zhu and
               Jingkuan Song and
               Lianli Gao and
               Feng Zheng and
               Heng Tao Shen},
  title     = {Unified Multivariate Gaussian Mixture for Efficient Neural Image Compression},
  booktitle = {CVPR},
  % pages     = {????--????}
  year      = {2022}
}
Copyright
Fonts:
- Source Sans Pro. © 2010, 2012 Adobe Systems Incorporated, SIL Open Font License.
- Flash Rogers 3D. © 2007 Iconian Fonts, donationware.
- Cambria Math. © 2017 Microsoft Corporation. All rights reserved.
- Times New Roman. © 2017 The Monotype Corporation. All Rights Reserved.
- Caramel and Vanilla. © 2017 FOUND MY FONT LTD. All Rights Reserved.
Pictures:
- kodim24.png by Alfons Rudolph, Kodak Image Dataset.
- assets/sample.png by Ales Krivec, CLIC Professional valid set.
Third-party repos:
This repo is licensed under


Release history Release notifications | RSS feed


Download files
Download the file for your platform. If you're not sure which to choose, learn more about installing packages.
Source Distribution
Built Distributions
Filter files by name, interpreter, ABI, and platform.
If you're not sure about the file name format, learn more about wheel file names.
Copy a direct link to the current filters
File details
Details for the file mcquic-0.1.40.tar.gz.
File metadata
- Download URL: mcquic-0.1.40.tar.gz
- Upload date:
- Size: 83.2 kB
- Tags: Source
- Uploaded using Trusted Publishing? No
- Uploaded via: twine/4.0.0 CPython/3.9.13
File hashes
| Algorithm | Hash digest | |
|---|---|---|
| SHA256 |
1b373cfb1a16fc29f1a7f8667fc9582bcec6aee9a9ad8feb4e1ac137e16f767b
|
|
| MD5 |
a00b3d26a15e0e7fc72fa49deafa028f
|
|
| BLAKE2b-256 |
7e756b77a081ae118dea41832939d84b97043690be20e8916b20774b1d76d304
|
File details
Details for the file mcquic-0.1.40-cp39-cp39-win_amd64.whl.
File metadata
- Download URL: mcquic-0.1.40-cp39-cp39-win_amd64.whl
- Upload date:
- Size: 152.0 kB
- Tags: CPython 3.9, Windows x86-64
- Uploaded using Trusted Publishing? No
- Uploaded via: twine/4.0.0 CPython/3.9.13
File hashes
| Algorithm | Hash digest | |
|---|---|---|
| SHA256 |
5735a08f93a7f0ef3a80a36d18a219ab8278b30382c5f88b0c9501b0a14c7d1b
|
|
| MD5 |
995661a4a92d0fa0f225a14fa2f39670
|
|
| BLAKE2b-256 |
2aa177b813c6a752ed807cf87071f094720e7fb5a0be6bc90502b394fc276a2b
|
File details
Details for the file mcquic-0.1.40-cp39-cp39-manylinux_2_17_x86_64.manylinux2014_x86_64.whl.
File metadata
- Download URL: mcquic-0.1.40-cp39-cp39-manylinux_2_17_x86_64.manylinux2014_x86_64.whl
- Upload date:
- Size: 199.9 kB
- Tags: CPython 3.9, manylinux: glibc 2.17+ x86-64
- Uploaded using Trusted Publishing? No
- Uploaded via: twine/4.0.0 CPython/3.9.13
File hashes
| Algorithm | Hash digest | |
|---|---|---|
| SHA256 |
08f0961c6a047b8b28e8a596cf588519ba0e0189acfb4c8fe10e05dd459473e5
|
|
| MD5 |
c13f3112e5616d52898db8f773a9d9f9
|
|
| BLAKE2b-256 |
fa284e40c11572ff2b294d4d3d787587d53572a36d4337f1b21150dfa426731c
|
File details
Details for the file mcquic-0.1.40-cp39-cp39-macosx_10_15_x86_64.whl.
File metadata
- Download URL: mcquic-0.1.40-cp39-cp39-macosx_10_15_x86_64.whl
- Upload date:
- Size: 156.6 kB
- Tags: CPython 3.9, macOS 10.15+ x86-64
- Uploaded using Trusted Publishing? No
- Uploaded via: twine/4.0.0 CPython/3.9.13
File hashes
| Algorithm | Hash digest | |
|---|---|---|
| SHA256 |
d6fd0d47b41d00039338d78589a293b3e8b9d091031862e3a2a5bcc267704c3d
|
|
| MD5 |
8257044765e9991462a429313df000f7
|
|
| BLAKE2b-256 |
77999ada082b9442a7bb0899c791d6ec3f5fd066abca415d37782431ee2be910
|


