
MechanoChat
MechanoChat infers and visualizes mechanical cell–cell communication from spatial transcriptomics data.
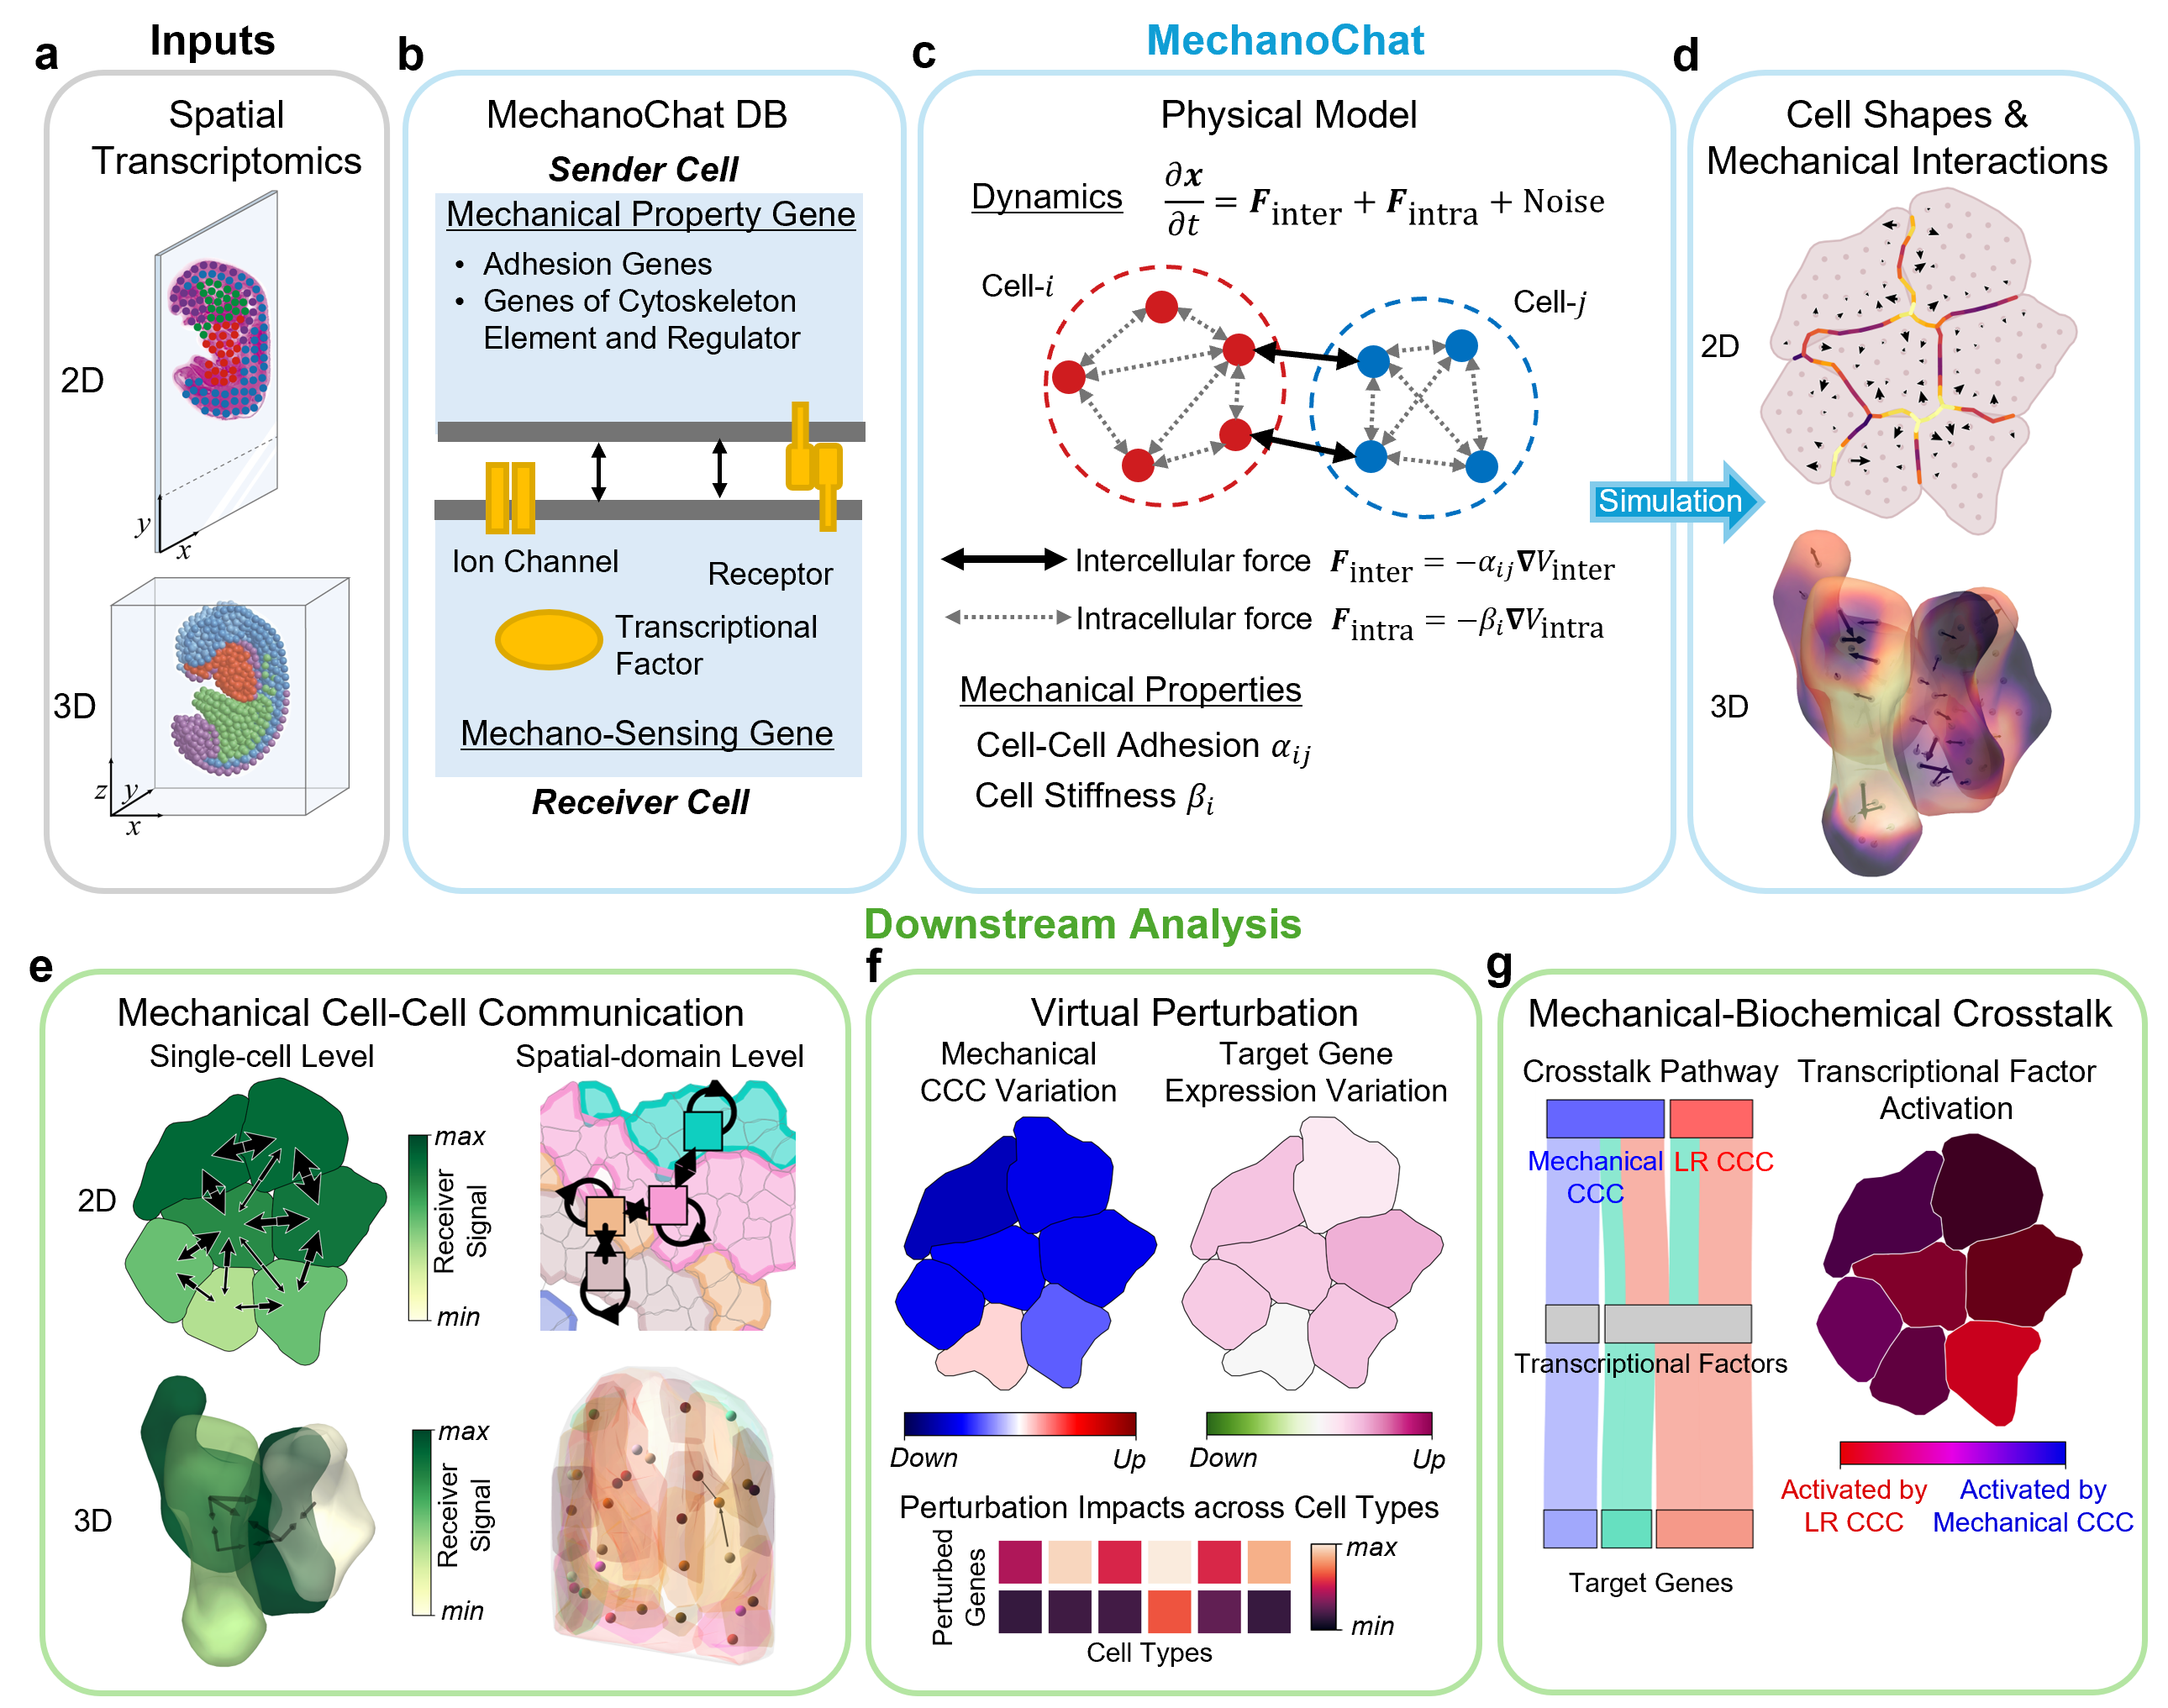
MechanoChat is built on the subcellular element method : each cell is represented by a collection of subcellular elements interacting through Lennard-Jones potentials, with per-cell adhesion and stiffness derived from gene expression. Relaxing this system reconstructs cell shapes and cell–cell contacts from spot/cell coordinates, and generates the forces acting between neighboring cells. These mechanical quantities are then coupled with expression of mechanosensitive genes (ion channels, transcription factors, ligand–receptor) to compute signaling between every pair of contacting cells.
- Simulate: GPU-accelerated (
numba.cuda) 2D/3D SEM dynamics (mechanochat.SEM2,mechanochat.SEM3). - MechanoChatDB: prior knowledge of mechanotransduction related genes (
mechanochat.preprocessing). - Infer: cell–cell contacts, forces, mechanical cell-cell communication, and crosstalk (
mechanochat.tools). - Visualize: reconstructed cell shapes (alpha-shapes), spatial distributions of mechanical cell-cell communication(
mechanochat.plotting).
Everything is written into the AnnData object (.obsp / .obsm / .uns), so MechanoChat can be integrated into a standard Scanpy workflow.
Installation
MechanoChat requires Python >= 3.9 and an NVIDIA GPU.
We recommend using Conda or Mamba for environment management. To install Mamba, see https://github.com/conda-forge/miniforge.
Step 1: Create and activate a virtual environment
mamba create -n mc_39 python=3.9
mamba activate mc_39
Step 2: Install the CUDA toolkit
mamba install cudatoolkit -c conda-forge # installs CUDA 11.8 by default
Step 3: Install MechanoChat (with the matching GPU bindings)
You can check your driver / CUDA version with nvidia-smi. Choose the extra according to your CUDA toolkit major version (step 2 installs 11.x):
pip install "mechanochat[cuda11]"     # for CUDA 11.x toolkit (default)
# pip install "mechanochat[cuda12]"   # for CUDA 12.x toolkit
Do not omit the extra. It pulls in NVIDIA's official cuda-python bindings, which numba
needs on recent NVIDIA drivers (CUDA 13 / driver 580+) — without them, numba 0.60's built-in
ctypes driver bindings cause a segfault when initializing the CUDA context. cuda-python is
shipped as an extra rather than a regular dependency only because its major version has to match
the CUDA version on your machine, which cannot be decided at packaging time.
To install the development version from source:
git clone https://github.com/XiangyuKuang/mechanochat.git
cd mechanochat
pip install -e ".[cuda11]"
Usage
⚠️ Before running simulation (
sem.sim_gpu(...)), make sureNUMBA_CUDA_USE_NVIDIA_BINDING=1is set . Without it, on CUDA 13 / driver 580+ the kernel crashes (segfault) on the first CUDA call, with no Python traceback.Do it in the very first cell, before any other import (including
scanpy):import os os.environ["NUMBA_CUDA_USE_NVIDIA_BINDING"] = "1" # — must run before importing scanpy / numba — import mechanochat as mc import scanpy as scQuick self-check:
import numba.cuda as c
assert c.cudadrv.driver.USE_NV_BINDING == 1, "env var not in effect — restart the kernel"
Optional — set NUMBA_CUDA_USE_NVIDIA_BINDING once at the environment level
Setting the variable at the environment level saves you from repeating the two os.environ lines
at the top of every script and notebook. The effect is exactly the same; it is only a convenience.
# conda activation hook — applies on every `mamba activate mc_39`
mkdir -p "$CONDA_PREFIX/etc/conda/activate.d"
echo 'export NUMBA_CUDA_USE_NVIDIA_BINDING=1' \
    > "$CONDA_PREFIX/etc/conda/activate.d/numba_cuda_binding.sh"
mamba activate mc_39   # re-activate for it to take effect
For Jupyter / VSCode notebooks, also set it in the kernel, so it applies even when the kernel is
launched without shell activation. Add an "env" block to the kernel's kernel.json (locate it
with jupyter kernelspec list):
{
  "argv": ["...python", "-m", "ipykernel_launcher", "-f", "{connection_file}"],
  "env": { "NUMBA_CUDA_USE_NVIDIA_BINDING": "1" }
}
Documentation
Documentation is under construction.
1 maintainer

Metadata
1 maintainer
Release files for mechanochat 0.1.0
For a detailed explanation of source distributions (sdists) and built distributions (wheels), please see the package formats documentation.
Source distribution (sdist)
| File | Size | Uploaded | |
|---|---|---|---|
| mechanochat-0.1.0.tar.gz | 147.2 kB | Details |
Built distribution (wheel)
| File | Interpreter | ABI | Platform | Reset |
|---|---|---|---|---|
| mechanochat-0.1.0-py3-none-any.whl | Python 3 | none | any | Details |
Total release size: 297.6 kB
Release files / mechanochat-0.1.0.tar.gz
| Download URL | mechanochat-0.1.0.tar.gz |
|---|---|
| Size | 147.2 kB |
| Tags | Source |
|
SHA-256 checksum How to use checksums |
b066a514cde72fe481065298f5234d6bce1bde9ac6c828e87c5a68a58a51aa75
|
|
BLAKE2b-256 checksum How to use checksums |
075552c2ff021d168646511c2491ee5226e8a4a64fcbef5a37540d7624f283f7
|
| Upload date | |
|
Uploaded using Trusted Publishing? What is trusted publishing? |
No |
| Uploaded via |
twine/7.0.0 CPython/3.12.13
|
Release files / mechanochat-0.1.0-py3-none-any.whl
| Download URL | mechanochat-0.1.0-py3-none-any.whl |
|---|---|
| Size | 150.4 kB |
| Tags | Python 3 |
|
SHA-256 checksum How to use checksums |
1ec39aafc8a74d28393fc61a3b8f7157a1af0e1f1267db84c307162f86233b1a
|
|
BLAKE2b-256 checksum How to use checksums |
8e24890d251cdf08e5e79207da35af7630e97b8d40d61d979b04a9d8fcb6e184
|
| Upload date | |
|
Uploaded using Trusted Publishing? What is trusted publishing? |
No |
| Uploaded via |
twine/7.0.0 CPython/3.12.13
|














